2011 MERCEDES-BENZ GL350 BlueTEC reset
[x] Cancel search: resetPage 110 of 376
Mirrors
Rear-view mirror
Rear-view mirror (manual anti-glare)
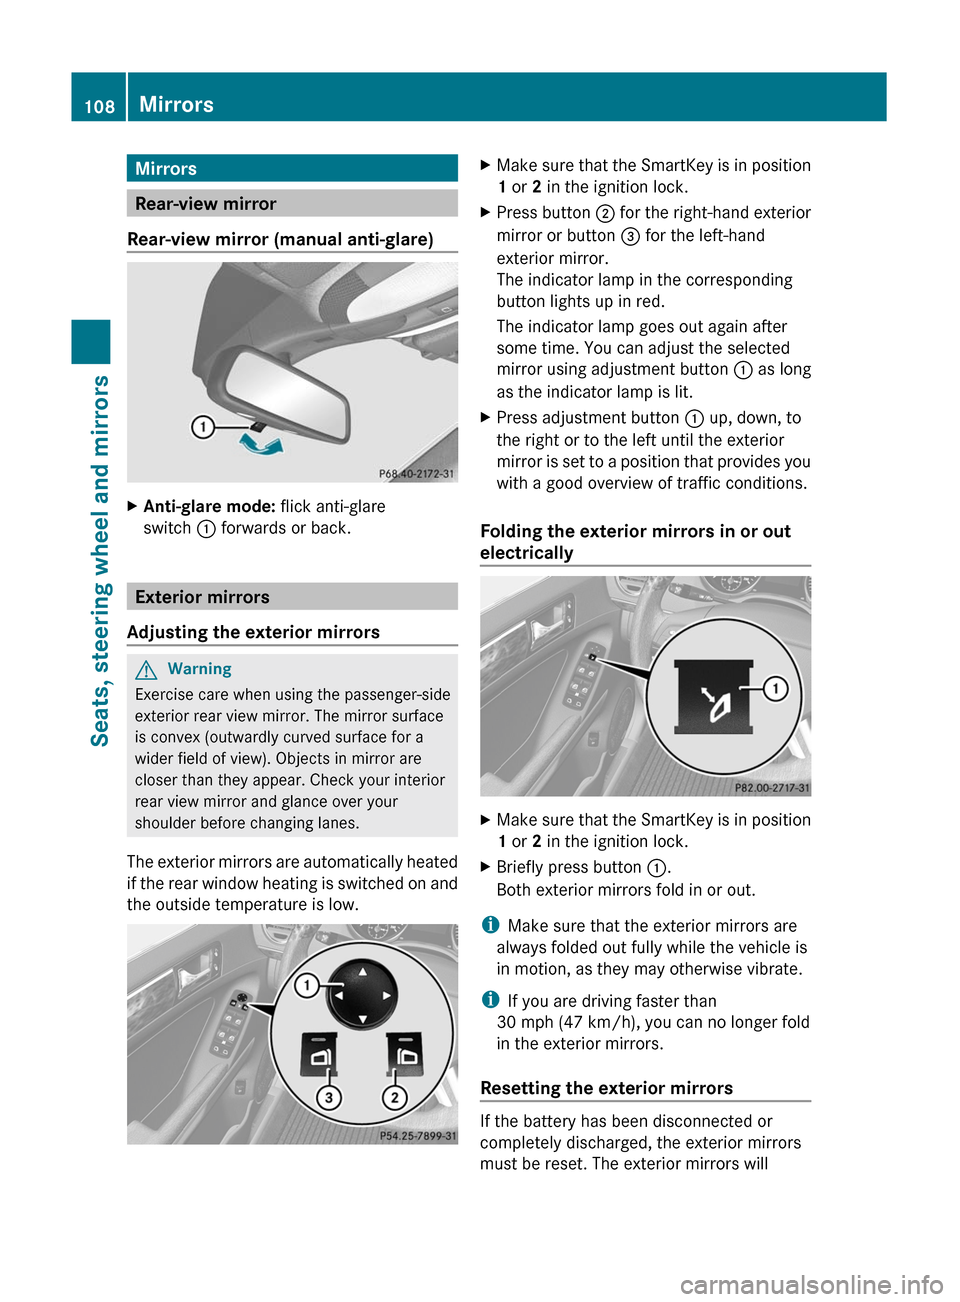
XAnti-glare mode: flick anti-glare
switch : forwards or back.
Exterior mirrors
Adjusting the exterior mirrors
GWarning
Exercise care when using the passenger-side
exterior rear view mirror. The mirror surface
is convex (outwardly curved surface for a
wider field of view). Objects in mirror are
closer than they appear. Check your interior
rear view mirror and glance over your
shoulder before changing lanes.
The exterior mirrors are automatically heated
if the rear window heating is switched on and
the outside temperature is low.
XMake sure that the SmartKey is in position
1 or 2 in the ignition lock.XPress button ; for the right-hand exterior
mirror or button = for the left-hand
exterior mirror.
The indicator lamp in the corresponding
button lights up in red.
The indicator lamp goes out again after
some time. You can adjust the selected
mirror using adjustment button : as long
as the indicator lamp is lit.XPress adjustment button : up, down, to
the right or to the left until the exterior
mirror is set to a position that provides you
with a good overview of traffic conditions.
Folding the exterior mirrors in or out
electrically
XMake sure that the SmartKey is in position
1 or 2 in the ignition lock.XBriefly press button :.
Both exterior mirrors fold in or out.
i Make sure that the exterior mirrors are
always folded out fully while the vehicle is
in motion, as they may otherwise vibrate.
i If you are driving faster than
30 mph (47 km/h), you can no longer fold
in the exterior mirrors.
Resetting the exterior mirrors
If the battery has been disconnected or
completely discharged, the exterior mirrors
must be reset. The exterior mirrors will
108MirrorsSeats, steering wheel and mirrors
BA 164.8 USA, CA Edition B 2011; 1; 2, en-USd2sboikeVersion: 3.0.3.52010-04-21T15:08:44+02:00 - Seite 108
Page 112 of 376
XEngage reverse gear.
The exterior mirror on the front-passenger
side moves to the preset parking position.XUse adjustment button : to adjust the
exterior mirror to a position which allows
you to see the rear wheel and the curb.
The parking position is stored.
i If you shift the transmission to another
position, the exterior mirror on the front-
passenger side returns to the driving
position.
Calling up a stored parking position
setting
XWith the key in position 2 in the ignition
lock and the exterior mirror on the front-
passenger side activated, engage reverse
gear.
The exterior mirror on the front-passenger
side moves to the stored parking position.
The exterior mirror on the front-passenger
side moves back to its original position:
R as soon as you exceed a speed of 6 mph
(10 km/h)
R about ten seconds after you have
disengaged reverse gear
R if you press button = for the exterior
mirror on the driver's side
Memory functions
Storing settings
With the memory function, you can store up
to three different settings, e.g. for three
different people.
The following settings are stored as a single
memory preset:
R position of the seat, backrest and head
restraint
R driver's side: steering wheel position
R driver's side: position of the exterior
mirrors on the driver's and front-passenger
sides
GWarning!
The memory function can still be used when
the key has been removed. For this reason,
children should never be left unsupervised in
the vehicle. They could otherwise become
trapped when adjusting the seat or the
steering wheel.
GWarning!
Only use the memory function on the driver's
side when the vehicle is stationary. You could
otherwise be distracted from the traffic
conditions by the steering wheel and seat
moving of their own accord, and as a result
cause an accident.
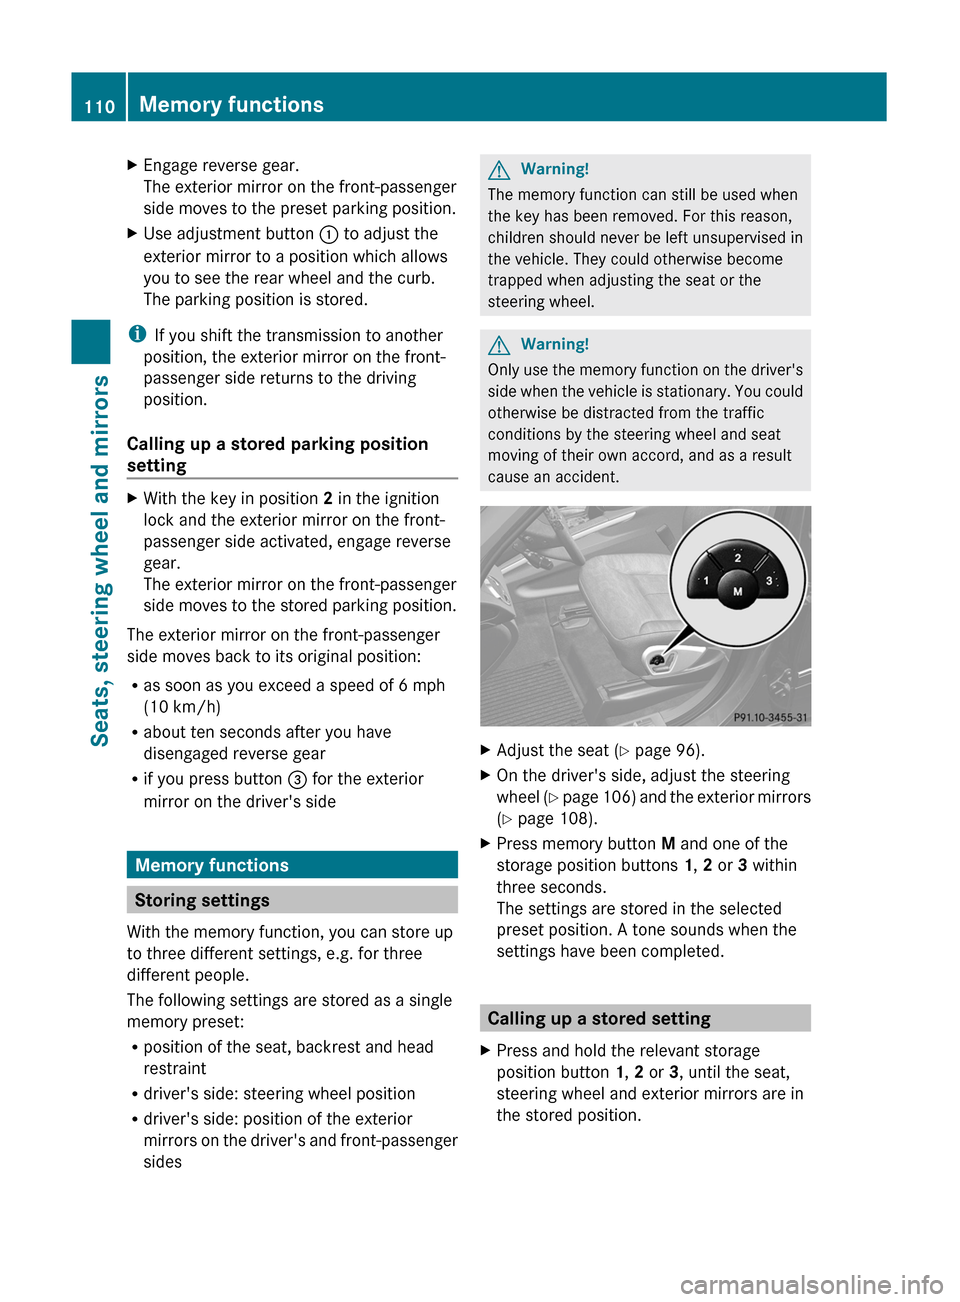
XAdjust the seat ( Y page 96).XOn the driver's side, adjust the steering
wheel (Y page 106) and the exterior mirrors
( Y page 108).XPress memory button M and one of the
storage position buttons 1, 2 or 3 within
three seconds.
The settings are stored in the selected
preset position. A tone sounds when the
settings have been completed.
Calling up a stored setting
XPress and hold the relevant storage
position button 1, 2 or 3, until the seat,
steering wheel and exterior mirrors are in
the stored position.110Memory functionsSeats, steering wheel and mirrors
BA 164.8 USA, CA Edition B 2011; 1; 2, en-USd2sboikeVersion: 3.0.3.52010-04-21T15:08:44+02:00 - Seite 110
Page 120 of 376

operated five times while the lights are on and
the engine is running (Y page 125). When you
switch off the ignition, the automatic
headlamp cleaning system is reset and
counting is resumed from 0.
Active light function
The active light function is a system that
moves the headlamps according to the
steering movements of the front wheels. In
this way, relevant areas remain illuminated
while driving. This allows you to recognize
pedestrians, cyclists and animals.
Active: when the lights are switched on.
Headlamps fogged up on the inside
The headlamps may fog up on the inside if
there is high atmospheric humidity.
XDrive with the headlamps switched on.
The headlamps clear up after a short
distance.
If the moisture does not disappear, the
headlamp casing is not sealed correctly and
moisture has been able to enter.
XHave the headlamps checked at a qualified
specialist workshop.Interior lighting
Overview of interior lighting
Overhead control panel
:p To switch the left-hand front reading
lamp on/off;v To switch the rear interior lighting
on/off=| To switch the automatic interior
lighting control on/off?c To switch the front interior lighting
on/offAp To switch the right-hand front
reading lamp on/offBFront interior lightingCFront reading lampsDFront interior lighting118Interior lightingLights and windshield wipers
BA 164.8 USA, CA Edition B 2011; 1; 2, en-USd2sboikeVersion: 3.0.3.52010-04-21T15:08:44+02:00 - Seite 118
Page 136 of 376
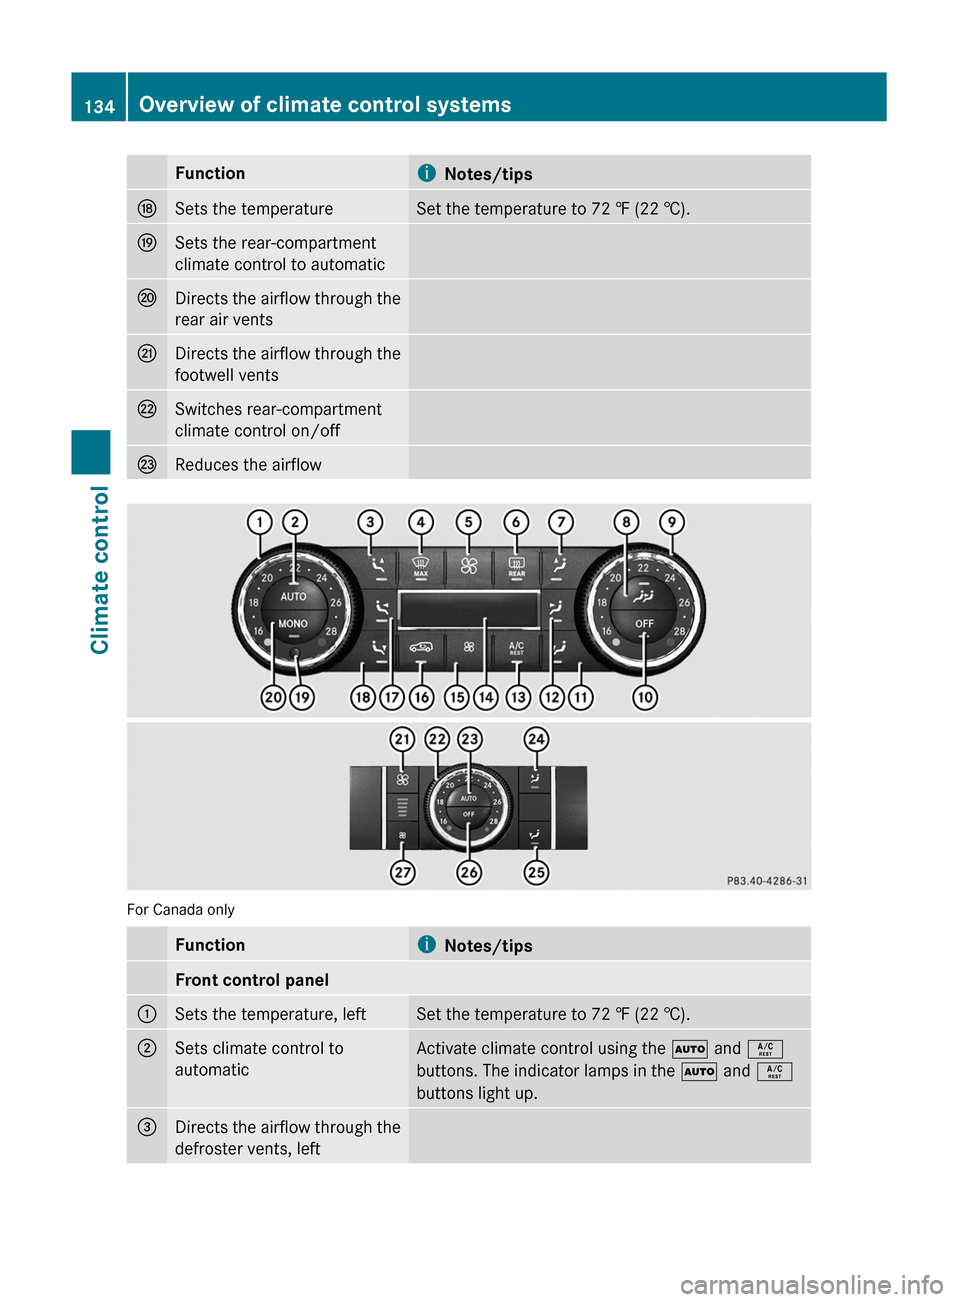
FunctioniNotes/tipsNSets the temperatureSet the temperature to 72 ‡ (22 †).OSets the rear-compartment
climate control to automaticPDirects the airflow through the
rear air ventsQDirects the airflow through the
footwell ventsRSwitches rear-compartment
climate control on/offSReduces the airflow
For Canada only
Functioni Notes/tipsFront control panel:Sets the temperature, leftSet the temperature to 72 ‡ (22 †).;Sets climate control to
automaticActivate climate control using the à and Á
buttons. The indicator lamps in the à and Á
buttons light up.=Directs the airflow through the
defroster vents, left134Overview of climate control systemsClimate control
BA 164.8 USA, CA Edition B 2011; 1; 2, en-USd2sboikeVersion: 3.0.3.52010-04-21T15:08:44+02:00 - Seite 134
Page 138 of 376
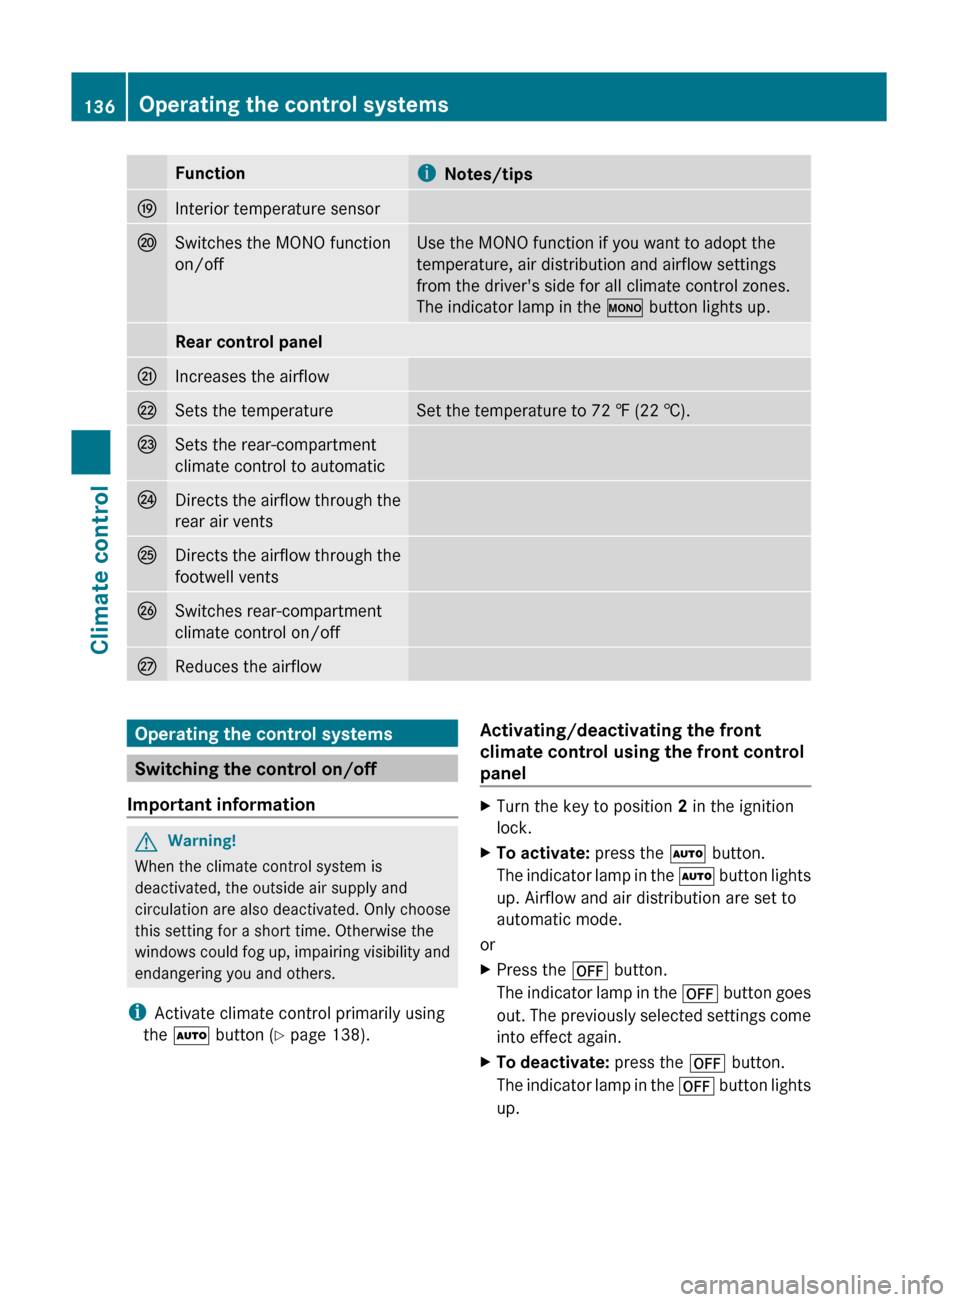
FunctioniNotes/tipsOInterior temperature sensorPSwitches the MONO function
on/offUse the MONO function if you want to adopt the
temperature, air distribution and airflow settings
from the driver's side for all climate control zones.
The indicator lamp in the º button lights up.Rear control panelQIncreases the airflowRSets the temperatureSet the temperature to 72 ‡ (22 †).SSets the rear-compartment
climate control to automaticTDirects the airflow through the
rear air ventsUDirects the airflow through the
footwell ventsVSwitches rear-compartment
climate control on/offWReduces the airflowOperating the control systems
Switching the control on/off
Important information
GWarning!
When the climate control system is
deactivated, the outside air supply and
circulation are also deactivated. Only choose
this setting for a short time. Otherwise the
windows could fog up, impairing visibility and
endangering you and others.
i Activate climate control primarily using
the à button ( Y page 138).
Activating/deactivating the front
climate control using the front control
panelXTurn the key to position 2 in the ignition
lock.XTo activate: press the à button.
The indicator lamp in the à button lights
up. Airflow and air distribution are set to
automatic mode.
or
XPress the ^ button.
The indicator lamp in the ^ button goes
out. The previously selected settings come
into effect again.XTo deactivate: press the ^ button.
The indicator lamp in the ^ button lights
up.136Operating the control systemsClimate control
BA 164.8 USA, CA Edition B 2011; 1; 2, en-USd2sboikeVersion: 3.0.3.52010-04-21T15:08:44+02:00 - Seite 136
Page 181 of 376
Driving systems
Cruise control
Important safety notes
Cruise control maintains a constant road
speed for you. It brakes automatically in order
to avoid exceeding the set speed. On long and
steep downhill gradients, especially if the
vehicle is laden or towing a trailer, you must
select shift range 1, 2 or 3 in good time. By
doing so, you will make use of the braking
effect of the engine, which relieves the load
on the brake system and prevents the brakes
from overheating and wearing too quickly.
Use cruise control only if road and traffic
conditions make it appropriate to maintain a
steady speed for a prolonged period. You can
store any road speed above 20 mph
(30 km/h).
GWarning
The cruise control is a convenience system
designed to assist the driver during vehicle
operation. The driver is and must always
remain responsible for the vehicle's speed
and for safe brake operation.
Only use the cruise control if the road, traffic,
and weather conditions make it advisable to
travel at a constant speed.
R The use of the cruise control can be
dangerous on winding roads or in heavy
traffic because conditions do not allow safe
driving at a constant speed.
R The use of the cruise control can be
dangerous on slippery roads. Rapid
changes in tire traction can result in wheel
spin and loss of control.
R Deactivate the cruise control when driving
in fog.
The "Resume" function should only be
operated if the driver is fully aware of the
previously set speed and wishes to resume
this particular preset speed.
GWarning
When cruise control brakes, the brake pedal
is pulled back (i.e. operated automatically).
The area around the pedal must not be
blocked by obstacles:
R Do not place any objects in the footwell.
R Ensure that floormats and carpets are fixed
securely. In particular, do not place several
floormats on top of one another.
R Do not place your foot under the brake
pedal, as it could become trapped.
Non-compliance could lead you to cause an
accident in which you and/or others could be
seriously injured.
i Cruise control should not be activated
during off-road driving.
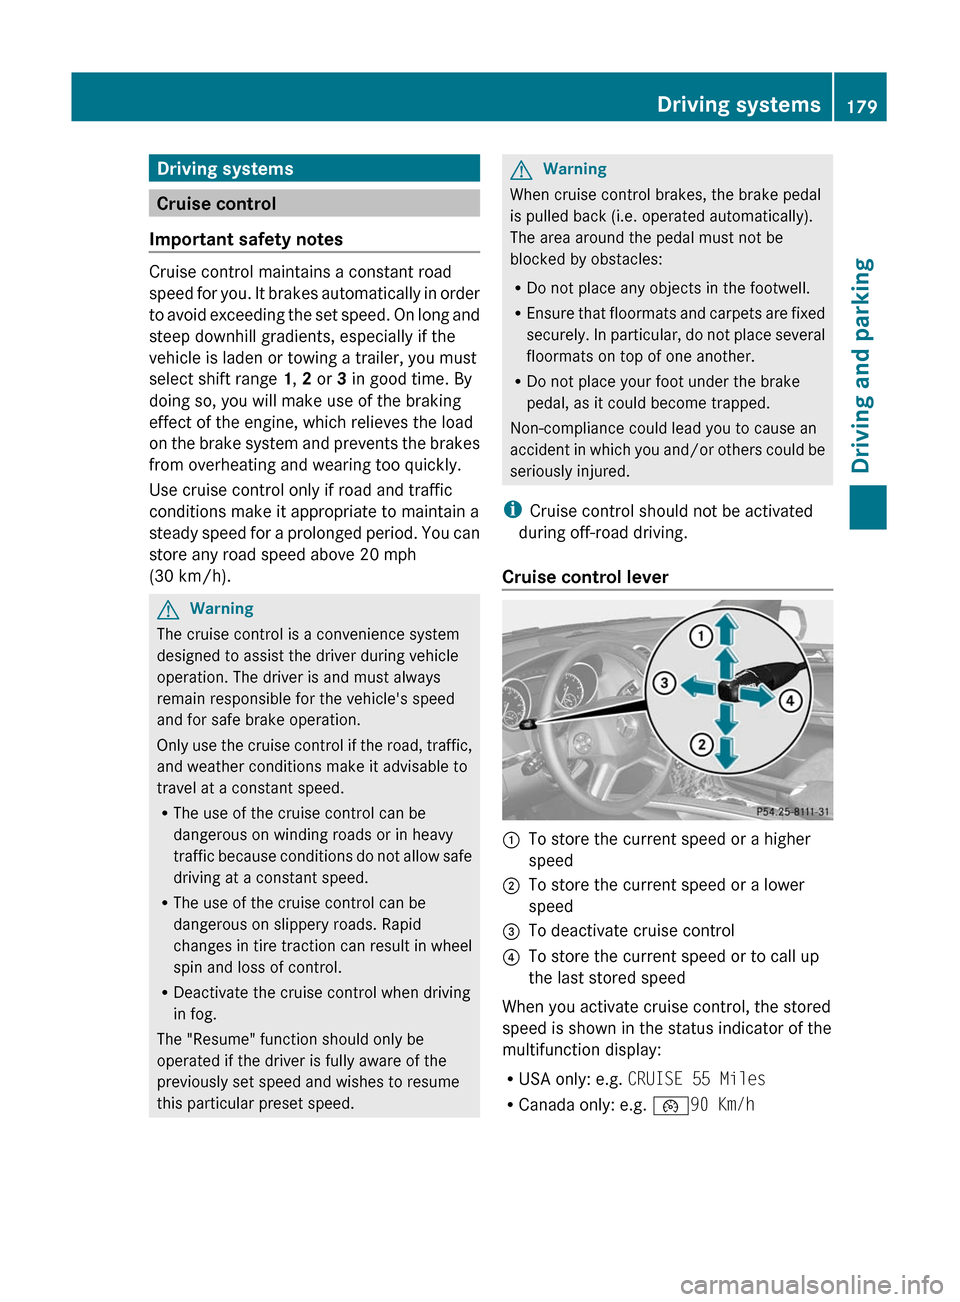
Cruise control lever
:To store the current speed or a higher
speed;To store the current speed or a lower
speed=To deactivate cruise control?To store the current speed or to call up
the last stored speed
When you activate cruise control, the stored
speed is shown in the status indicator of the
multifunction display:
R USA only: e.g. CRUISE 55 Miles
R Canada only: e.g. ¯90 Km/h
Driving systems179Driving and parkingBA 164.8 USA, CA Edition B 2011; 1; 2, en-USd2sboikeVersion: 3.0.3.52010-04-21T15:08:44+02:00 - Seite 179Z
Page 182 of 376
Storing and maintaining the current
speed
You can store the current speed if you are
driving faster than 20 mph (30 km/h).
XAccelerate the vehicle to the desired
speed.XBriefly press the cruise control lever
up : or down ; to the pressure point.XRemove your foot from the accelerator
pedal.
Cruise control is activated. The vehicle
automatically maintains the stored speed.
i Cruise control may be unable to maintain
the stored speed on uphill gradients. The
stored speed is resumed when the gradient
evens out. Cruise control maintains the
stored speed on downhill gradients by
automatically applying the brakes.
Storing the current speed or calling up
the last speed stored
GWarning
The set speed stored in memory should only
be set again if prevailing road conditions and
legal speed limits permit. Possible
acceleration or deceleration differences
arising from returning to the preset speed
could cause an accident and/or serious injury
to you and others.
XBriefly pull the cruise control lever towards
you ?.XRemove your foot from the accelerator
pedal.
The first time cruise control is activated, it
stores the current speed or regulates the
speed of the vehicle to the previously
stored speed.Setting a speedGWarning
Keep in mind that it may take a brief moment
until the vehicle has made the necessary
adjustments.
Increase or decrease the set vehicle speed to
a value that the prevailing road conditions and
legal speed limits permit. Otherwise, sudden
and unexpected acceleration or deceleration
of the vehicle could cause an accident and/
or serious injury to you and others.
XPress the cruise control lever to the
pressure point, up : for a higher speed or
down ; for a lower speed.XKeep the cruise control lever pressed until
the desired speed is reached.XRelease the cruise control lever.
The new speed is stored.
i Cruise control is not deactivated if you
depress the accelerator pedal. For
example, if you accelerate briefly to
overtake, cruise control adjusts the
vehicle's speed to the last speed stored
after you have finished overtaking.
Setting in 1 mph (Canada: 1 km/h)
increments
XBriefly press the cruise control lever to the
pressure point, up : for a higher speed or
down ; for a lower speed.
The last speed stored is increased or
reduced.
Setting in 5 mph (Canada: 10 km/h)
increments
XBriefly press the cruise control lever
beyond the pressure point, up : for a
higher speed or down ; for a lower speed.
The last speed stored is increased or
reduced.180Driving systemsDriving and parking
BA 164.8 USA, CA Edition B 2011; 1; 2, en-USd2sboikeVersion: 3.0.3.52010-04-21T15:08:44+02:00 - Seite 180
Page 183 of 376
Deactivating cruise control
There are several ways to deactivate cruise
control:
XBriefly press the cruise control lever
forwards =.
or
XBrake.
Cruise control is automatically deactivated if:
R you depress the parking brake.
R you are driving below 20 mph (30 km/h).
R ESP ®
intervenes or you deactivate ESP ®
.
R you shift the transmission to position N
while driving.
If cruise control is deactivated, you will hear
a warning tone. You will see the Cruise
control Off message in the multifunction
display for approximately five seconds.
i The last speed stored is cleared when you
switch off the engine.
DISTRONIC
Important safety notes
DISTRONIC regulates the speed and
automatically helps you maintain the
distance to the vehicle detected in front. It
brakes automatically in order to avoid
exceeding the set speed.
On long and steep downhill gradients,
especially if the vehicle is laden or towing a
trailer, you must select shift range 1, 2 or 3
in good time. By doing so, you will make use
of the braking effect of the engine, which
relieves the load on the brake system and
prevents the brakes from overheating and
wearing too quickly.
If a slower-moving vehicle is detected in front,
DISTRONIC causes your vehicle to brake and
maintain the preset distance to the vehicle in
front.
GWarning!
The Distronic requires familiarity with its
operational characteristics. We strongly
recommend that you review the following
information carefully before operating the
system.
GWarning
When DISTRONIC brakes, the brake pedal is
pulled back (i.e. operated automatically). The
area around the pedal must not be blocked by
obstacles:
R do not place any objects in the footwell.
R ensure that floormats and carpets are fixed
securely. In particular, do not place several
floormats on top of one another.
R do not place your foot under the brake
pedal, as it could become trapped.
Non-compliance could lead you to cause an
accident in which you and/or others could be
seriously injured.
GWarning!
The Distronic is a convenience system. Its
speed adjustment reduction capability is
intended to make cruise control more
effective and usable when traffic speeds vary.
It is not however, intended to, nor does it,
replace the need for extreme care.
The responsibility for the vehicle’s speed,
distance to the preceding vehicle and, most
importantly, brake operation to ensure a safe
stopping distance, always remains with the
driver.
The Distronic cannot take street and traffic
conditions into account. Complex driving
situations are not always fully recognized by
the Distronic. This could result in wrong or
missing distance warnings.
If there is no vehicle in front, DISTRONIC
operates in the same way as cruise control in
the speed range between 20 mph
( 30 km/h) and 120 mph (200 km/h). If there
is a vehicle in front, DISTRONIC operates in
Driving systems181Driving and parkingBA 164.8 USA, CA Edition B 2011; 1; 2, en-USd2sboikeVersion: 3.0.3.52010-04-21T15:08:44+02:00 - Seite 181Z