2011 MERCEDES-BENZ GL instrument cluster
[x] Cancel search: instrument clusterPage 171 of 376
Heavy and light loadsGWarning
Depressing the brake pedal constantly results
in excessive and premature wear to the brake
pads.
It may also cause the brakes to overheat,
seriously impairing their effectiveness. It may
then not be possible to stop the vehicle in
sufficient time to avoid an accident.
If the brakes have been subjected to a heavy
cargo, do not stop the vehicle immediately,
but drive on for a short while. This allows the
airflow to cool the brakes more quickly.
Wet roads
GWarning
After driving in heavy rain for some time
without applying the brakes or through water
deep enough to wet brake components, the
first braking action may be somewhat
reduced. You have to depress the brake pedal
more firmly. Maintain a safe distance from
vehicles in front.
After driving on a wet road or having the
vehicle washed, brake firmly while paying
attention to the traffic conditions. This will
warm up the brake discs, thereby drying them
more quickly and protecting them against
corrosion.
Limited braking performance on salt
treated roads
GWarning
The layer of salt on the brake discs and the
brake pads/linings may cause a delay in the
braking effect, resulting in a significantly
longer braking distance, which could lead to
an accident.
To avoid this danger, you should:
R occasionally brake carefully, without
putting other road users at risk, when you
are driving on salted roads. This helps to
remove any salt that may have started to
build up on the brake discs and the brake
pads/linings.
R maintain a greater distance to the vehicle
ahead and drive with particular care.
R carefully apply the brakes at the end of a
trip and immediately after commencing a
new trip, so that salt residues are removed
from the brake discs.
Maintenance of the brakes
! If the brake warning lamp lights up in the
instrument cluster and you hear a warning
tone, even though the parking brake has
been released, the brake fluid level may be
too low. Observe additional warning
messages in the multifunction display.
The brake fluid level may be too low due to
brake pad wear or leaking brake lines.
Have the brake system checked
immediately. This work should be carried
out at an authorized Mercedes-Benz
Center.
All checks and maintenance work on the
brake system must be carried out at a
qualified specialist workshop. Contact an
authorized Mercedes-Benz Center.
Only install brake pads and use brake fluid
recommended by Mercedes-Benz.
GWarning
If other than recommended brake pads are
installed, or other than recommended brake
fluid is used, the braking properties of the
vehicle can be degraded to an extent that safe
braking is substantially impaired. This could
result in an accident.
! A function or performance test may only
be carried out on a two-axle dynamometer.
If you are planning to have the vehicle
tested on such a dynamometer, contact an
authorized Mercedes-Benz Center to
obtain further information first. Otherwise,
the drive train or the brake system may
suffer damage.
Driving tips169Driving and parkingBA 164.8 USA, CA Edition B 2011; 1; 2, en-USd2sboikeVersion: 3.0.3.52010-04-21T15:08:44+02:00 - Seite 169Z
Page 188 of 376
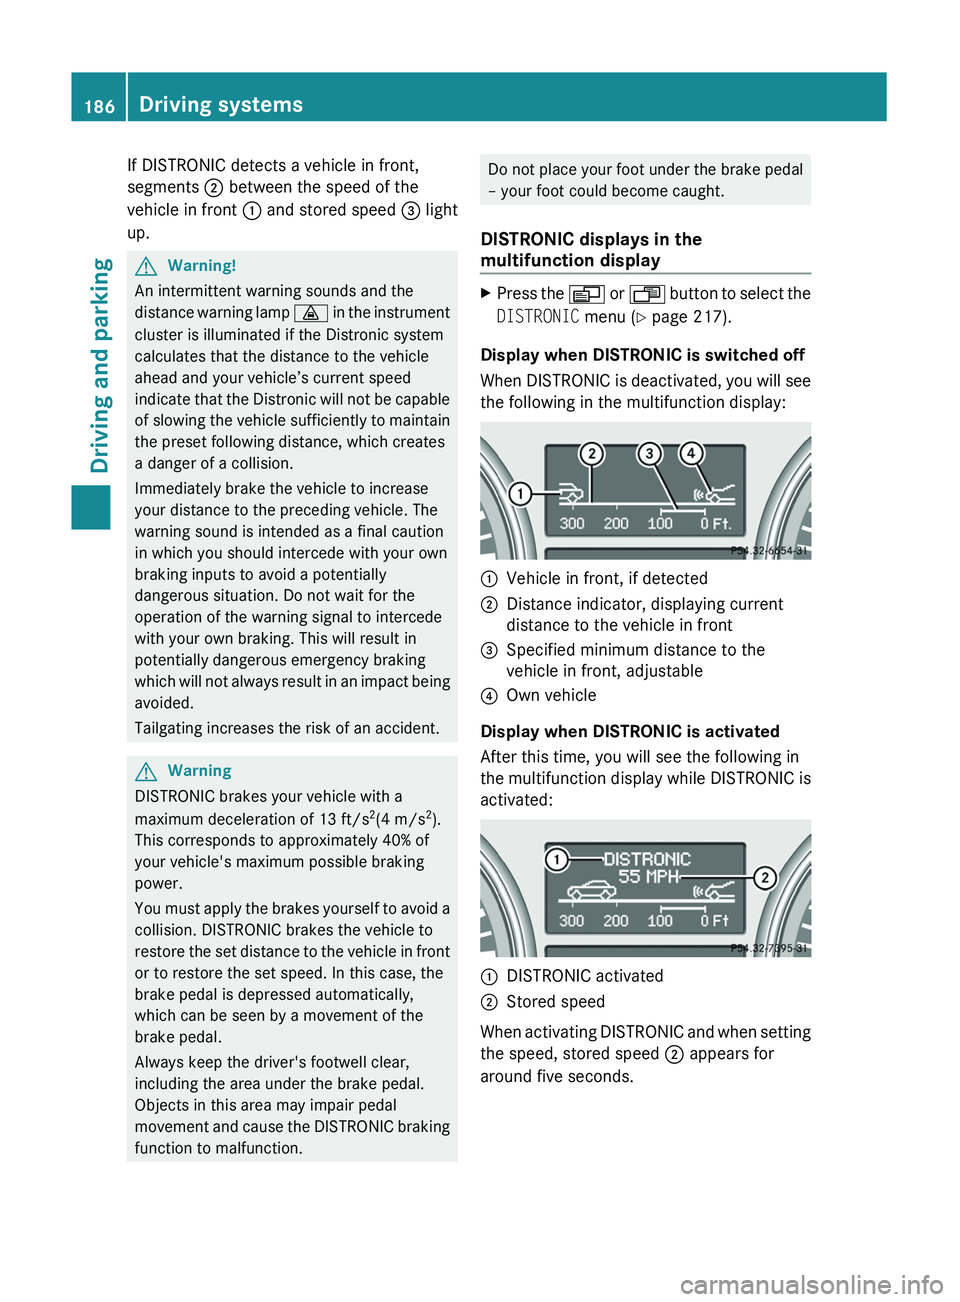
If DISTRONIC detects a vehicle in front,
segments ; between the speed of the
vehicle in front : and stored speed = light
up.GWarning!
An intermittent warning sounds and the
distance warning lamp · in the instrument
cluster is illuminated if the Distronic system
calculates that the distance to the vehicle
ahead and your vehicle’s current speed
indicate that the Distronic will not be capable
of slowing the vehicle sufficiently to maintain
the preset following distance, which creates
a danger of a collision.
Immediately brake the vehicle to increase
your distance to the preceding vehicle. The
warning sound is intended as a final caution
in which you should intercede with your own
braking inputs to avoid a potentially
dangerous situation. Do not wait for the
operation of the warning signal to intercede
with your own braking. This will result in
potentially dangerous emergency braking
which will not always result in an impact being
avoided.
Tailgating increases the risk of an accident.
GWarning
DISTRONIC brakes your vehicle with a
maximum deceleration of 13 ft/s 2
(4 m/s 2
).
This corresponds to approximately 40% of
your vehicle's maximum possible braking
power.
You must apply the brakes yourself to avoid a
collision. DISTRONIC brakes the vehicle to
restore the set distance to the vehicle in front
or to restore the set speed. In this case, the
brake pedal is depressed automatically,
which can be seen by a movement of the
brake pedal.
Always keep the driver's footwell clear,
including the area under the brake pedal.
Objects in this area may impair pedal
movement and cause the DISTRONIC braking
function to malfunction.
Do not place your foot under the brake pedal
– your foot could become caught.
DISTRONIC displays in the
multifunction displayXPress the V or U button to select the
DISTRONIC menu (Y page 217).
Display when DISTRONIC is switched off
When DISTRONIC is deactivated, you will see
the following in the multifunction display:
:Vehicle in front, if detected;Distance indicator, displaying current
distance to the vehicle in front=Specified minimum distance to the
vehicle in front, adjustable?Own vehicle
Display when DISTRONIC is activated
After this time, you will see the following in
the multifunction display while DISTRONIC is
activated:
:DISTRONIC activated;Stored speed
When activating DISTRONIC and when setting
the speed, stored speed ; appears for
around five seconds.
186Driving systemsDriving and parking
BA 164.8 USA, CA Edition B 2011; 1; 2, en-USd2sboikeVersion: 3.0.3.52010-04-21T15:08:44+02:00 - Seite 186
Page 215 of 376
Vehicle equipment ............................214
Important safety notes ....................214
Displays and operation ....................214
Menus and submenus ......................217
Display messages ............................. 229
Warning and indicator lamps in the
instrument cluster ............................254213On-board computer and displaysBA 164.8 USA, CA Edition B 2011; 1; 2, en-USd2sboikeVersion: 3.0.3.52010-04-21T15:08:44+02:00 - Seite 213
Page 216 of 376

Vehicle equipment
i This manual describes all the standard
and optional equipment of your vehicle
which was available at the time of
purchase. Country-specific differences are
possible. Bear in mind that your vehicle
may not feature all functions described
here. This also refers to safety-related
systems and functions.
Important safety notes
You will find an illustration of the instrument
cluster in the "At a glance" section
( Y page 28).
GWarning
A driver's attention to the road and traffic
conditions must always be his/her primary
focus when driving.
For your safety and the safety of others,
selecting features through the multifunction
steering wheel should only be done by the
driver when traffic and road conditions permit
it to be done safely.
Bear in mind that at a speed of just 30 mph
(approximately 50 km/h ), your vehicle is
covering a distance of 44 feet (approximately
14 m) every second.
GWarning!
No messages will be displayed if either the
instrument cluster or the multifunction
display is inoperative.
As a result, you will not be able to see
information about your driving conditions,
such as
R speed
R outside temperature
R warning/indicator lamps
R malfunction/warning messages
R failure of any systems
Driving characteristics may be impaired.
If you must continue to drive, do so with added
caution. Contact an authorized Mercedes-
Benz Center as soon as possible.GWarning
Malfunction and warning messages are only
indicated for certain systems and are
intentionally not very detailed. The
malfunction and warning messages are
simply a reminder with respect to the
operation of certain systems. They do not
replace the owner's and/or driver's
responsibility to maintain the vehicle's
operating safety. Have all required
maintenance and safety checks performed on
the vehicle. Bring the vehicle to an authorized
Mercedes-Benz Center to address the
malfunction and warning messages.
Displays and operation
Tachometer
The red band in the tachometer indicates the
engine's overrevving range.
! Do not drive in the overrevving range, as
this could damage the engine.
The fuel supply is interrupted to protect the
engine when the red band is reached.
Outside temperature display
The outside temperature display is in the
multifunction display.
GWarning!
The outside temperature indicator is not
designed to serve as an ice-warning device
and is therefore unsuitable for that purpose.
Indicated temperatures just above the
freezing point do not guarantee that the road
surface is free of ice. The road may still be icy,
especially in wooded areas or on bridges.
Changes in the outside temperature are
displayed after a short delay.
214Displays and operationOn-board computer and displays
BA 164.8 USA, CA Edition B 2011; 1; 2, en-USd2sboikeVersion: 3.0.3.52010-04-21T15:08:44+02:00 - Seite 214
Page 217 of 376
Speedometer with segments
The segments in the speedometer indicate
which speed range is available.
DISTRONIC mode:
One or two segments around the stored
speed light up.
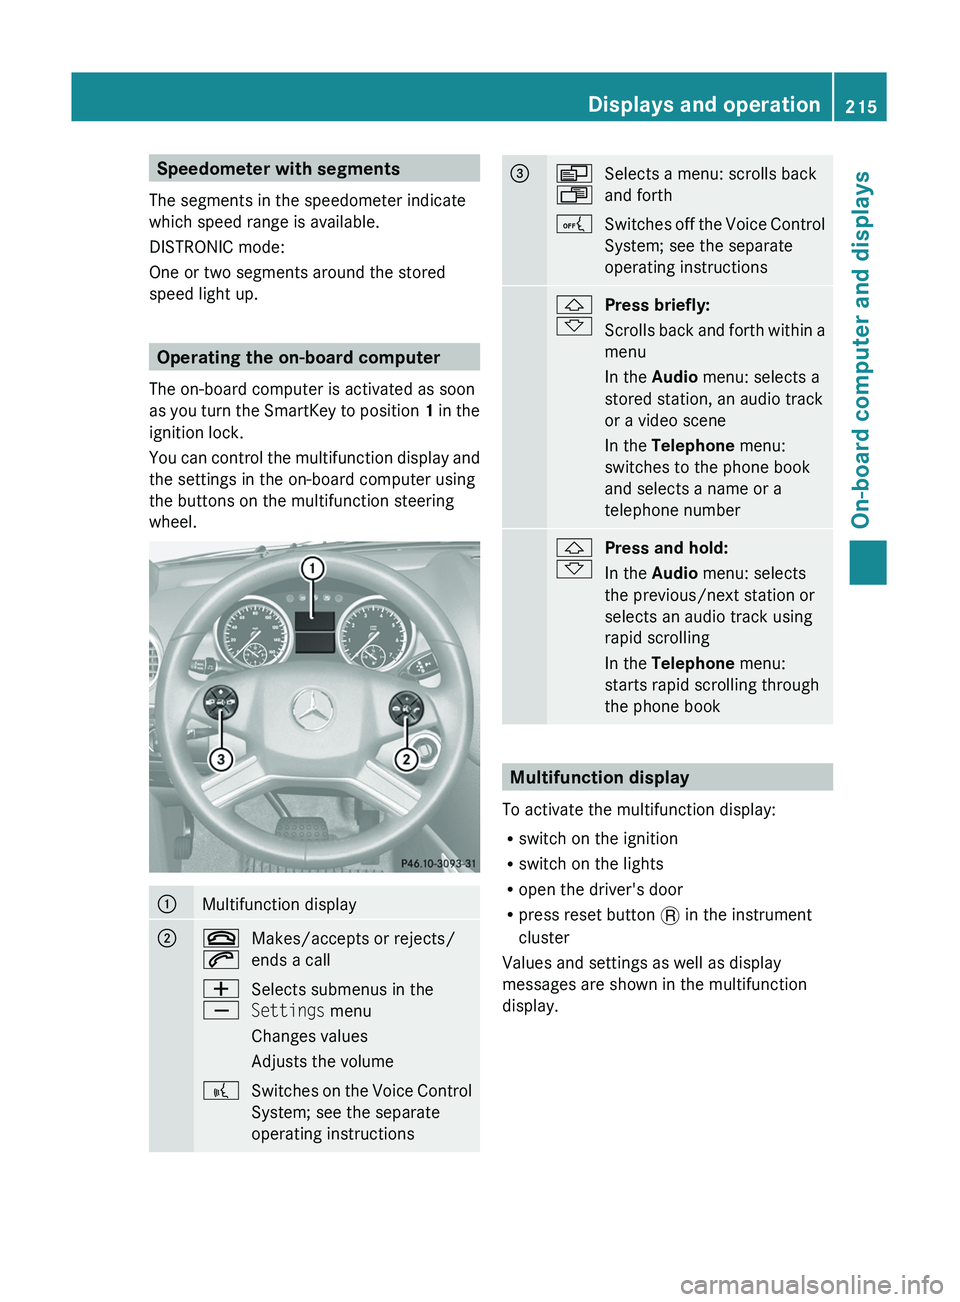
Operating the on-board computer
The on-board computer is activated as soon
as you turn the SmartKey to position 1 in the
ignition lock.
You can control the multifunction display and
the settings in the on-board computer using
the buttons on the multifunction steering
wheel.
:Multifunction display;~
6Makes/accepts or rejects/
ends a callW
XSelects submenus in the
Settings menu
Changes values
Adjusts the volume?Switches on the Voice Control
System; see the separate
operating instructions=V
USelects a menu: scrolls back
and forthASwitches off the Voice Control
System; see the separate
operating instructions&
*Press briefly:
Scrolls back and forth within a
menu
In the Audio menu: selects a
stored station, an audio track
or a video scene
In the Telephone menu:
switches to the phone book
and selects a name or a
telephone number&
*Press and hold:
In the Audio menu: selects
the previous/next station or
selects an audio track using
rapid scrolling
In the Telephone menu:
starts rapid scrolling through
the phone book
Multifunction display
To activate the multifunction display:
R switch on the ignition
R switch on the lights
R open the driver's door
R press reset button . in the instrument
cluster
Values and settings as well as display
messages are shown in the multifunction
display.
Displays and operation215On-board computer and displaysBA 164.8 USA, CA Edition B 2011; 1; 2, en-USd2sboikeVersion: 3.0.3.52010-04-21T15:08:44+02:00 - Seite 215Z
Page 220 of 376
FunctionETrip computer menu (Y page 227)FTelephone menu (Y page 227)Standard display menu
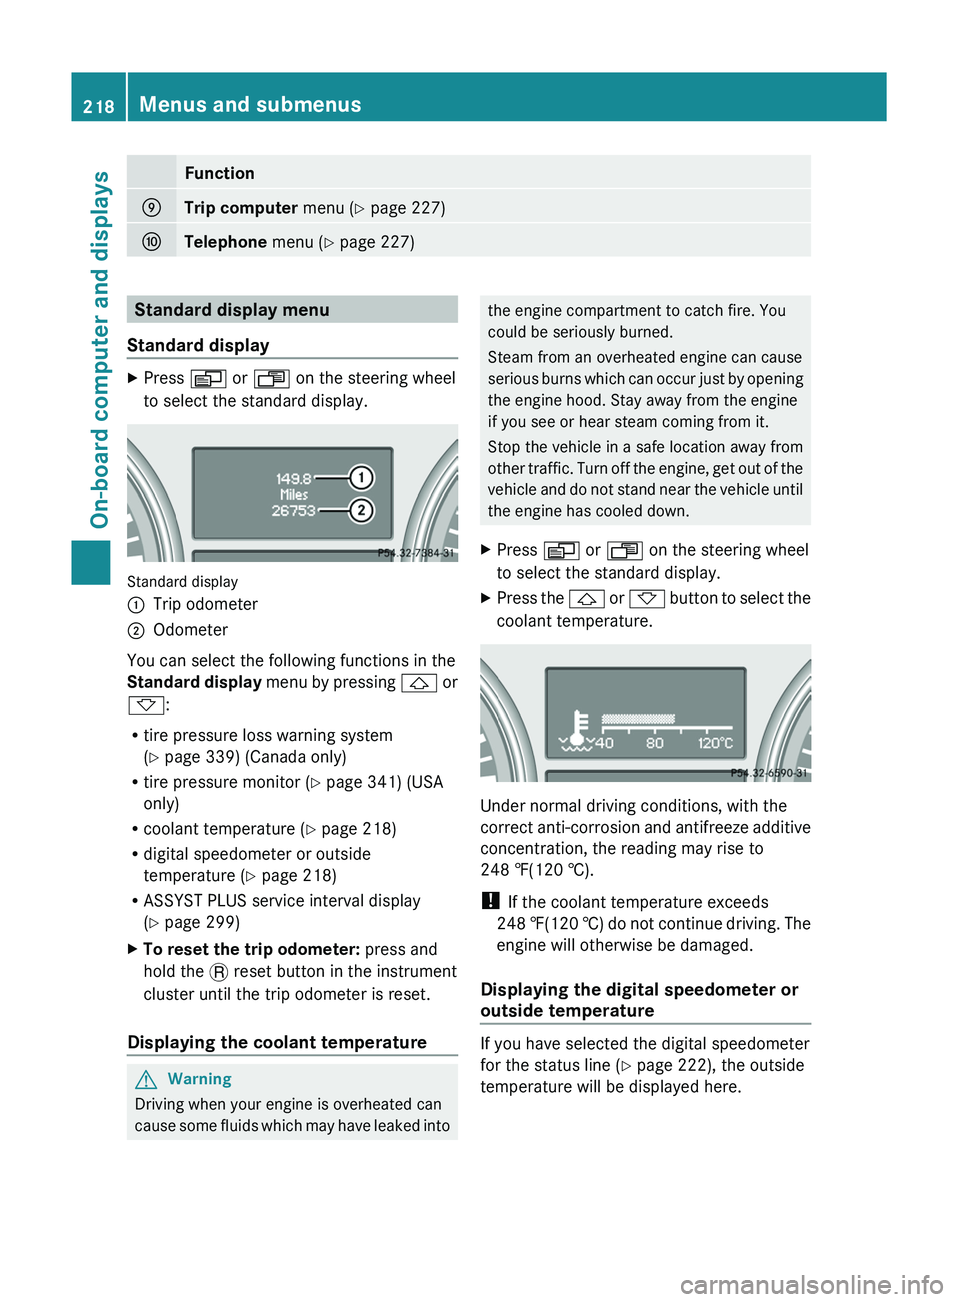
Standard displayXPress V or U on the steering wheel
to select the standard display.
Standard display
:Trip odometer;Odometer
You can select the following functions in the
Standard display menu by pressing & or
* :
R tire pressure loss warning system
( Y page 339) (Canada only)
R tire pressure monitor ( Y page 341) (USA
only)
R coolant temperature ( Y page 218)
R digital speedometer or outside
temperature ( Y page 218)
R ASSYST PLUS service interval display
( Y page 299)
XTo reset the trip odometer: press and
hold the . reset button in the instrument
cluster until the trip odometer is reset.
Displaying the coolant temperature
GWarning
Driving when your engine is overheated can
cause some fluids which may have leaked into
the engine compartment to catch fire. You
could be seriously burned.
Steam from an overheated engine can cause
serious burns which can occur just by opening
the engine hood. Stay away from the engine
if you see or hear steam coming from it.
Stop the vehicle in a safe location away from
other traffic. Turn off the engine, get out of the
vehicle and do not stand near the vehicle until
the engine has cooled down.XPress V or U on the steering wheel
to select the standard display.XPress the & or * button to select the
coolant temperature.
Under normal driving conditions, with the
correct anti-corrosion and antifreeze additive
concentration, the reading may rise to
248 ‡(120 †).
! If the coolant temperature exceeds
248 ‡(120 †) do not continue driving. The
engine will otherwise be damaged.
Displaying the digital speedometer or
outside temperature
If you have selected the digital speedometer
for the status line ( Y page 222), the outside
temperature will be displayed here.
218Menus and submenusOn-board computer and displays
BA 164.8 USA, CA Edition B 2011; 1; 2, en-USd2sboikeVersion: 3.0.3.52010-04-21T15:08:44+02:00 - Seite 218
Page 223 of 376
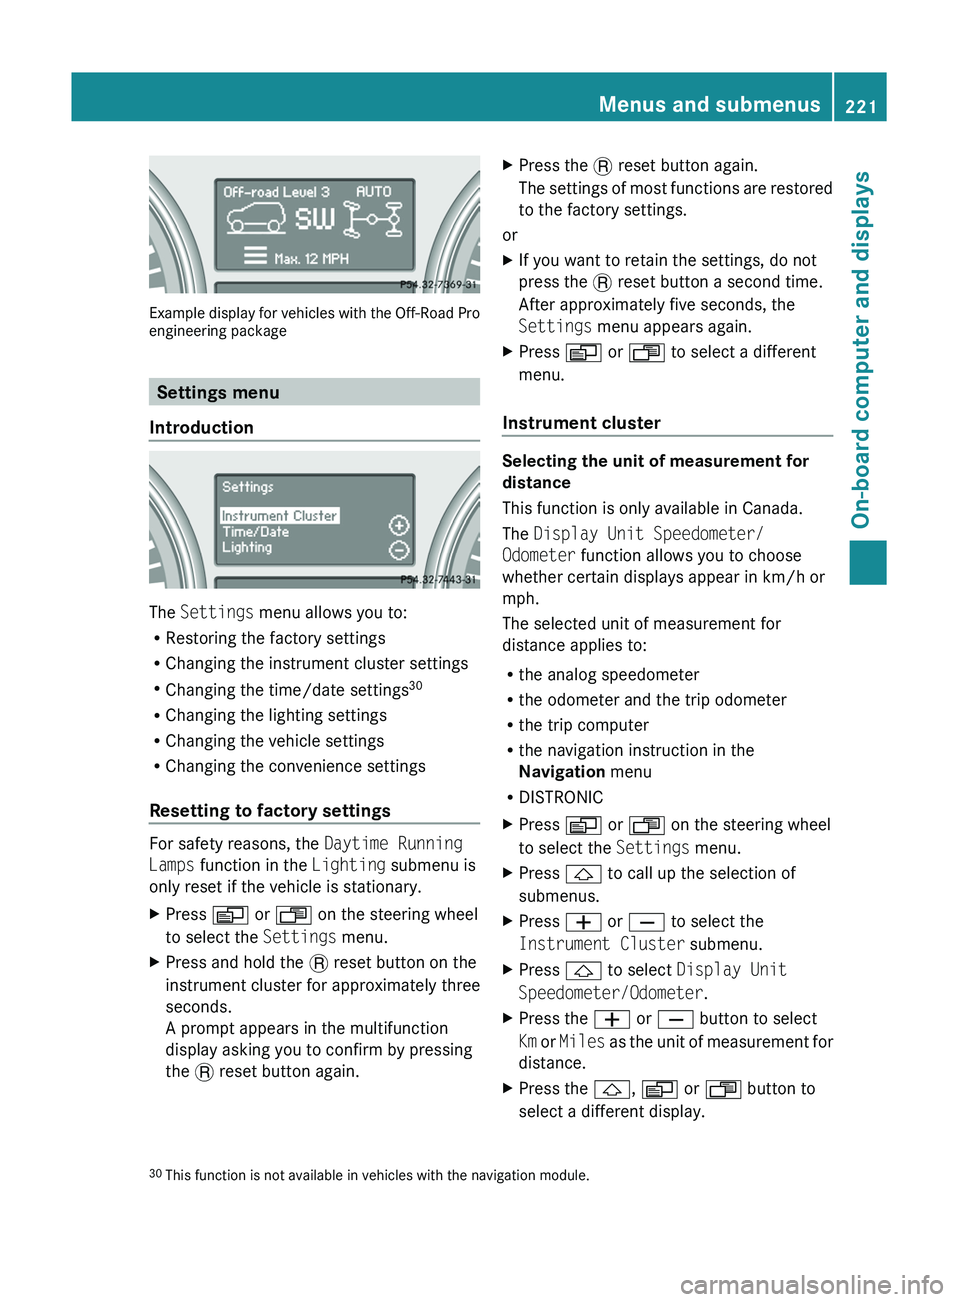
Example display for vehicles with the Off-Road Pro
engineering package
Settings menu
Introduction
The Settings menu allows you to:
R Restoring the factory settings
R Changing the instrument cluster settings
R Changing the time/date settings 30
R Changing the lighting settings
R Changing the vehicle settings
R Changing the convenience settings
Resetting to factory settings
For safety reasons, the Daytime Running
Lamps function in the Lighting submenu is
only reset if the vehicle is stationary.
XPress V or U on the steering wheel
to select the Settings menu.XPress and hold the . reset button on the
instrument cluster for approximately three
seconds.
A prompt appears in the multifunction
display asking you to confirm by pressing
the . reset button again.XPress the . reset button again.
The settings of most functions are restored
to the factory settings.
or
XIf you want to retain the settings, do not
press the . reset button a second time.
After approximately five seconds, the
Settings menu appears again.XPress V or U to select a different
menu.
Instrument cluster
Selecting the unit of measurement for
distance
This function is only available in Canada.
The Display Unit Speedometer/
Odometer function allows you to choose
whether certain displays appear in km/h or
mph.
The selected unit of measurement for
distance applies to:
R the analog speedometer
R the odometer and the trip odometer
R the trip computer
R the navigation instruction in the
Navigation menu
R DISTRONIC
XPress V or U on the steering wheel
to select the Settings menu.XPress & to call up the selection of
submenus.XPress W or X to select the
Instrument Cluster submenu.XPress & to select Display Unit
Speedometer/Odometer .XPress the W or X button to select
Km or Miles as the unit of measurement for
distance.XPress the &, V or U button to
select a different display.30 This function is not available in vehicles with the navigation module.Menus and submenus221On-board computer and displaysBA 164.8 USA, CA Edition B 2011; 1; 2, en-USd2sboikeVersion: 3.0.3.52010-04-21T15:08:44+02:00 - Seite 221Z
Page 224 of 376
Selecting the unit of distance for the
digital speedometerXPress V or U on the steering wheel
to select the Settings menu.XPress & to call up the selection of
submenus.XPress the W or X button to select the
Instrument Cluster submenu.XPress the & button to display Display
Unit Digital speedometer .XPress the W or X button to select
Km or Miles as the unit of measurement for
distance.XPress the &, V or U button to
select a different display.
Selecting the language
The Language function allows you to select
the language for the instrument cluster.
XPress V or U on the steering wheel
to select the Settings menu.XPress & to call up the selection of
submenus.XPress W or X to select the
Instrument Cluster submenu.XPress the & button to select Language.XPress the W or X button to select the
desired language.XPress the &, V or U button to
select a different display.
Selecting the status line display
XPress V or U on the steering wheel
to select the Settings menu.XPress & to call up the selection of
submenus.XPress W or X to select the
Instrument Cluster submenu.XPress & to select Status Line
Display .XPress W or X to select the display in
the status line: speed ( Speed) or outside
temperature ( Outside Temperature ).
The selected display now appears
constantly in the lower multifunction
display. When you scroll through the
Standard display menu (Y page 218), you
will see the display you have not selected.XPress the &, V or U button to
select a different display.
Time/date
Only vehicles without the navigation module
have this submenu. To set the time and date
on vehicles without the navigation module,
see the separate operating instructions.
In the Time / Date submenu, you can set the
time and date.
XPress V or U on the steering wheel
to select the Settings menu.XPress & to call up the selection of
submenus.XPress the W or X button to select the
Time / Date submenu.XTo set the clock: press & on the
steering wheel to select Clock Set hour
or Clock Set Minute(s) .
or
XTo set the date: press & to select
Date Set day , Date Set Month or Date
Set Year .XPress W or X to set a value.XPress the &, V or U button to
select a different display.
Lighting
Switching the daytime running lamps on/
off
This function is not available in Canada.
If you have activated the daytime running
lamps function and the light switch is in the
$ or à position, the daytime running
222Menus and submenusOn-board computer and displays
BA 164.8 USA, CA Edition B 2011; 1; 2, en-USd2sboikeVersion: 3.0.3.52010-04-21T15:08:44+02:00 - Seite 222