2011 MERCEDES-BENZ GL instrument cluster
[x] Cancel search: instrument clusterPage 118 of 376
With the engine running: depending on the
brightness of the ambient light, the daytime
running lamps 11
or the low-beam
headlamps are switched on or off
automatically.
When the low-beam headlamps are
switched on, the L indicator lamp in the
instrument cluster lights up.
Fog lamps and rear fog lamps
Front fog lamps
Only vehicles with front fog lamps have the
"fog lamps" function.
GWarning!
If you suspect that driving conditions will be
foggy, turn the light switch to L before you
start your journey. Otherwise, your vehicle
may not be visible and you could endanger
yourself and others.
GWarning
In low ambient lighting or foggy conditions,
only switch from position à to L with
the vehicle at a standstill in a safe location.
Switching from à to L will briefly
switch off the headlamps. Doing so while
driving in low ambient lighting conditions may
result in an accident.
XTo switch on the front fog lamps: turn
the key in the ignition lock to position 2 or
start the engine.XTurn the light switch to L or T . If the
light switch is set to Ã, you cannot
switch on the fog lamps.XPull the light switch out to the first detent.
The green N indicator lamp on the light
switch lights up.XTo switch off the front fog lamps: press
the light switch in as far as it will go.
The green N indicator lamp on the light
switch goes out.Rear fog lampXTo switch on (vehicles with front fog
lamps): turn the key in the ignition lock to
position 2 or start the engine.XTurn the light switch to L or T . When
the light switch is set to Ã, you cannot
switch on the rear fog lamp.XPull the light switch out to the second stop.
The yellow R indicator lamp on the light
switch lights up.XTo switch off the rear fog lamp: press the
light switch in as far as it will go.
The yellow R indicator lamp on the light
switch goes out.XTo switch on (vehicles without front fog
lamps): turn the key in the ignition lock to
position 2 or start the engine.XTurn the light switch to L. When the
light switch is set to Ã, you cannot
switch on the rear fog lamp.XPull the light switch out to the stop.
The yellow R indicator lamp on the light
switch lights up.XTo switch off the rear fog lamp: press the
light switch in as far as it will go.
The yellow R indicator lamp on the light
switch goes out.11 Only if daytime running lamps have been activated via the on-board computer.116Exterior lightingLights and windshield wipers
BA 164.8 USA, CA Edition B 2011; 1; 2, en-USd2sboikeVersion: 3.0.3.52010-04-21T15:08:44+02:00 - Seite 116
Page 119 of 376
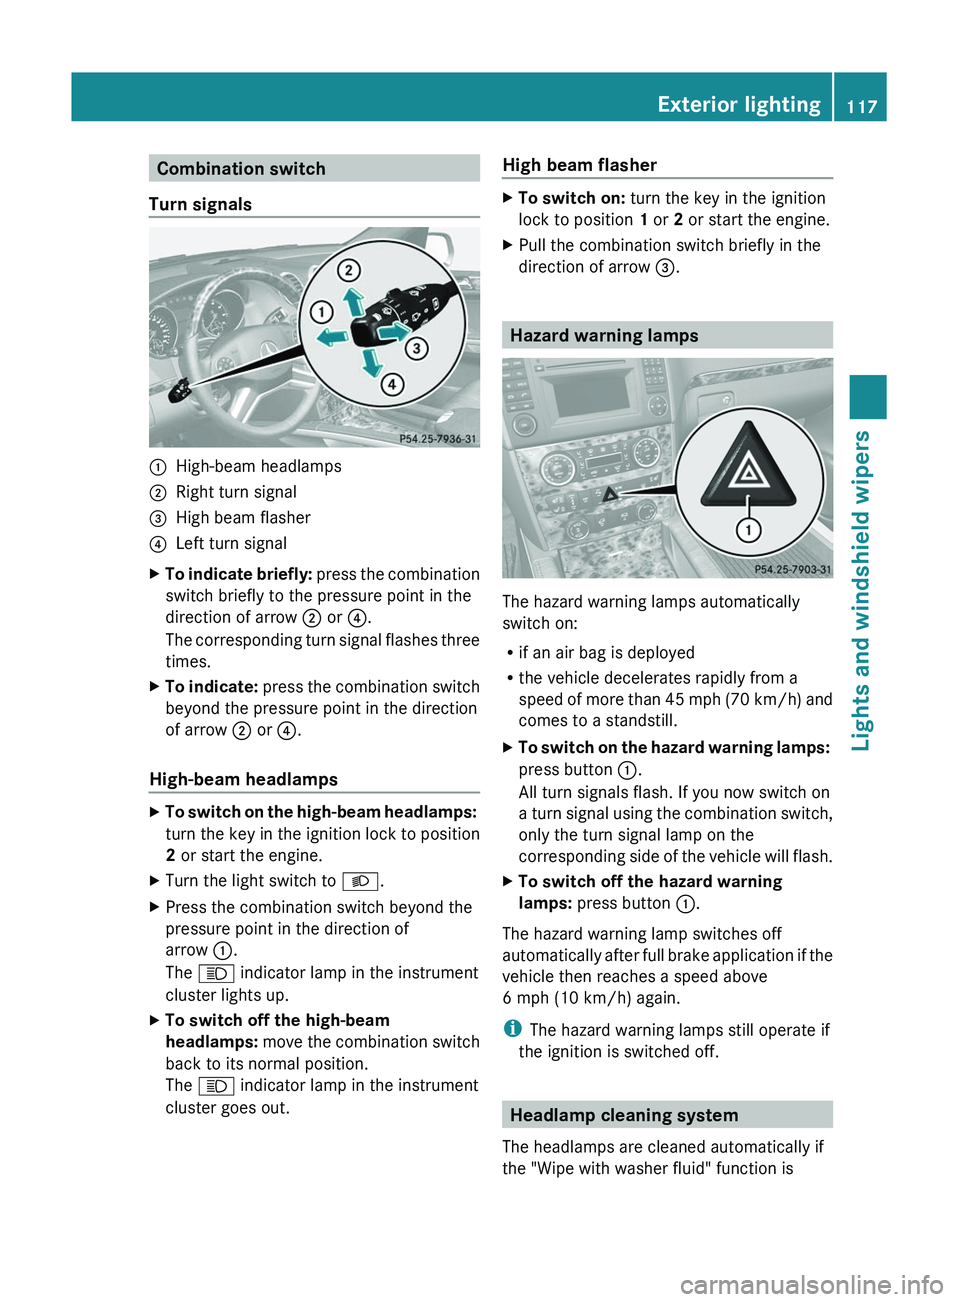
Combination switch
Turn signals:High-beam headlamps;Right turn signal=High beam flasher?Left turn signalXTo indicate briefly: press the combination
switch briefly to the pressure point in the
direction of arrow ; or ?.
The corresponding turn signal flashes three
times.XTo indicate: press the combination switch
beyond the pressure point in the direction
of arrow ; or ?.
High-beam headlamps
XTo switch on the high-beam headlamps:
turn the key in the ignition lock to position
2 or start the engine.XTurn the light switch to L.XPress the combination switch beyond the
pressure point in the direction of
arrow :.
The K indicator lamp in the instrument
cluster lights up.XTo switch off the high-beam
headlamps: move the combination switch
back to its normal position.
The K indicator lamp in the instrument
cluster goes out.High beam flasherXTo switch on: turn the key in the ignition
lock to position 1 or 2 or start the engine.XPull the combination switch briefly in the
direction of arrow =.
Hazard warning lamps
The hazard warning lamps automatically
switch on:
R if an air bag is deployed
R the vehicle decelerates rapidly from a
speed of more than 45 mph (70 km/h) and
comes to a standstill.
XTo switch on the hazard warning lamps:
press button :.
All turn signals flash. If you now switch on
a turn signal using the combination switch,
only the turn signal lamp on the
corresponding side of the vehicle will flash.XTo switch off the hazard warning
lamps: press button :.
The hazard warning lamp switches off
automatically after full brake application if the
vehicle then reaches a speed above
6 mph (10 km/h) again.
i The hazard warning lamps still operate if
the ignition is switched off.
Headlamp cleaning system
The headlamps are cleaned automatically if
the "Wipe with washer fluid" function is
Exterior lighting117Lights and windshield wipersBA 164.8 USA, CA Edition B 2011; 1; 2, en-USd2sboikeVersion: 3.0.3.52010-04-21T15:08:44+02:00 - Seite 117Z
Page 128 of 376
prevents a person from being splashed
inadvertently when getting into or out of the
vehicle.
Intermittent wiping continues when all doors
are closed and
R you shift the automatic transmission to
drive position D or reverse gear R
or
R you change the wipe setting on the
combination switch.
i To prevent smearing on the windshield or
noise when wiping, wipe the windshield
occasionally with washer fluid.
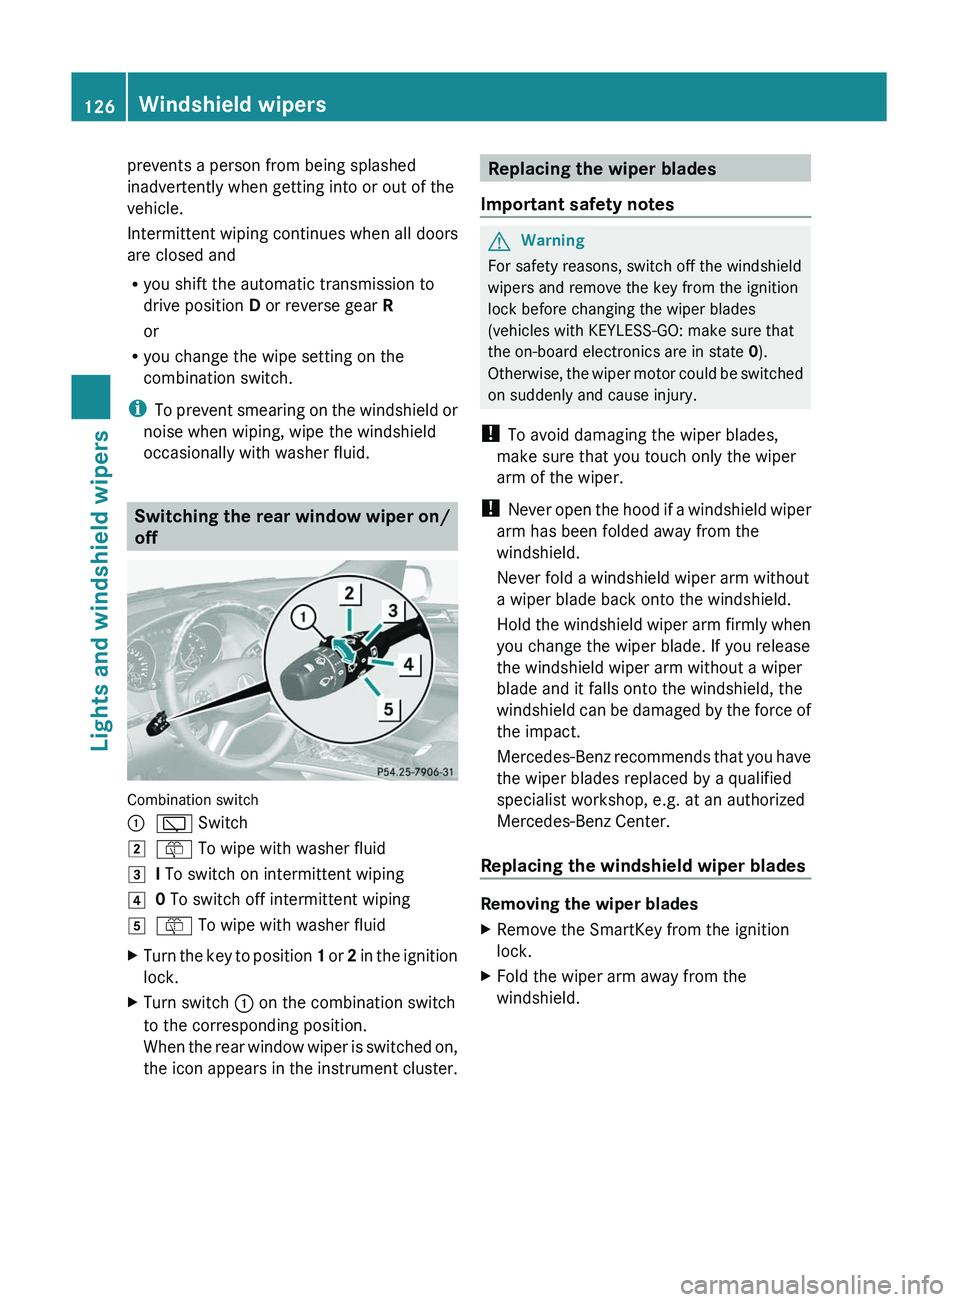
Switching the rear window wiper on/
off
Combination switch
:è Switch2ô To wipe with washer fluid3I To switch on intermittent wiping40 To switch off intermittent wiping5ô To wipe with washer fluidXTurn the key to position 1 or 2 in the ignition
lock.XTurn switch : on the combination switch
to the corresponding position.
When the rear window wiper is switched on,
the icon appears in the instrument cluster.Replacing the wiper blades
Important safety notesGWarning
For safety reasons, switch off the windshield
wipers and remove the key from the ignition
lock before changing the wiper blades
(vehicles with KEYLESS-GO: make sure that
the on-board electronics are in state 0).
Otherwise, the wiper motor could be switched
on suddenly and cause injury.
! To avoid damaging the wiper blades,
make sure that you touch only the wiper
arm of the wiper.
! Never open the hood if a windshield wiper
arm has been folded away from the
windshield.
Never fold a windshield wiper arm without
a wiper blade back onto the windshield.
Hold the windshield wiper arm firmly when
you change the wiper blade. If you release
the windshield wiper arm without a wiper
blade and it falls onto the windshield, the
windshield can be damaged by the force of
the impact.
Mercedes-Benz recommends that you have
the wiper blades replaced by a qualified
specialist workshop, e.g. at an authorized
Mercedes-Benz Center.
Replacing the windshield wiper blades
Removing the wiper blades
XRemove the SmartKey from the ignition
lock.XFold the wiper arm away from the
windshield.126Windshield wipersLights and windshield wipers
BA 164.8 USA, CA Edition B 2011; 1; 2, en-USd2sboikeVersion: 3.0.3.52010-04-21T15:08:44+02:00 - Seite 126
Page 149 of 376

SmartKey positions
SmartKeygTo remove the SmartKey1Power supply for some consumers, such
as the windshield wipers2Ignition (power supply for all consumers)
and drive position3To start the engine
As soon as the ignition is switched on, all the
indicator lamps in the instrument cluster light
up. The indicator lamps of the low-beam
headlamps, high-beam headlamps or the turn
signal lamps only light up if the low-beam
headlamps, high-beam headlamps or turn
signal lamps are switched on. If an indicator
lamp does not light up when the ignition is
switched on, check it and replace it if
necessary. If an indicator lamp does not go
out after the engine is started or if it lights up
while the vehicle is in motion, see
( Y page 254).
XRemove the SmartKey when the engine is
switched off.
The battery may otherwise discharge.
If you cannot turn the SmartKey in the ignition
lock, the vehicle battery may not be charged
sufficiently.
XCheck the vehicle battery and charge if
necessary ( Y page 323).
or
XJump-start the vehicle ( Y page 325).
i
The SmartKey can be turned in the
ignition lock even if it is not the correct
SmartKey for the vehicle. The ignition is not
switched on. The engine cannot be started.
KEYLESS-GO
Vehicles with KEYLESS-GO are equipped with
a SmartKey with an integrated KEYLESS-GO
function and a detachable Start/Stop button.
The Start/Stop button must be inserted in the
ignition lock and the SmartKey must be in the
vehicle.
Pressing the Start/Stop button several times
in succession corresponds to the different
key positions in the ignition lock. This is only
the case if you are not depressing the brake
pedal.
If you depress the brake pedal and press the
Start/Stop button, the engine starts
immediately.
The Start/Stop button can be removed from
the ignition lock. Then you can insert the
SmartKey in the ignition lock.
i You do not have to remove the Start/Stop
button from the ignition lock when you
leave the vehicle. However, you should
always take the SmartKey with you when
leaving the vehicle. The vehicle can be
started with the Start/Stop button and the
electrical equipment can be operated while
the SmartKey is in the vehicle.
:Start/Stop button;Ignition lockXInsert Start/Stop button : into ignition
lock ;.Driving147Driving and parkingBA 164.8 USA, CA Edition B 2011; 1; 2, en-USd2sboikeVersion: 3.0.3.52010-04-21T15:08:44+02:00 - Seite 147Z
Page 150 of 376
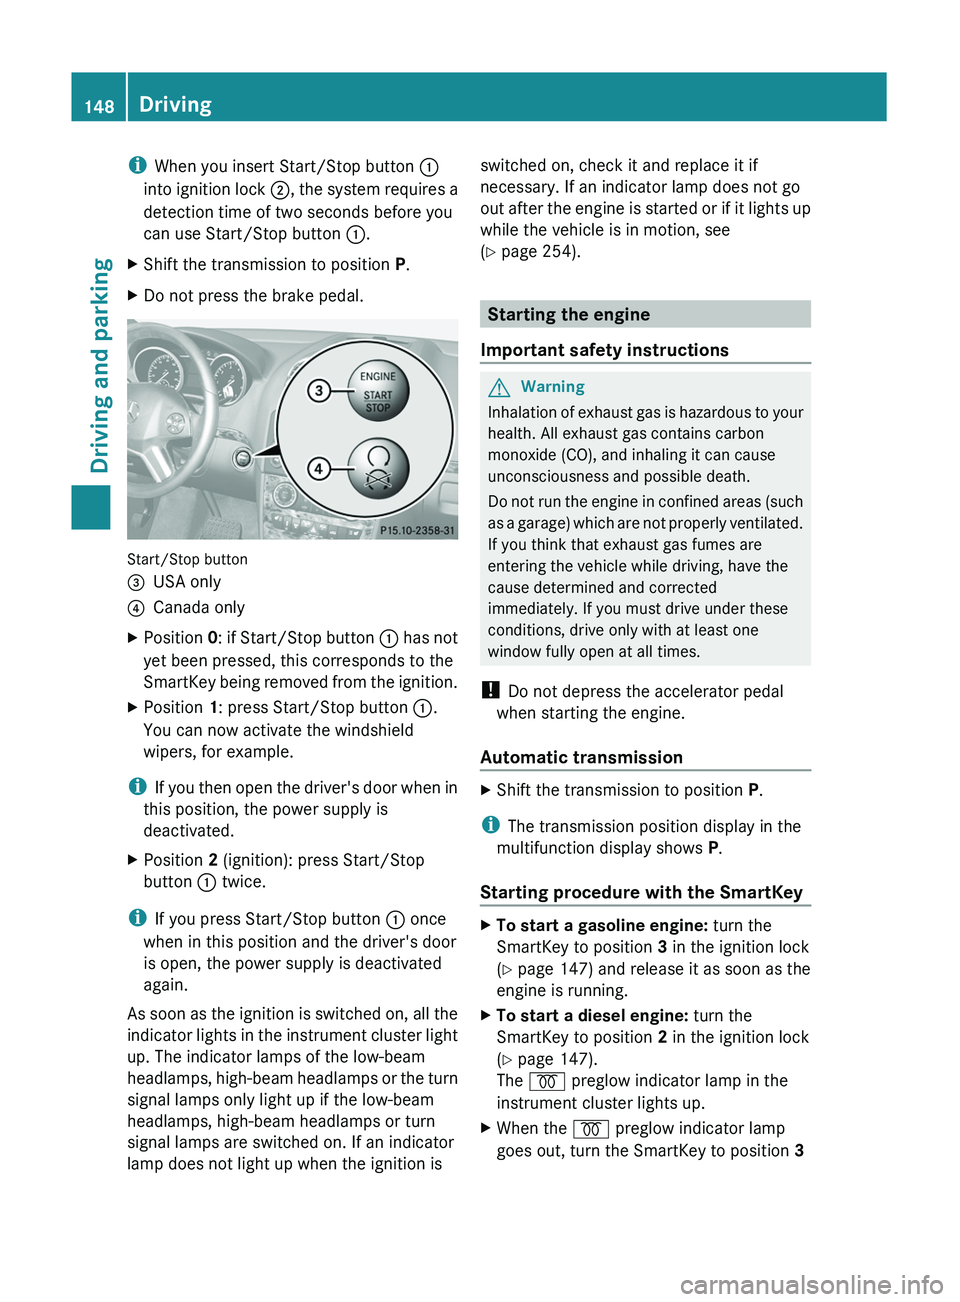
iWhen you insert Start/Stop button :
into ignition lock ;, the system requires a
detection time of two seconds before you
can use Start/Stop button :.XShift the transmission to position P.XDo not press the brake pedal.
Start/Stop button
=USA only?Canada onlyXPosition 0: if Start/Stop button : has not
yet been pressed, this corresponds to the
SmartKey being removed from the ignition.XPosition 1: press Start/Stop button :.
You can now activate the windshield
wipers, for example.
i If you then open the driver's door when in
this position, the power supply is
deactivated.
XPosition 2 (ignition): press Start/Stop
button : twice.
i
If you press Start/Stop button : once
when in this position and the driver's door
is open, the power supply is deactivated
again.
As soon as the ignition is switched on, all the
indicator lights in the instrument cluster light
up. The indicator lamps of the low-beam
headlamps, high-beam headlamps or the turn
signal lamps only light up if the low-beam
headlamps, high-beam headlamps or turn
signal lamps are switched on. If an indicator
lamp does not light up when the ignition is
switched on, check it and replace it if
necessary. If an indicator lamp does not go
out after the engine is started or if it lights up
while the vehicle is in motion, see
( Y page 254).
Starting the engine
Important safety instructions
GWarning
Inhalation of exhaust gas is hazardous to your
health. All exhaust gas contains carbon
monoxide (CO), and inhaling it can cause
unconsciousness and possible death.
Do not run the engine in confined areas (such
as a garage) which are not properly ventilated.
If you think that exhaust gas fumes are
entering the vehicle while driving, have the
cause determined and corrected
immediately. If you must drive under these
conditions, drive only with at least one
window fully open at all times.
! Do not depress the accelerator pedal
when starting the engine.
Automatic transmission
XShift the transmission to position P.
i
The transmission position display in the
multifunction display shows P.
Starting procedure with the SmartKey
XTo start a gasoline engine: turn the
SmartKey to position 3 in the ignition lock
( Y page 147) and release it as soon as the
engine is running.XTo start a diesel engine: turn the
SmartKey to position 2 in the ignition lock
( Y page 147).
The % preglow indicator lamp in the
instrument cluster lights up.XWhen the % preglow indicator lamp
goes out, turn the SmartKey to position 3 148DrivingDriving and parking
BA 164.8 USA, CA Edition B 2011; 1; 2, en-USd2sboikeVersion: 3.0.3.52010-04-21T15:08:44+02:00 - Seite 148
Page 151 of 376
(Y page 147) and release it as soon as the
engine is running.
i You can start the engine without preglow
if the engine is warm.
Using KEYLESS-GO to start the engine
GWarning!
As long as the SmartKey is in your vehicle, the
vehicle can be started. Therefore, never leave
children unattended in the vehicle, as they
could otherwise accidentally start the engine.
When leaving the vehicle, always take the
SmartKey with you and lock the vehicle. Do
not leave children unattended in the vehicle,
or with access to an unlocked vehicle. A
child's unsupervised access to a vehicle could
result in an accident and/or serious personal
injury.
i The Start/Stop button can be used to
start the vehicle without inserting the
SmartKey in the ignition lock. The
SmartKey must be in the vehicle.
XThe Start/Stop button must be inserted in
the ignition lock.
i To start the engine with the SmartKey
instead of with KEYLESS-GO, remove the
Start/Stop button from the ignition lock.
XDepress the brake pedal and keep it
depressed.XTo start a gasoline engine: press the
Start/Stop button ( Y page 147) once.
The engine starts.XTo start a diesel engine: press the Start/
Stop button ( Y page 147) once.
Preglow is activated and the engine starts.
i If the engine is warm, the preglow time is
shortened.
Pulling away
Automatic transmissionGWarning
It is dangerous to shift the automatic
transmission out of parking position P or
neutral position N if the engine speed is
higher than idle speed. If your foot is not firmly
on the brake pedal, the vehicle could
accelerate quickly forward or in reverse. You
could lose control of the vehicle and hit
someone or something. Only shift into gear
when the engine is idling normally and when
your right foot is firmly on the brake pedal.
i It is only possible to shift the transmission
from position P to the desired position if
you depress the brake pedal. Only then is
the parking lock released. If you do not
depress the brake pedal, you can move the
DIRECT SELECT selector lever but the
parking lock remains engaged.
XDepress the brake pedal and keep it
depressed.XShift the transmission to position D or R.XWait until the gear change is completed
before pulling away.XRelease the parking brake ( Y page 166).XRelease the brake pedal.XCarefully depress the accelerator pedal.
!
If a warning tone sounds and the
Release Park. Brake message appears
in the instrument cluster, the parking brake
is still applied. Release the parking brake.
i The vehicle locks centrally once you have
pulled away. The locking knobs in the doors
drop down.
You can open the doors from the inside at
any time.
You can also deactivate the automatic
locking feature ( Y page 224).
i Upshifts take place at higher engine
speeds after a cold start. This helps the
Driving149Driving and parkingBA 164.8 USA, CA Edition B 2011; 1; 2, en-USd2sboikeVersion: 3.0.3.52010-04-21T15:08:44+02:00 - Seite 149Z
Page 162 of 376
the label on the gasoline pump, ask the gas
station staff.
You can find further information under
"Fuel" ( Y page 366), by consulting an
authorized Mercedes-Benz Center or
visiting http://www.mbusa.com (USA
only).
Diesel
Fuel grade
! Only refuel with ULTRA-LOW SULFUR
DIESEL FUEL (ULSD, 15 ppm SULFUR
MAXIMUM). Using other diesel fuels could
result in increased wear and damage to the
engine and/or exhaust system.
Never refuel with marine diesel or heating
oil.
Do not mix these fuels with diesel fuels and
do not use any special additives, as this
may result in damage.
! When refueling using a fuel can, use a
filter or use a clean cloth as a filter.
Otherwise, particles from the fuel can may
block the fuel lines and/or the diesel
injection system.
i Refuel only with ULTRA-LOW SULFUR
DIESEL FUEL (ULSD, 15 ppm SULFUR
MAXIMUM).
Usually you will find information about the
fuel grade on the pump. If you cannot find
the label on the gasoline pump, ask the gas
station staff.
You can find further information under
"Fuel" ( Y page 366), by consulting an
authorized Mercedes-Benz Center or by
visiting http://www.mbusa.com (USA
only).
Low outside temperatures
! Do not use gasoline to refuel vehicles with
a diesel engine. Never mix diesel with
gasoline or kerosene, as this may result in
damage to the engine or fuel system.
Diesel fuel with improved cold flow properties
is available during the winter months. Further
information on fuel properties can be
obtained from oil companies, e.g. at filling
stations.
Refueling
Fuel filler flap
The fuel filler flap is unlocked or locked
automatically when you open or close the
vehicle with the SmartKey or using KEYLESS-
GO.
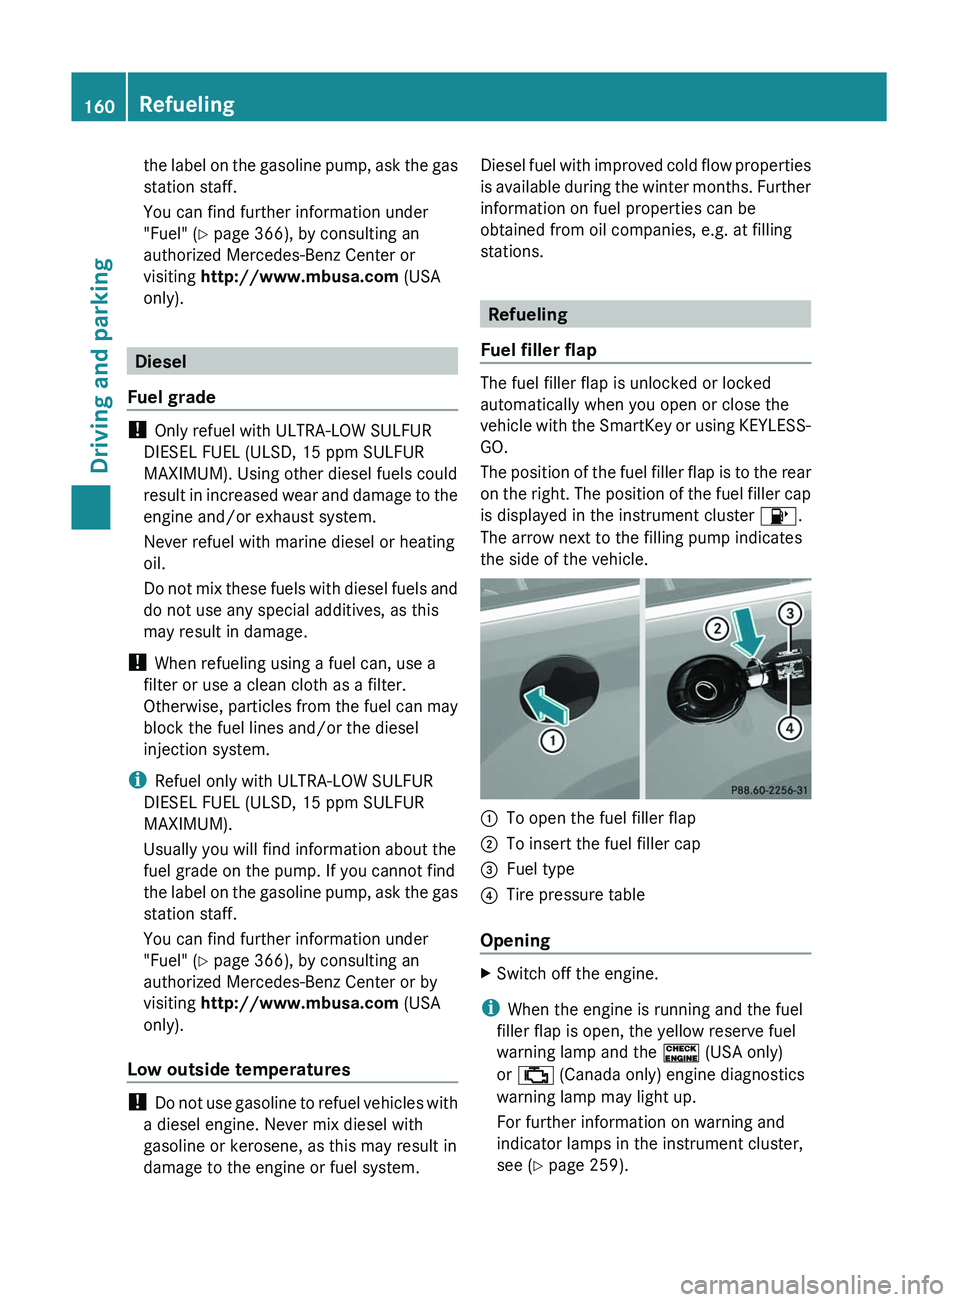
The position of the fuel filler flap is to the rear
on the right. The position of the fuel filler cap
is displayed in the instrument cluster 8.
The arrow next to the filling pump indicates
the side of the vehicle.
:To open the fuel filler flap;To insert the fuel filler cap=Fuel type?Tire pressure table
Opening
XSwitch off the engine.
i When the engine is running and the fuel
filler flap is open, the yellow reserve fuel
warning lamp and the ! (USA only)
or ; (Canada only) engine diagnostics
warning lamp may light up.
For further information on warning and
indicator lamps in the instrument cluster,
see ( Y page 259).
160RefuelingDriving and parking
BA 164.8 USA, CA Edition B 2011; 1; 2, en-USd2sboikeVersion: 3.0.3.52010-04-21T15:08:44+02:00 - Seite 160
Page 168 of 376
Using KEYLESS-GOXPress the Start/Stop button (Y page 147).
When the driver's door is closed, the Start/
Stop button is in position 1. When the
driver's door is opened, the Start/Stop
button moves to position 0. This
corresponds to removing the SmartKey.XApply the parking brake firmly.
i If you turn off the engine with the Start/
Stop button and open a front door, the
automatic transmission switches to P
automatically.
i The engine can be turned off while the
vehicle is in motion by pressing and holding
the Start/Stop button for three seconds.
If you have started the engine with the Start/
Stop button and it cannot be switched off as
described:
Xremove the Start/Stop button from the
ignition lock.Xinsert the SmartKey into the ignition lock.
The engine stops. The ignition lock is in
position 0.
Parking brake
GWarning
Engaging the parking brake while the vehicle
is in motion can cause the rear wheels to lock
up. You could lose control of the vehicle and
cause an accident. In addition, the vehicle's
brake lights do not light up when the parking
brake is engaged.
GWarning!
When leaving the vehicle, always remove the
SmartKey from the starter switch, take it with
you, and lock the vehicle. Do not leave
children unattended in the vehicle, or with
access to an unlocked vehicle. Children could
release the parking brake and/or shift the
automatic transmission out of park position
P , either of which could result in an accident
and/or serious personal injury.
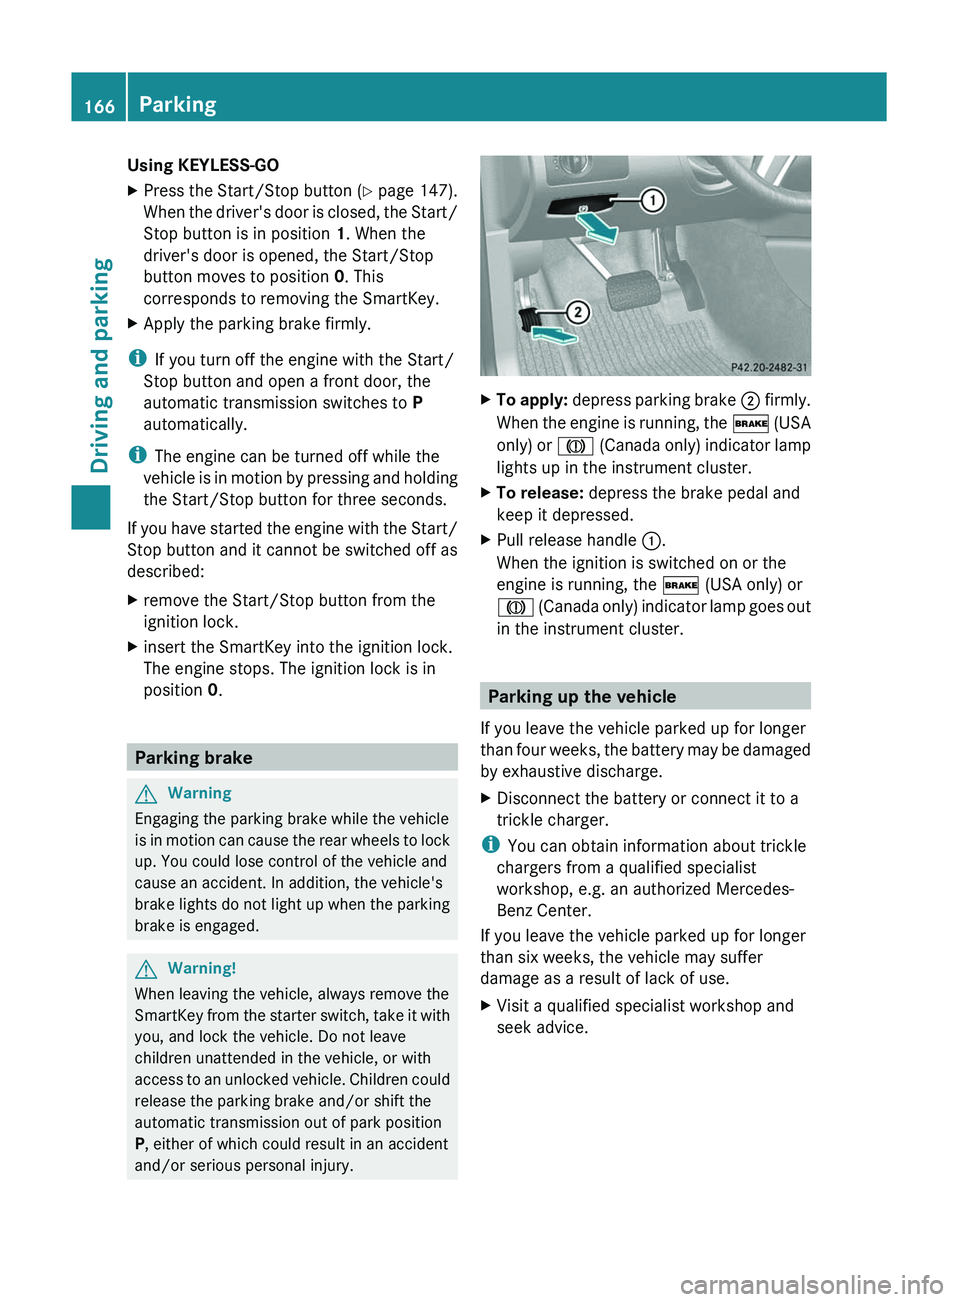
XTo apply: depress parking brake ; firmly.
When the engine is running, the $ (USA
only) or J (Canada only) indicator lamp
lights up in the instrument cluster.XTo release: depress the brake pedal and
keep it depressed.XPull release handle :.
When the ignition is switched on or the
engine is running, the $ (USA only) or
J (Canada only) indicator lamp goes out
in the instrument cluster.
Parking up the vehicle
If you leave the vehicle parked up for longer
than four weeks, the battery may be damaged
by exhaustive discharge.
XDisconnect the battery or connect it to a
trickle charger.
i You can obtain information about trickle
chargers from a qualified specialist
workshop, e.g. an authorized Mercedes-
Benz Center.
If you leave the vehicle parked up for longer
than six weeks, the vehicle may suffer
damage as a result of lack of use.
XVisit a qualified specialist workshop and
seek advice.166ParkingDriving and parking
BA 164.8 USA, CA Edition B 2011; 1; 2, en-USd2sboikeVersion: 3.0.3.52010-04-21T15:08:44+02:00 - Seite 166