2011 MERCEDES-BENZ GL lock
[x] Cancel search: lockPage 283 of 376
12 V sockets
Points to observe before use
! If you are using all sockets in the vehicle,
make sure that you do not exceed the
maximum current draw of 55 A. Otherwise,
you will overload the fuses.
The socket can be used for accessories with
a maximum power consumption of 180 W,
e.g. lamps or chargers for mobile phones.
If you use the socket for long periods when
the engine is switched off, the battery may
discharge.
XTurn the key to position 2 in the ignition
lock.
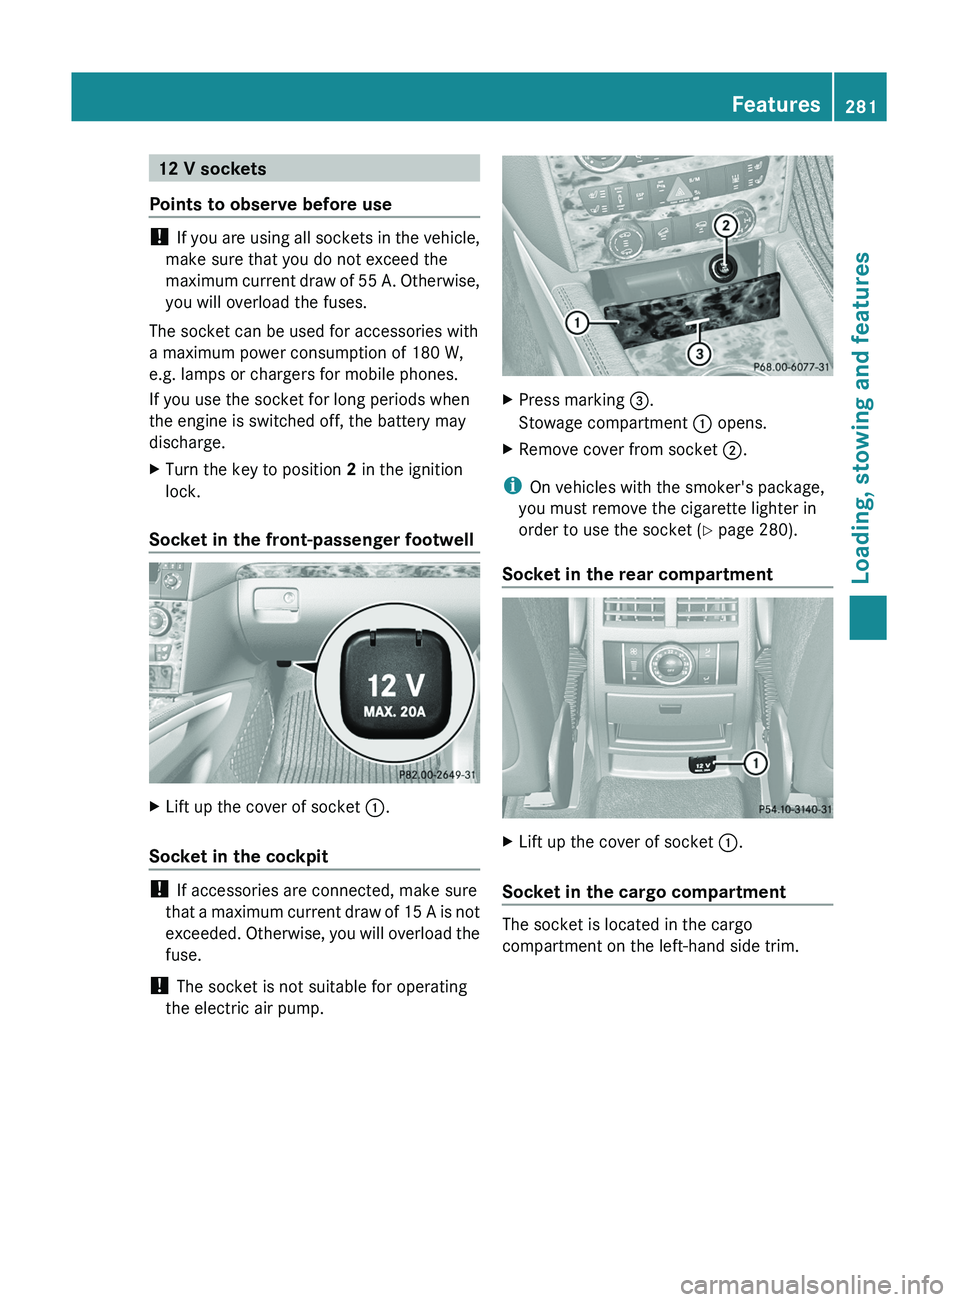
Socket in the front-passenger footwell
XLift up the cover of socket :.
Socket in the cockpit
!
If accessories are connected, make sure
that a maximum current draw of 15 A is not
exceeded. Otherwise, you will overload the
fuse.
! The socket is not suitable for operating
the electric air pump.
XPress marking =.
Stowage compartment : opens.XRemove cover from socket ;.
i
On vehicles with the smoker's package,
you must remove the cigarette lighter in
order to use the socket ( Y page 280).
Socket in the rear compartment
XLift up the cover of socket :.
Socket in the cargo compartment
The socket is located in the cargo
compartment on the left-hand side trim.
Features281Loading, stowing and featuresBA 164.8 USA, CA Edition B 2011; 1; 2, en-USd2sboikeVersion: 3.0.3.52010-04-21T15:08:44+02:00 - Seite 281Z
Page 289 of 376
Failed message appears in the
multifunction display.XTo end a call: press the ~ button on the
multifunction steering wheel.
or
XPress the corresponding button for ending
a phone call on COMAND.
Call priority
An emergency call can still be initiated even
if a service call is currently active, e.g. a
Roadside Assistance call or an MB info call.
In this case, an emergency call will take
priority and override all other active calls.
The indicator lamp of the respective button
flashes until the call is ended. An emergency
call can only be terminated by the Response
Center. All other calls can be ended by
pressing the ~ button on the
multifunction steering wheel or the
corresponding button for ending a telephone
call on COMAND.
i When an mbrace call has been initiated,
COMAND is muted. The mobile phone is no
longer connected to COMAND. If you must
use your mobile phone, we recommend
that you do this only when the vehicle is
stationary and in a safe location.
Downloading destinations in COMAND
i Information on the components and
operating principles of COMAND can be
found in the separate COMAND operating
instructions.
Destination Download gives you access to a
database with over 10 million points of
interest (POIs) which can be downloaded onto
the navigation system of your vehicle. If you
know the destination, you can download the
address or obtain the location of points of
interest (POIs) or important destinations in
the surrounding area.
You are prompted to confirm route guidance
to the entered address.XSelect Yes using the = button or
select ; on COMAND.XPress the 9 button on COMAND to
confirm.
The system calculates the route and
subsequently starts the route guidance with
the address entered.
i If you select No, the address can be stored
in the address book.
i The Destination Download function is
available if the corresponding cellular
phone network is available and data
transfer is possible.
Search & Send
"Search & Send" is a destination entry
service. You can find further information on
"Search & Send" in the separate COMAND
operating instructions.
Vehicle remote opening
If you have unintentionally locked your
vehicle (e.g. the SmartKey is inside the
vehicle) and a replacement key is not
available:
XContact the following service hotlines:
R USA: Response Center under the
number 866-990-9007
R Canada: Customer Service under
1-888-923-8367
You will be asked for your password.XReturn to your vehicle at the time arranged
with the Response Center.XPull the tailgate handle for at least 20
seconds until the indicator lamp in the SOS
button ( Y page 284) flashes.
The Connecting Call message appears in
the multifunction display.
Alternatively, the vehicle can also be opened
via the Internet in the "Owners Online"
Features287Loading, stowing and featuresBA 164.8 USA, CA Edition B 2011; 1; 2, en-USd2sboikeVersion: 3.0.3.52010-04-21T15:08:44+02:00 - Seite 287Z
Page 290 of 376
section using your ID number and
password 40
.
i Vehicle remote unlocking is only possible
if the corresponding cellular phone
network is accessible.
The SOS button flashes and the Call
Connected message appears in the
multifunction display to confirm that the
command for vehicle remote unlocking has
been received.
If you pull the tailgate handle for more than
20 seconds before receiving authorization
for remote unlocking from the Response
Center, you must wait 15 minutes before
you can pull on the handle of the tailgate
again.
Stolen Vehicle Recovery Services
If your vehicle has been stolen:
XContact the police.
The police will issue an incident report. This
report has a number.XThis number will be forwarded to the
Response Center together with your PIN.
The Response Center will then attempt to
covertly contact the mbrace system. The
Response Center contacts you and the
local law enforcement authority if the
vehicle is located. However, only the law
enforcement authority is informed of the
location of the vehicle.
i If the anti-theft alarm system remains
activated for longer than thirty seconds,
mbrace is automatically connected to the
Customer Assistance Center.
Garage door opener
Important safety notes
Up to three different door and gate systems
can be operated using the remote control
integrated in the overhead control panel.
i Certain garage door openers are not
compatible with the integrated remote
control. If you experience difficulties with
the programming of the integrated remote
control, contact an authorized Mercedes-
Benz Center or call the following telephone
assistance service:
R USA: Mercedes-Benz Customer
Assistance Center on
1-800-FOR-MERCedes
R Canada: Customer Service
on1-800-387-0100GWarning
Before programming the integrated remote
control to a garage door opener or gate
operator, make sure people and objects are
out of the way of the device to prevent
potential harm or damage. When
programming a garage door opener, the door
moves up or down. When programming a gate
operator, the gate opens or closes.
Do not use the integrated remote control with
any garage door opener that lacks safety stop
and reverse features as required by U.S.
federal safety standards (this includes any
garage door opener model manufactured
before April 1, 1982). A garage door that
cannot detect an object - signaling the door
to stop and reverse - does not meet current
U.S. federal safety standards.
When programming a garage door opener,
park vehicle outside the garage.
Do not run the engine while programming the
integrated remote control. Inhalation of
exhaust gas is hazardous to your health. All
exhaust gas contains carbon monoxide (CO),
and inhaling it can cause unconsciousness
and possible death. All exhaust gas contains
carbon monoxide (CO), and inhaling it can
cause unconsciousness and possible death.
i USA only:
40
USA only.288FeaturesLoading, stowing and features
BA 164.8 USA, CA Edition B 2011; 1; 2, en-USd2sboikeVersion: 3.0.3.52010-04-21T15:08:44+02:00 - Seite 288
Page 291 of 376
This device complies with part 15 of the
FCC rules. Operation is subject to the
following two conditions:
1. The device must not cause harmful
interference.
2. The device must withstand any
interference received, including
interference that may cause undesired
operation.
Unauthorized modification of this device
could void the device's operating permit.
i Canada only:
This device complies with the RSS-210
requirements of Industry Canada.
Operation is subject to the following two
conditions:
1. The device must not cause harmful
interference.
2. The device must accept any interference
received, including interference that may
cause undesired operation.
Unauthorized modification of this device
could void the user's authority to legally
operate the device.
Programming the remote control
Programming
GWarning!
Only press the transmitter button on the
integrated remote control if there are no
persons or objects present within the sweep
of the garage door. People could otherwise be
injured by the movement of the door.
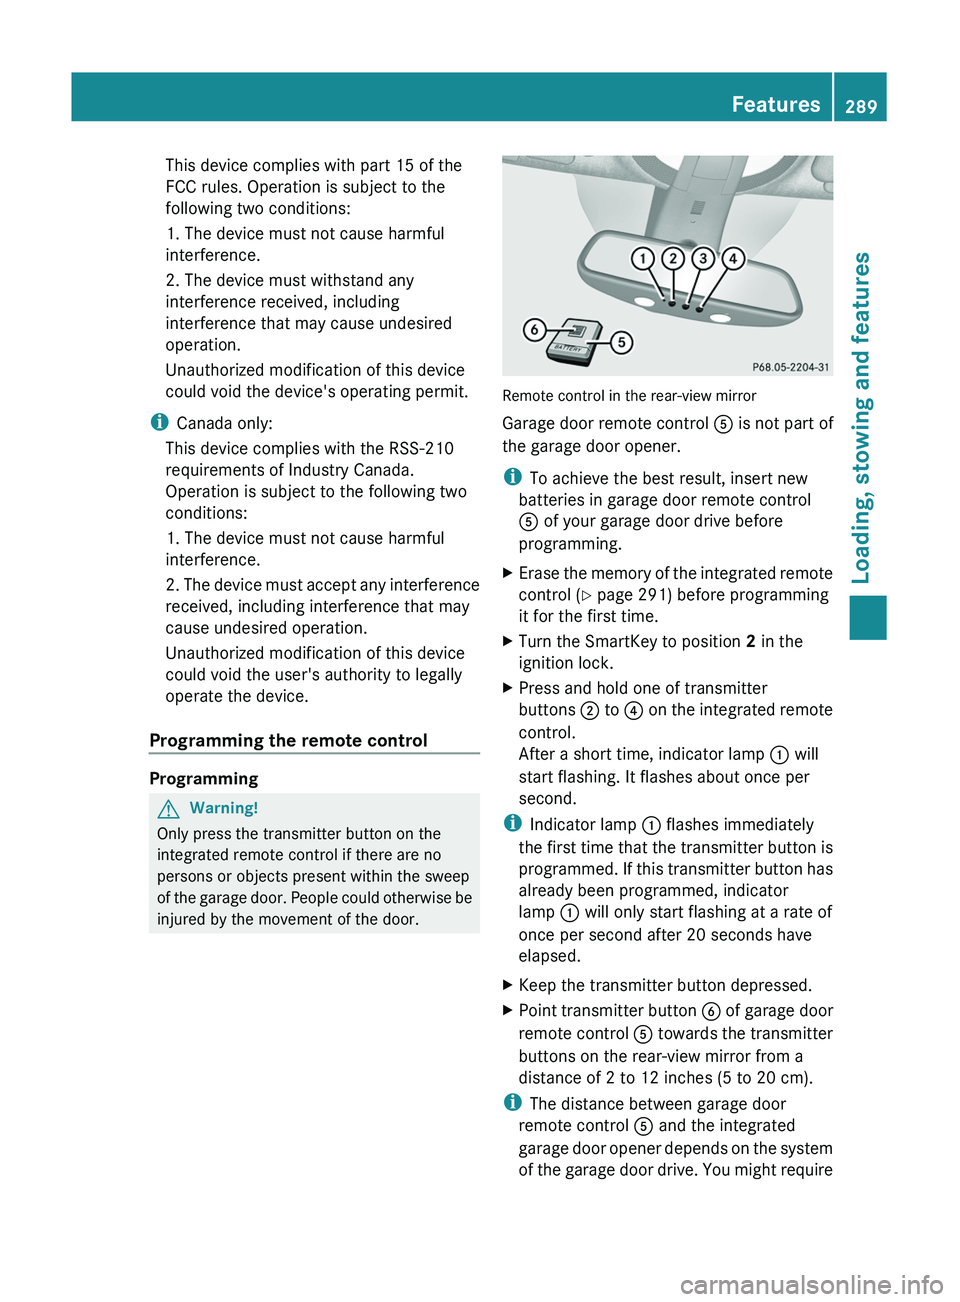
Remote control in the rear-view mirror
Garage door remote control A is not part of
the garage door opener.
i To achieve the best result, insert new
batteries in garage door remote control
A of your garage door drive before
programming.
XErase the memory of the integrated remote
control ( Y page 291) before programming
it for the first time.XTurn the SmartKey to position 2 in the
ignition lock.XPress and hold one of transmitter
buttons ; to ? on the integrated remote
control.
After a short time, indicator lamp : will
start flashing. It flashes about once per
second.
i Indicator lamp : flashes immediately
the first time that the transmitter button is
programmed. If this transmitter button has
already been programmed, indicator
lamp : will only start flashing at a rate of
once per second after 20 seconds have
elapsed.
XKeep the transmitter button depressed.XPoint transmitter button B of garage door
remote control A towards the transmitter
buttons on the rear-view mirror from a
distance of 2 to 12 inches (5 to 20 cm).
i The distance between garage door
remote control A and the integrated
garage door opener depends on the system
of the garage door drive. You might require
Features289Loading, stowing and featuresBA 164.8 USA, CA Edition B 2011; 1; 2, en-USd2sboikeVersion: 3.0.3.52010-04-21T15:08:44+02:00 - Seite 289Z
Page 293 of 376
from the transmitter button that you are
programming. Try different angles from a
distance of 2 to 12 inches (5 to 30 cm) or
the same angle from differing distances.
RIf there is another garage door remote
control for the same device, perform the
programming steps again using the remote
control. Before performing these steps,
make sure that new batteries have been
installed in the garage door remote control.
RAlign the antenna cable of the garage door
opener unit. This can improve signal
reception/transmission.
Opening or closing the garage door
Once programmed, the integrated remote
control will assume the function of the garage
door system's remote control. Please also
read the operating instructions for the garage
door system.
XTurn the SmartKey to position 2 in the
ignition lock.
XPress transmitter button ;, = or ? in the
overhead control panel that you have
programmed to operate the garage door.
Garage door system with fixed code:
indicator lamp : lights up continuously.
Garage door system with rolling code:
indicator lamp : flashes briefly and then
lights up for approximately two seconds.
This is repeated for up to 20 seconds.
iThe transmitter will transmit a signal for
as long as the transmitter button is being
pressed. The transmission will be halted
after a maximum of 20 seconds and
indicator lamp : will flash. Press the
transmitter button again, if necessary.
Clearing the remote control memoryXTurn the SmartKey to position 2 in the
ignition lock.
XPress and hold transmitter buttons ;
and ? for approximately 20 seconds until
indicator lamp : flashes rapidly.
The memory is cleared.
iYou should clear the remote control
memory before selling the vehicle.
Compass
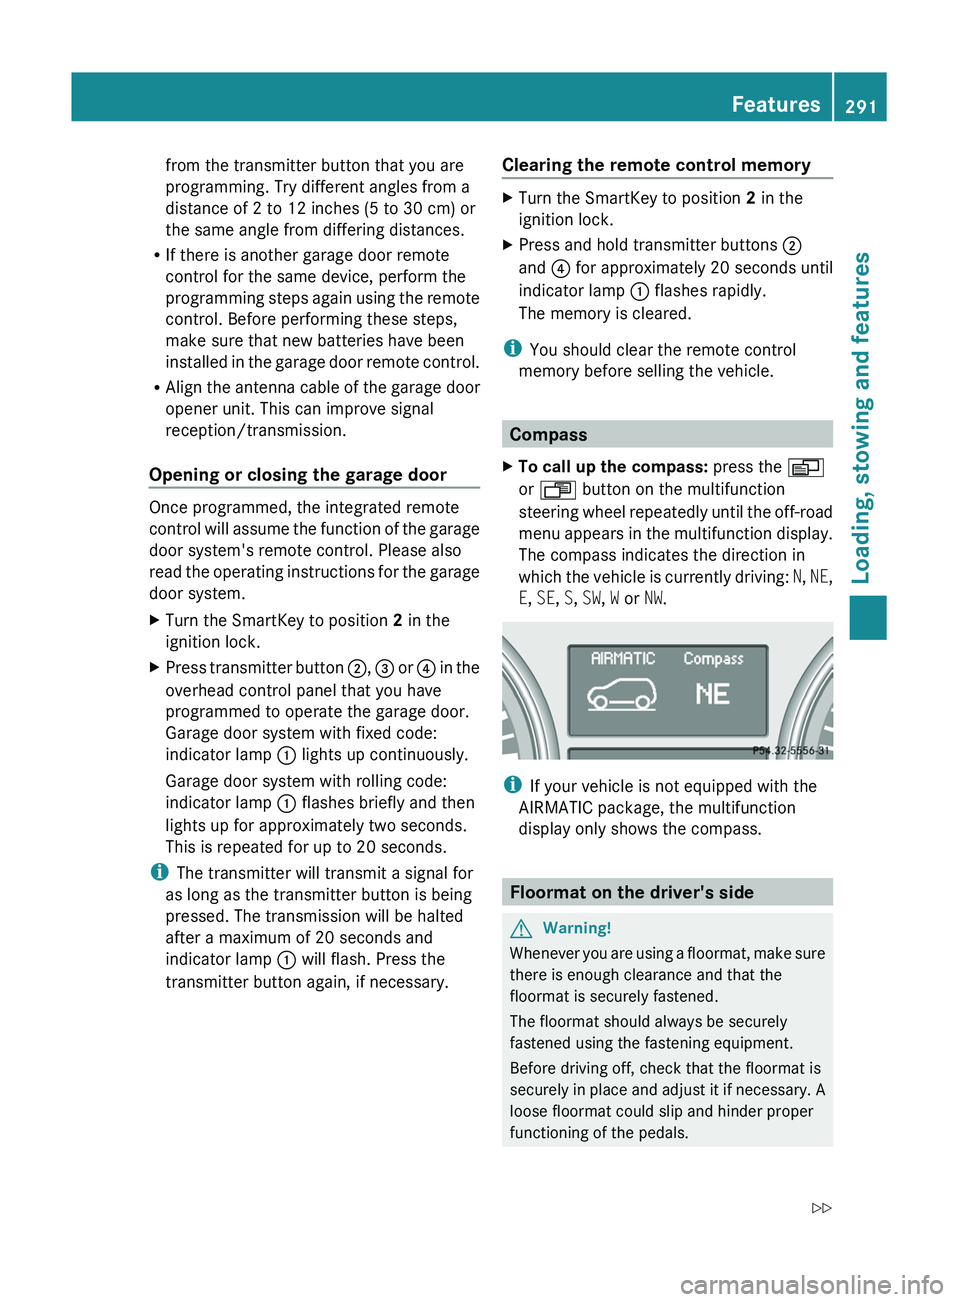
XTo call up the compass: press the V
or U button on the multifunction
steering wheel repeatedly until the off-road
menu appears in the multifunction display.
The compass indicates the direction in
which the vehicle is currently driving: N, NE,
E, SE, S, SW, W or NW.
iIf your vehicle is not equipped with the
AIRMATIC package, the multifunction
display only shows the compass.
Floormat on the driver's side
GWarning!
Whenever you are using a floormat, make sure
there is enough clearance and that the
floormat is securely fastened.
The floormat should always be securely
fastened using the fastening equipment.
Before driving off, check that the floormat is
securely in place and adjust it if necessary. A
loose floormat could slip and hinder proper
functioning of the pedals.
Features291Loading, stowing and featuresBA 164.8 USA, CA Edition B 2011; 1; 2, en-USd2sboikeVersion: 3.0.3.52010-04-21T15:08:44+02:00 - Seite 291Z
Page 294 of 376
Do not place several floormats on top of each
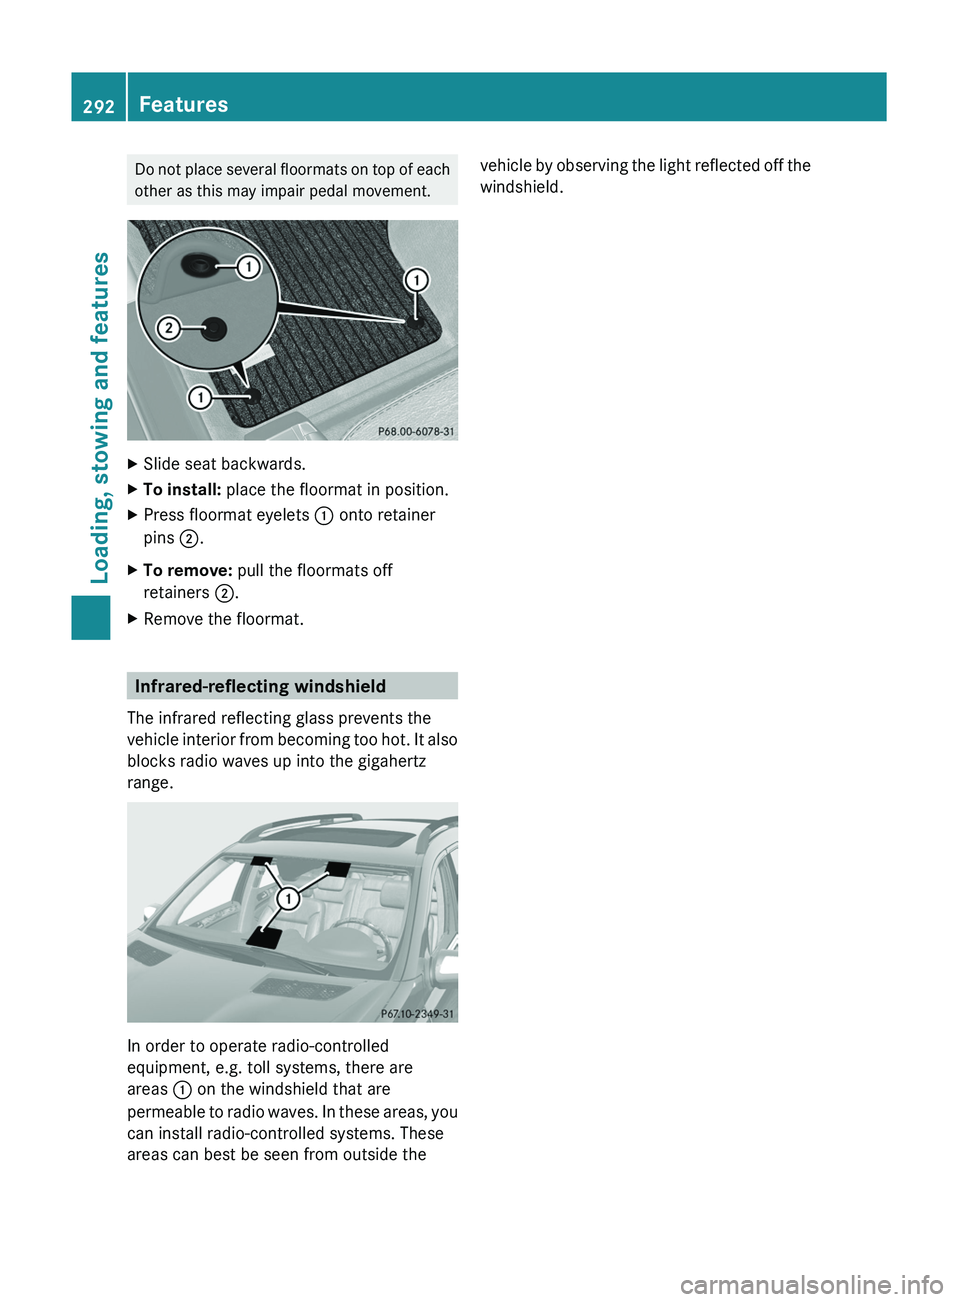
other as this may impair pedal movement.XSlide seat backwards.XTo install: place the floormat in position.XPress floormat eyelets : onto retainer
pins ;.XTo remove: pull the floormats off
retainers ;.XRemove the floormat.
Infrared-reflecting windshield
The infrared reflecting glass prevents the
vehicle interior from becoming too hot. It also
blocks radio waves up into the gigahertz
range.
In order to operate radio-controlled
equipment, e.g. toll systems, there are
areas : on the windshield that are
permeable to radio waves. In these areas, you
can install radio-controlled systems. These
areas can best be seen from outside the
vehicle by observing the light reflected off the
windshield.292FeaturesLoading, stowing and features
BA 164.8 USA, CA Edition B 2011; 1; 2, en-USd2sboikeVersion: 3.0.3.52010-04-21T15:08:44+02:00 - Seite 292
Page 298 of 376
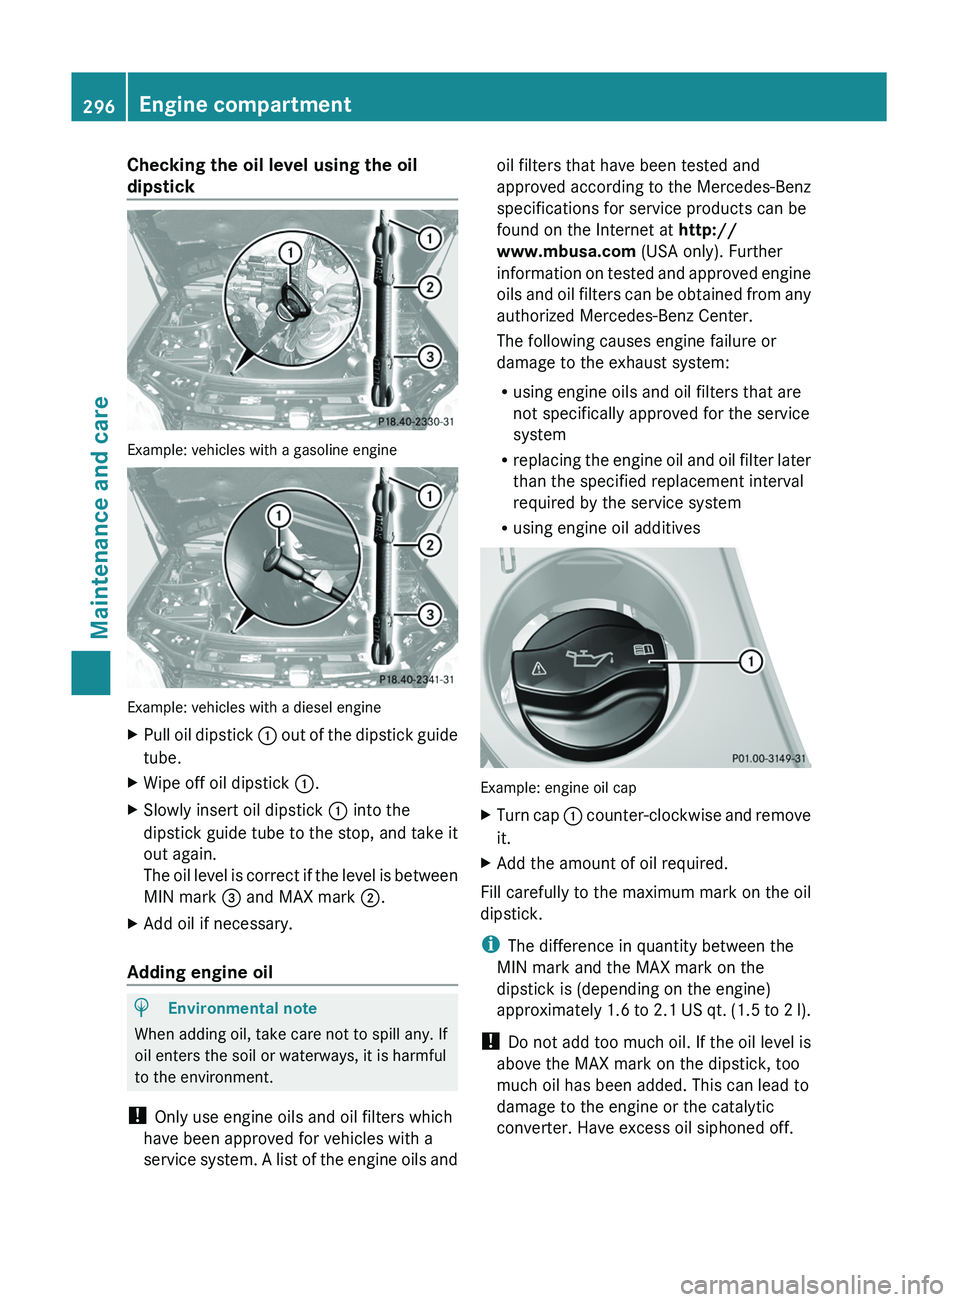
Checking the oil level using the oil
dipstick
Example: vehicles with a gasoline engine
Example: vehicles with a diesel engine
XPull oil dipstick : out of the dipstick guide
tube.
XWipe off oil dipstick :.XSlowly insert oil dipstick : into the
dipstick guide tube to the stop, and take it
out again.
The oil level is correct if the level is between
MIN mark = and MAX mark ;.
XAdd oil if necessary.
Adding engine oil
HEnvironmental note
When adding oil, take care not to spill any. If
oil enters the soil or waterways, it is harmful
to the environment.
! Only use engine oils and oil filters which
have been approved for vehicles with a
service system. A list of the engine oils and
oil filters that have been tested and
approved according to the Mercedes-Benz
specifications for service products can be
found on the Internet at http://
www.mbusa.com (USA only). Further
information on tested and approved engine
oils and oil filters can be obtained from any
authorized Mercedes-Benz Center.
The following causes engine failure or
damage to the exhaust system:
Rusing engine oils and oil filters that are
not specifically approved for the service
system
Rreplacing the engine oil and oil filter later
than the specified replacement interval
required by the service system
Rusing engine oil additives
Example: engine oil cap
XTurn cap : counter-clockwise and remove
it.
XAdd the amount of oil required.
Fill carefully to the maximum mark on the oil
dipstick.
iThe difference in quantity between the
MIN mark and the MAX mark on the
dipstick is (depending on the engine)
approximately 1.6 to 2.1 US qt. (1.5 to 2 l).
! Do not add too much oil. If the oil level is
above the MAX mark on the dipstick, too
much oil has been added. This can lead to
damage to the engine or the catalytic
converter. Have excess oil siphoned off.
296Engine compartmentMaintenance and care
BA 164.8 USA, CA Edition B 2011; 1; 2, en-USd2sboikeVersion: 3.0.3.52010-04-21T15:08:44+02:00 - Seite 296
Page 299 of 376
Further information on engine oil
( Y page 368).XReplace cap : on the filler neck and
tighten clockwise.
Ensure that the cap locks into place
securely.
Checking and adding other service
products
Checking the coolant level
Only check the coolant level when the vehicle
is on a level surface and the engine has cooled
down.
XTurn the SmartKey to position
2 (Y page 147) in the ignition lock.
On vehicles with KEYLESS-GO, press the
Start/Stop button twice ( Y page 147).XCheck the coolant temperature gauge in
the multifunction display.
The coolant temperature must be below
158 ‡ (70 †).GWarning
In order to avoid any potentially serious burns:
R use extreme caution when opening the
hood if there are any signs of steam or
coolant leaking from the cooling system, or
if the coolant temperature display indicates
that the coolant is overheated.
R do not remove the pressure cap on the
coolant reservoir if the coolant temperature
is above 158 ‡ (70 †). Allow the engine to
cool down before removing the cap. The
coolant reservoir contains hot fluid and is
under pressure.
R using a rag, slowly turn the cap
approximately 1
/ 2 turn to relieve excess
pressure. If opened immediately, scalding
hot fluid and steam will be blown out under
pressure.
R do not spill antifreeze on hot engine parts.
Antifreeze contains ethylene glycol which
may burn if it comes into contact with hot
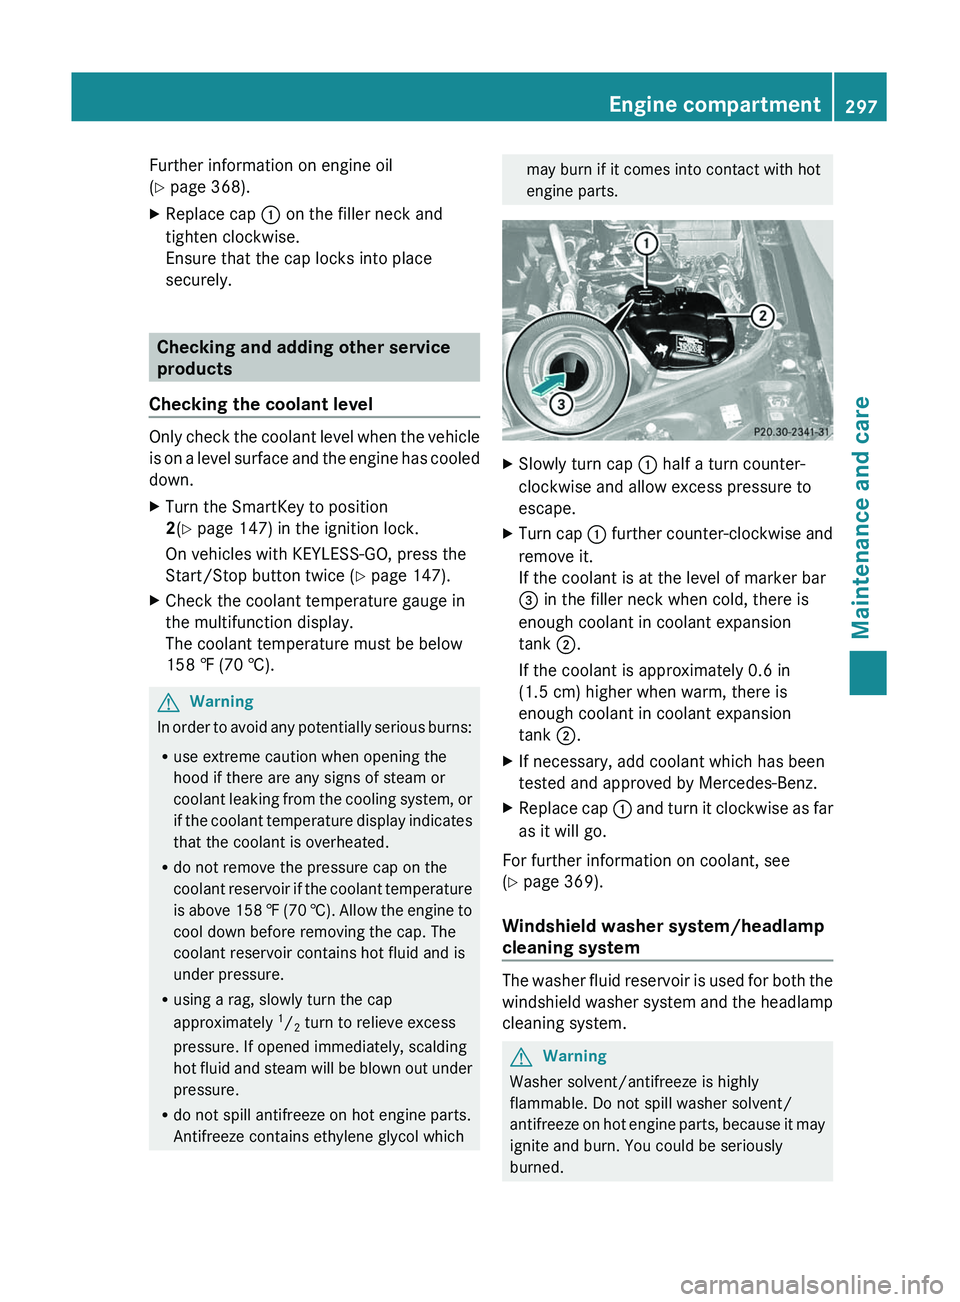
engine parts.XSlowly turn cap : half a turn counter-
clockwise and allow excess pressure to
escape.XTurn cap : further counter-clockwise and
remove it.
If the coolant is at the level of marker bar
= in the filler neck when cold, there is
enough coolant in coolant expansion
tank ;.
If the coolant is approximately 0.6 in
(1.5 cm) higher when warm, there is
enough coolant in coolant expansion
tank ;.XIf necessary, add coolant which has been
tested and approved by Mercedes-Benz.XReplace cap : and turn it clockwise as far
as it will go.
For further information on coolant, see
( Y page 369).
Windshield washer system/headlamp
cleaning system
The washer fluid reservoir is used for both the
windshield washer system and the headlamp
cleaning system.
GWarning
Washer solvent/antifreeze is highly
flammable. Do not spill washer solvent/
antifreeze on hot engine parts, because it may
ignite and burn. You could be seriously
burned.
Engine compartment297Maintenance and careBA 164.8 USA, CA Edition B 2011; 1; 2, en-USd2sboikeVersion: 3.0.3.52010-04-21T15:08:44+02:00 - Seite 297Z