2011 MERCEDES-BENZ GL check oil
[x] Cancel search: check oilPage 10 of 376

Driving over obstacles ...................176
Off-road driving .............................. 174
Off-road fording ............................. 171
Tire ruts ......................................... 176
Towing a trailer .............................. 209
Wet road surface ........................... 169
Winter ............................................ 173
DSR (Downhill Speed
Regulation) ......................................... 203
Display message ............................ 246
Setting (on-board computer) .......... 226
DVD audio (on-board computer) ...... 219
E
EASY-ENTRY feature ......................... 107
3rd row of seats ............................. 101
Activating/deactivating (on-
board computer) ............................ 225
EASY-EXIT feature ............................. 107
3rd row of seats ............................. 101
Crash-responsive ........................... 107
EASY-PACK cargo compartment
management system ........................ 271
EASY-PACK load-securing kit ........... 271
EBD (Electronic Brake force
Distribution) Display message ............................ 236
Function/notes ................................ 68
Electrical fuses
see Fuses
Electronic Brake-force
Distribution) see EBD
Electronic Stability Program
see ESP ®
Electronic Traction Support
see 4ETS
Emergency call
see mbrace
Emergency release
Fuel filler flap ................................. 161
Vehicle ............................................. 80
Emergency running mode
Automatic transmission .................157
Emergency spare wheel
Storage location ............................ 311
Emergency tensioning device
Function ........................................... 57
Safety guidelines ............................. 37
Emissions purification
Service and warranty information ....19
Engine
Irregular running ............................ 151
Starting problems ..........................151
Starting the engine with the key ....148
Starting with KEYLESS GO .............149
Switching off .................................. 165
Warning lamp (engine
diagnostics) ................................... 259
Engine electronics
Malfunction .................................... 151
Engine emergency stop .................... 331
Engine number .................................. 364
Engine oil Adding ........................................... 296
Checking the oil level ..................... 295
Display message ............................ 242
Lubricant additives ........................369
Notes about oil grades ................... 368
Viscosity ........................................ 369
ESP ®
(Electronic Stability
Program) Activating/deactivating ...................67
Display message ............................ 230
Important safety information ...........66
Trailer stabilization ........................... 68
Warning lamp ................................. 257
Exhaust check ................................... 168
Exhaust tail pipe (cleaning
instructions) ...................................... 303
Exterior lighting see Lights
Exterior mirrors
Adjusting ....................................... 108
Dipping (automatic) .......................109
Folding in/out (automatically) .......109
Folding in/out (electrically) ...........108
Folding in when locking (on-board
computer) ...................................... 226
Out of position ............................... 109
Setting ........................................... 1088IndexBA 164.8 USA, CA Edition B 2011; 1; 2, en-USd2sboikeVersion: 3.0.3.52010-04-21T15:08:44+02:00 - Seite 8
Page 16 of 376

Emergency Tensioning Devices ........ 57
Fastening ......................................... 55
Important safety guidelines .............53
Releasing ......................................... 57
Safety guidelines ............................. 37
Switching belt adjustment on/off
(on-board computer) ......................225
Warning lamp ................................. 255
Warning lamp (function) ................... 57
Seat heating
Indicator lamp (Malfunction) ..........105
Seats
Adjusting (electrically) .....................96
Adjusting (second and third rows) . 100
Adjusting the 4-way lumbar
support .......................................... 104
Adjusting the head restraint ............97
Cleaning the cover .........................304
Correct driver's seat position ........... 94
Important safety instructions ...........95
Multicontour seat .......................... 103
Storing settings (memory
function) ........................................ 110
Switching seat heating on/off .......104
Switching the seat ventilation on/
off .................................................. 105
Seat ventilation
Indicator lamp (Malfunction) ..........105
Securing hooks .................................. 268
Sensors (cleaning instructions) ....... 303
Service indicator see Service interval display
Service interval display .................... 298
Displaying a service message (on-
board computer) ............................ 299
Service products
AdBlue ®
special additives ..............367
Brake fluid ..................................... 369
Coolant (engine) ............................ 369
Engine oil ....................................... 368
Filling capacity ............................... 365
Fuel ................................................ 366
Important safety notes ..................364
Notes ............................................. 364
Refrigerant (air-conditioning
system) .......................................... 369
Washer fluid ................................... 370Settings
Factory (on-board computer) .........221
On-board computer .......................221
Shift ranges ....................................... 155
Side impact air bag ............................. 41
Side marker lamp (display
message) ............................................ 239
Side windows Convenience closing feature ............87
Convenience opening feature ..........86
Hinged side windows .......................86
Important safety information ...........84
Opening/closing .............................. 85
Resetting ......................................... 87
Troubleshooting ............................... 88
Sliding sunroof
Important safety information ...........88
Troubleshooting ............................... 90
see Tilt/sliding sunroof
SmartKey
Changing the battery .......................76
Changing the programming .............75
Checking the battery .......................76
Important safety notes ....................72
Malfunction ...................................... 77
Snow chains ...................................... 172
Socket ................................................ 281
Dashboard ..................................... 281
Front-passenger footwell ...............281
Luggage compartment ...................281
Rear compartment .........................281
SOS
see mbrace
Spare wheel
Notes/data .................................... 359
Storage location ............................ 311
see Emergency spare wheel
Speedometer
Additional speedometer (on-
board computer) ............................ 218
Segments ...................................... 215
Setting the unit (on-board
computer) ...................................... 221
SRS (Supplemental Restraint
System) Display message ............................ 231
Introduction ..................................... 3614IndexBA 164.8 USA, CA Edition B 2011; 1; 2, en-USd2sboikeVersion: 3.0.3.52010-04-21T15:08:44+02:00 - Seite 14
Page 76 of 376
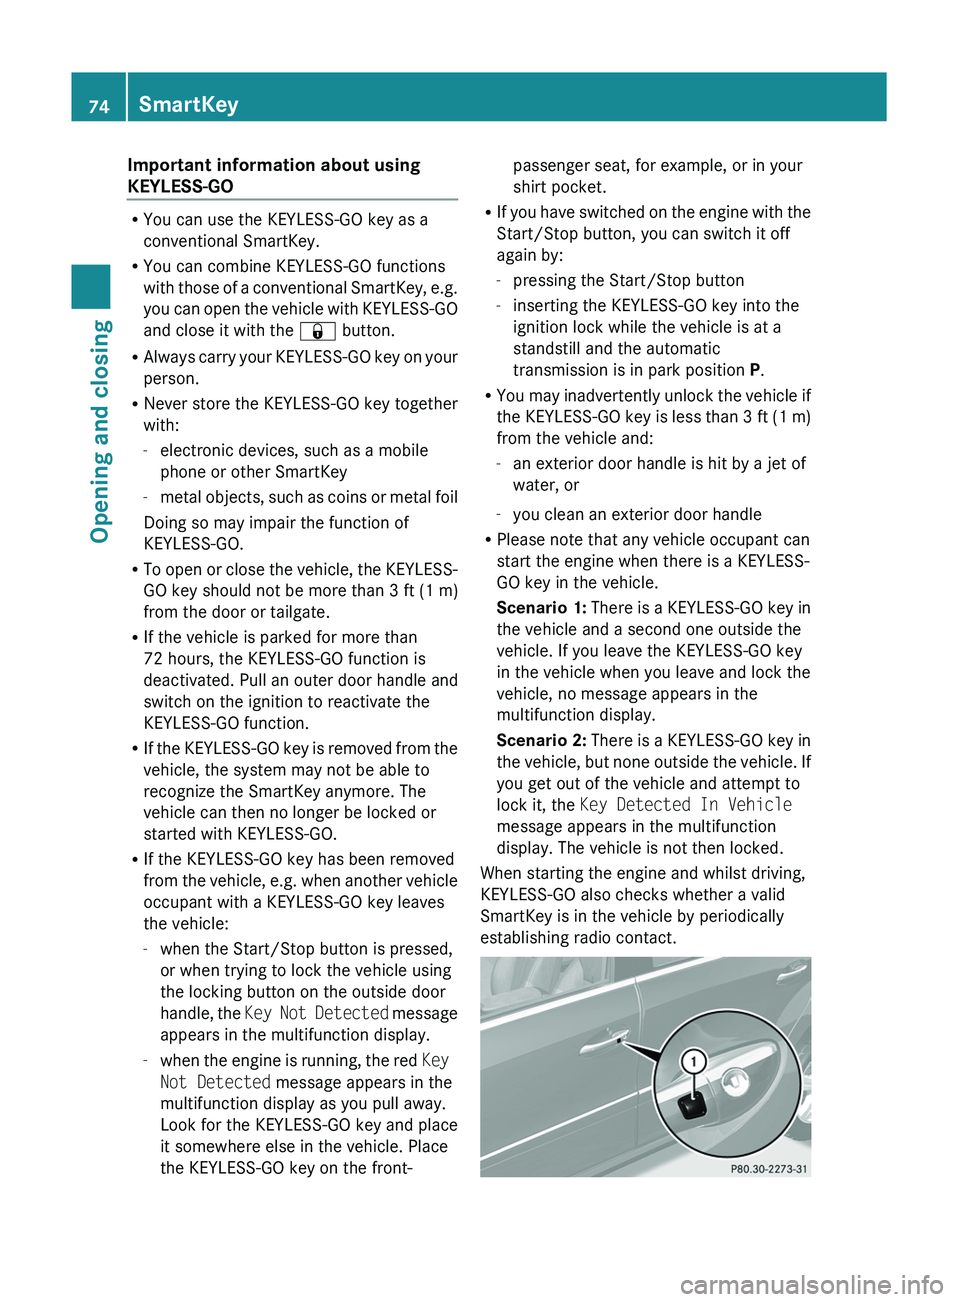
Important information about using
KEYLESS-GO
R You can use the KEYLESS-GO key as a
conventional SmartKey.
R You can combine KEYLESS-GO functions
with those of a conventional SmartKey, e.g.
you can open the vehicle with KEYLESS-GO
and close it with the & button.
R Always carry your KEYLESS-GO key on your
person.
R Never store the KEYLESS-GO key together
with:
- electronic devices, such as a mobile
phone or other SmartKey
- metal objects, such as coins or metal foil
Doing so may impair the function of
KEYLESS-GO.
R To open or close the vehicle, the KEYLESS-
GO key should not be more than 3 ft (1 m)
from the door or tailgate.
R If the vehicle is parked for more than
72 hours, the KEYLESS-GO function is
deactivated. Pull an outer door handle and
switch on the ignition to reactivate the
KEYLESS-GO function.
R If the KEYLESS-GO key is removed from the
vehicle, the system may not be able to
recognize the SmartKey anymore. The
vehicle can then no longer be locked or
started with KEYLESS-GO.
R If the KEYLESS-GO key has been removed
from the vehicle, e.g. when another vehicle
occupant with a KEYLESS-GO key leaves
the vehicle:
- when the Start/Stop button is pressed,
or when trying to lock the vehicle using
the locking button on the outside door
handle, the Key Not Detected message
appears in the multifunction display.
- when the engine is running, the red Key
Not Detected message appears in the
multifunction display as you pull away.
Look for the KEYLESS-GO key and place
it somewhere else in the vehicle. Place
the KEYLESS-GO key on the front-
passenger seat, for example, or in your
shirt pocket.
R If you have switched on the engine with the
Start/Stop button, you can switch it off
again by:
- pressing the Start/Stop button
- inserting the KEYLESS-GO key into the
ignition lock while the vehicle is at a
standstill and the automatic
transmission is in park position P.
R You may inadvertently unlock the vehicle if
the KEYLESS-GO key is less than 3 ft (1 m)
from the vehicle and:
- an exterior door handle is hit by a jet of
water, or
- you clean an exterior door handle
R Please note that any vehicle occupant can
start the engine when there is a KEYLESS-
GO key in the vehicle.
Scenario 1: There is a KEYLESS-GO key in
the vehicle and a second one outside the
vehicle. If you leave the KEYLESS-GO key
in the vehicle when you leave and lock the
vehicle, no message appears in the
multifunction display.
Scenario 2: There is a KEYLESS-GO key in
the vehicle, but none outside the vehicle. If
you get out of the vehicle and attempt to
lock it, the Key Detected In Vehicle
message appears in the multifunction
display. The vehicle is not then locked.
When starting the engine and whilst driving,
KEYLESS-GO also checks whether a valid
SmartKey is in the vehicle by periodically
establishing radio contact.74SmartKeyOpening and closing
BA 164.8 USA, CA Edition B 2011; 1; 2, en-USd2sboikeVersion: 3.0.3.52010-04-21T15:08:44+02:00 - Seite 74
Page 170 of 376
Coasting with the engine switched offGWarning!
There is no power assistance for the steering
and the brake when the engine is not running.
Steering and braking requires significantly
more effort and you could lose control of the
vehicle and cause an accident as a result.
Do not turn off the engine while the vehicle is
in motion.
Exhaust check
GWarning
Inhalation of exhaust gas is hazardous to your
health. All exhaust gas contains carbon
monoxide (CO), and inhaling it can cause
unconsciousness and possible death.
Do not run the engine in confined areas (such
as a garage) which are not properly ventilated.
If you think that exhaust gas fumes are
entering the vehicle while driving, have the
cause determined and corrected
immediately. If you must drive under these
conditions, drive only with at least one
window fully open at all times.
Certain engine systems are designed to keep
the level of poisonous components in exhaust
fumes within legal limits.
These systems only work optimally if they are
maintained exactly in accordance with the
manufacturer's specifications. For this
reason, all work on the engine must be carried
out by qualified and authorized Mercedes-
Benz technicians.
The engine settings must not be changed in
any circumstances. Furthermore, all specific
service work must be carried out at regular
intervals and in accordance with the
Mercedes-Benz service requirements. Details
can be found in the Service Booklet.
Engine oil
! Vehicles with a diesel particle filter:
If the vehicle is mostly driven for short
distances, it is possible that malfunctions
may occur during the automatic cleaning of
the diesel particle filter. This can lead to
engine damage. Therefore, if you frequently
drive short distances, make sure to drive
on highways or country roads for 20
minutes at least every 500 km.
Brakes
Important safety notes
GWarning!
On slippery road surfaces, never downshift in
order to obtain braking action. This could
result in drive wheel slip and reduced vehicle
control. Your vehicle’s ABS will not prevent
this type of control loss.
Do not engage the transfer case in position
LOW when driving on ice or packed snow. At
speeds below 18 mph (30 km/h) vehicle
steering is adversely affected by the Off-road
ABS.
GWarning
Make sure that you do not endanger other
road users when you apply the brakes.
Downhill gradients
! On long and steep gradients, you must
reduce the cargo on the brakes by shifting
to a lower gear in good time. This allows
you to take advantage of engine braking
and helps you to avoid overheating the
brakes and wearing them out excessively.
When you take advantage of engine
braking, a drive wheel may not turn for
some time, e.g. on a slippery road surface.
This could cause damage to the drive train.
Such damage is not covered by the
Mercedes-Benz warranty.
168Driving tipsDriving and parking
BA 164.8 USA, CA Edition B 2011; 1; 2, en-USd2sboikeVersion: 3.0.3.52010-04-21T15:08:44+02:00 - Seite 168
Page 177 of 376
Check list before driving off-roadXEngine oil level: check the engine oil and
top it up if necessary.
The oil supply can only be guaranteed on
steep slopes if the engine oil level is
sufficient.
! If the engine oil warning lamp lights up
while the vehicle is in motion, stop the
vehicle in a safe place as soon as possible.
Check the engine oil level. The engine oil
warning lamp warning must not be ignored.
Continuing the journey while the symbol is
displayed could lead to engine damage.
XWheel-changing tool kit: check that the
jack is working and make sure you have the
wheelbrace, a robust tow cable and a
folding spade in the vehicle.XWheels and tires: check the tire tread
depth and tire pressure. A table with the
recommended tire pressures can be found
on the B-pillar on the driver's side of your
vehicle.XCheck for damage and remove any foreign
objects, e.g. small stones, from the
wheels/tires.XReplace any missing valve caps.XReplace dented or damaged wheels.XWheels: dented or deformed wheels could
result in a loss of tire pressure and damage
the tire bead. Therefore, check the wheels
before driving off-road and replace them if
necessary.
Check list after driving off-road
GWarning
If you feel a sudden significant vibration or
ride disturbance, or you suspect that possible
damage to your vehicle has occurred, you
should turn on the hazard warning flashers,
carefully slow down, and drive with caution to
an area which is a safe distance from the road.
Inspect the tires and the vehicle underbody
for possible damage. If the vehicle appears
unsafe, have the vehicle towed to the nearest
authorized Mercedes-Benz Center or tire
dealer for repairs.
Driving over rough terrain places greater
demands on your vehicle than driving on
normal roads. After driving off-road, check
the vehicle. This allows you to detect damage
promptly and reduce the risk of an accident
to yourself and other road users.XDeactivate the off-road drive program
( Y page 204) or the LOW RANGE off-road
gear ( Y page 157).XDeactivate DSR ( Y page 203).XSet the differential lock setting to AUTO on
the selector wheel ( Y page 207).XLower the vehicle level again to a level
suitable to the road conditions, e.g. to the
highway/high-speed level.XClean the headlamps and rear lights and
check for damage.XClean the front and rear license plates.XClean the wheels/tires, wheel arch and the
underbody with a water jet. Check for
damage and remove any foreign objects.XAfter the trip, examine without fail the
entire undercarriage, wheels, tires, brakes,
bodywork structure, steering, chassis and
exhaust system for damage.XCheck whether twigs or other parts of
plants have become trapped. These
increase the risk of fire and can damage
fuel pipes, brake hoses or the rubber
bellows of the axle joints and propeller
shafts.XAfter driving for extended periods across
sand, mud, gravel, water or in similarly dirty
conditions, have the brake discs, wheels,
brake pads/linings and axle joints checked
and cleaned.XIf you detect strong vibrations after off-road
travel, check for foreign objects in the
wheels and drive train and remove them ifDriving tips175Driving and parkingBA 164.8 USA, CA Edition B 2011; 1; 2, en-USd2sboikeVersion: 3.0.3.52010-04-21T15:08:44+02:00 - Seite 175Z
Page 244 of 376
Display messagesPossible causes/consequences and M Solutions?The engine fan is faulty.XAt coolant temperatures under 248 ‡(120 †), drive to the next
qualified specialist workshop.XAvoid subjecting the engine to heavy loads, e.g. driving in
mountainous terrain, and stop-start driving.#The battery is not being charged.
Possible causes are:
R a faulty alternator
R a torn poly-V-belt
R a malfunction in the electronicsXPull over and stop the vehicle safely and switch off the engine,
paying attention to road and traffic conditions.XOpen the hood.XCheck whether the poly-V-belt is torn.
If the poly-V-belt is torn:
! Do not continue driving. The engine could otherwise overheat.
XConsult a qualified specialist workshop.
If the poly-V-belt is OK:
XVisit a qualified specialist workshop.#
Battery/
Alternator Stop
VehicleThe battery is faulty.XPull over and stop the vehicle safely as soon as possible, paying
attention to road and traffic conditions. Do not continue driving
under any circumstances.XEngage the parking brake.XConsult a qualified specialist workshop.4
Check engine oil
level at next
refuelingThe oil level is too low.XCheck the oil level ( Y page 295).XIf necessary, add the engine oil ( Y page 296).XHave the engine checked for leaks if engine oil has to be added
more often than usual.
Information on approved engine oils can be obtained from any qualified specialist workshop
or on the Internet at http://www.mbusa.com (USA only).
! The oil level is too low. Avoid long journeys with too little engine oil. There is a risk of
engine damage.
The display messages and the corresponding symbol that indicate that the oil level is too
low must not be ignored.
242Display messagesOn-board computer and displays
BA 164.8 USA, CA Edition B 2011; 1; 2, en-USd2sboikeVersion: 3.0.3.52010-04-21T15:08:44+02:00 - Seite 242
Page 297 of 376
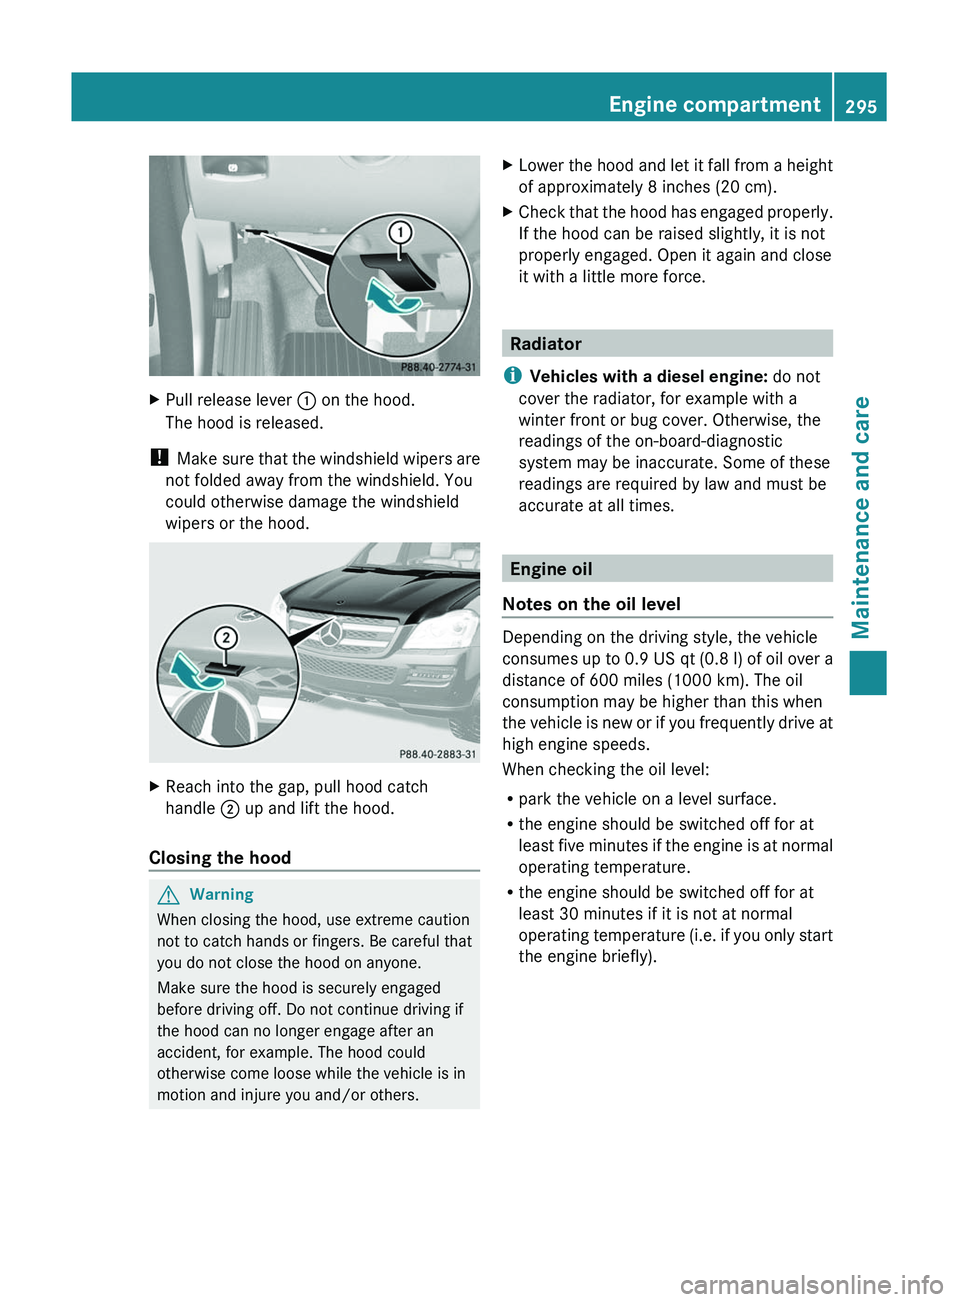
XPull release lever : on the hood.
The hood is released.
! Make sure that the windshield wipers are
not folded away from the windshield. You
could otherwise damage the windshield
wipers or the hood.
XReach into the gap, pull hood catch
handle ; up and lift the hood.
Closing the hood
GWarning
When closing the hood, use extreme caution
not to catch hands or fingers. Be careful that
you do not close the hood on anyone.
Make sure the hood is securely engaged
before driving off. Do not continue driving if
the hood can no longer engage after an
accident, for example. The hood could
otherwise come loose while the vehicle is in
motion and injure you and/or others.
XLower the hood and let it fall from a height
of approximately 8 inches (20 cm).XCheck that the hood has engaged properly.
If the hood can be raised slightly, it is not
properly engaged. Open it again and close
it with a little more force.
Radiator
i Vehicles with a diesel engine: do not
cover the radiator, for example with a
winter front or bug cover. Otherwise, the
readings of the on-board-diagnostic
system may be inaccurate. Some of these
readings are required by law and must be
accurate at all times.
Engine oil
Notes on the oil level
Depending on the driving style, the vehicle
consumes up to 0.9 US qt (0.8 l) of oil over a
distance of 600 miles (1000 km). The oil
consumption may be higher than this when
the vehicle is new or if you frequently drive at
high engine speeds.
When checking the oil level:
R park the vehicle on a level surface.
R the engine should be switched off for at
least five minutes if the engine is at normal
operating temperature.
R the engine should be switched off for at
least 30 minutes if it is not at normal
operating temperature (i.e. if you only start
the engine briefly).
Engine compartment295Maintenance and careBA 164.8 USA, CA Edition B 2011; 1; 2, en-USd2sboikeVersion: 3.0.3.52010-04-21T15:08:44+02:00 - Seite 295Z
Page 298 of 376
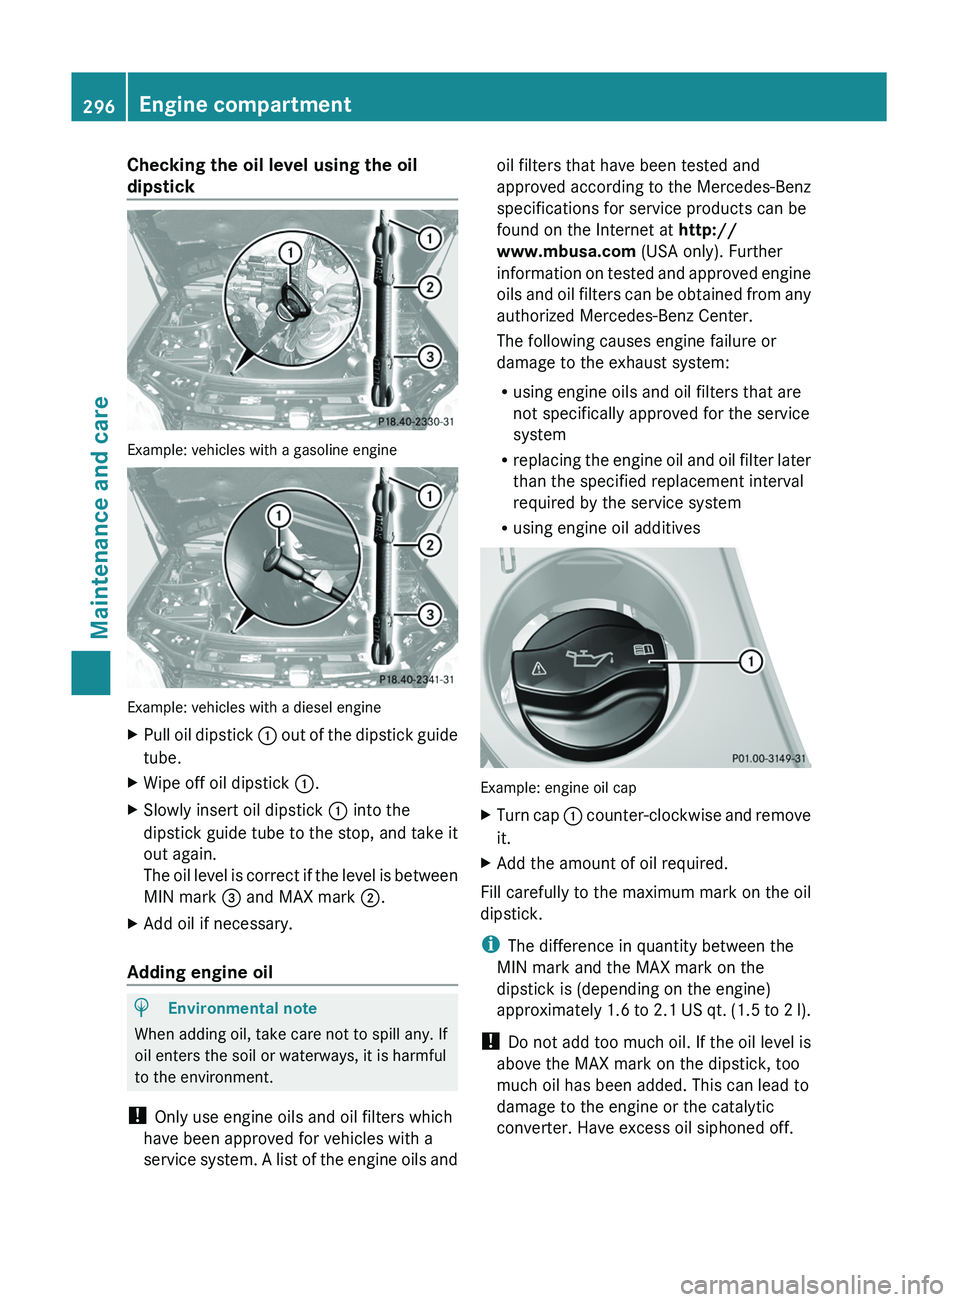
Checking the oil level using the oil
dipstick
Example: vehicles with a gasoline engine
Example: vehicles with a diesel engine
XPull oil dipstick : out of the dipstick guide
tube.
XWipe off oil dipstick :.XSlowly insert oil dipstick : into the
dipstick guide tube to the stop, and take it
out again.
The oil level is correct if the level is between
MIN mark = and MAX mark ;.
XAdd oil if necessary.
Adding engine oil
HEnvironmental note
When adding oil, take care not to spill any. If
oil enters the soil or waterways, it is harmful
to the environment.
! Only use engine oils and oil filters which
have been approved for vehicles with a
service system. A list of the engine oils and
oil filters that have been tested and
approved according to the Mercedes-Benz
specifications for service products can be
found on the Internet at http://
www.mbusa.com (USA only). Further
information on tested and approved engine
oils and oil filters can be obtained from any
authorized Mercedes-Benz Center.
The following causes engine failure or
damage to the exhaust system:
Rusing engine oils and oil filters that are
not specifically approved for the service
system
Rreplacing the engine oil and oil filter later
than the specified replacement interval
required by the service system
Rusing engine oil additives
Example: engine oil cap
XTurn cap : counter-clockwise and remove
it.
XAdd the amount of oil required.
Fill carefully to the maximum mark on the oil
dipstick.
iThe difference in quantity between the
MIN mark and the MAX mark on the
dipstick is (depending on the engine)
approximately 1.6 to 2.1 US qt. (1.5 to 2 l).
! Do not add too much oil. If the oil level is
above the MAX mark on the dipstick, too
much oil has been added. This can lead to
damage to the engine or the catalytic
converter. Have excess oil siphoned off.
296Engine compartmentMaintenance and care
BA 164.8 USA, CA Edition B 2011; 1; 2, en-USd2sboikeVersion: 3.0.3.52010-04-21T15:08:44+02:00 - Seite 296