2011 MERCEDES-BENZ GL tire pressure
[x] Cancel search: tire pressurePage 6 of 376

1, 2, 3 ...
115 V socket ...................................... 282
12 V socket ........................................ 281
4ETS (Electronic Traction System) Function/notes ................................ 67
4MATIC (permanent four-wheel
drive) .................................................. 202
A
ABS (Anti-lock Braking System) Display message ............................ 235
Function/notes ................................ 65
Warning lamp ................................. 256
Accident (notes) ................................ 309
Active light function (display
message) ............................................ 240
Active service system see Service interval display
Adaptive Damping System (ADS) ..... 194
AdBlue ®
Adding ........................................... 163
Display message ............................ 243
Additional functions (on-board
computer) .......................................... 226
ADS (Adaptive Damping System) ..... 194
Air bags Display message ............................ 232
Front air bag (driver, front
passenger) ....................................... 39
Important safety information ...........38
Knee bag .......................................... 40
PASSENGER AIRBAG OFF
indicator lamp (only Canada) ...........48
PASSENGER AIRBAG OFF
indicator lamp (only USA) ................42
Safety guidelines ............................. 37
Side impact air bag ..........................41
Window curtain air bag ....................42
Air-conditioning system
see Climate control
Air dehumidification
Activating/deactivating with
cooling ........................................... 137
Air distribution
Setting ........................................... 140
Air filter (display message) .............. 243
Airflow
Setting ........................................... 140
Air nozzles
see Air vents .................................. 143
Air pressure
see Tire pressure
Air-recirculation mode
Activating/deactivating .................141
Air vents ............................................. 143
Important safety information .........142
Rear ............................................... 143
Setting the center air vents ...........143
Setting the side air vents ...............143
Alarm system
see ATA
Ambient lighting (on-board
computer) .......................................... 223
Anti-lock Braking System see ABS
Anti-Theft Alarm system
see ATA
Anti-theft system
ATA (Anti-Theft Alarm system) .........69
Approach/departure angle .............. 177
Ashtray ............................................... 279
ATA (Anti-Theft Alarm system) Activating/deactivating ...................69
Function ........................................... 69
Switching off the alarm ....................69
Audio menu (on-board computer) .... 219
AUTO lights see Light sensor
Automatic car wash .......................... 300
Automatic transmission DIRECT SELECT lever .....................152
Display message ............................ 250
Driving tips .................................... 155
Emergency running mode ..............157
Kickdown ....................................... 155
Malfunction .................................... 157
Pulling away ................................... 149
Starting .......................................... 148
Trailer towing ................................. 1554IndexBA 164.8 USA, CA Edition B 2011; 1; 2, en-USd2sboikeVersion: 3.0.3.52010-04-21T15:08:44+02:00 - Seite 4
Page 12 of 376

I
Immobilizer .......................................... 69
Indicator and warning lamps ABS ................................................ 256
Brakes ........................................... 254
DISTRONIC .................................... 260
Engine diagnostics .........................259
ESP ®
.............................................. 257
Fuel tank ........................................ 259
Reserve fuel ................................... 259
Seat belt ........................................ 255
SRS ................................................ 258
Tire pressure monitor ....................260
Insect protection on the radiator .... 295
Instrument cluster Overview .......................................... 28
Selecting the language (on-board
computer) ...................................... 222
Submenu (on-board computer) ......221
Warning and indicator lamps ...........29
Instrument cluster lighting ................ 28
Instrument lighting see Instrument cluster lighting
Interior lighting
Automatic control ..........................119
Delayed switch-off (on-board
computer) ...................................... 224
Emergency lighting ........................119
Manual control ............................... 119
Reading lamp ................................. 118
Setting ambient lighting (on-board
computer) ...................................... 223
ISOFIX (LATCH-type child seat
securing system) ................................. 62
J
Jack Storage location ............................ 310
Using ............................................. 318
Jump-starting ..................................... 325
K
Key Convenience closing feature ............87
Convenience opening feature ..........86
Display message ............................ 252
Starting the engine ........................148
KEYLESS-GO
Button ............................................ 147
Convenience closing feature ............87
Locking ............................................ 73
Starting the engine ........................149
Unlocking ......................................... 73
Key positions
KEYLESS-GO .................................. 147
SmartKey ....................................... 147
Kickdown ........................................... 155
Knee bag .............................................. 40
L
Lane-change assistant see Blind Spot Assist
Language (on-board computer) ........ 222
Level control ...................................... 189
Level control (display message) ...... 244
License plate lamp (display
message) ............................................ 239
Light Setting ambient lighting (on-board
computer) ...................................... 223
Lights
Activating/deactivating the
interior lighting delayed switch-off
(on-board computer) ......................224
Active light function .......................118
Automatic headlamp mode ............115
Daytime running lamps ..................115
Driving abroad ............................... 114
Fog lamps ...................................... 116
Hazard warning lamps ...................117
High-beam headlamps ...................117
Light switch ................................... 114
Low-beam headlamps ....................115
Rear fog lamp ................................ 116
Switching the daytime driving
lights on/off (on-board computer) . 223
Switching the exterior lighting
delayed switch-off on/off (on-
board computer) ............................ 223
Switching the surround lighting
on/off (on-board computer) ..........223
Light sensor (display message) ....... 240
10IndexBA 164.8 USA, CA Edition B 2011; 1; 2, en-USd2sboikeVersion: 3.0.3.52010-04-21T15:08:44+02:00 - Seite 10
Page 18 of 376
Outside temperature ...................... 214
Setting ........................................... 139
Theft deterrent locking system
Immobilizer ...................................... 69
Tilt/sliding sunroof
Opening/closing .............................. 89
Resetting ......................................... 90
Time (on-board computer) ................ 222
TIREFIT kit .......................................... 312
Tire pressure Calling up (on-board computer) .....341
Checking manually ........................339
Display message ............................ 248
Maximum ....................................... 344
Notes ............................................. 337
Not reached (TIREFIT) ....................315
Pressure loss warning ....................339
Reached (TIREFIT) ..........................315
Recommended ............................... 336
Tire pressure monitor
Warning lamp ................................. 260
Tire pressure monitoring system
Function/notes ............................. 341
Restarting ...................................... 343
Tires
Aspect ratio (definition) .................356
Average weight of the vehicle
occupants (definition) ....................354
Bar (definition) ............................... 354
Characteristics .............................. 354
Checking ........................................ 335
Cleaning ......................................... 336
Definition of terms .........................354
Direction of rotation ......................348
Distribution of the vehicle
occupants (definition) ....................357
DOT, Tire Identification Number
(TIN) ............................................... 353
DOT (Department of
Transportation) (definition) ............354
Flat tire .......................................... 311
GAWR (Gross Axle Weight Rating)
(definition) ..................................... 355
GTW (Gross Trailer Weight)
(definition) ..................................... 355
Guidelines to be observed .............335
GVW (Gross Vehicle Weight)
(definition) ..................................... 355GVWR (Gross Vehicle Weight
Rating) (definition) .........................355
Increased vehicle weight due to
optional equipment (definition) ......354
Kilopascal (kPa) (definition) ...........355
Labeling (overview) ........................350
Load bearing index (definition) ......356
Load index ..................................... 353
Load index (definition) ...................355
Maximum loaded vehicle weight
(definition) ..................................... 355
Maximum load on a tire
(definition) ..................................... 356
Maximum permissible tire
pressure (definition) ....................... 355
Maximum tire load .........................348
Maximum tire loading (definition) ..355
Optional equipment weight
(definition) ..................................... 356
PSI (pounds per square inch)
(definition) ..................................... 356
Replacing ....................................... 350
Service life ..................................... 335
Sidewall (definition) .......................356
Speed index (definition) .................355
Storing ........................................... 336
Structure and characteristics
(definition) ..................................... 354
Temperature .................................. 349
TIN (Tire Identification Number)
(definition) ..................................... 356
Tire bead (definition) ......................356
Tire pressure (definition) ................356
Tire pressures (recommended) ......354
Tire quality classes ........................348
Tire size (data) ............................... 357
Tire size designation, load-bearing
capacity, speed index ....................351
Tire tread ....................................... 335
Tire tread (definition) .....................356
Total load limit (definition) .............357
Traction ......................................... 349
Traction (definition) .......................356
Tread wear ..................................... 349
TWR (permissible trailer drawbar
noseweight) (definition) .................356
Uniform tire quality classification
standards (definition) .....................35416IndexBA 164.8 USA, CA Edition B 2011; 1; 2, en-USd2sboikeVersion: 3.0.3.52010-04-21T15:08:44+02:00 - Seite 16
Page 31 of 376
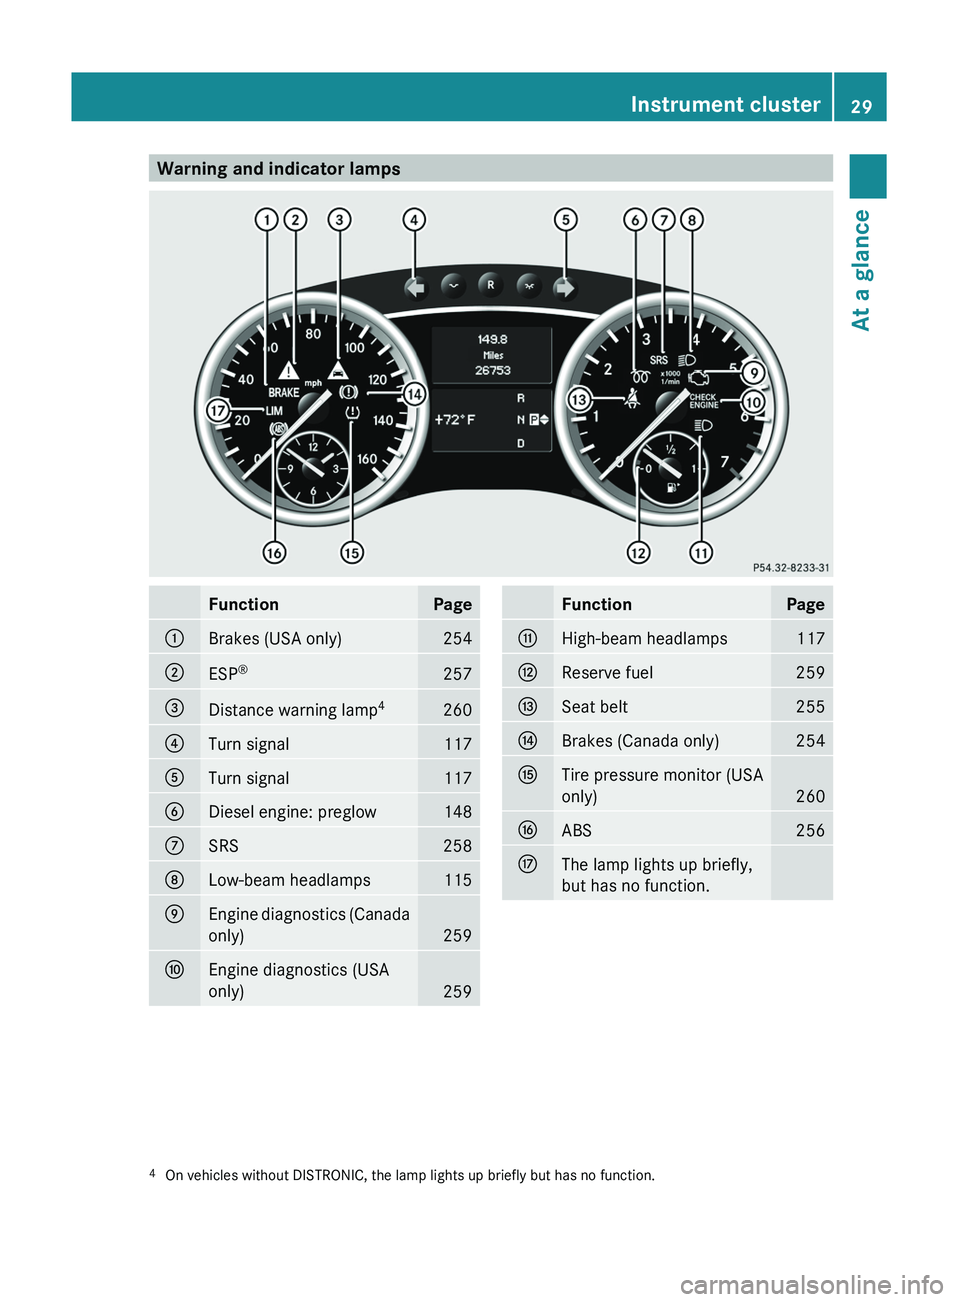
Warning and indicator lampsFunctionPage:Brakes (USA only)254;ESP®257=Distance warning lamp 4260?Turn signal117ATurn signal117BDiesel engine: preglow148CSRS258DLow-beam headlamps115EEngine diagnostics (Canada
only)
259
FEngine diagnostics (USA
only)
259
FunctionPageGHigh-beam headlamps117HReserve fuel259ISeat belt255JBrakes (Canada only)254KTire pressure monitor (USA
only)
260
LABS256MThe lamp lights up briefly,
but has no function.4 On vehicles without DISTRONIC, the lamp lights up briefly but has no function.Instrument cluster29At a glanceBA 164.8 USA, CA Edition B 2011; 1; 2, en-USd2sboikeVersion: 3.0.3.52010-04-21T15:08:44+02:00 - Seite 29
Page 91 of 376
hot, and the child could be burned by these
parts.GWarning!
Do not carry heavy or hard objects in the
passenger or cargo compartment unless they
are firmly secured in place.
Unsecured or improperly positioned cargo
increases a child’s risk of injury in the event
of
R strong braking maneuvers
R sudden changes of direction
R an accident
GWarning!
When opening or closing the tilt/sliding
sunroof, make sure there is no danger of
anyone being harmed by the opening/closing
procedure.
The tilt/sliding sunroof is equipped with the
automatic operation and anti-entrapment
features. If the movement of the tilt/sliding
sunroof is blocked during the closing
procedure, the tilt/sliding sunroof will stop
and open slightly.
The tilt/sliding sunroof operates differently
when the sunroof switch is pressed and held.
See the "Closing when the tilt/sliding sunroof
is blocked" section for details.
The opening/closing procedure of the tilt/
sliding sunroof can be immediately halted by
releasing the sunroof switch or, if the sunroof
switch was moved past the resistance point
and released, by moving the sunroof switch in
any direction.
GWarning!
The tilt/sliding sunroof is made out of glass.
In the event of an accident, the glass may
shatter. This may result in an opening in the
roof.
In a vehicle rollover, occupants not wearing
their seat belts or not wearing them properly
may be thrown out of the opening. Such an
opening also presents a potential for injury for
occupants wearing their seat belts properly as
entire body parts or portions of them may
protrude from the passenger compartment.
! Only open the sliding sunroof if it is free
of snow and ice. Otherwise, malfunctions
may occur.
Do not allow anything to protrude from the
sliding sunroof. Otherwise, the seals could
be damaged.
! If the sliding sunroof cannot be opened or
closed due to a malfunction, contact a
qualified specialist workshop, e.g. an
authorized Mercedes-Benz Center.
! Do not forget that the weather can
change abruptly. Make certain that the
sliding sunroof is closed when you leave the
vehicle. The vehicle electronics can be
damaged if water enters the vehicle
interior.
i Resonance noises can occur in addition
to the usual airflow noises when the sliding
sunroof is open. They are caused by minor
pressure fluctuations in the vehicle interior.
Change the position of the sliding sunroof
or open a side window slightly to reduce or
eliminate these noises.
Operating the sliding sunroof
Opening and closing
i You can still operate the tilt/sliding
sunroof even if you switch off the engine or
remove the SmartKey. This function
remains active for five minutes or until one
of the front doors is opened.
Sliding sunroof89Opening and closingBA 164.8 USA, CA Edition B 2011; 1; 2, en-USd2sboikeVersion: 3.0.3.52010-04-21T15:08:44+02:00 - Seite 89Z
Page 162 of 376
the label on the gasoline pump, ask the gas
station staff.
You can find further information under
"Fuel" ( Y page 366), by consulting an
authorized Mercedes-Benz Center or
visiting http://www.mbusa.com (USA
only).
Diesel
Fuel grade
! Only refuel with ULTRA-LOW SULFUR
DIESEL FUEL (ULSD, 15 ppm SULFUR
MAXIMUM). Using other diesel fuels could
result in increased wear and damage to the
engine and/or exhaust system.
Never refuel with marine diesel or heating
oil.
Do not mix these fuels with diesel fuels and
do not use any special additives, as this
may result in damage.
! When refueling using a fuel can, use a
filter or use a clean cloth as a filter.
Otherwise, particles from the fuel can may
block the fuel lines and/or the diesel
injection system.
i Refuel only with ULTRA-LOW SULFUR
DIESEL FUEL (ULSD, 15 ppm SULFUR
MAXIMUM).
Usually you will find information about the
fuel grade on the pump. If you cannot find
the label on the gasoline pump, ask the gas
station staff.
You can find further information under
"Fuel" ( Y page 366), by consulting an
authorized Mercedes-Benz Center or by
visiting http://www.mbusa.com (USA
only).
Low outside temperatures
! Do not use gasoline to refuel vehicles with
a diesel engine. Never mix diesel with
gasoline or kerosene, as this may result in
damage to the engine or fuel system.
Diesel fuel with improved cold flow properties
is available during the winter months. Further
information on fuel properties can be
obtained from oil companies, e.g. at filling
stations.
Refueling
Fuel filler flap
The fuel filler flap is unlocked or locked
automatically when you open or close the
vehicle with the SmartKey or using KEYLESS-
GO.
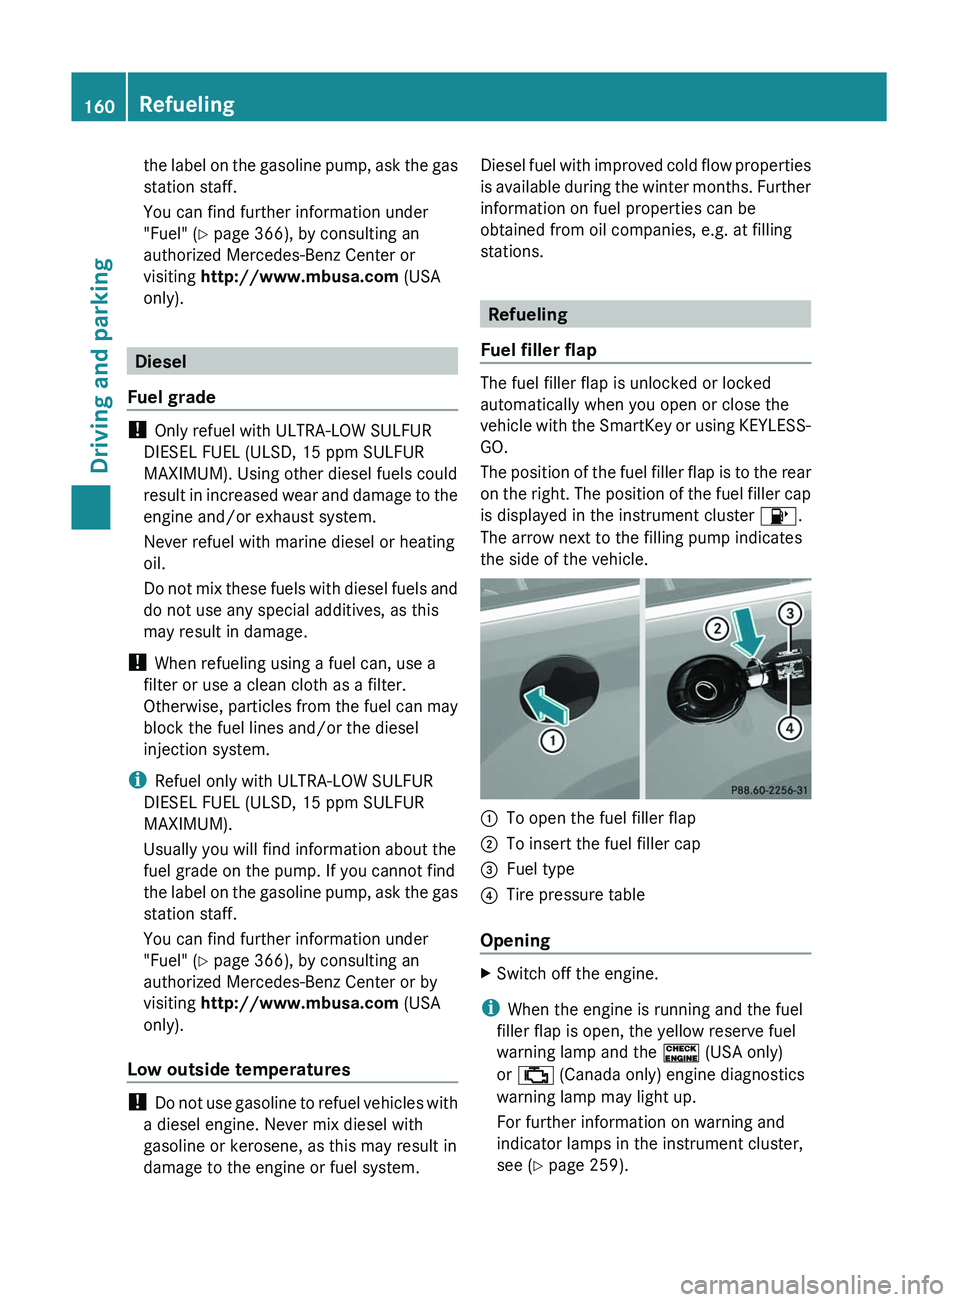
The position of the fuel filler flap is to the rear
on the right. The position of the fuel filler cap
is displayed in the instrument cluster 8.
The arrow next to the filling pump indicates
the side of the vehicle.
:To open the fuel filler flap;To insert the fuel filler cap=Fuel type?Tire pressure table
Opening
XSwitch off the engine.
i When the engine is running and the fuel
filler flap is open, the yellow reserve fuel
warning lamp and the ! (USA only)
or ; (Canada only) engine diagnostics
warning lamp may light up.
For further information on warning and
indicator lamps in the instrument cluster,
see ( Y page 259).
160RefuelingDriving and parking
BA 164.8 USA, CA Edition B 2011; 1; 2, en-USd2sboikeVersion: 3.0.3.52010-04-21T15:08:44+02:00 - Seite 160
Page 169 of 376
Driving tips
General driving tips
Important safety instructions
GWarning!
Please do not forget that your primary
responsibility is to drive the vehicle. A driver’s
attention to the road must always be his/her
primary focus when driving. For your safety
and the safety of others, we recommend that
you pull over to a safe location and stop
before placing or taking a telephone call.
If you choose to use the telephone 25
while
driving, please use the hands-free device and
only use the telephone when road, weather
and traffic conditions permit. Some
jurisdictions prohibit the driver from using a
mobile telephone while driving a vehicle.
Only operate the COMAND 25
(Cockpit
Management and Data System) if road,
weather and traffic conditions permit.
Otherwise, you may not be able to observe
traffic conditions and could endanger yourself
and others.
Bear in mind that at a speed of just 30 mph
(approximately 50 km/h), your vehicle is
covering a distance of 44 feet (approximately
14 m) every second.
Drive sensibly – save fuel
To save fuel, observe the following notes:
XKeep tires at the recommended inflation
pressures.XRemove unnecessary cargo.XRemove the roof carrier when not in use.XRemove the basic carrier bars when not in
use.XMaintain a low engine speed until the
engine is warm.XAvoid frequent acceleration and
deceleration.XHave all maintenance work performed at
the service intervals specified in the
Service Booklet or indicated by the service
interval indicator.
Fuel consumption is also increased by driving
in cold weather, in stop-and-go traffic, on
short trips and in mountainous areas.
Drinking and driving
GWarning
Drinking and driving and/or taking drugs and
driving are very dangerous combinations.
Even a small amount of alcohol or drugs can
affect your reflexes, perceptions and
judgment.
The possibility of a serious or even fatal
accident are greatly increased when you drink
or take drugs and drive.
Do not drink or take drugs and drive or allow
anyone to drive who has been drinking or
taking drugs.
Pedals
GWarning
Make sure absolutely no objects are
obstructing the pedals' range of movement.
Keep the driver's footwell clear of all
obstacles. If there are any floormats or
carpets in the footwell, make sure that the
pedals still have sufficient clearance.
During sudden driving or braking maneuvers,
the objects could get caught between the
pedals. You could then no longer brake or
accelerate. This could lead to accidents and
injury.
25 Observe all legal requirements.Driving tips167Driving and parkingBA 164.8 USA, CA Edition B 2011; 1; 2, en-USd2sboikeVersion: 3.0.3.52010-04-21T15:08:44+02:00 - Seite 167Z
Page 174 of 376

snowflake symbol next to the M+S marking
provide the best-possible grip in wintry road
conditions. Only these tires will allow the ABS
and ESP ®
driving systems to function
optimally in winter, as these tires have been
designed specifically for driving on snow.
Use M+S tires of the same make and tread on
all wheels to maintain safe handling
characteristics.GWarning
M+S tires with a tread depth of less than 1
/ 6
inch (4 mm) must be replaced. They are no
longer suitable for winter operation.
Always observe the maximum permissible
speed specified for the M+S tires you have
installed.
Once you have installed the winter tires:
XCheck the tire pressures ( Y page 339).XRestart the tire pressure monitor
( Y page 341).GWarning
If you use your spare wheel when M+S tires
are fitted on the other wheels, be aware that
the difference in tire characteristics may very
well impair turning stability and that overall
driving stability may be reduced. Adapt your
driving style accordingly.
Have the spare wheel replaced by a regular
road wheel with an M+S tire at the nearest
authorized Mercedes-Benz Center.
Snow chains
For safety reasons, Mercedes-Benz
recommends that you only use snow chains
which have been specially approved for your
vehicle by Mercedes-Benz, or are of a
corresponding standard of quality.
! Vehicles with the Adaptive Damping
System (ADS): do not drive in ADS SPORT
mode if snow chains have been mounted.
The vehicle may otherwise be damaged.
! There is not enough space for snow
chains on some wheel sizes. Observe the
information under "Tires and wheels" in the
"Technical Data" section to avoid damage
to the vehicle or the wheels.
R Only use snow chains when driving on an
area completely covered by snow. Do not
exceed the maximum permissible speed of
30 mph (50 km/h). Remove the snow
chains as soon as possible when you are no
longer driving on snow-covered roads.
R Local regulations may restrict the use of
snow chains. Applicable regulations must
be observed if you wish to mount snow
chains.
R Snow chains must not be mounted on
emergency spare wheels.
If you intend to mount snow chains, please
bear the following points in mind:
R you may not attach snow chains to all
wheel-tire combinations; see the "Tires and
wheels" section in the "Technical data"
chapter.
R mount snow chains only in pairs and only
on the rear wheels. Observe the
manufacturer's installation instructions.
! If snow chains are mounted on the front
wheels, the snow chains could grind
against the bodywork or components of the
chassis. This could result in damage to the
vehicle or the tires.
! Vehicles with steel wheels
If you wish to mount snow chains to steel
wheels, make sure that you remove the
respective wheels' hubcaps first. The
hubcaps may otherwise be damaged.
i You may wish to deactivate
ESP ®
(Y page 66) when pulling away with
snow chains installed. This way you can
allow the wheels to spin in a controlled
manner, achieving an increased driving
force (cutting action).172Driving tipsDriving and parking
BA 164.8 USA, CA Edition B 2011; 1; 2, en-USd2sboikeVersion: 3.0.3.52010-04-21T15:08:44+02:00 - Seite 172