2011 MERCEDES-BENZ G55AMG Front
[x] Cancel search: FrontPage 232 of 288
The vehicle tool kit contains:
R vehicle tool kit with:
- fuse extractor
- Allen key, e.g. to operate the sliding roof
manually in an emergency
- pump lever for vehicle jack
- screwdriver
- lug wrench
R jack
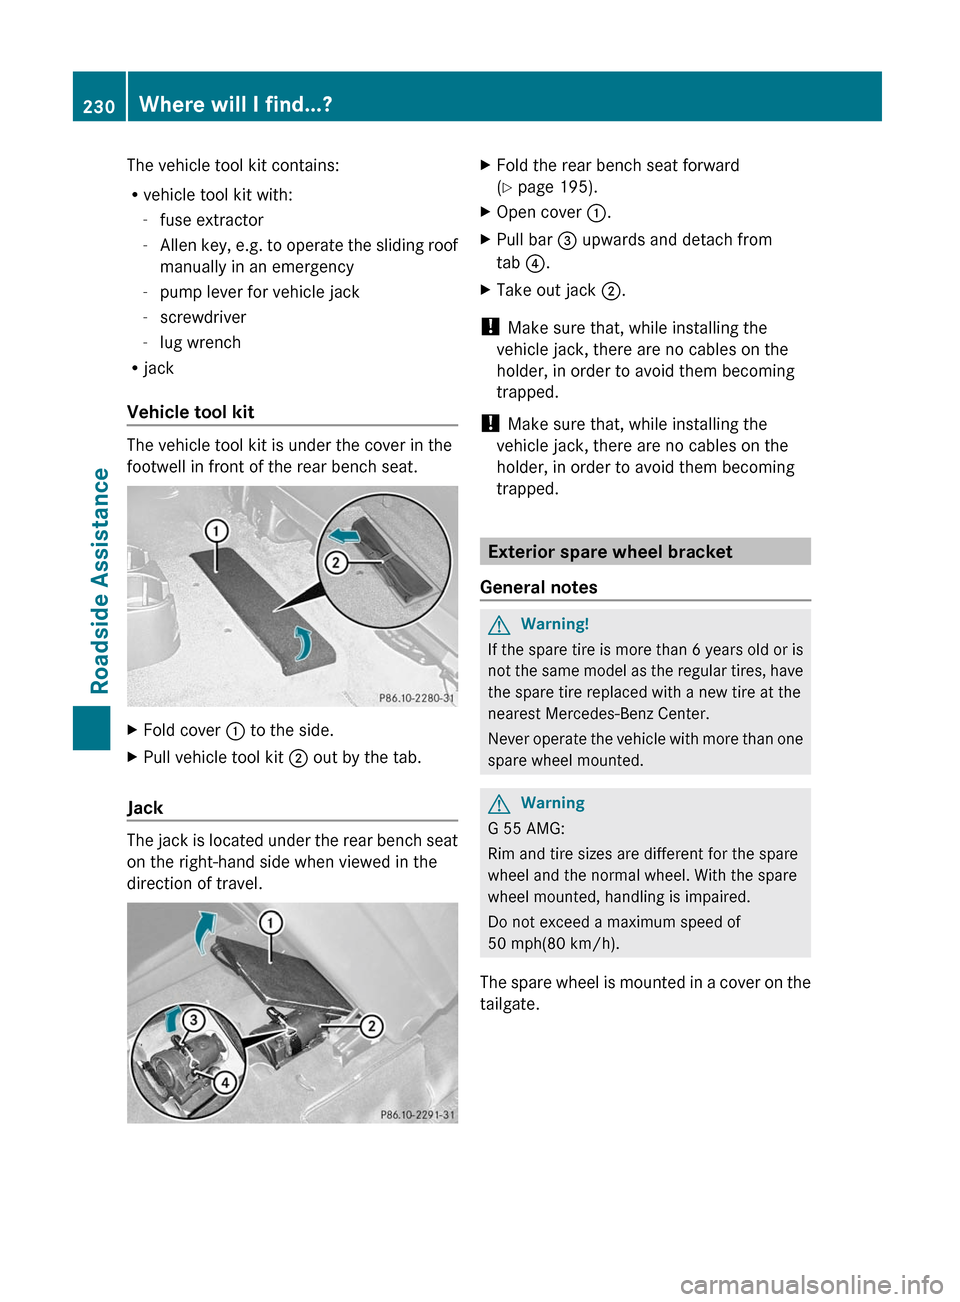
Vehicle tool kit
The vehicle tool kit is under the cover in the
footwell in front of the rear bench seat.
XFold cover : to the side.XPull vehicle tool kit ; out by the tab.
Jack
The jack is located under the rear bench seat
on the right-hand side when viewed in the
direction of travel.
XFold the rear bench seat forward
( Y page 195).XOpen cover :.XPull bar = upwards and detach from
tab ?.XTake out jack ;.
!
Make sure that, while installing the
vehicle jack, there are no cables on the
holder, in order to avoid them becoming
trapped.
! Make sure that, while installing the
vehicle jack, there are no cables on the
holder, in order to avoid them becoming
trapped.
Exterior spare wheel bracket
General notes
GWarning!
If the spare tire is more than 6 years old or is
not the same model as the regular tires, have
the spare tire replaced with a new tire at the
nearest Mercedes-Benz Center.
Never operate the vehicle with more than one
spare wheel mounted.
GWarning
G 55 AMG:
Rim and tire sizes are different for the spare
wheel and the normal wheel. With the spare
wheel mounted, handling is impaired.
Do not exceed a maximum speed of
50 mph(80 km/h).
The spare wheel is mounted in a cover on the
tailgate.
230Where will I find...?Roadside Assistance
Page 234 of 288
Flat tire
Preparing the vehicle
XStop the vehicle as far away as possible
from traffic on solid, non-slippery and level
ground.XSwitch on the hazard warning lamps.XApply the parking brake.XBring the front wheels into the straight-
ahead position.XMove the selector lever to P.XSwitch off the engine.XRemove the SmartKey from the ignition
lock.XAll occupants must get out of the vehicle.
Make sure that they are not endangered as
they do so.XMake sure that no one is near the danger
area while a wheel is being changed.
Anyone who is not directly assisting in the
wheel change should, for example, stand
behind the barrier.XGet out of the vehicle. Pay attention to
traffic conditions when doing so.XClose the driver's door.
Changing a wheel and mounting the
spare wheel
Important safety notes
GWarning!
If the spare tire is more than 6 years old or is
not the same model as the regular tires, have
the spare tire replaced with a new tire at the
nearest Mercedes-Benz Center.
Never operate the vehicle with more than one
spare wheel mounted.
GWarning
G 55 AMG:
Rim and tire sizes are different for the spare
wheel and the normal wheel. With the spare
wheel mounted, handling is impaired.
Do not exceed a maximum speed of
50 mph(80 km/h).
Preparing the vehicleXPrepare the vehicle as described
( Y page 232).GWarning!
You must remove the spare wheel from the
spare wheel carrier before lifting the vehicle.
Otherwise the vehicle could fall off the jack
and injure you or others.
XRemove the vehicle tool kit and the jack
( Y page 229).XRemove the spare wheel from the spare
wheel bracket ( Y page 230).
i
Vehicles without an emergency spare
wheel/spare wheel are not equipped with
a wheel-changing tool kit at the factory. For
more information on which tools are
required to perform a wheel change on your
vehicle e.g. lug wrench or jack, consult an
authorized Mercedes-Benz Center.
Securing the vehicle to prevent it from
rolling away
XSecure the vehicle to prevent it from rolling
away.
On level ground: place chocks or similar
items under the front and rear of the wheel
that is diagonally opposite to the wheel you
wish to change.XOn downhill gradients: place chocks or
similar items behind both wheels of the
other axle.GWarning
Only jack up the vehicle on level ground or on
slight inclines/declines. The vehicle could
otherwise fall off the jack and injure you or
others.
232Flat tireRoadside Assistance
Page 236 of 288

iNever turn pressure release screw = by
more than one to two revolutions.
Otherwise, hydraulic fluid could escape.
! The jack is designed exclusively for
jacking up the vehicle at the jacking points.
Otherwise, your vehicle could be damaged.XPlace the jack on solid ground.XPosition the jack at the front or rear axle
carrier tubes The jack must always stand
vertically, even on slopes.
Make sure that the jack is placed in the
correct position beneath the axle carrier
tube. The front or rear axle must fit into the
support on the jack.XRaise the vehicle by pumping (arrow) until
the tire is a maximum of 1.2 inches (3 cm)
above the ground.
Removing a wheel
XUnscrew the wheel bolts.
! Do not place wheel bolts in sand or on a
dirty surface. The bolt and wheel hub
threads could otherwise be damaged when
you screw them in.
XRemove the wheel.
Mounting a new wheel
GWarning!
Always replace wheel bolts that are damaged
or rusted.
Never apply oil or grease to wheel bolts.
Damaged wheel hub threads should be
repaired immediately. Do not continue to
drive under these circumstances! Contact an
authorized Mercedes-Benz Center or call
Roadside Assistance.
Incorrect wheel bolts or improperly tightened
wheel bolts can cause the wheel to come off.
This could cause an accident. Make sure to
use the correct wheel bolts.GWarning
Only use genuine Mercedes-Benz wheel bolts.
Other wheel bolts may come loose.
Do not tighten the wheel bolts when the
vehicle is raised. Otherwise, the vehicle could
fall off the jack.
XClean the wheel and wheel hub contact
surfaces.
! To prevent damage to the paintwork, hold
the wheel securely against the wheel hub
while screwing in the first wheel bolt.
XPlace the wheel on the wheel hub and push
it on.XTighten the wheel bolts until they are
finger-tight.
Lowering the vehicle
XOpen the pressure release screw on the
jack using the pump lever ( Y page 233) by
approximately one turn.XLower the vehicle until it is once again
standing firmly on the ground.XPlace the jack to one side.234Flat tireRoadside Assistance
Page 238 of 288
GWarning
Failure to follow these instructions can result
in severe injury or death.
Never lean over batteries while connecting.
You might get injured.
Battery fluid contains sulfuric acid. Do not
allow this fluid to come in contact with eyes,
skin or clothing. In case it does, immediately
flush affected area with water and seek
medical help if necessary.
A battery will also produce hydrogen gas,
which is flammable and explosive. Keep
flames or sparks away from battery, avoid
improper connection of jumper cables,
smoking etc.
GWarning
Do not place any metal objects on the battery
as this could result in a short circuit.
Use leak-proof batteries only to avoid the risk
of acid burns in the event of an accident.
Take care that you do not become statically
charged, e.g. by wearing synthetic clothing or
rubbing against textiles. For this reason, you
also should not pull or push the battery over
carpets or other synthetic materials.
Never touch the battery first. First, touch the
outside body of the vehicle in order to release
any possible electrostatic charges.
Do not rub the battery with rags or cloths. The
battery could explode if touched due to
electrostatic charge or due to spark
formation.
! Switch off the engine and remove the
SmartKey before disconnecting the
terminal clamps from the battery. You may
otherwise destroy electronic components,
such as the alternator.
! Like other batteries, the vehicle battery
may discharge over time if you do not use
the vehicle. In this case, have the battery
disconnected at a qualified specialist
workshop, e.g. an authorized Mercedes-
Benz Center. You can also charge the
battery with a charger recommended by
Mercedes-Benz. Contact an authorized
Mercedes-Benz Center for further
information.
The battery, breather hose and cover of the
positive terminal clamp must be installed
securely during operation.
i Remove the SmartKey if you park the
vehicle and do not require any electrical
consumers. The vehicle will then use very
little energy, thus conserving battery
power.
Mercedes-Benz recommends that you do not
carry out work on batteries yourself, e.g.
removing, charging or replacing. Always have
this work performed at a qualified specialist
workshop, e.g. an authorized Mercedes-Benz
Center.
i If the power supply has been interrupted,
e.g. if the battery has been reconnected,
you must carry out the following tasks:
R reset the head restraints on the front
seats ( Y page 80).
Charging the battery
GWarning
Never charge a battery while still installed in
the vehicle unless the accessory battery
charge unit approved by Mercedes-Benz is
being used. Gases may escape during
charging and cause explosions that may
result in paint damage, corrosion or personal
injury.
An accessory battery charge unit specially
adapted for Mercedes-Benz vehicles and
tested and approved by Mercedes-Benz is
available. It permits the charging of the
battery in its installed position. Contact an
authorized Mercedes-Benz Center for
information and availability.
Charge the battery in accordance with the
separate instructions for the accessory
battery charger.
236BatteryRoadside Assistance
Page 242 of 288
Towing and tow-starting
Important safety notes
GWarning
If circumstances require towing the vehicle
with all wheels on the ground, always tow with
a tow bar if:
R the engine will not run
R there is a malfunction in the brake system
R there is a malfunction in the power supply
or the vehicle's electrical system
This is necessary to adequately control the
towed vehicle.
Prior to towing the vehicle with all wheels on
the ground, make sure the SmartKey is in
starter switch position 2.
If the SmartKey is left in starter switch
position 0 for an extended period of time, it
can no longer be turned in the switch. In this
case, the steering is locked. To unlock,
remove SmartKey from starter switch and
reinsert.
It is better to have the vehicle transported
than to have it towed.
! You may only tow the vehicle a maximum
distance of 30 miles (50 km). A towing
speed of 30 mph (50 km/h) must not be
exceeded.
For towing distances over 30 miles
(50 km), the vehicle must loaded onto a
transporter.
! Only secure the tow cable or tow bar to
the towing eyes. You could otherwise
damage the vehicle.
! Do not tow with sling-type equipment.
This could damage the vehicle.
! Do not use the towing eyes for recovery
purposes as this could damage the vehicle.
If in doubt, recover the vehicle with a crane.
! When towing, pull away slowly and
smoothly. If the tractive power is too high,
the vehicles could be damaged.
! Your vehicles is equipped with an
automatic transmission. Therefore, you
must not have the vehicle tow-started. The
transmission may otherwise be damaged.
If the transfer case can be shifted into neutral
N , you can tow the vehicle.
If the transfer case cannot be shifted into
neutral N, you can tow the vehicle with one
axle raised. Please bear the following in mind:
R remove the propeller shaft between the
transfer case and the rolling axle.
R turn the key to position 1 in the ignition
lock.
The battery must be connected and charged.
Otherwise, you:
R cannot turn the key in the ignition lock to
position 2
R cannot shift the automatic transmission to
position N
i Deactivate the automatic locking feature
( Y page 165) You could otherwise be
locked out when pushing or towing the
vehicle.
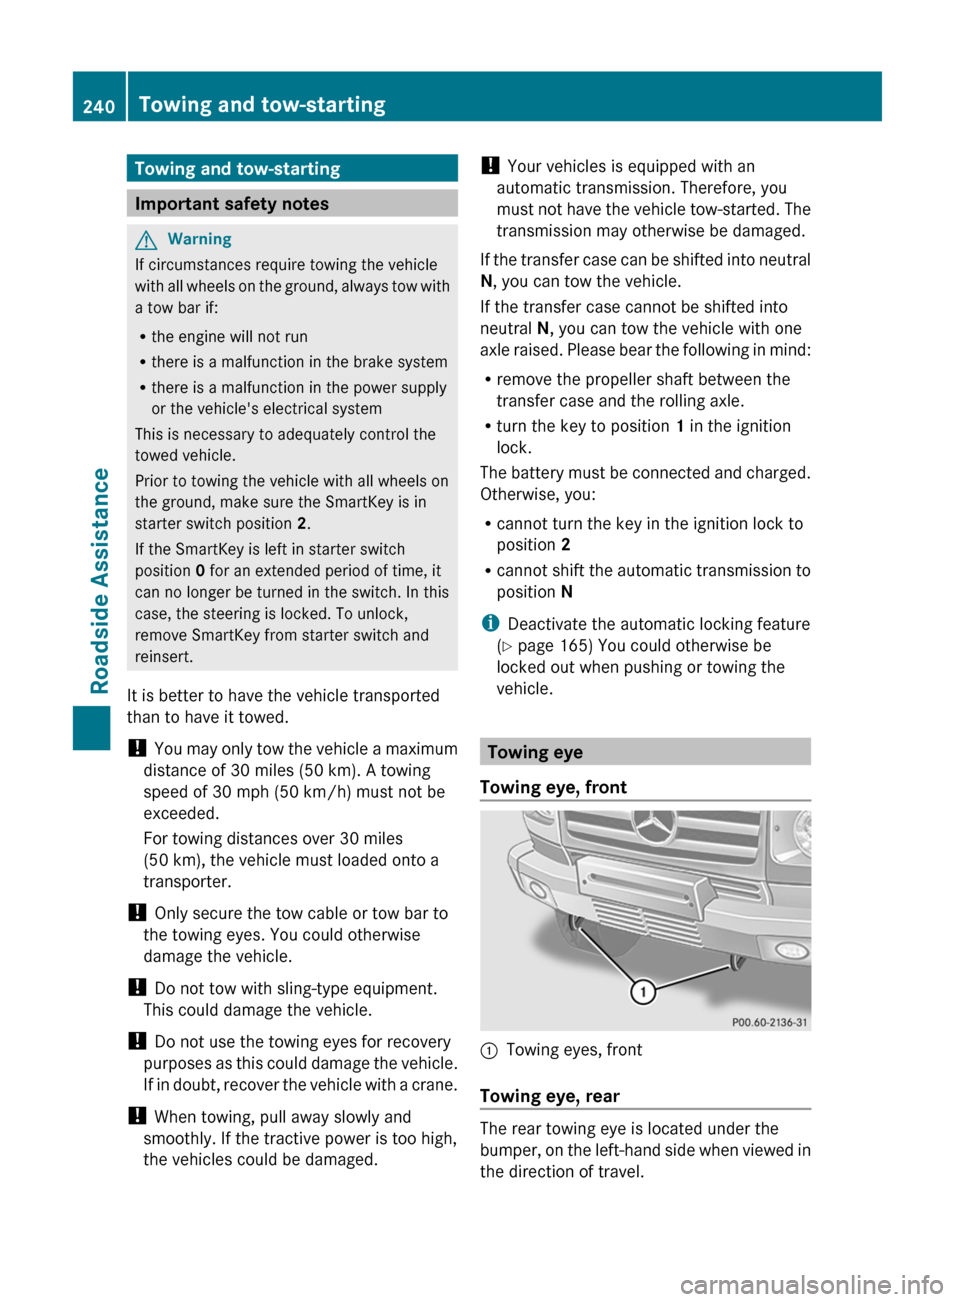
Towing eye
Towing eye, front
:Towing eyes, front
Towing eye, rear
The rear towing eye is located under the
bumper, on the left-hand side when viewed in
the direction of travel.
240Towing and tow-startingRoadside Assistance
Page 244 of 288
Never attempt to recover a vehicle with a
trailer attached.
Pull out the vehicle backwards, if possible,
using the tracks it made when it became
stuck.
Towing in the event of malfunctions
General notes
! If you are removing the propeller shaft,
use M10 nuts as spacers on the M8 bolts
and secure them with M8 nuts.
New self-locking nuts must be used when
the propeller shafts are refitted.
XObserve the safety notes as you do so
( Y page 240).
i
Consult an authorized Mercedes-Benz
Center.
Engine damage, gear damage or
electrical malfunctions
XMove the selector lever to N(Y page 122).XShift the transfer case to neutral position
N (Y page 126).
In the event of damage to the transfer
case
Have the propeller shafts between the axles
and the transfer case removed.
Have the vehicle towed with the front axle
raised.
In the event of damage to the front axle
Have the propeller shaft between the rear
axle and the transfer case removed.
Have the vehicle towed with the front axle
raised.
In the event of damage to the rear axle
Have the propeller shaft between the front
axle and the transfer case removed.
Then, have the vehicle towed with the rear
axle raised and with wheel rollers under the
front axle.
Electrical fuses
Important safety notes
The fuses in your vehicle serve to close down
faulty circuits. If a fuse blows, all the
components on the circuit and their functions
stop operating.
GWarning
Only use fuses approved by Mercedes-Benz
with the specified amperage for the system in
question and do not attempt to repair or
bridge a blown fuse. Using other than
approved fuses or using repaired or bridged
fuses may cause an overload leading to a fire,
and/or cause damage to electrical
components and/or systems. Have the cause
determined and remedied by an authorized
Mercedes-Benz Center.
Blown fuses must be replaced with fuses of
the same rating, which you can recognize by
the color and value. The fuse ratings are listed
in the fuse allocation chart. An authorized
Mercedes-Benz Center will be happy to
advise you.
i If a fuse has blown, visit a breakdown
service or an authorized Mercedes-Benz
Center.
If the newly inserted fuse also blows, have the
cause traced and rectified at a qualified
specialist workshop, e.g. an authorized
Mercedes-Benz Center.
! Only use fuses that have been approved
for Mercedes-Benz vehicles and which
have the correct fuse rating for the system
concerned. Otherwise, components or
systems could be damaged.
242Electrical fusesRoadside Assistance
Page 245 of 288
Before changing a fuseXPark the vehicle and apply the parking
brake.XSwitch off all electrical consumers.XRemove the key from the ignition lock.
The fuses are located in various fuse boxes:
R main fuse box on the driver's side of the
dashboard
R fuse box in the front-passenger footwell
R fuse box in the transmission tunnel
R fuse box in the battery case
The fuse allocation chart and the spare fuses
are in the main fuse box on the dashboard
( Y page 243).
You can find the fuse extractor in the vehicle
tool kit ( Y page 229).
Dashboard fuse box
! Do not use a pointed object such as a
screwdriver to open the cover in the
dashboard. You could damage the
dashboard or the cover.
XOpen the driver's door.XTo open: pull cover : outwards in the
direction of the arrow and remove it.Fuse box in the front-passenger
footwellXTo open : remove screws :.XRemove cover ; in the direction of the
arrow.XRemove screws =.XRemove cover ? in the direction of the
arrow.Electrical fuses243Roadside AssistanceZ
Page 246 of 288
To make it easier to change the fuse, you can
fold fuse box A down slightly:XRemove screws B.XFold fuse box A down.
Fuse box on the transmission tunnel
In order to access the fuse box, you have to
remove the stop clamps on the front-
passenger seat.
GWarning!
Do not drive the vehicle when the front end
stops are not correctly installed. Failure to
reinstall stops as indicated may result in
serious injury in certain frontal crashes.
Adjust the front passenger seat as far as
possible rearward from the dashboard when
the seat is occupied. Comply with information
on occupant safety section.
The stop clamps are at the front of the guide
rails.
Stop clamp of the right guide rail, reverse image
for the left
:Stop clamp;SpacingXTo remove the stop clamps: remove both
stop clamps : of the front-passenger seat
guide rails using a screwdriver.
! When replacing the stop clamps, make
sure you maintain the correct spacing.
XTo open the fuse box: move the front-
passenger seat to its foremost position.XRemove screws :.XRemove cover ; in the direction of the
arrow.
Fuse box in the battery case
The battery case is under a cover in the rear
footwell.
The fuses in the battery case do not usually
need to be replaced. If a fuse has to be
changed, visit a qualified specialist workshop,
e.g. an authorized Mercedes-Benz Center.
! The cover must be seated properly,
otherwise moisture or dirt could impair the
function of the fuses.
244Electrical fusesRoadside Assistance