2011 MERCEDES-BENZ G55AMG Front
[x] Cancel search: FrontPage 186 of 288
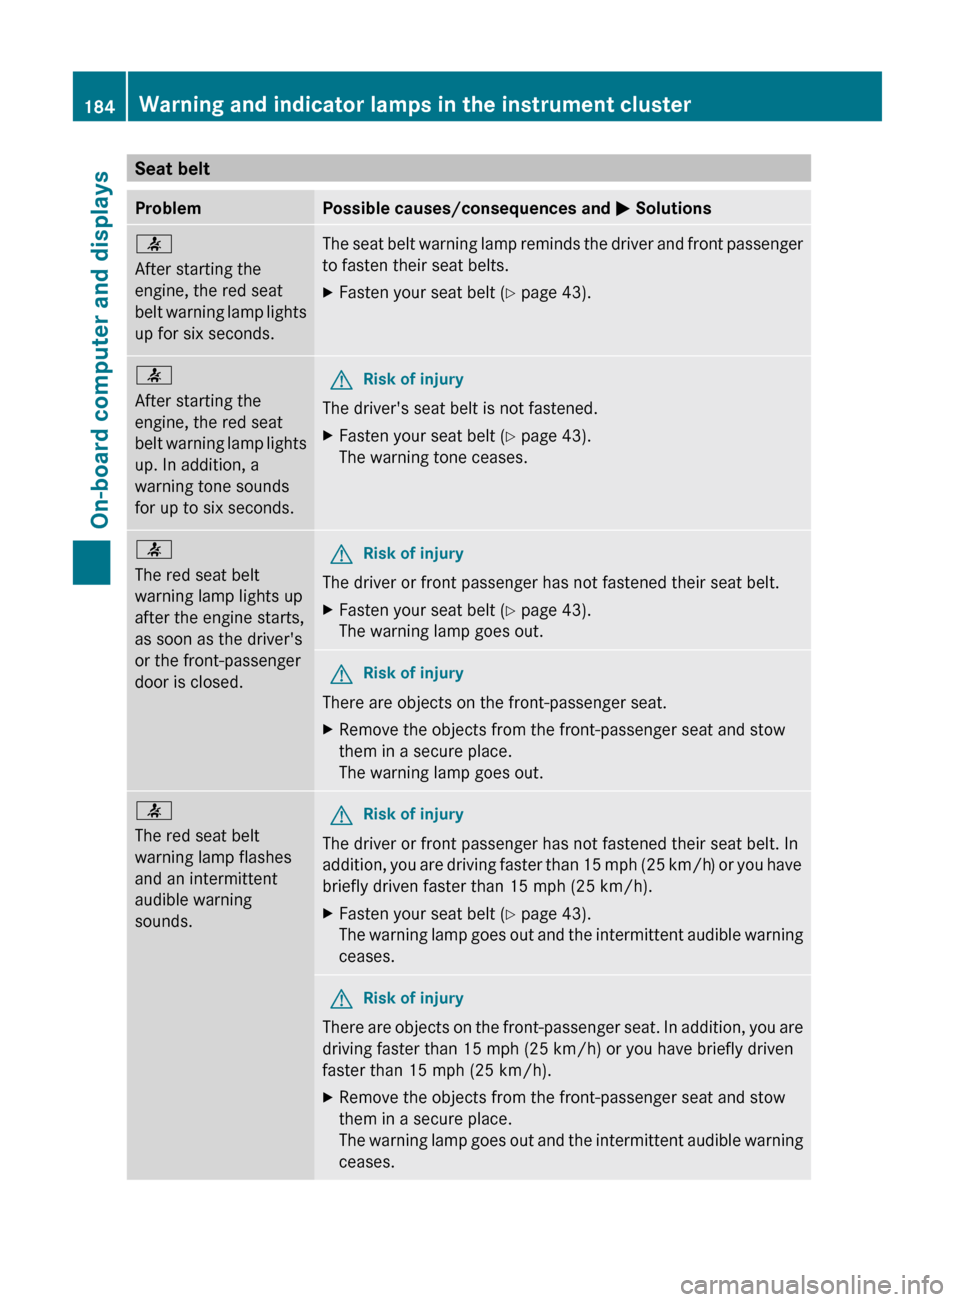
Seat beltProblemPossible causes/consequences and M Solutions7
After starting the
engine, the red seat
belt warning lamp lights
up for six seconds.The seat belt warning lamp reminds the driver and front passenger
to fasten their seat belts.XFasten your seat belt ( Y page 43).7
After starting the
engine, the red seat
belt warning lamp lights
up. In addition, a
warning tone sounds
for up to six seconds.GRisk of injury
The driver's seat belt is not fastened.
XFasten your seat belt ( Y page 43).
The warning tone ceases.7
The red seat belt
warning lamp lights up
after the engine starts,
as soon as the driver's
or the front-passenger
door is closed.GRisk of injury
The driver or front passenger has not fastened their seat belt.
XFasten your seat belt ( Y page 43).
The warning lamp goes out.GRisk of injury
There are objects on the front-passenger seat.
XRemove the objects from the front-passenger seat and stow
them in a secure place.
The warning lamp goes out.7
The red seat belt
warning lamp flashes
and an intermittent
audible warning
sounds.GRisk of injury
The driver or front passenger has not fastened their seat belt. In
addition, you are driving faster than 15 mph (25 km/h) or you have
briefly driven faster than 15 mph (25 km/h).
XFasten your seat belt ( Y page 43).
The warning lamp goes out and the intermittent audible warning
ceases.GRisk of injury
There are objects on the front-passenger seat. In addition, you are
driving faster than 15 mph (25 km/h) or you have briefly driven
faster than 15 mph (25 km/h).
XRemove the objects from the front-passenger seat and stow
them in a secure place.
The warning lamp goes out and the intermittent audible warning
ceases.184Warning and indicator lamps in the instrument clusterOn-board computer and displays
Page 194 of 288
Vehicle equipment
i This manual describes all the standard
and optional equipment of your vehicle
which was available at the time of
purchase. Country-specific differences are
possible. Please note that your vehicle may
not be equipped with all features
described. This also applies to safety-
relevant systems and functions.
Loading guidelines
GWarning!
Always fasten items being carried as securely
as possible using cargo tie-down rings and
fastening materials appropriate for the weight
and size of the load.
In an accident, during hard braking or sudden
maneuvers, loose items will be thrown around
inside the vehicle. This can cause injury to
vehicle occupants unless the items are
securely fastened in the vehicle.
To help avoid personal injury during a collision
or sudden maneuver, exercise care when
transporting cargo. Do not pile luggage or
cargo higher than the seat backrests.
Never drive a vehicle with the tailgate open.
Deadly carbon monoxide (CO) gases may
enter vehicle interior resulting in
unconsciousness and death.
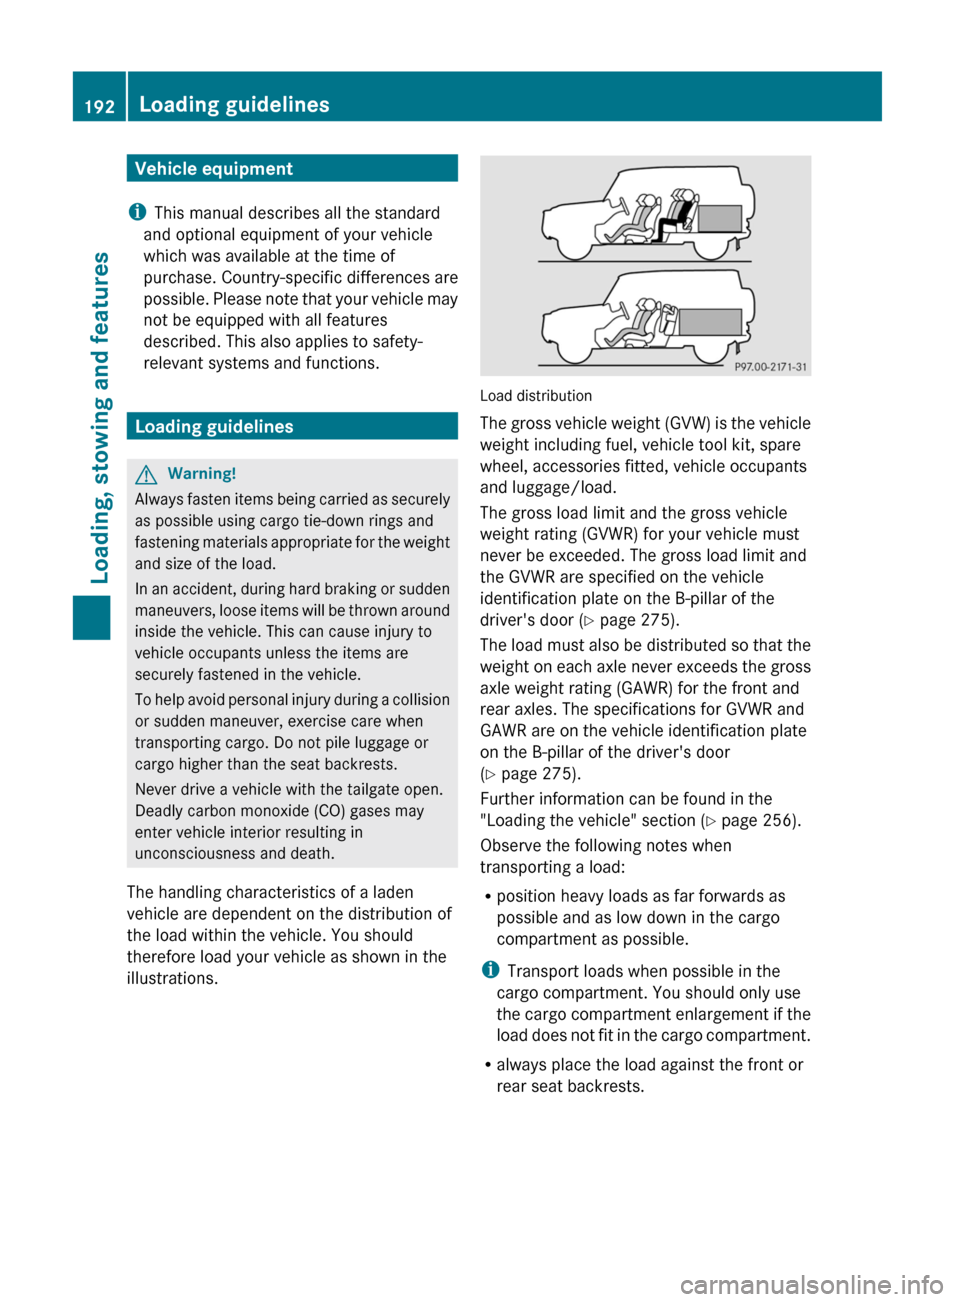
The handling characteristics of a laden
vehicle are dependent on the distribution of
the load within the vehicle. You should
therefore load your vehicle as shown in the
illustrations.
Load distribution
The gross vehicle weight (GVW) is the vehicle
weight including fuel, vehicle tool kit, spare
wheel, accessories fitted, vehicle occupants
and luggage/load.
The gross load limit and the gross vehicle
weight rating (GVWR) for your vehicle must
never be exceeded. The gross load limit and
the GVWR are specified on the vehicle
identification plate on the B-pillar of the
driver's door ( Y page 275).
The load must also be distributed so that the
weight on each axle never exceeds the gross
axle weight rating (GAWR) for the front and
rear axles. The specifications for GVWR and
GAWR are on the vehicle identification plate
on the B-pillar of the driver's door
( Y page 275).
Further information can be found in the
"Loading the vehicle" section ( Y page 256).
Observe the following notes when
transporting a load:
R position heavy loads as far forwards as
possible and as low down in the cargo
compartment as possible.
i Transport loads when possible in the
cargo compartment. You should only use
the cargo compartment enlargement if the
load does not fit in the cargo compartment.
R always place the load against the front or
rear seat backrests.
192Loading guidelinesLoading, stowing and features
Page 195 of 288
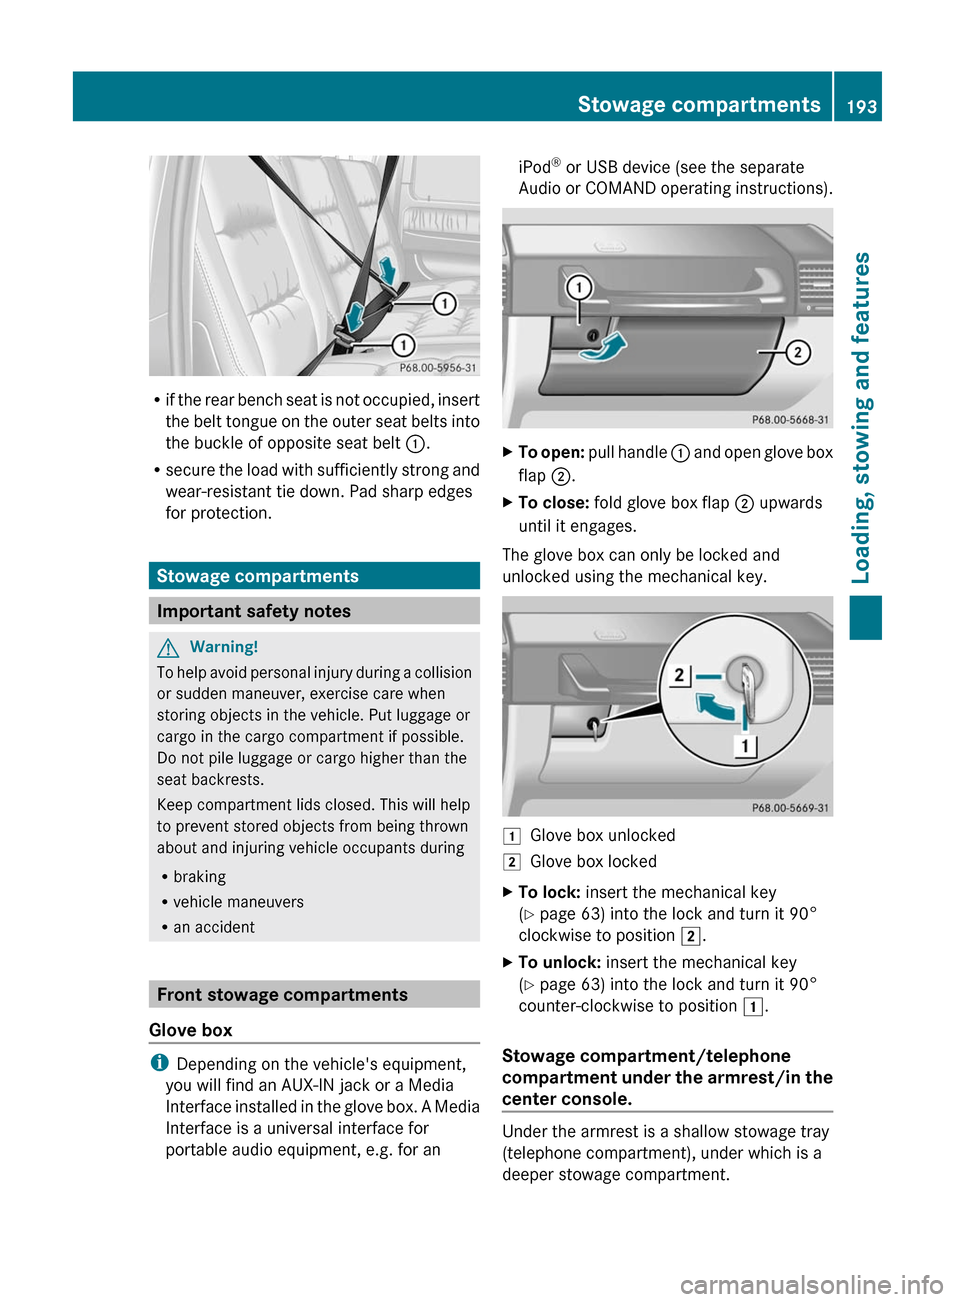
Rif the rear bench seat is not occupied, insert
the belt tongue on the outer seat belts into
the buckle of opposite seat belt :.
R secure the load with sufficiently strong and
wear-resistant tie down. Pad sharp edges
for protection.
Stowage compartments
Important safety notes
GWarning!
To help avoid personal injury during a collision
or sudden maneuver, exercise care when
storing objects in the vehicle. Put luggage or
cargo in the cargo compartment if possible.
Do not pile luggage or cargo higher than the
seat backrests.
Keep compartment lids closed. This will help
to prevent stored objects from being thrown
about and injuring vehicle occupants during
R braking
R vehicle maneuvers
R an accident
Front stowage compartments
Glove box
i Depending on the vehicle's equipment,
you will find an AUX-IN jack or a Media
Interface installed in the glove box. A Media
Interface is a universal interface for
portable audio equipment, e.g. for an
iPod ®
or USB device (see the separate
Audio or COMAND operating instructions).XTo open: pull handle : and open glove box
flap ;.XTo close: fold glove box flap ; upwards
until it engages.
The glove box can only be locked and
unlocked using the mechanical key.
1Glove box unlocked2Glove box lockedXTo lock: insert the mechanical key
( Y page 63) into the lock and turn it 90°
clockwise to position 2.XTo unlock: insert the mechanical key
( Y page 63) into the lock and turn it 90°
counter-clockwise to position 1.
Stowage compartment/telephone
compartment under the armrest/in the
center console.
Under the armrest is a shallow stowage tray
(telephone compartment), under which is a
deeper stowage compartment.
Stowage compartments193Loading, stowing and featuresZ
Page 196 of 288
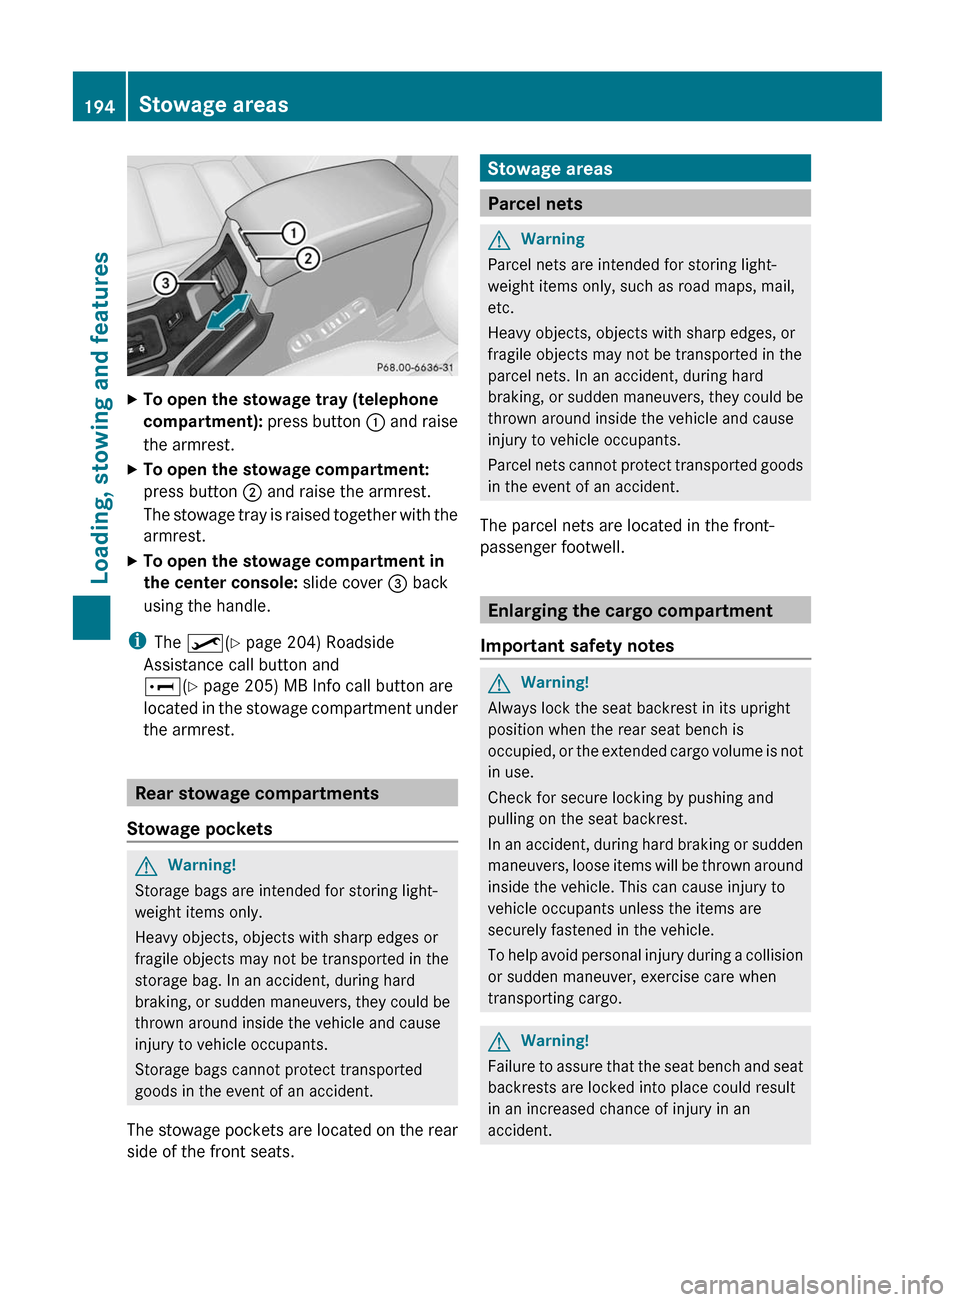
XTo open the stowage tray (telephone
compartment): press button : and raise
the armrest.XTo open the stowage compartment:
press button ; and raise the armrest.
The stowage tray is raised together with the
armrest.XTo open the stowage compartment in
the center console: slide cover = back
using the handle.
i The º (Y page 204) Roadside
Assistance call button and
E (Y page 205) MB Info call button are
located in the stowage compartment under
the armrest.
Rear stowage compartments
Stowage pockets
GWarning!
Storage bags are intended for storing light-
weight items only.
Heavy objects, objects with sharp edges or
fragile objects may not be transported in the
storage bag. In an accident, during hard
braking, or sudden maneuvers, they could be
thrown around inside the vehicle and cause
injury to vehicle occupants.
Storage bags cannot protect transported
goods in the event of an accident.
The stowage pockets are located on the rear
side of the front seats.
Stowage areas
Parcel nets
GWarning
Parcel nets are intended for storing light-
weight items only, such as road maps, mail,
etc.
Heavy objects, objects with sharp edges, or
fragile objects may not be transported in the
parcel nets. In an accident, during hard
braking, or sudden maneuvers, they could be
thrown around inside the vehicle and cause
injury to vehicle occupants.
Parcel nets cannot protect transported goods
in the event of an accident.
The parcel nets are located in the front-
passenger footwell.
Enlarging the cargo compartment
Important safety notes
GWarning!
Always lock the seat backrest in its upright
position when the rear seat bench is
occupied, or the extended cargo volume is not
in use.
Check for secure locking by pushing and
pulling on the seat backrest.
In an accident, during hard braking or sudden
maneuvers, loose items will be thrown around
inside the vehicle. This can cause injury to
vehicle occupants unless the items are
securely fastened in the vehicle.
To help avoid personal injury during a collision
or sudden maneuver, exercise care when
transporting cargo.
GWarning!
Failure to assure that the seat bench and seat
backrests are locked into place could result
in an increased chance of injury in an
accident.
194Stowage areasLoading, stowing and features
Page 197 of 288
Never place hands under seat or near any
moving parts while a seat is being adjusted.
For safety reasons, the rear seat bench must
only be adjusted when the vehicle is
stationary.
Never drive a vehicle with the tailgate open.
Deadly carbon monoxide (CO) gases may
enter vehicle interior resulting in
unconsciousness and death.
! Ensure that you remove all containers
from the cup holder in the rear before
folding the seat backrest and the seat
cushion of the rear bench seat forwards.
The left-hand and right-hand rear seats can
be folded down to increase the cargo
compartment capacity. The following
changes are possible:
R fold the seat backrests forward
R fold the rear bench seat back fully.
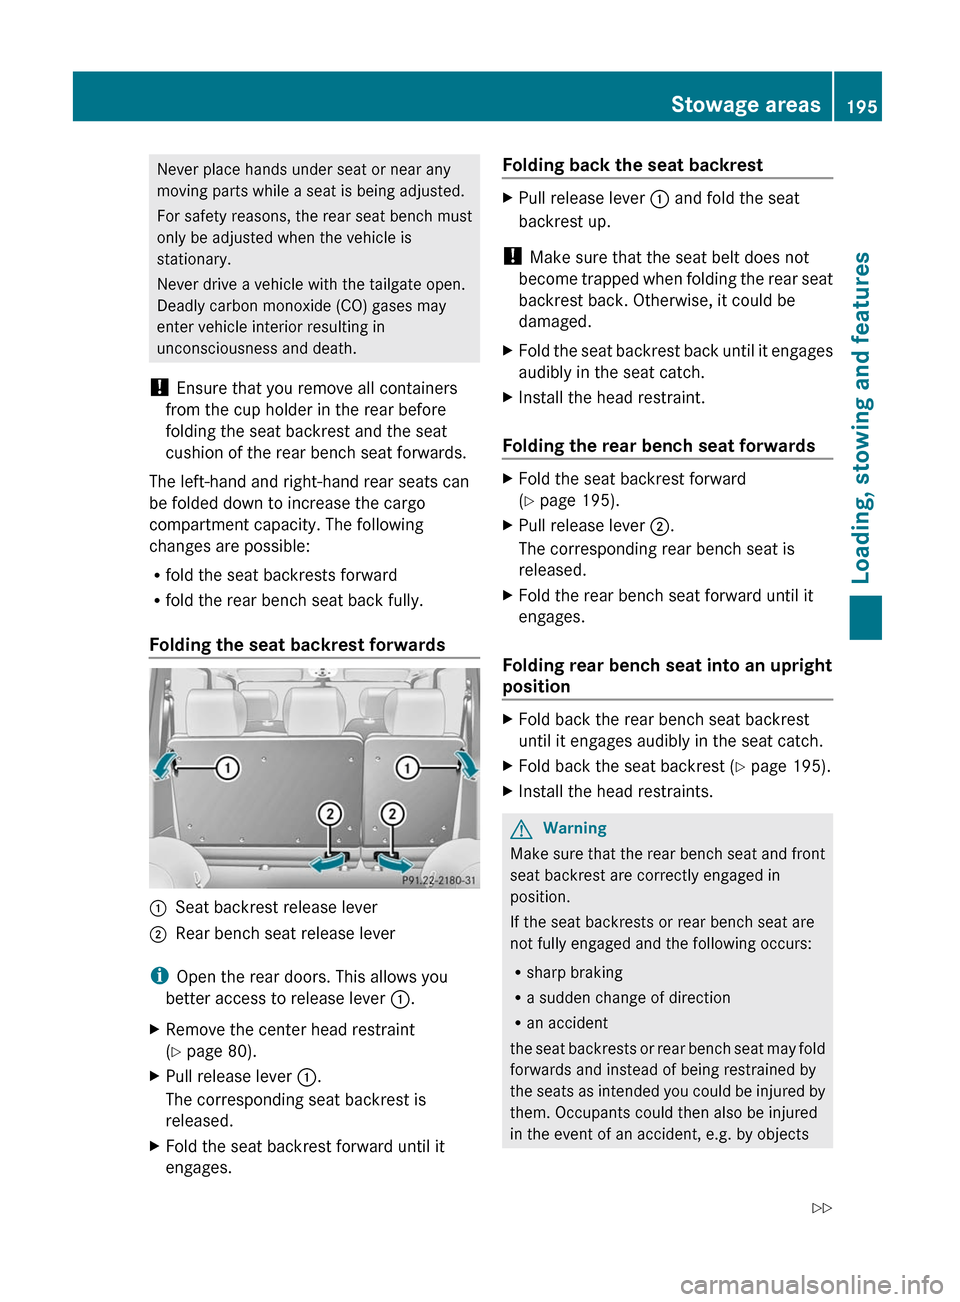
Folding the seat backrest forwards:Seat backrest release lever;Rear bench seat release lever
i Open the rear doors. This allows you
better access to release lever :.
XRemove the center head restraint
( Y page 80).XPull release lever :.
The corresponding seat backrest is
released.XFold the seat backrest forward until it
engages.Folding back the seat backrestXPull release lever : and fold the seat
backrest up.
! Make sure that the seat belt does not
become trapped when folding the rear seat
backrest back. Otherwise, it could be
damaged.
XFold the seat backrest back until it engages
audibly in the seat catch.XInstall the head restraint.
Folding the rear bench seat forwards
XFold the seat backrest forward
( Y page 195).XPull release lever ;.
The corresponding rear bench seat is
released.XFold the rear bench seat forward until it
engages.
Folding rear bench seat into an upright
position
XFold back the rear bench seat backrest
until it engages audibly in the seat catch.XFold back the seat backrest ( Y page 195).XInstall the head restraints.GWarning
Make sure that the rear bench seat and front
seat backrest are correctly engaged in
position.
If the seat backrests or rear bench seat are
not fully engaged and the following occurs:
R sharp braking
R a sudden change of direction
R an accident
the seat backrests or rear bench seat may fold
forwards and instead of being restrained by
the seats as intended you could be injured by
them. Occupants could then also be injured
in the event of an accident, e.g. by objects
Stowage areas195Loading, stowing and featuresZ
Page 199 of 288
X To remove: make sure that cargo
compartment cover ; is rolled up.
XSlide catches : on the left-hand and right-
hand sides of cargo compartment
cover ; towards the center of the vehicle.
XSwing cargo compartment cover ; up and
out.
XTo install: slide catches : towards the
center of the vehicle.
XInsert cargo compartment cover ; into
the recesses in the side trim.
XPress the right and left sides of cargo
compartment cover ; downwards until
cargo compartment cover ; engages.
XSlide catches : in the direction of the side
trim.
Roof carrier
The roof is not suited for transporting loads.
Never use roof rails or other accessories
mounted on the roof.
GWarning!
Do not load items on the roof. It may cause
instability during some maneuvers which
could result in an accident.
Features
Cup holders
Important safety notes
GWarning
In order to help prevent spilling liquids on
vehicle occupants and/or vehicle equipment,
only use containers that fit into the cup
holder. Use lids on open containers and do
not fill containers to a height where the
contents, especially hot liquids, could spill
during braking, vehicle maneuvers, or in an
accident. Liquids spilled on vehicle occupants
may cause serious personal injury. Liquids
spilled on vehicle equipment may cause
damage not covered by the Mercedes-Benz
Limited Warranty.
When not in use, keep the cup holder closed.
An open cup holder may cause injury to you
or others when contacted during braking,
vehicle maneuvers, or in an accident.
Keep in mind that objects placed in the cup
holder may come loose during braking,
vehicle maneuvers, or in an accident and be
thrown around in the vehicle interior. Objects
thrown around in the vehicle interior may
cause an accident and/or serious personal
injury.
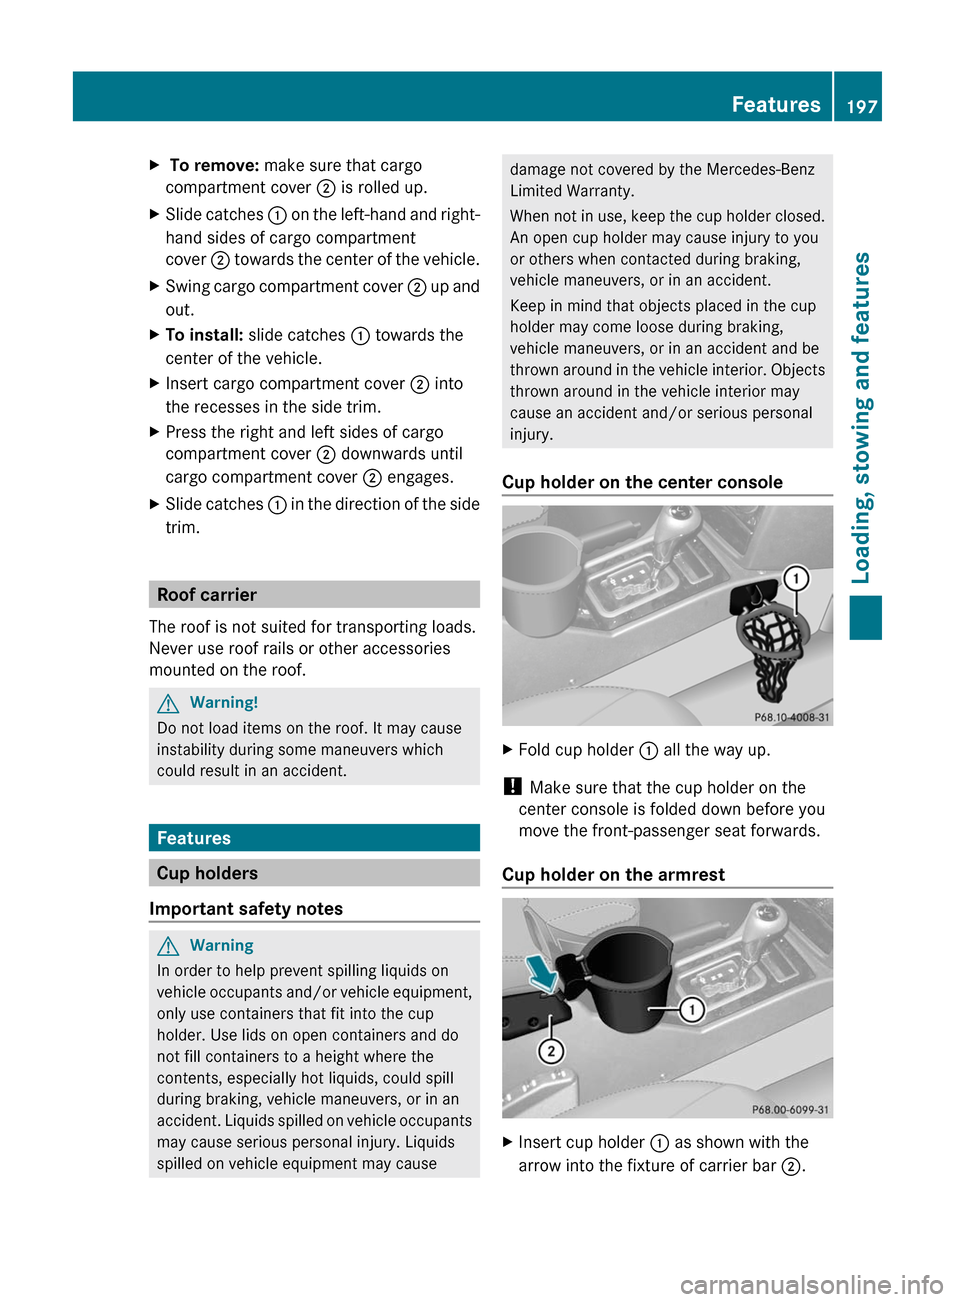
Cup holder on the center console
XFold cup holder : all the way up.
! Make sure that the cup holder on the
center console is folded down before you
move the front-passenger seat forwards.
Cup holder on the armrest
XInsert cup holder : as shown with the
arrow into the fixture of carrier bar ;.
Features197Loading, stowing and featuresZ
Page 202 of 288
frequent insertion and removal or by
sockets that do not fit correctly. A damaged
socket can cause the cigarette lighter to
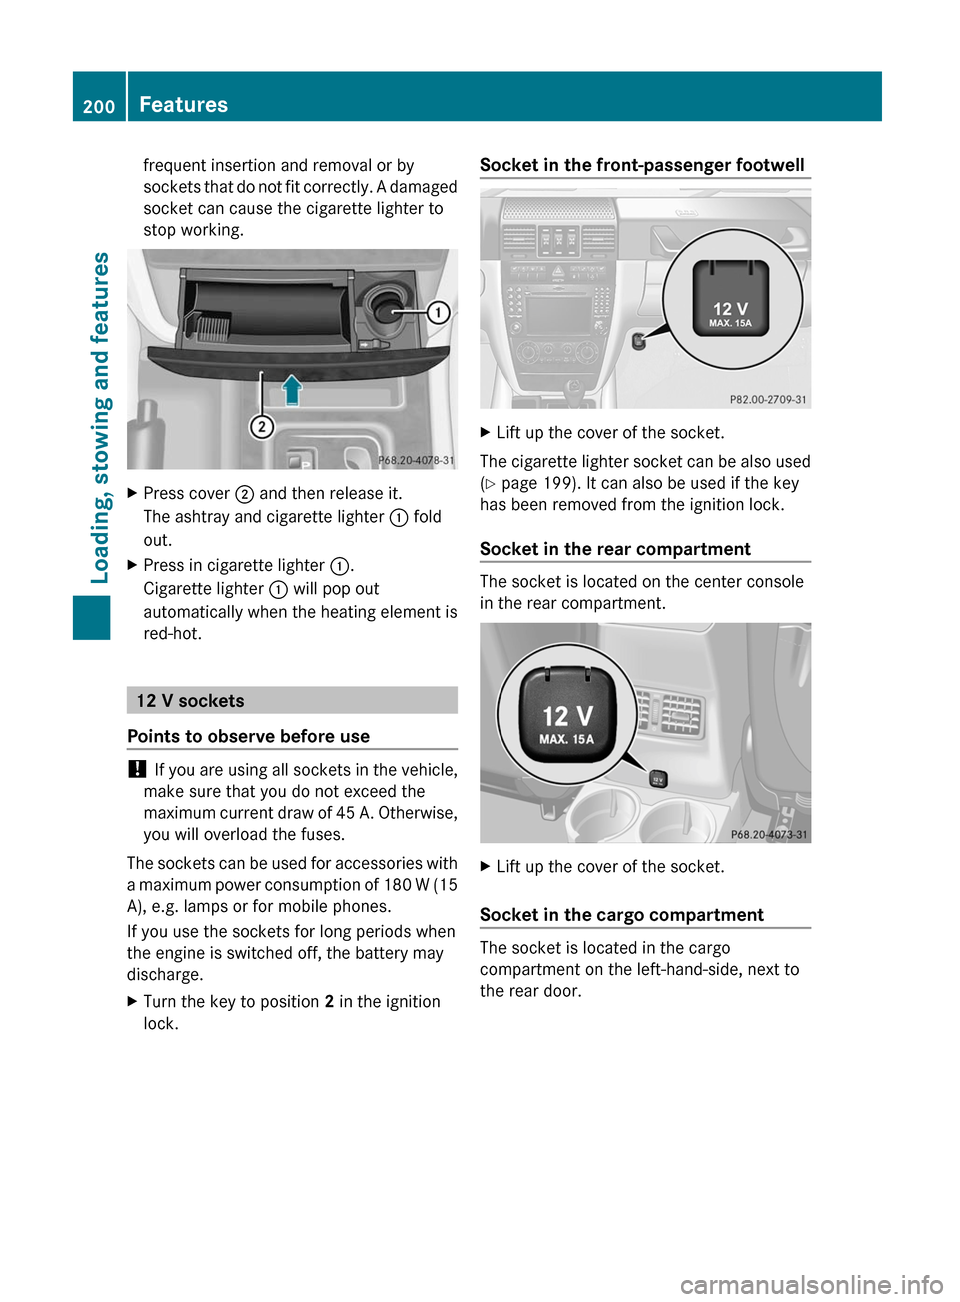
stop working.XPress cover ; and then release it.
The ashtray and cigarette lighter : fold
out.XPress in cigarette lighter :.
Cigarette lighter : will pop out
automatically when the heating element is
red-hot.
12 V sockets
Points to observe before use
! If you are using all sockets in the vehicle,
make sure that you do not exceed the
maximum current draw of 45 A. Otherwise,
you will overload the fuses.
The sockets can be used for accessories with
a maximum power consumption of 180 W (15
A), e.g. lamps or for mobile phones.
If you use the sockets for long periods when
the engine is switched off, the battery may
discharge.
XTurn the key to position 2 in the ignition
lock.Socket in the front-passenger footwellXLift up the cover of the socket.
The cigarette lighter socket can be also used
( Y page 199). It can also be used if the key
has been removed from the ignition lock.
Socket in the rear compartment
The socket is located on the center console
in the rear compartment.
XLift up the cover of the socket.
Socket in the cargo compartment
The socket is located in the cargo
compartment on the left-hand-side, next to
the rear door.
200FeaturesLoading, stowing and features
Page 231 of 288
After an accidentProblemPossible causes/consequences and M SolutionsFuel is leaking from the
vehicle.GRisk of explosion or fire
The fuel line or the fuel tank is faulty.
XImmediately turn the SmartKey to position 0 ( Y page 117) in the
ignition lock and remove it.XDo not restart the engine under any circumstances.XConsult a qualified specialist workshop.You are unable to
determine the extent of
the damage.XConsult a qualified specialist workshop.You cannot detect any
damage.XStart the engine as normal.The NECK-PRO head
restraints on the
driver's and front-
passenger seats have
been triggered.Your vehicle has been involved in a rear-end collision.XReset the NECK-PRO head restraints ( Y page 43).Where will I find...?
First-aid kit
i Check the expiration date on the first-aid
kit at least once a year. Replace the
contents if necessary, and replace missing
contents.
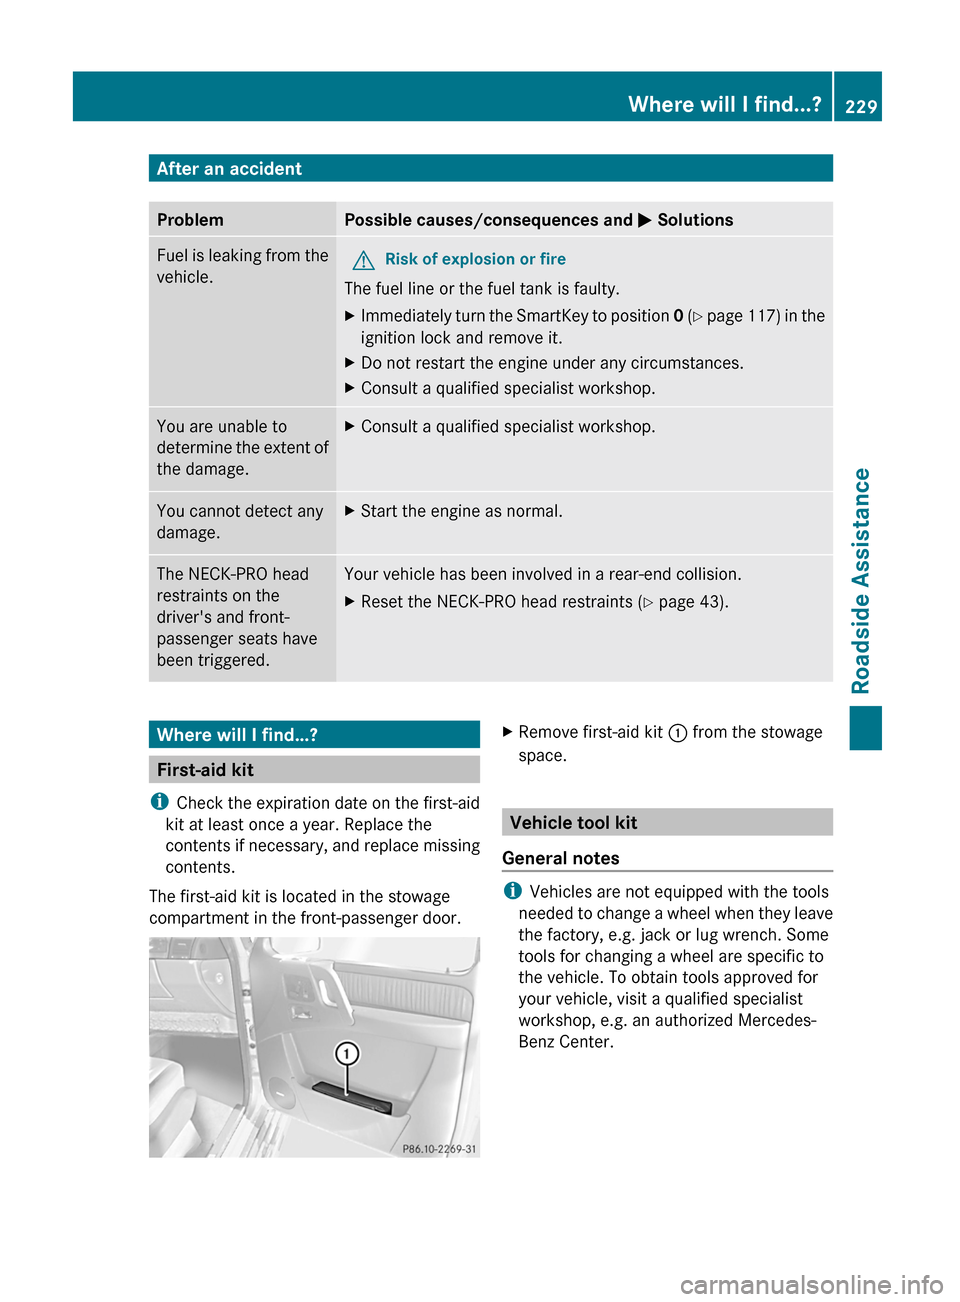
The first-aid kit is located in the stowage
compartment in the front-passenger door.
XRemove first-aid kit : from the stowage
space.
Vehicle tool kit
General notes
i Vehicles are not equipped with the tools
needed to change a wheel when they leave
the factory, e.g. jack or lug wrench. Some
tools for changing a wheel are specific to
the vehicle. To obtain tools approved for
your vehicle, visit a qualified specialist
workshop, e.g. an authorized Mercedes-
Benz Center.
Where will I find...?229Roadside AssistanceZ