2011 MERCEDES-BENZ G55AMG remove seats
[x] Cancel search: remove seatsPage 53 of 288
restraint, toddler restraint, or booster seat
recommended for the size and weight of the
child.
Children can be killed or seriously injured by
an inflating air bag. Note the following
important information when circumstances
require you to place a child in the front
passenger seat:
R Children 12 years old and under must never
ride in the front seat, except in a Mercedes-
Benz authorized BabySmart™ compatible
child seat, which operates with the
BabySmart™ system installed in the vehicle
to deactivate the front passenger front air
bag when it is installed properly. Otherwise
they will be struck by the air bag when it
inflates in a crash. If this happens, serious
or fatal injury will result.
R A child in a rear-facing child restraint on the
front passenger seat will be seriously
injured or even killed if the front passenger
front air bag inflates in a collision which
could occur under some circumstances,
even with the air bag technology installed
in your vehicle. The only means to
completely eliminate this risk is to never
place a child in a rear-facing child restraint
in the front seat. We therefore strongly
recommend that you always place a child
in a rear-facing child restraint in a backseat.
R If you must install a rear-facing child
restraint on the front passenger seat
because circumstances require you to do
so, make sure the 4 / indicator
lamp is illuminated, indicating that the front
passenger front air bag is deactivated.
Should the 4 / indicator lamp not
illuminate or go out while the restraint is
installed, please check installation.
Periodically check the 4 / indicator
lamp while driving to make sure the
4 / indicator lamp is illuminated. If
the 4 / indicator lamp goes out or
remains out, do not transport a child on the
front passenger seat until the system has
been repaired.A child in a rear-facing child restraint on the
front passenger seat will be seriously
injured or even killed if the front passenger
front air bag inflates.
R If you have to place a child in a forward-
facing child restraint on the front passenger
seat, move the seat as far back as possible,
use the proper child restraint
recommended for the age, size and weight
of the child, and secure child restraint with
the vehicle’s seat belt according to the child
seat manufacturer’s instructions.GWarning
Infants and small children should never share
a seat belt with another occupant. During an
accident, they could be crushed between the
occupant and seat belt.
A child's risk of serious or fatal injuries is
significantly increased if the child restraints
are not properly secured in the vehicle and/
or the child is not properly secured in the child
restraint.
Children too big for a toddler restraint must
ride in seats using regular seat belts. Position
the shoulder belt across the chest and
shoulder, not face or neck. A booster seat
may be necessary to achieve proper seat belt
positioning for children over 41 lb (18 kg) until
they reach a height where a lap/shoulder belt
fits properly without a booster.
When the child restraint is not in use, remove
it from the vehicle or secure it with the seat
belt to prevent the child restraint from
becoming a projectile in the event of an
accident.
Special seat belt retractor
GWarning
Observe "Important safety notes"
( Y page 49).
All seat belts except the driver's seat belt are
equipped with a special seat belt retractor.
When enabled, the special seat belt retractor
function ensures that the seat belt does not
Children in the vehicle51SafetyZ
Page 55 of 288
instructions when installing the ISOFIX
child restraint system.XWhen an ISOFIX child seat securing system
is installed, make sure that the center seat
belt in the rear compartment is fully
functional and can move freely.
Top Tether
GWarning
Observe "Important safety notes"
( Y page 49).
GWarning
Always lock the rear seat backrests in their
upright position when the rear seats are
occupied by passengers. Lock the rear seat
backrests in their upright position before
installing the Top Tether straps or when the
cargo compartment is not in use. Make sure
that rear seat backrests are secured properly
by pushing and pulling on the seat backrests.
If the seat backrest is not locked properly, the
seat backrest could fold forward. The child
restraint system is no longer supported
properly or held in position and can no longer
fulfill its function. This could cause serious or
even fatal injuries.
Top Tether provides an additional connection
between the child restraint system secured
with ISOFIX and the rear seat. It helps reduce
the risk of injury even further.
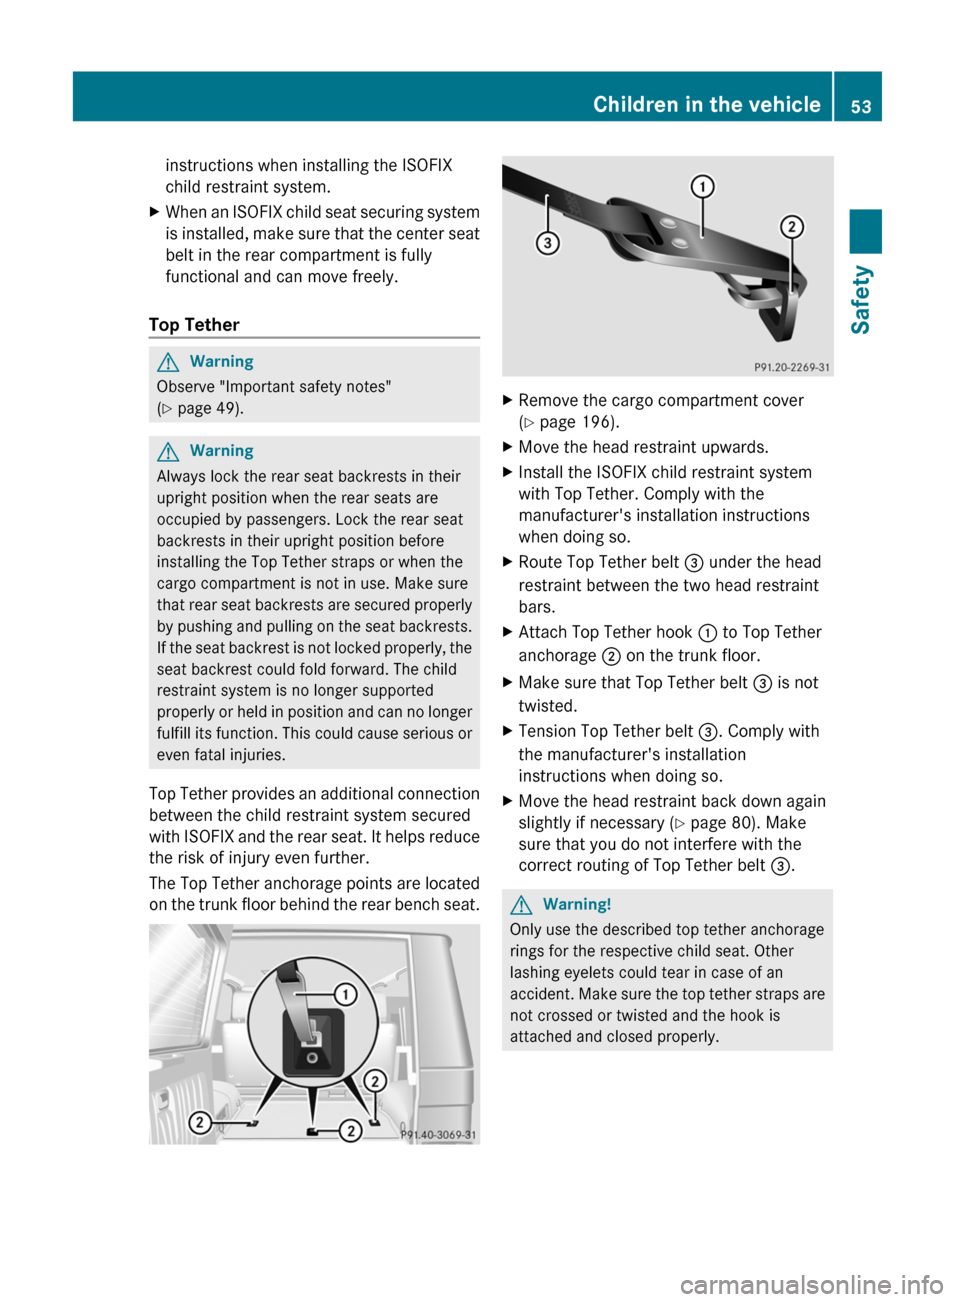
The Top Tether anchorage points are located
on the trunk floor behind the rear bench seat.
XRemove the cargo compartment cover
( Y page 196).XMove the head restraint upwards.XInstall the ISOFIX child restraint system
with Top Tether. Comply with the
manufacturer's installation instructions
when doing so.XRoute Top Tether belt = under the head
restraint between the two head restraint
bars.XAttach Top Tether hook : to Top Tether
anchorage ; on the trunk floor.XMake sure that Top Tether belt = is not
twisted.XTension Top Tether belt =. Comply with
the manufacturer's installation
instructions when doing so.XMove the head restraint back down again
slightly if necessary ( Y page 80). Make
sure that you do not interfere with the
correct routing of Top Tether belt =.GWarning!
Only use the described top tether anchorage
rings for the respective child seat. Other
lashing eyelets could tear in case of an
accident. Make sure the top tether straps are
not crossed or twisted and the hook is
attached and closed properly.
Children in the vehicle53SafetyZ
Page 80 of 288
Do not drive the vehicle without the seat head
restraints. Head restraints are intended to
help reduce injuries during an accident.
! To avoid damage to the seats and the seat
heating, observe the following information:
R do not spill any liquids on the seats. If
liquid is spilled on the seats, dry them as
soon as possible.
R if the seat covers are damp or wet, do not
switch on the seat heating. The seat
heating should also not to be used to dry
the seats.
R clean the seat covers as recommended;
see the "Interior care" section.
R do not transport heavy loads on the
seats. Do not place sharp objects on the
seat cushions, e.g. knives, nails or tools.
The seats should only be occupied by
passengers, if possible.
R when the seat heating is in operation, do
not cover the seats with insulating
materials, e.g. blankets, coats, bags,
seat covers, child seats or booster seats.
! Make sure that there are no objects in the
footwell or behind the seats when resetting
the seats. There is a risk that the seats
and/or the objects could be damaged.
! When the rear bench seat is folded
forwards, the front seats cannot be moved
to their rearmost position. You could
otherwise damage the seats and the rear
bench seat.
! Make sure that the sun visor is folded up
before adjusting the backrest and head
restraint height. The head restraint and sun
visor could otherwise collide when the head
restraint is fully extended.
i If the front door is open, the seats can be
adjusted for up 30 minutes after the
ignition has been switched off.
i The head restraints in the front and rear
seats can be removed ( Y page 80).Please contact an authorized Mercedes-
Benz Center for more information.
i You can find further information about
enlarging the cargo compartment (folding
the rear bench seat forwards) on
( Y page 194).
Adjusting the seat electrically
Front seat adjustment
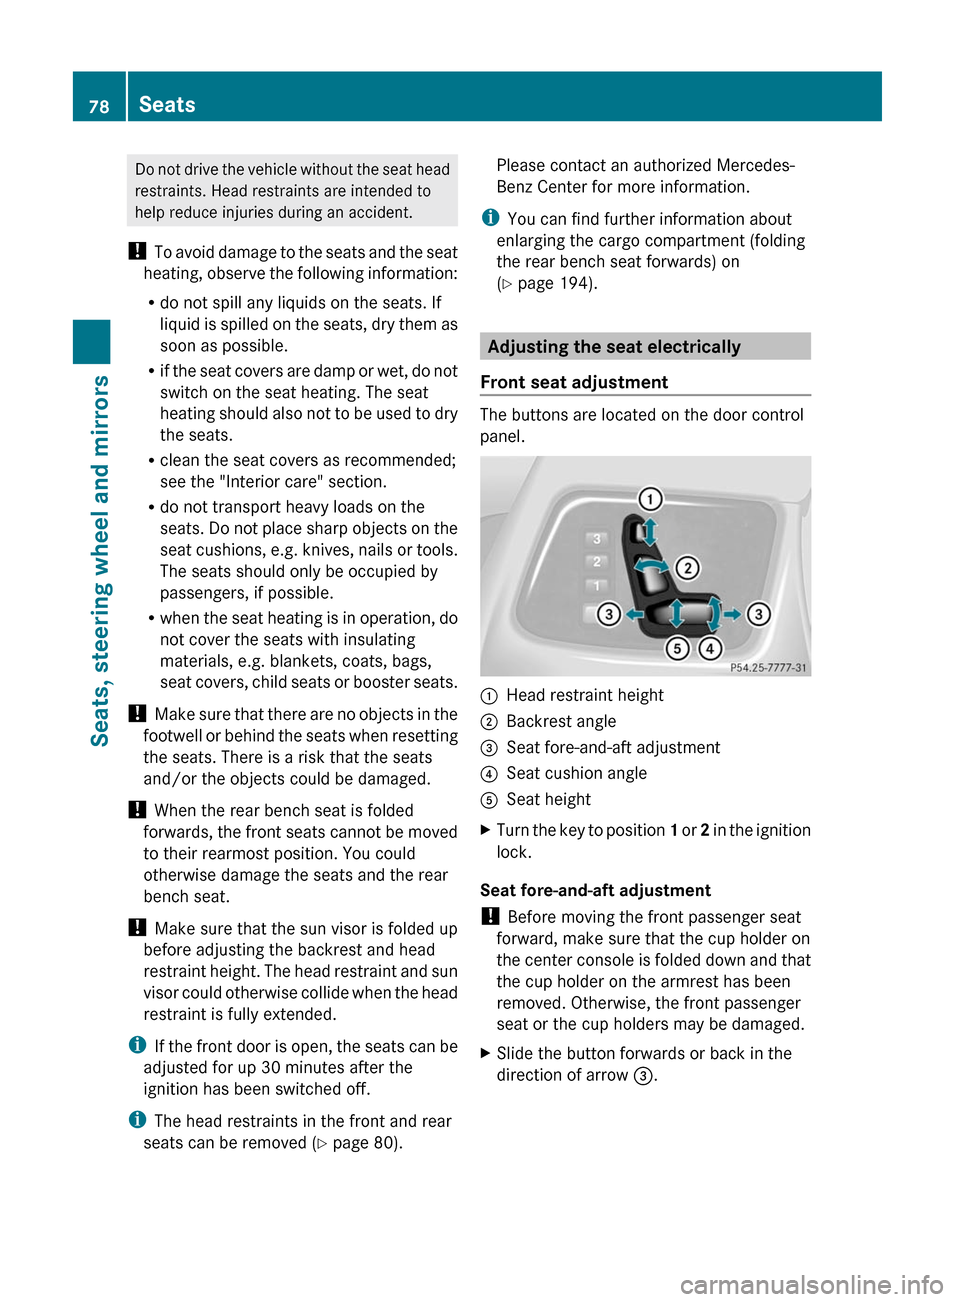
The buttons are located on the door control
panel.
:Head restraint height;Backrest angle=Seat fore-and-aft adjustment?Seat cushion angleASeat heightXTurn the key to position 1 or 2 in the ignition
lock.
Seat fore-and-aft adjustment
! Before moving the front passenger seat
forward, make sure that the cup holder on
the center console is folded down and that
the cup holder on the armrest has been
removed. Otherwise, the front passenger
seat or the cup holders may be damaged.
XSlide the button forwards or back in the
direction of arrow =.78SeatsSeats, steering wheel and mirrors
Page 82 of 288
Resetting the front seat head restraints
It is necessary to reset the front seat head
restraints after the voltage supply has been
interrupted, e.g. if the battery has been
completely discharged or disconnected.
XMake sure that the cup holder on the center
console is folded down ( Y page 197).XMove the seat as far forward as possible
and the head restraint in as far as possible.
Rear seat head restraints
Important safety notes
GWarning!
For safety reasons, always drive with the rear
head restraints in the upright position when
the rear seats are occupied.
Keep the area around head restraints clear of
articles (e.g. clothing) to not obstruct the
folding operation of the head restraints.
GWarning!
For your protection, drive only with properly
positioned head restraints.
Adjust the head restraint in such a way that it
is as close to the head as possible and the
center of the head restraint supports the back
of the head at eye level. This will reduce the
potential for injury to the head and neck in the
event of an accident or similar situation.
With a rear seat occupied, make sure to move
the respective head restraint up from the
lowest non-use position and have the
occupant adjust the head restraint properly.
Do not drive the vehicle without the seat head
restraints installed when the rear seats are
occupied. Head restraints are intended to
help reduce injuries during an accident.
GWarning!
Make sure the rear seat head restraints
engage when placing them upright manually.
Otherwise their protective function cannot be
ensured.
The back of the head will not be supported in
the event of a collision. That could cause
serious or even fatal injuries. Rear seat
occupants can be seriously injured or killed.
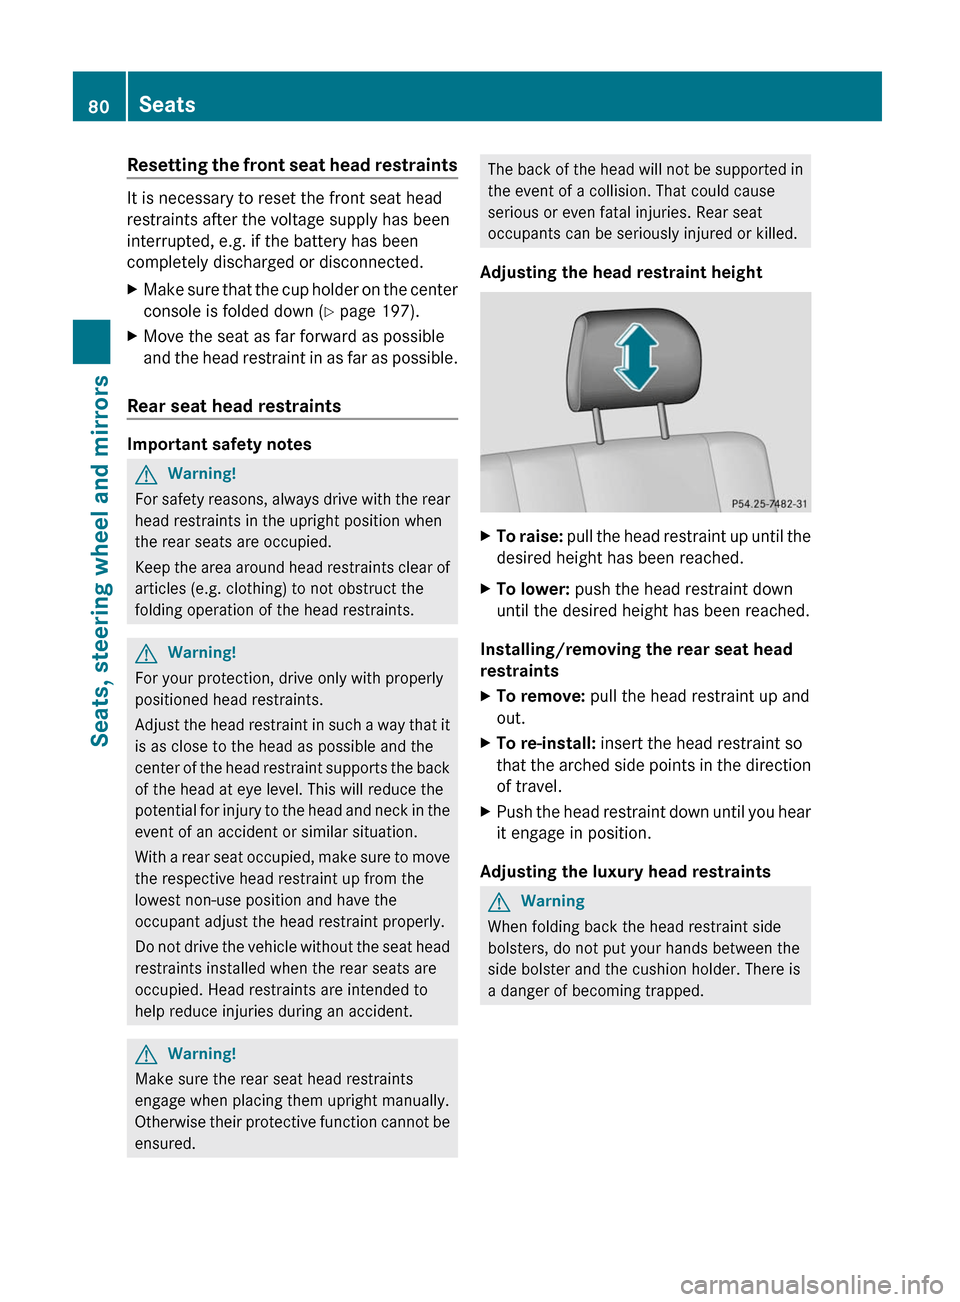
Adjusting the head restraint heightXTo raise: pull the head restraint up until the
desired height has been reached.XTo lower: push the head restraint down
until the desired height has been reached.
Installing/removing the rear seat head
restraints
XTo remove: pull the head restraint up and
out.XTo re-install: insert the head restraint so
that the arched side points in the direction
of travel.XPush the head restraint down until you hear
it engage in position.
Adjusting the luxury head restraints
GWarning
When folding back the head restraint side
bolsters, do not put your hands between the
side bolster and the cushion holder. There is
a danger of becoming trapped.
80SeatsSeats, steering wheel and mirrors
Page 86 of 288
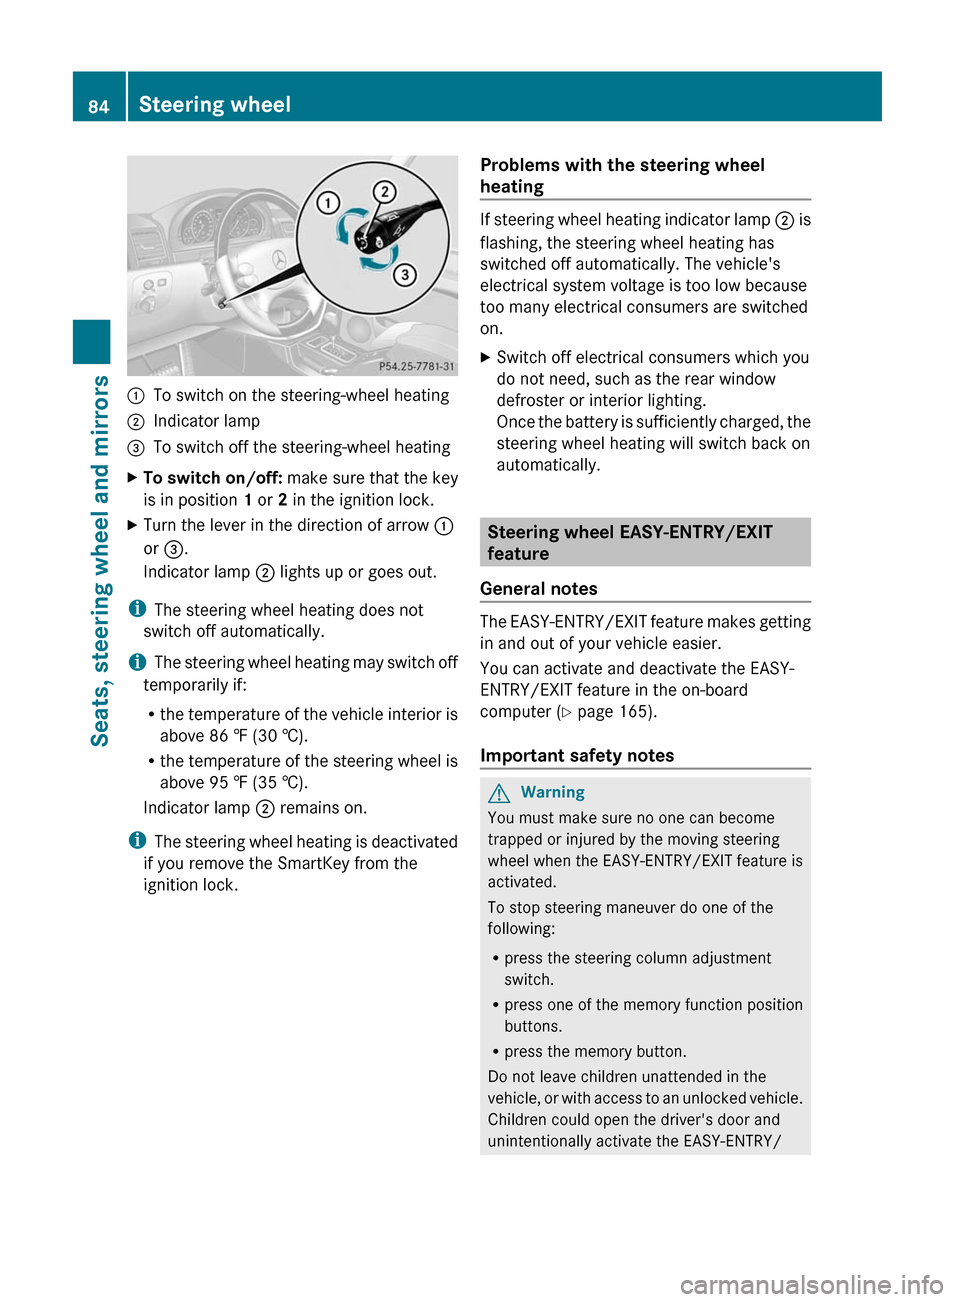
:To switch on the steering-wheel heating;Indicator lamp=To switch off the steering-wheel heatingXTo switch on/off: make sure that the key
is in position 1 or 2 in the ignition lock.XTurn the lever in the direction of arrow :
or = .
Indicator lamp ; lights up or goes out.
i
The steering wheel heating does not
switch off automatically.
i The steering wheel heating may switch off
temporarily if:
R the temperature of the vehicle interior is
above 86 ‡ (30 †).
R the temperature of the steering wheel is
above 95 ‡ (35 †).
Indicator lamp ; remains on.
i The steering wheel heating is deactivated
if you remove the SmartKey from the
ignition lock.
Problems with the steering wheel
heating
If steering wheel heating indicator lamp ; is
flashing, the steering wheel heating has
switched off automatically. The vehicle's
electrical system voltage is too low because
too many electrical consumers are switched
on.
XSwitch off electrical consumers which you
do not need, such as the rear window
defroster or interior lighting.
Once the battery is sufficiently charged, the
steering wheel heating will switch back on
automatically.
Steering wheel EASY-ENTRY/EXIT
feature
General notes
The EASY-ENTRY/EXIT feature makes getting
in and out of your vehicle easier.
You can activate and deactivate the EASY-
ENTRY/EXIT feature in the on-board
computer ( Y page 165).
Important safety notes
GWarning
You must make sure no one can become
trapped or injured by the moving steering
wheel when the EASY-ENTRY/EXIT feature is
activated.
To stop steering maneuver do one of the
following:
R press the steering column adjustment
switch.
R press one of the memory function position
buttons.
R press the memory button.
Do not leave children unattended in the
vehicle, or with access to an unlocked vehicle.
Children could open the driver's door and
unintentionally activate the EASY-ENTRY/
84Steering wheelSeats, steering wheel and mirrors
Page 87 of 288
EXIT feature. This could result in an accident
and/or serious personal injury.GWarning
Let the system complete the adjustment
procedure before setting the vehicle in
motion. All steering wheel adjustment must
be completed before setting the vehicle in
motion. Driving off with the steering wheel
still adjusting could cause the driver to lose
control of the vehicle.
! Do not activate the EASY-ENTRY/EXIT
feature, if the seat backrest is reclined too
far backwards. This can damage the front
or rear seats. You must first move the
backrest to a vertical position.
Position of the steering wheel when the
EASY-ENTRY/EXIT feature is active
The steering wheel moves upwards and
towards the dashboard if:
R an easy-entry/exit steering wheel position
has been stored for the key and
R you remove the key from the ignition lock
or
R you open the driver's door with the key in
position 0 or 1 in the ignition lock.
If you insert the key into the ignition lock with
the driver's door closed, the steering wheel is
automatically moved to the previously set
position.
The last position of the steering wheel is
stored when you switch off the ignition or
when you store the setting with the memory
function ( Y page 88).
i The steering wheel only moves upwards
and towards the dashboard if it has not
already reached the upper end stop.
Mirrors
Rear-view mirror
XAdjust the rear-view mirror by hand so you
have a good overview of the traffic
conditions.
Exterior mirrors
Important safety notes
GWarning
Exercise care when using the passenger-side
exterior rear view mirror. The mirror surface
is convex (outwardly curved surface for a
wider field of view). Objects in mirror are
closer than they appear. Check your interior
rear view mirror and glance over your
shoulder before changing lanes.
At low outside temperatures, the exterior
mirrors are heated automatically.
Adjusting the exterior mirrors
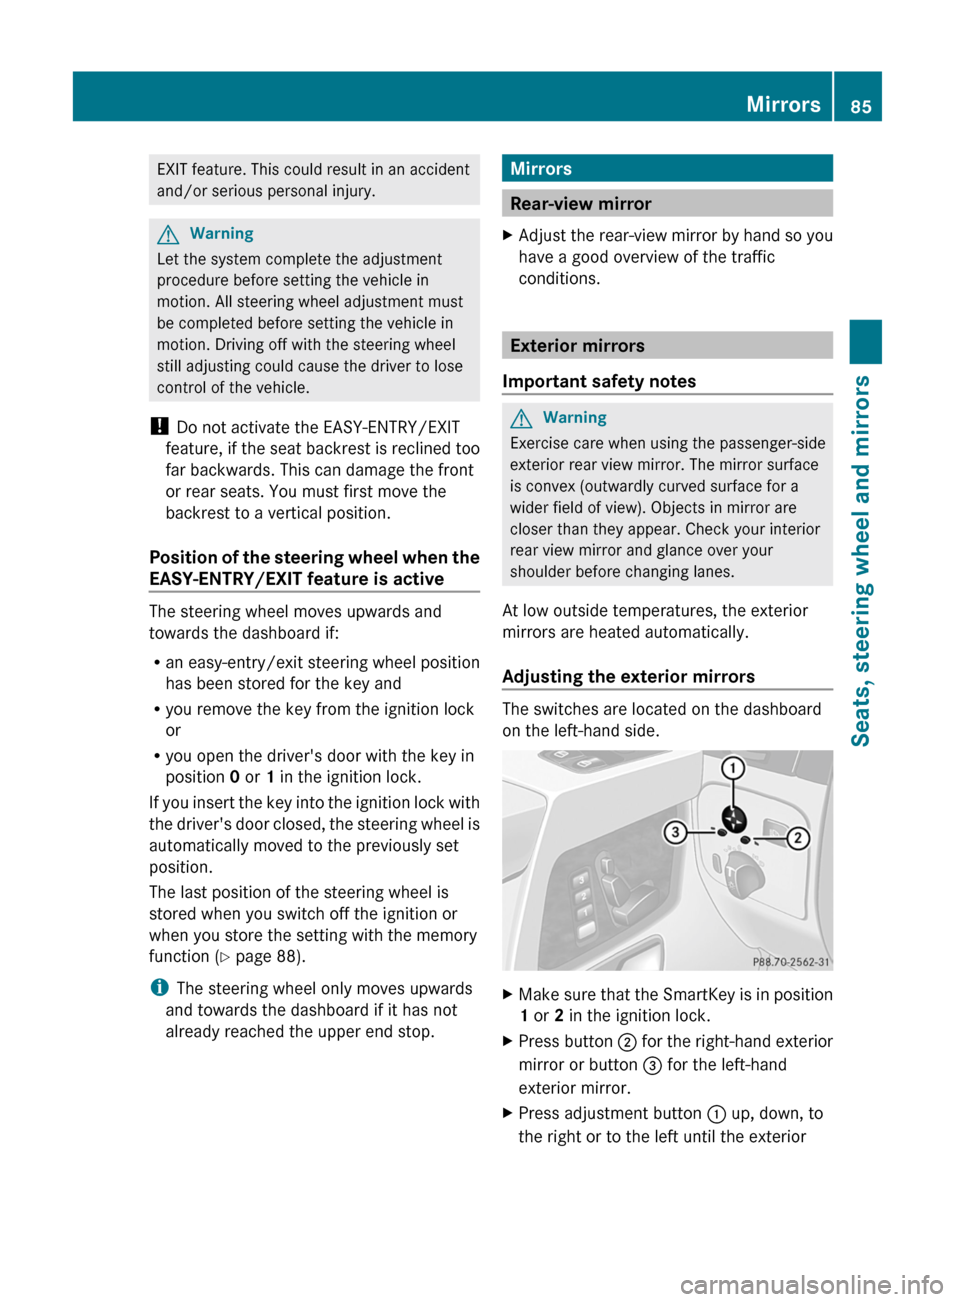
The switches are located on the dashboard
on the left-hand side.
XMake sure that the SmartKey is in position
1 or 2 in the ignition lock.XPress button ; for the right-hand exterior
mirror or button = for the left-hand
exterior mirror.XPress adjustment button : up, down, to
the right or to the left until the exteriorMirrors85Seats, steering wheel and mirrorsZ
Page 197 of 288
Never place hands under seat or near any
moving parts while a seat is being adjusted.
For safety reasons, the rear seat bench must
only be adjusted when the vehicle is
stationary.
Never drive a vehicle with the tailgate open.
Deadly carbon monoxide (CO) gases may
enter vehicle interior resulting in
unconsciousness and death.
! Ensure that you remove all containers
from the cup holder in the rear before
folding the seat backrest and the seat
cushion of the rear bench seat forwards.
The left-hand and right-hand rear seats can
be folded down to increase the cargo
compartment capacity. The following
changes are possible:
R fold the seat backrests forward
R fold the rear bench seat back fully.
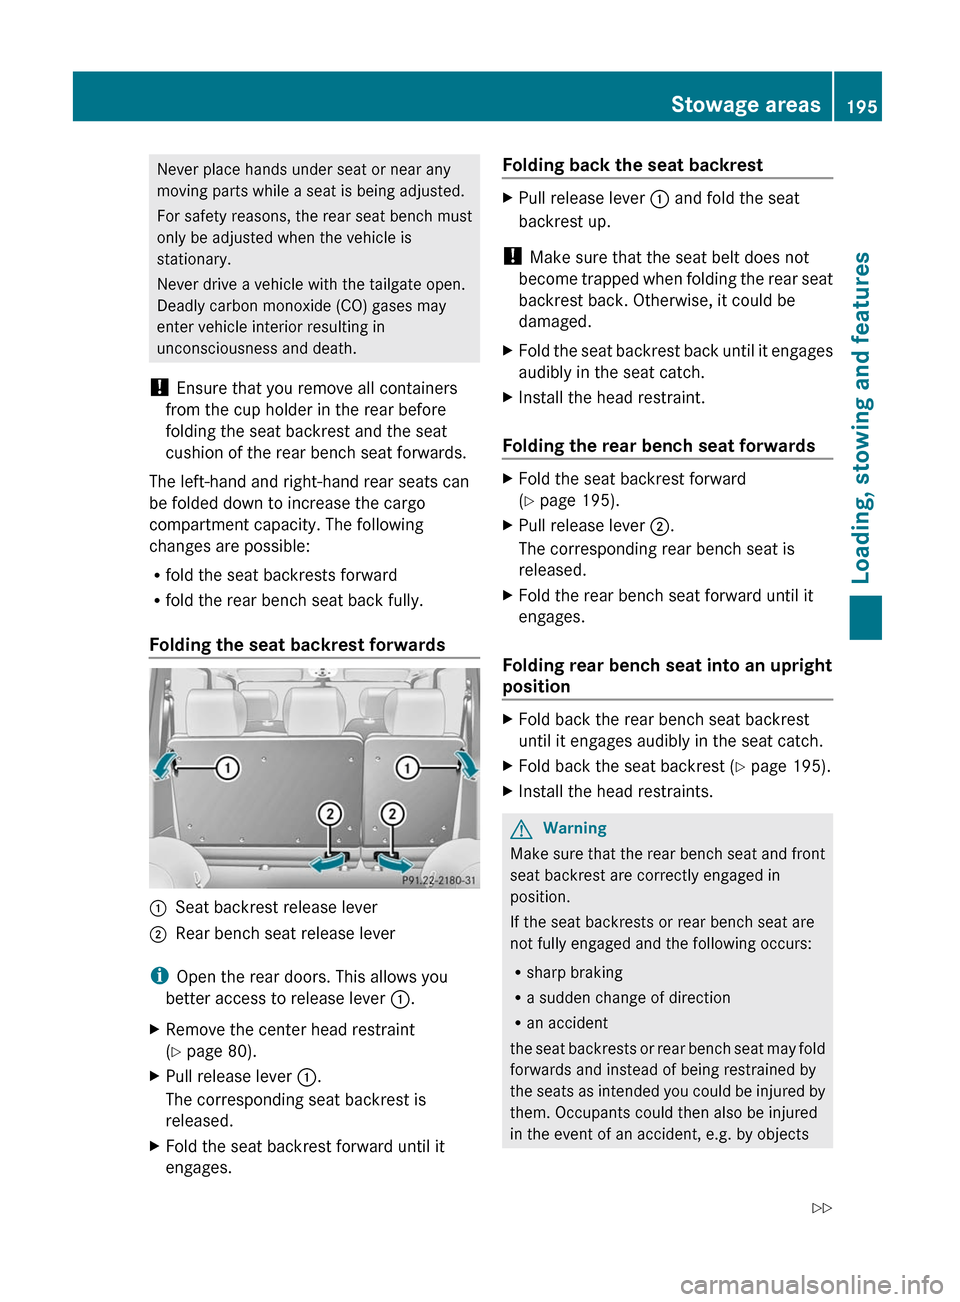
Folding the seat backrest forwards:Seat backrest release lever;Rear bench seat release lever
i Open the rear doors. This allows you
better access to release lever :.
XRemove the center head restraint
( Y page 80).XPull release lever :.
The corresponding seat backrest is
released.XFold the seat backrest forward until it
engages.Folding back the seat backrestXPull release lever : and fold the seat
backrest up.
! Make sure that the seat belt does not
become trapped when folding the rear seat
backrest back. Otherwise, it could be
damaged.
XFold the seat backrest back until it engages
audibly in the seat catch.XInstall the head restraint.
Folding the rear bench seat forwards
XFold the seat backrest forward
( Y page 195).XPull release lever ;.
The corresponding rear bench seat is
released.XFold the rear bench seat forward until it
engages.
Folding rear bench seat into an upright
position
XFold back the rear bench seat backrest
until it engages audibly in the seat catch.XFold back the seat backrest ( Y page 195).XInstall the head restraints.GWarning
Make sure that the rear bench seat and front
seat backrest are correctly engaged in
position.
If the seat backrests or rear bench seat are
not fully engaged and the following occurs:
R sharp braking
R a sudden change of direction
R an accident
the seat backrests or rear bench seat may fold
forwards and instead of being restrained by
the seats as intended you could be injured by
them. Occupants could then also be injured
in the event of an accident, e.g. by objects
Stowage areas195Loading, stowing and featuresZ
Page 231 of 288
After an accidentProblemPossible causes/consequences and M SolutionsFuel is leaking from the
vehicle.GRisk of explosion or fire
The fuel line or the fuel tank is faulty.
XImmediately turn the SmartKey to position 0 ( Y page 117) in the
ignition lock and remove it.XDo not restart the engine under any circumstances.XConsult a qualified specialist workshop.You are unable to
determine the extent of
the damage.XConsult a qualified specialist workshop.You cannot detect any
damage.XStart the engine as normal.The NECK-PRO head
restraints on the
driver's and front-
passenger seats have
been triggered.Your vehicle has been involved in a rear-end collision.XReset the NECK-PRO head restraints ( Y page 43).Where will I find...?
First-aid kit
i Check the expiration date on the first-aid
kit at least once a year. Replace the
contents if necessary, and replace missing
contents.
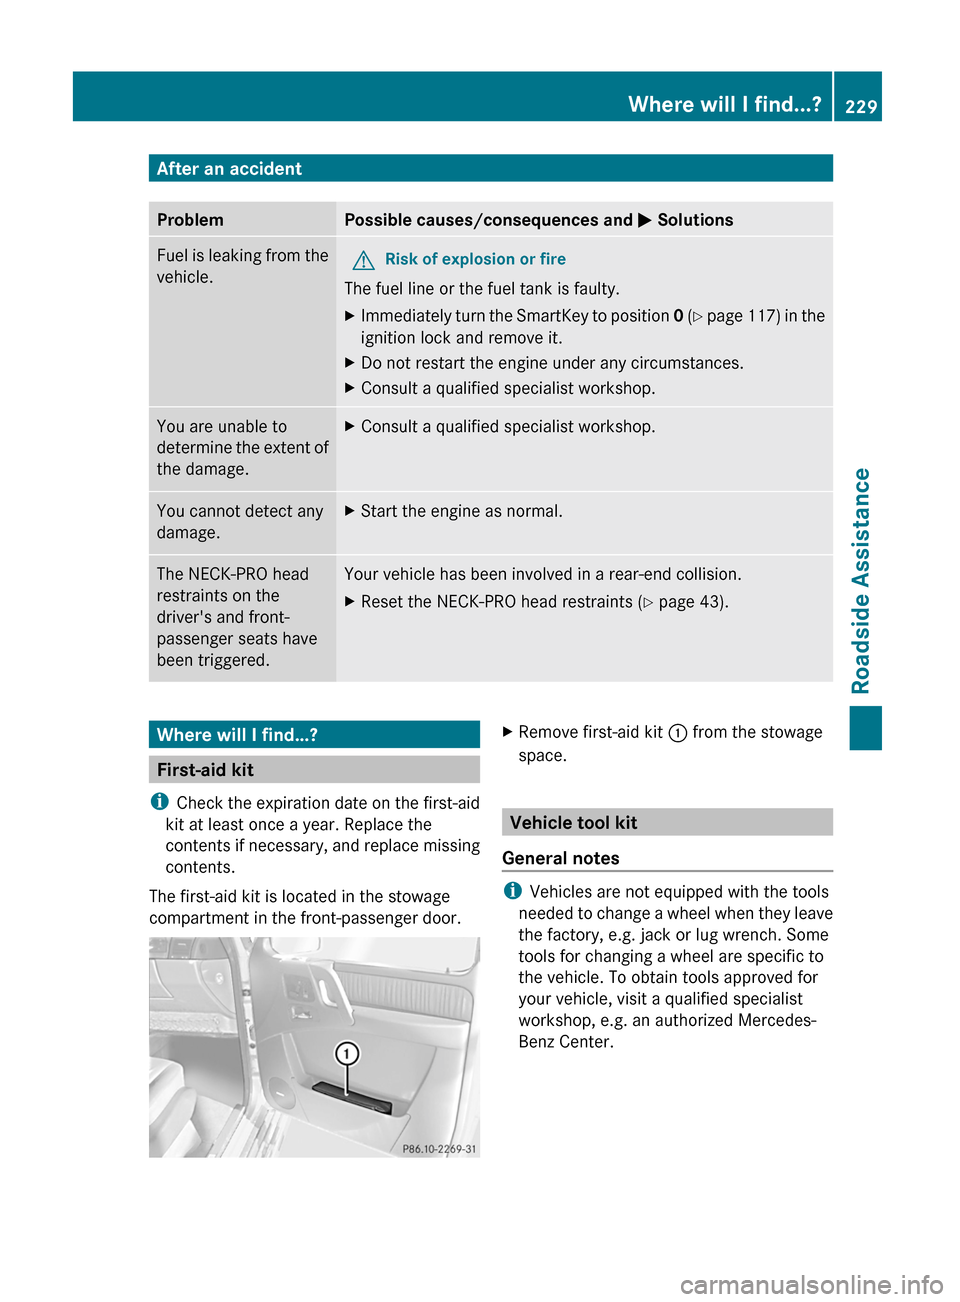
The first-aid kit is located in the stowage
compartment in the front-passenger door.
XRemove first-aid kit : from the stowage
space.
Vehicle tool kit
General notes
i Vehicles are not equipped with the tools
needed to change a wheel when they leave
the factory, e.g. jack or lug wrench. Some
tools for changing a wheel are specific to
the vehicle. To obtain tools approved for
your vehicle, visit a qualified specialist
workshop, e.g. an authorized Mercedes-
Benz Center.
Where will I find...?229Roadside AssistanceZ