2011 MERCEDES-BENZ G-CLASS warning lights
[x] Cancel search: warning lightsPage 152 of 288

Range of the sensors
The sensors must be free of dirt, ice and
slush; otherwise they may not function
correctly. Clean the sensors regularly, taking
care not to scratch or damage them
( Y page 224).
Side view
Top view
Sensors
CenterApprox. 59 in (approx.
150 cm)CornersApprox. 40 in (approx.
100 cm)
! When parking, pay particular attention to
objects above or below the sensors, such
as flower pots or trailer towbars. The
ultrasonic backing up aid does not detect
such objects when they are in the
immediate vicinity of the vehicle. You could
damage the vehicle or the objects.
Ultrasonic sources such as an automatic
car wash, a lorry's compressed-air brakes
or a pneumatic drill could cause the
ultrasonic backing up aid to malfunction.
Minimum distanceCenterApprox. 8 in (approx.
20 cm)CornersApprox. 8 in (approx.
20 cm)
If there is an obstacle within this range, all
warning displays flash and a warning tone
sounds. If the distance falls below the
minimum, the distance may no longer be
shown.
Warning displays
The warning display shows the distance
between the sensors and the obstacle.
The warning display is in the rear
compartment next to the rear door.
The warning display is divided into four yellow
and two red segments :. The ultrasonic
backing up aid is ready for use when you hear
a warning tone and segment ; lights up
briefly.
One or more segments : light up as the
vehicle approaches an obstacle, depending
on the distance from the obstacle.
150Driving systemsDriving and parking
ProCarManuals.com
Page 186 of 288
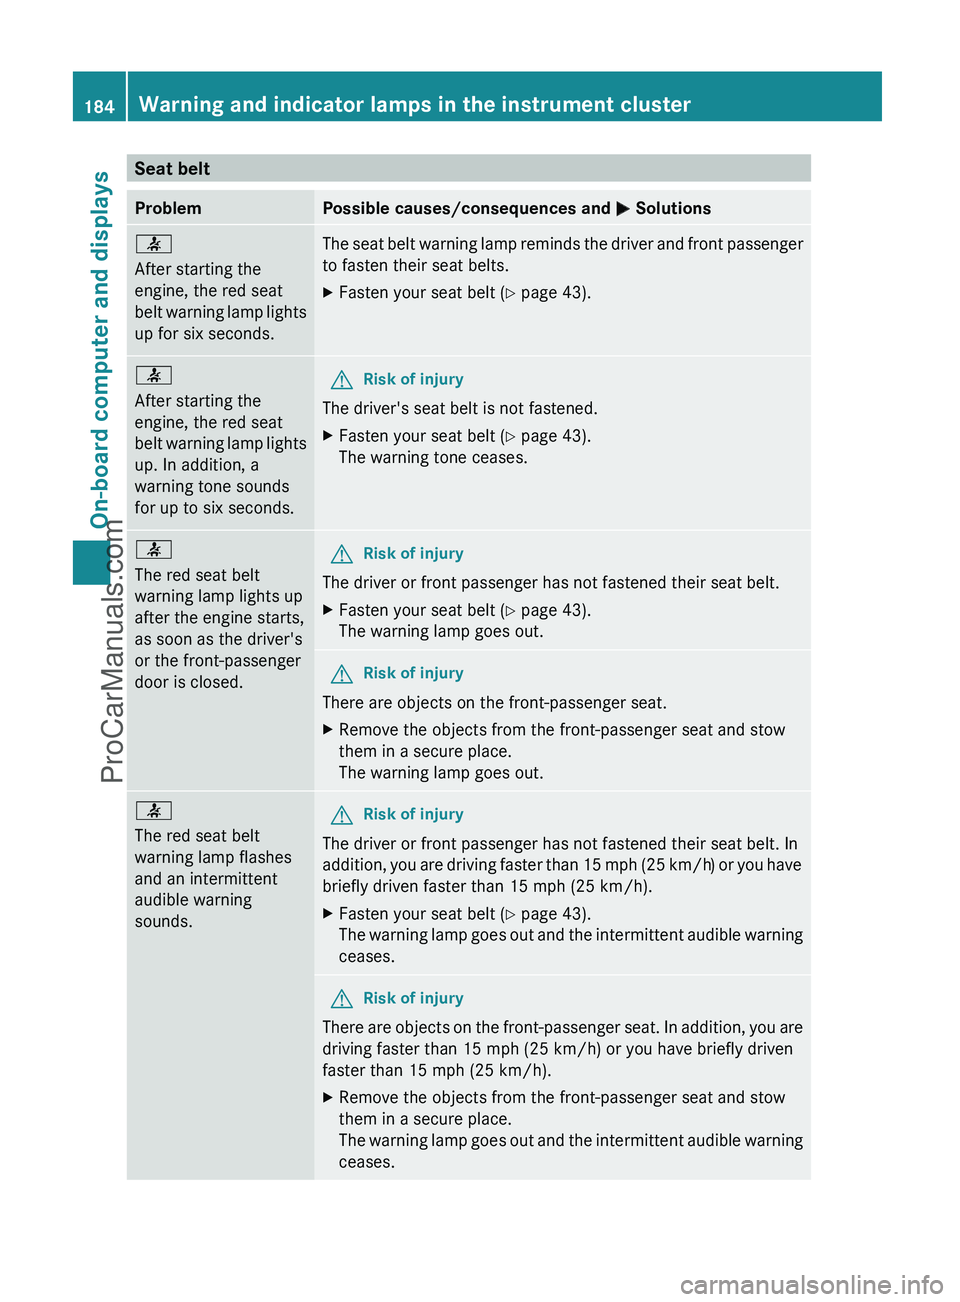
Seat beltProblemPossible causes/consequences and M Solutions7
After starting the
engine, the red seat
belt warning lamp lights
up for six seconds.The seat belt warning lamp reminds the driver and front passenger
to fasten their seat belts.XFasten your seat belt ( Y page 43).7
After starting the
engine, the red seat
belt warning lamp lights
up. In addition, a
warning tone sounds
for up to six seconds.GRisk of injury
The driver's seat belt is not fastened.
XFasten your seat belt ( Y page 43).
The warning tone ceases.7
The red seat belt
warning lamp lights up
after the engine starts,
as soon as the driver's
or the front-passenger
door is closed.GRisk of injury
The driver or front passenger has not fastened their seat belt.
XFasten your seat belt ( Y page 43).
The warning lamp goes out.GRisk of injury
There are objects on the front-passenger seat.
XRemove the objects from the front-passenger seat and stow
them in a secure place.
The warning lamp goes out.7
The red seat belt
warning lamp flashes
and an intermittent
audible warning
sounds.GRisk of injury
The driver or front passenger has not fastened their seat belt. In
addition, you are driving faster than 15 mph (25 km/h) or you have
briefly driven faster than 15 mph (25 km/h).
XFasten your seat belt ( Y page 43).
The warning lamp goes out and the intermittent audible warning
ceases.GRisk of injury
There are objects on the front-passenger seat. In addition, you are
driving faster than 15 mph (25 km/h) or you have briefly driven
faster than 15 mph (25 km/h).
XRemove the objects from the front-passenger seat and stow
them in a secure place.
The warning lamp goes out and the intermittent audible warning
ceases.184Warning and indicator lamps in the instrument clusterOn-board computer and displays
ProCarManuals.com
Page 190 of 288
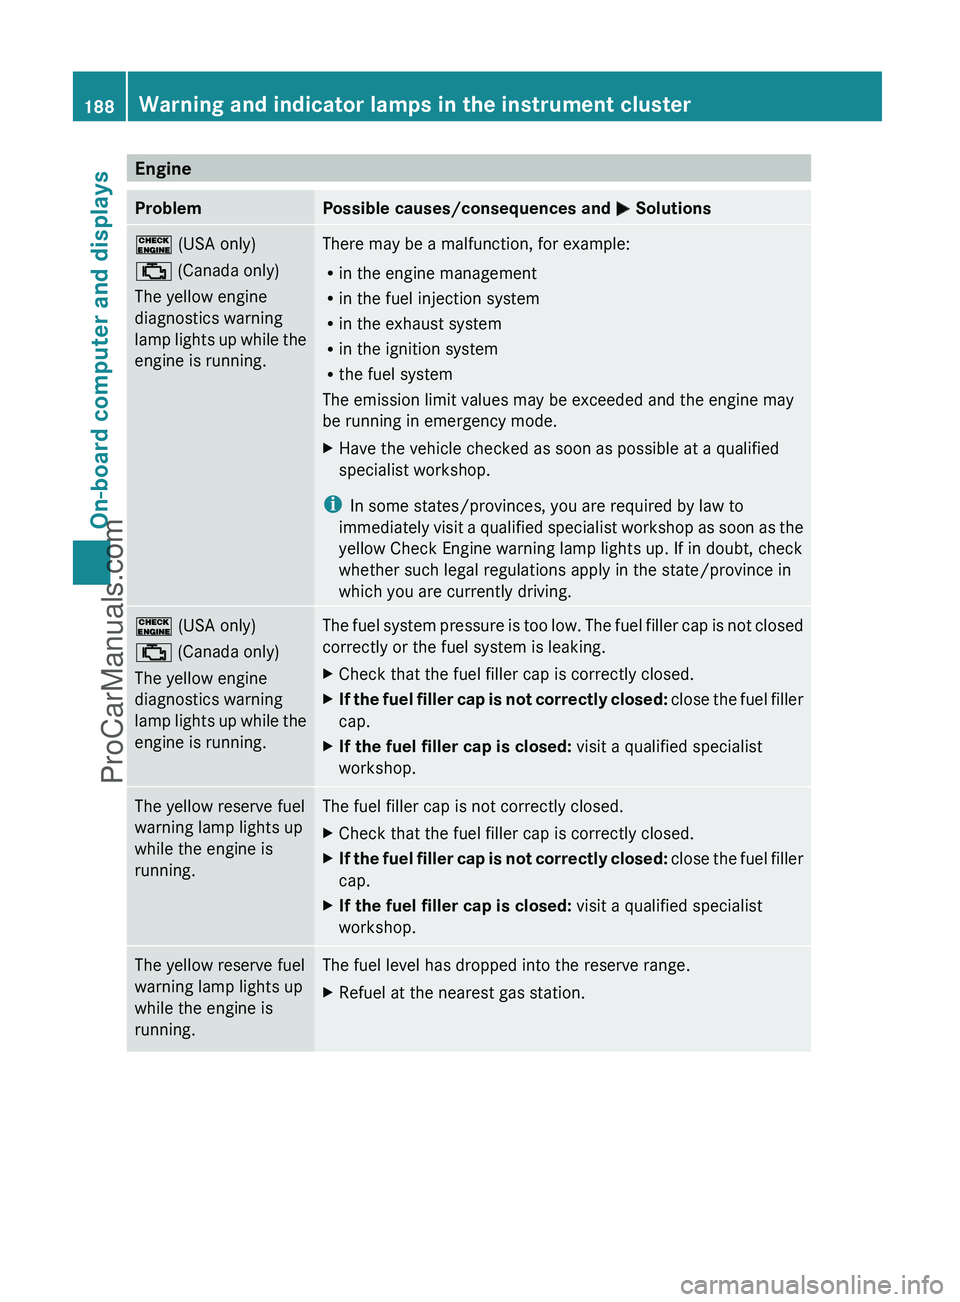
EngineProblemPossible causes/consequences and M Solutions! (USA only)
; (Canada only)
The yellow engine
diagnostics warning
lamp lights up while the
engine is running.There may be a malfunction, for example:
R in the engine management
R in the fuel injection system
R in the exhaust system
R in the ignition system
R the fuel system
The emission limit values may be exceeded and the engine may
be running in emergency mode.XHave the vehicle checked as soon as possible at a qualified
specialist workshop.
i In some states/provinces, you are required by law to
immediately visit a qualified specialist workshop as soon as the
yellow Check Engine warning lamp lights up. If in doubt, check
whether such legal regulations apply in the state/province in
which you are currently driving.
! (USA only)
; (Canada only)
The yellow engine
diagnostics warning
lamp lights up while the
engine is running.The fuel system pressure is too low. The fuel filler cap is not closed
correctly or the fuel system is leaking.XCheck that the fuel filler cap is correctly closed.XIf the fuel filler cap is not correctly closed: close the fuel filler
cap.XIf the fuel filler cap is closed: visit a qualified specialist
workshop.The yellow reserve fuel
warning lamp lights up
while the engine is
running.The fuel filler cap is not correctly closed.XCheck that the fuel filler cap is correctly closed.XIf the fuel filler cap is not correctly closed: close the fuel filler
cap.XIf the fuel filler cap is closed: visit a qualified specialist
workshop.The yellow reserve fuel
warning lamp lights up
while the engine is
running.The fuel level has dropped into the reserve range.XRefuel at the nearest gas station.188Warning and indicator lamps in the instrument clusterOn-board computer and displays
ProCarManuals.com
Page 191 of 288
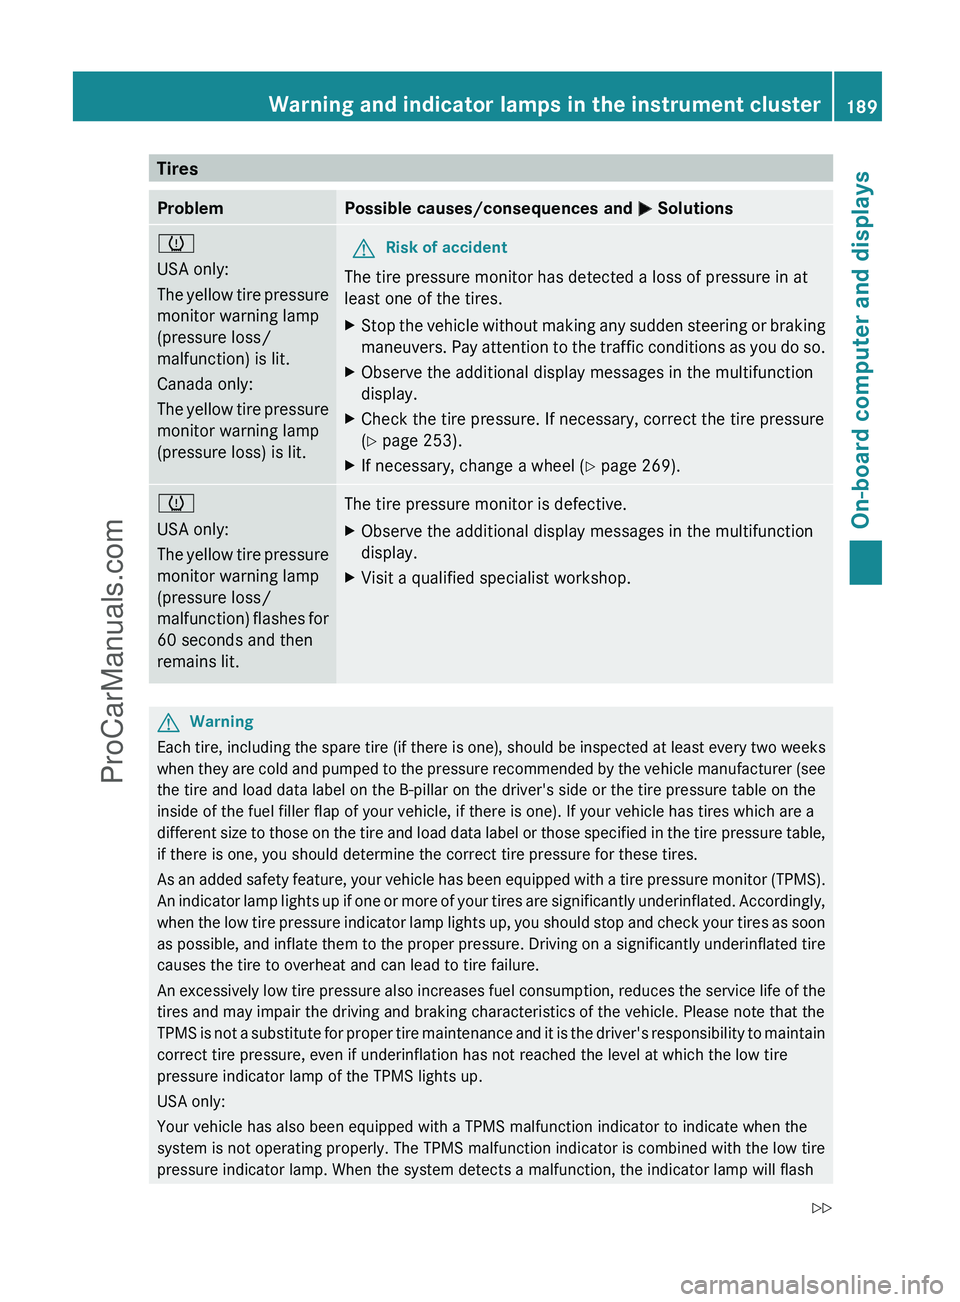
TiresProblemPossible causes/consequences and M Solutionsh
USA only:
The yellow tire pressure
monitor warning lamp
(pressure loss/
malfunction) is lit.
Canada only:
The yellow tire pressure
monitor warning lamp
(pressure loss) is lit.GRisk of accident
The tire pressure monitor has detected a loss of pressure in at
least one of the tires.
XStop the vehicle without making any sudden steering or braking
maneuvers. Pay attention to the traffic conditions as you do so.XObserve the additional display messages in the multifunction
display.XCheck the tire pressure. If necessary, correct the tire pressure
( Y page 253).XIf necessary, change a wheel ( Y page 269).h
USA only:
The yellow tire pressure
monitor warning lamp
(pressure loss/
malfunction) flashes for
60 seconds and then
remains lit.The tire pressure monitor is defective.XObserve the additional display messages in the multifunction
display.XVisit a qualified specialist workshop.GWarning
Each tire, including the spare tire (if there is one), should be inspected at least every two weeks
when they are cold and pumped to the pressure recommended by the vehicle manufacturer (see
the tire and load data label on the B-pillar on the driver's side or the tire pressure table on the
inside of the fuel filler flap of your vehicle, if there is one). If your vehicle has tires which are a
different size to those on the tire and load data label or those specified in the tire pressure table,
if there is one, you should determine the correct tire pressure for these tires.
As an added safety feature, your vehicle has been equipped with a tire pressure monitor (TPMS).
An indicator lamp lights up if one or more of your tires are significantly underinflated. Accordingly,
when the low tire pressure indicator lamp lights up, you should stop and check your tires as soon
as possible, and inflate them to the proper pressure. Driving on a significantly underinflated tire
causes the tire to overheat and can lead to tire failure.
An excessively low tire pressure also increases fuel consumption, reduces the service life of the
tires and may impair the driving and braking characteristics of the vehicle. Please note that the
TPMS is not a substitute for proper tire maintenance and it is the driver's responsibility to maintain
correct tire pressure, even if underinflation has not reached the level at which the low tire
pressure indicator lamp of the TPMS lights up.
USA only:
Your vehicle has also been equipped with a TPMS malfunction indicator to indicate when the
system is not operating properly. The TPMS malfunction indicator is combined with the low tire
pressure indicator lamp. When the system detects a malfunction, the indicator lamp will flash
Warning and indicator lamps in the instrument cluster189On-board computer and displaysZProCarManuals.com
Page 200 of 288
If you do not require the cup holder, it can be
stored in the glove box or in the stowage
compartment in the center console, for
example.
Cup holders in the rear compartment
! Ensure that you remove all containers
from the cup holder in the rear before
folding the seat backrest and the seat
cushion of the rear bench seat forwards.
Sun visors
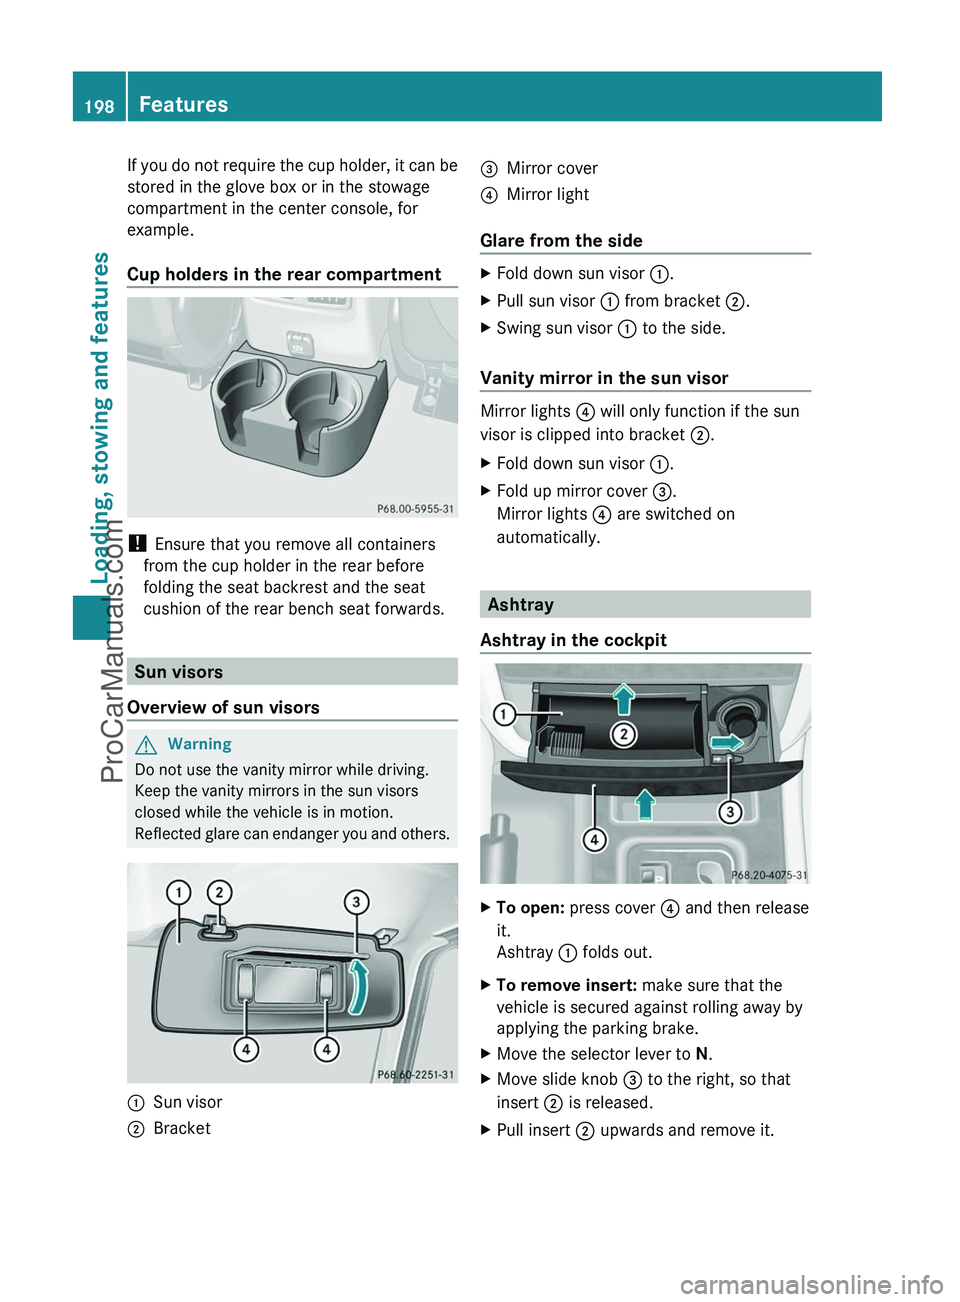
Overview of sun visors
GWarning
Do not use the vanity mirror while driving.
Keep the vanity mirrors in the sun visors
closed while the vehicle is in motion.
Reflected glare can endanger you and others.
:Sun visor;Bracket=Mirror cover?Mirror light
Glare from the side
XFold down sun visor :.XPull sun visor : from bracket ;.XSwing sun visor : to the side.
Vanity mirror in the sun visor
Mirror lights ? will only function if the sun
visor is clipped into bracket ;.
XFold down sun visor :.XFold up mirror cover =.
Mirror lights ? are switched on
automatically.
Ashtray
Ashtray in the cockpit
XTo open: press cover ? and then release
it.
Ashtray : folds out.XTo remove insert: make sure that the
vehicle is secured against rolling away by
applying the parking brake.XMove the selector lever to N.XMove slide knob = to the right, so that
insert ; is released.XPull insert ; upwards and remove it.198FeaturesLoading, stowing and features
ProCarManuals.com
Page 203 of 288
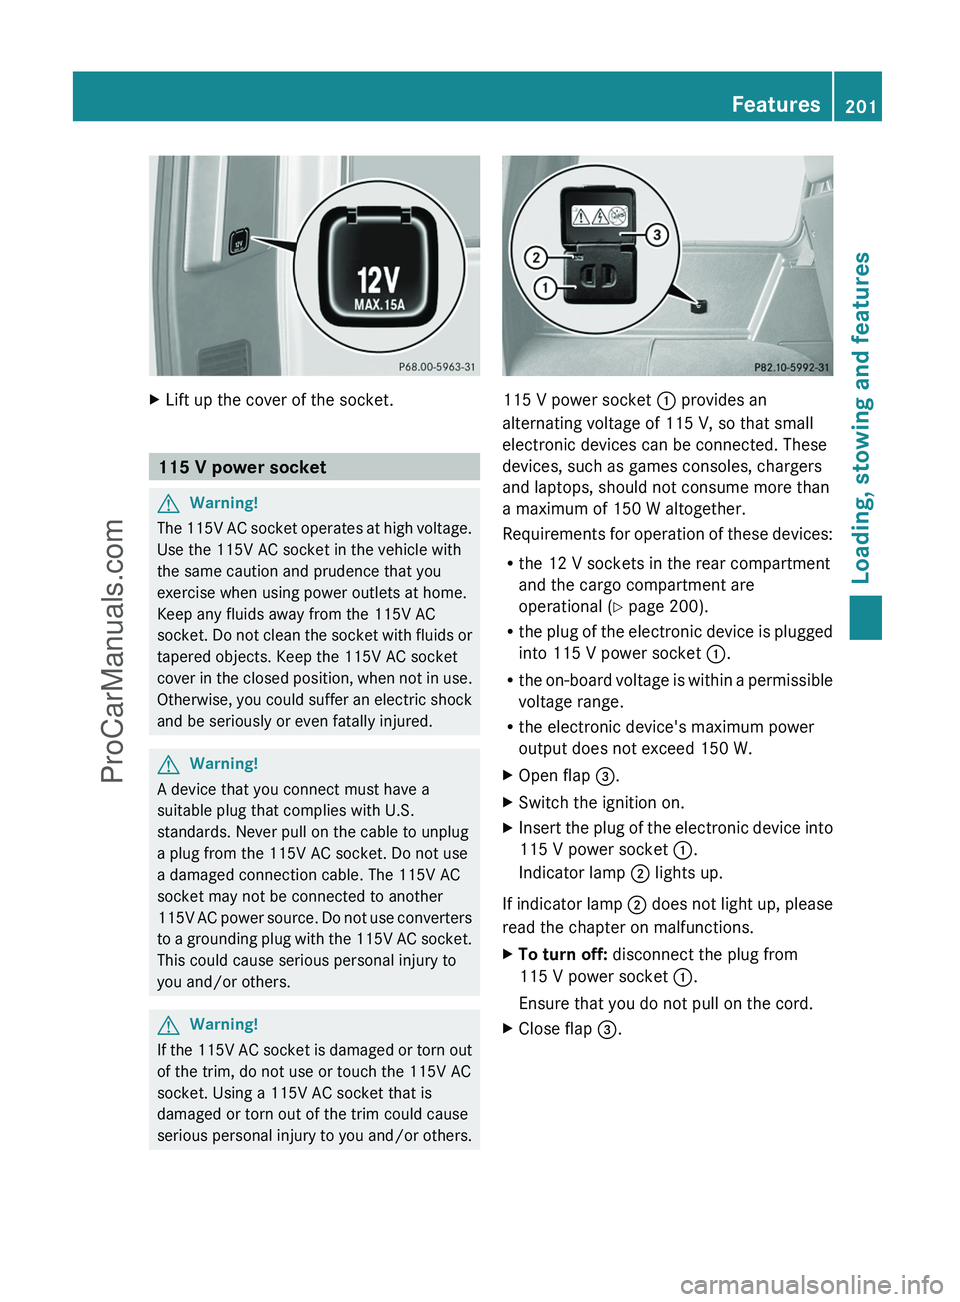
XLift up the cover of the socket.
115 V power socket
GWarning!
The 115V AC socket operates at high voltage.
Use the 115V AC socket in the vehicle with
the same caution and prudence that you
exercise when using power outlets at home.
Keep any fluids away from the 115V AC
socket. Do not clean the socket with fluids or
tapered objects. Keep the 115V AC socket
cover in the closed position, when not in use.
Otherwise, you could suffer an electric shock
and be seriously or even fatally injured.
GWarning!
A device that you connect must have a
suitable plug that complies with U.S.
standards. Never pull on the cable to unplug
a plug from the 115V AC socket. Do not use
a damaged connection cable. The 115V AC
socket may not be connected to another
115V AC power source. Do not use converters
to a grounding plug with the 115V AC socket.
This could cause serious personal injury to
you and/or others.
GWarning!
If the 115V AC socket is damaged or torn out
of the trim, do not use or touch the 115V AC
socket. Using a 115V AC socket that is
damaged or torn out of the trim could cause
serious personal injury to you and/or others.
115 V power socket : provides an
alternating voltage of 115 V, so that small
electronic devices can be connected. These
devices, such as games consoles, chargers
and laptops, should not consume more than
a maximum of 150 W altogether.
Requirements for operation of these devices:
R the 12 V sockets in the rear compartment
and the cargo compartment are
operational ( Y page 200).
R the plug of the electronic device is plugged
into 115 V power socket :.
R the on-board voltage is within a permissible
voltage range.
R the electronic device's maximum power
output does not exceed 150 W.
XOpen flap =.XSwitch the ignition on.XInsert the plug of the electronic device into
115 V power socket :.
Indicator lamp ; lights up.
If indicator lamp ; does not light up, please
read the chapter on malfunctions.
XTo turn off: disconnect the plug from
115 V power socket :.
Ensure that you do not pull on the cord.XClose flap =.Features201Loading, stowing and featuresZProCarManuals.com
Page 224 of 288
Washing by hand
When using the vehicle in winter, remove all
traces of road salt deposits carefully and as
soon as possible.
When washing the vehicle underbody, also
clean the inside of the wheels.
XDo not use hot water and do not wash the
vehicle in direct sunlight.XUse a soft sponge to clean.XUse a mild cleaning agent, such as a car
shampoo approved by Mercedes-Benz.XThoroughly hose down the vehicle with a
gentle jet of water.XDo not point the water jet directly towards
the air inlets.XUse plenty of water and rinse out the
sponge frequently.XRinse the vehicle with clean water and dry
thoroughly with a chamois.XDo not let the cleaning agent dry on the
paintwork.
High-pressure cleaning equipment
GWarning
Do not use power washers with circular jet
nozzles (concentrated-power jets) to clean
your vehicle, especially for cleaning tires. You
could otherwise damage the tires and cause
an accident.
! Maintain a minimum distance of
11.8 in (30 cm) between the vehicle and the
power washer nozzle. Information about
the correct distance is available from the
equipment manufacturer.
Move the power washer nozzle around
when cleaning your vehicle.
Do not aim directly at any of the following:
R tires
R door gaps, roof gaps, joints, etc.
R electrical components
R battery
R connectors
Rlights
R seals
R trim elements
R ventilation slots
Damaged seals or electrical components
can lead to leaks or failures.
Cleaning the wheels
! Do not use acidic wheel cleaning products
to remove brake dust. This could damage
wheel bolts and brake components.
! Do not park the vehicle for an extended
period right after cleaning it, particularly
after having cleaned the wheels with wheel
cleaner. Wheel cleaners could cause
increased corrosion of the brake discs and
brake pads/linings. For this reason, you
should drive for a few minutes after
cleaning. Braking heats the brake discs and
brake pads, thus drying them. The vehicle
can then be parked up.
Cleaning the paintwork
Scratches, corrosive deposits, areas affected
by corrosion and damage caused by
inadequate care cannot always be completely
repaired. In such cases, visit a qualified
specialist workshop immediately, e.g. an
authorized Mercedes-Benz Center.
XRemove impurities immediately, where
possible, whilst avoiding rubbing too hard.XSoak insect remains with insect remover
and rinse off the treated areas afterwards.XSoak bird droppings with water and rinse
off the treated areas afterwards.XRemove coolant, brake fluid, tree resin,
oils, fuels and greases by rubbing gently
with a cloth soaked in petroleum ether or
lighter fluid.XUse tar remover to remove tar stains.XUse silicone remover to remove wax.222CareMaintenance and care
ProCarManuals.com
Page 255 of 288

Check the tire pressures at least once a
month.
Only check and correct tire pressures when
the tires are cold ( Y page 249).
Checking the tire pressure manually
To determine and set the correct tire
pressure, proceed as follows:
XRemove the valve cap of the tire that is to
be checked.XPress the tire pressure gauge securely onto
the valve.XRead the tire pressure and compare it with
the recommended value on the tire and
loading information table on the B-pillar on
the driver's side of your vehicle.XIf necessary, increase the tire pressure to
the recommended value ( Y page 249).XIf the tire pressure is too high, release air
by pressing down the metal pin in the valve
using the tip of a pen, for example. Then,
check the tire pressure again using the tire
pressure gauge.XScrew the valve cap onto the valve.XRepeat these steps for the other tires.
Tire pressure monitor
Important safety notes
If a tire pressure monitor system is installed,
the vehicle's wheels have sensors that
monitor the tire pressures in all four tires. The
tire pressure monitor warns you when the
pressure drops in one or more of the tires. The
tire pressure monitor only functions if the
correct wheel electronics units are installed
on all wheels.
The tire pressure monitor has a yellow
warning lamp in the instrument cluster for
indicating pressure loss/malfunctions (USA)
or pressure loss (Canada). Whether the
warning lamp flashes or lights up indicates
whether a tire pressure is too low or the tire
pressure monitoring system is
malfunctioning:
R If the warning lamp is lit continuously, the
tire pressure on one or more tires is
significantly too low. The tire pressure
monitor is not malfunctioning.
R USA only: if the warning lamp flashes for
60 seconds and then remains lit constantly,
the tire pressure monitor is malfunctioning.GWarning!
The TPMS does not indicate a warning for
wrongly selected inflation pressures. Always
adjust tire inflation pressure according to the
Tire and Loading Information placard or the
supplemental tire inflation pressure
information on the inside of the fuel filler flap.
The TPMS is not able to issue a warning due
to a sudden dramatic loss of pressure (e.g. tire
blowout caused by a foreign object). In this
case bring the vehicle to a halt by carefully
applying the brakes and avoiding abrupt
steering maneuvers.
GWarning
Each tire, including the spare (if provided),
should be checked at least once a month
when cold and inflated to the inflation
pressure recommended by the vehicle
manufacturer on the Tire and Loading
Information placard on the driver’s door B-
pillar or the tire inflation pressure label on the
inside of the fuel filler flap. If your vehicle has
tires of a different size than the size indicated
on the Tire and Loading Information placard
or the tire inflation pressure label, you should
determine the proper tire inflation pressure
for those tires.
As an added safety feature, your vehicle has
been equipped with a tire pressure monitoring
system (TPMS) that illuminates a low tire
Tire pressure253Wheels and tiresZProCarManuals.com