2011 MERCEDES-BENZ G-CLASS hood open
[x] Cancel search: hood openPage 10 of 288

Exterior viewOverview .......................................... 24
F
First-aid kit ......................................... 229
Flat tire Changing a wheel/mounting the
spare wheel ................................... 232
Preparing the vehicle .....................232
Raising the vehicle .........................233
Floormat ............................................. 211
Front fog lamp (display message) ... 173
Fuel Additives ........................................ 278
Notes ............................................. 277
Premium-grade unleaded gasoline . 278
Refueling ........................................ 131
Specifications ................................ 278
Troubleshooting ............................. 134
Fuel/water separator ....................... 220
Fuel consumption Notes ............................................. 136
Fuel filler cap (display message) ..... 178
Fuel filler flap Emergency release ........................133
Opening/closing ............................ 132
Fuel filter
Display message ............................ 178
Fuel level
Calling up the range (on-board
computer) ...................................... 167
Fuse allocation chart ........................ 243
Fuse box Battery case ................................... 244
Dashboard ..................................... 243
Front-passenger footwell ...............243
Transmission tunnel ....................... 244
Fuse extractor ................................... 243
Fuses Dashboard fuse box .......................243
Fuse allocation chart .....................243
Fuse box in the front-passenger
footwell .......................................... 243
Fuse box in the transmission
tunnel ............................................ 244
In the battery case .........................244
Notes ............................................. 242
G
Garage door opener Clearing the memory .....................211
Notes ............................................. 208
Opening/closing the garage door ..210
Programming the remote control ...209
Gear or selector lever (cleaning
guidelines) ......................................... 225
Genuine Mercedes-Benz parts ......... 274
Genuine wood trim and trim strips
(cleaning instructions) ...................... 225
Glove box ........................................... 193
Gradient-climbing capability
(maximum) ......................................... 146
GTW (Gross Trailer Weight)
(definition) ......................................... 267
H
Hazard warning lamps ........................ 93
Headlamp cleaning system ................ 93
Adding washer fluid .......................218
Notes ............................................. 281
Headlamp delayed switch-off
see Exterior lighting delayed switch-off
Headlamp protection grille .............. 100
Headlamps Cleaning ......................................... 224
Misting up ........................................ 94
Headlamps (automatic) ...................... 91
Head restraints Adjusting (angle) .............................. 79
Adjusting (rear) ................................ 80
Installing/removing (rear) ................80
Luxury .............................................. 80
Resetting (front) ............................... 80
see NECK-PRO head restraints
Heating
see Climate control ........................ 106
High beam flasher ............................... 93
high-mounted brake lamp Display message ............................ 173
Hill start assist .................................. 118
Hood Closing ........................................... 215
Display message ............................ 181
Opening ......................................... 214
8IndexProCarManuals.com
Page 26 of 288
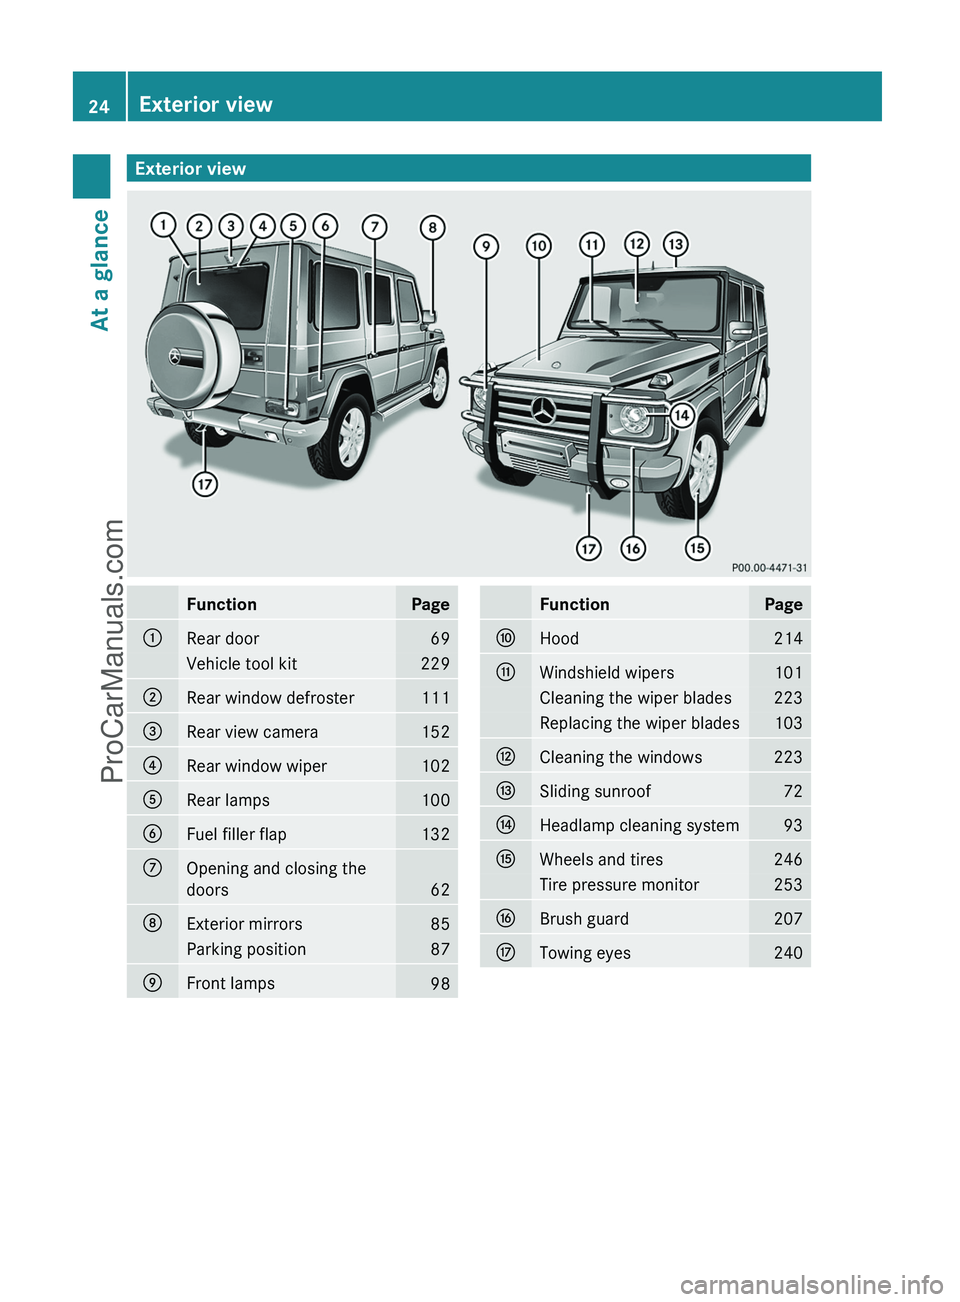
Exterior viewFunctionPage:Rear door69Vehicle tool kit229;Rear window defroster111=Rear view camera152?Rear window wiper102ARear lamps100BFuel filler flap132COpening and closing the
doors
62
DExterior mirrors85Parking position87EFront lamps98FunctionPageFHood214GWindshield wipers101Cleaning the wiper blades223Replacing the wiper blades103HCleaning the windows223ISliding sunroof72JHeadlamp cleaning system93KWheels and tires246Tire pressure monitor253LBrush guard207MTowing eyes24024Exterior viewAt a glance
ProCarManuals.com
Page 27 of 288
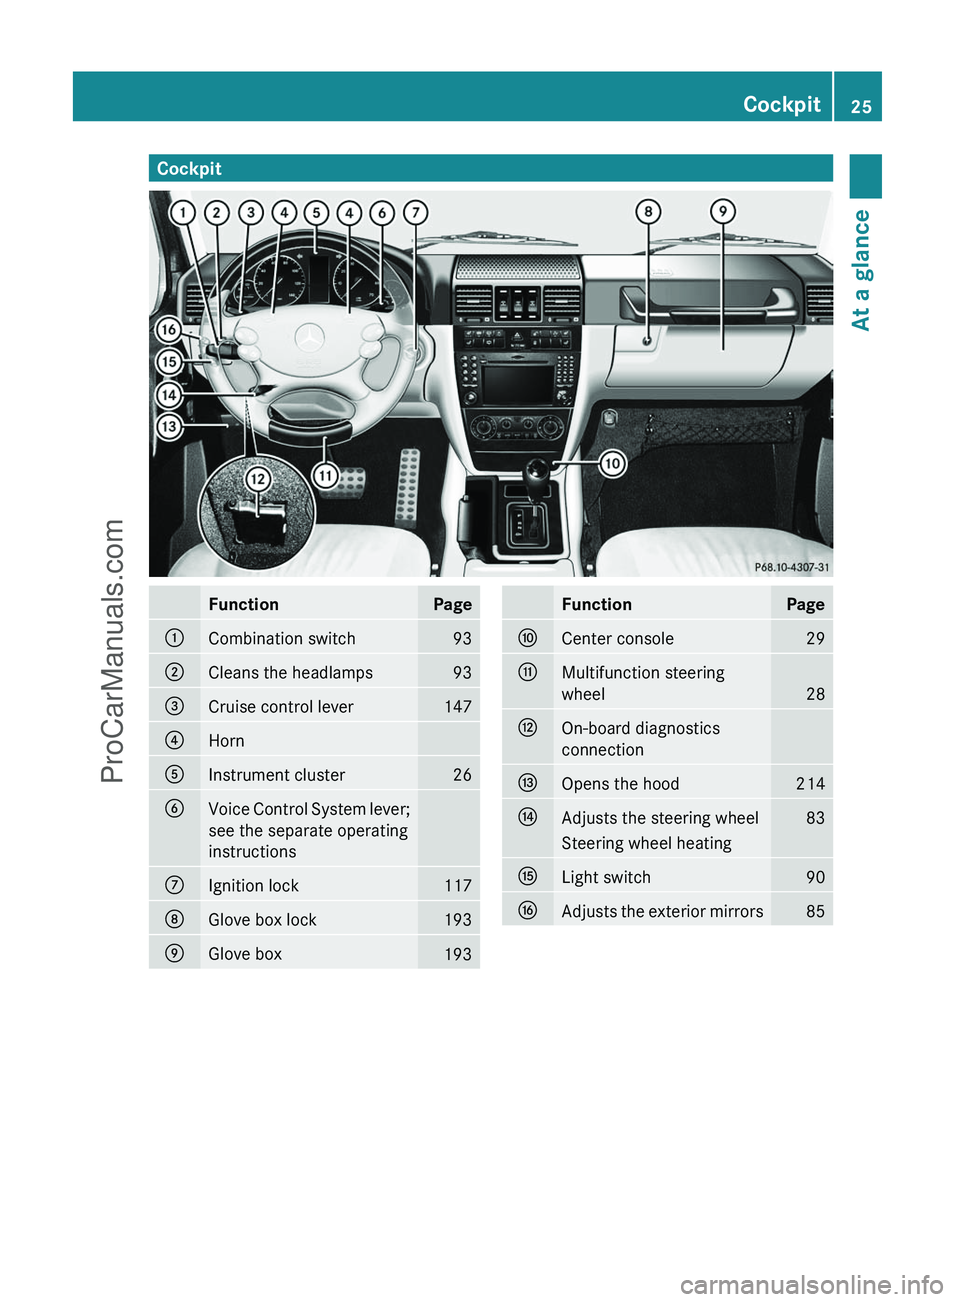
CockpitFunctionPage:Combination switch93;Cleans the headlamps93=Cruise control lever147?HornAInstrument cluster26BVoice Control System lever;
see the separate operating
instructionsCIgnition lock117DGlove box lock193EGlove box193FunctionPageFCenter console29GMultifunction steering
wheel
28
HOn-board diagnostics
connectionIOpens the hood214JAdjusts the steering wheel83Steering wheel heatingKLight switch90LAdjusts the exterior mirrors85Cockpit25At a glanceProCarManuals.com
Page 61 of 288
! Avoid spinning a drive wheel for an
extended period with ESP ®
switched off.
This could cause serious damage to the
drive train.XTo activate: press button : until the
å warning lamp goes out in the
instrument cluster.
EBD (Electronic Brake force
Distribution)
GWarning
Observe "Important safety notes"
( Y page 55).
EBD monitors and controls the brake
pressure on the rear wheels to improve
driving stability while braking.
GWarning!
If the EBD malfunctions, the brake system will
still function with full brake boost. However,
the rear wheels could lock up during
emergency braking situations, for example.
You could lose control of the vehicle and
cause an accident.
Adapt your driving style to the changed
driving characteristics.
Anti-theft systems
Immobilizer
The immobilizer prevents your vehicle from
being started without the correct key.
When leaving the vehicle, always take the
SmartKey with you and lock the vehicle. The
engine can be started by anyone with a valid
SmartKey that is left inside the vehicle.
XTo activate: remove the SmartKey from
the ignition lock.XTo deactivate: switch on the ignition.
i
The immobilizer is always deactivated
when you start the engine.
In the event that the engine cannot be
started when the starter battery is fully
charged, the immobilizer may be faulty.
Contact an authorized Mercedes-Benz
Center or call 1-800-FOR-MERCedes (in
USA) or 1-800-387-0100 (in Canada).
ATA (Anti-Theft Alarm system)
A visual and audible alarm is triggered if the
alarm system is armed and you open:
R a door
R a door using the mechanical key
R the rear door
R the hood
The alarm is also triggered if:
R the position of the vehicle is changed.
R a window is smashed.
The alarm is not switched off, even if you
close the open door that has triggered it, for
example.
i If the alarm stays on for more than 30
seconds, the emergency call system
mbrace (USA only) or TELEAID (Canada
only) initiates a call to the Customer
Assistance Center automatically. The
emergency call system initiates the call
provided that:
R you have subscribed to the mbrace/
TELEAID service.
R the mbrace/TELEAID service has been
activated properly.
R the required mobile phone, power supply
and GPS are available.
Anti-theft systems59SafetyZProCarManuals.com
Page 105 of 288
Replacing the wiper blades
Important safety notesGWarning!
For safety reasons, switch off the wipers and
remove the SmartKey from the starter switch
before replacing a wiper blade. Otherwise, the
wiper motor could suddenly turn on and cause
injury.
! To avoid damaging the wiper blades,
make sure that you touch only the wiper
arm of the wiper.
! Never open the hood if a windshield wiper
arm has been folded away from the
windshield.
Never fold a windshield wiper arm without
a wiper blade back onto the windshield/
rear window.
Hold the windshield wiper arm firmly when
you change the wiper blade. If you release
the windshield wiper arm without a wiper
blade and it falls onto the windshield, the
windshield may be damaged by the force of
the impact.
Mercedes-Benz recommends that you have
the wiper blades replaced by a qualified
specialist workshop, e.g. at an authorized
Mercedes-Benz Center.
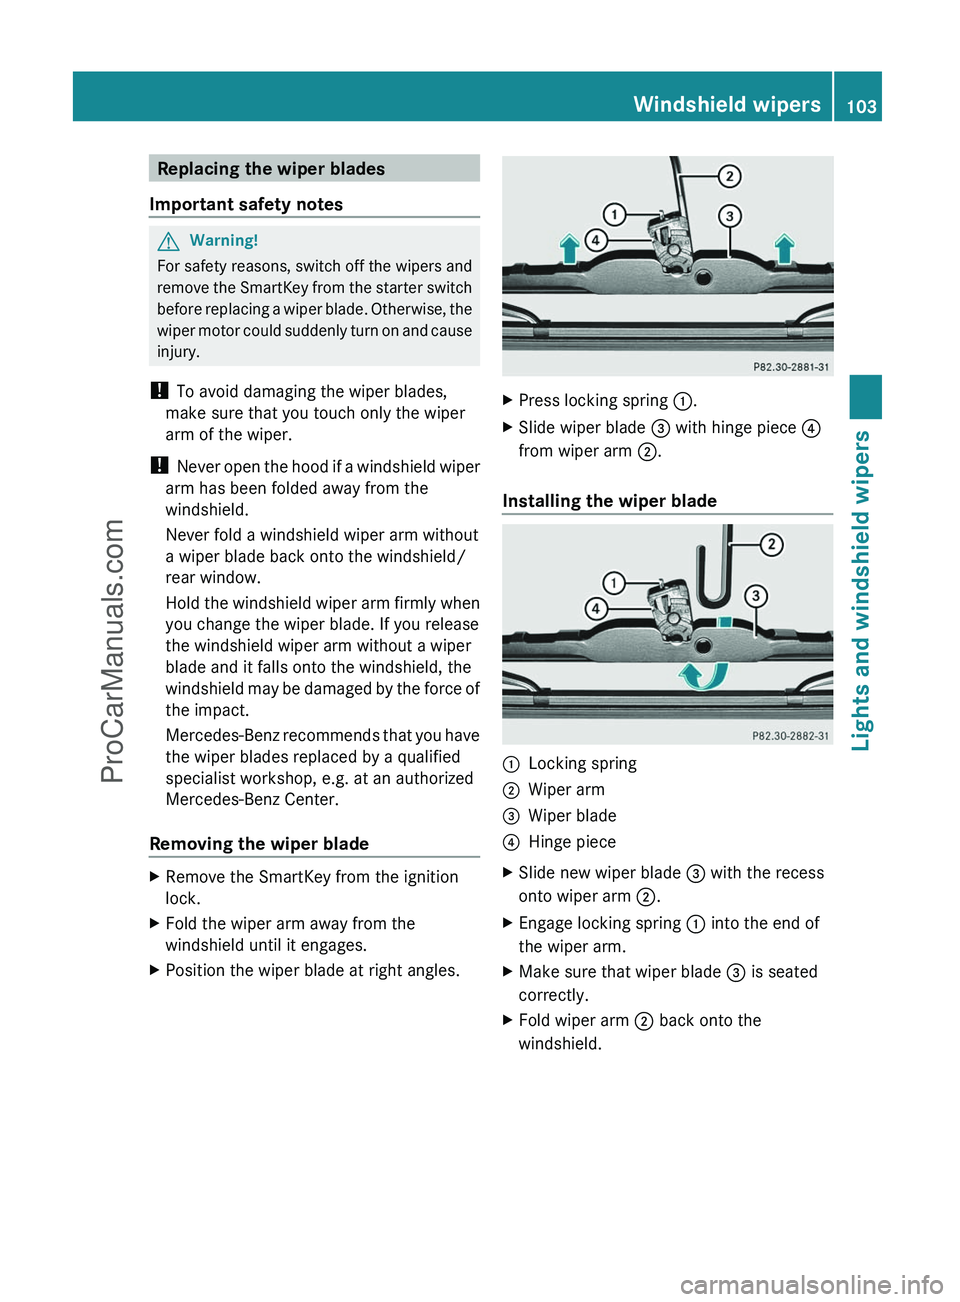
Removing the wiper blade
XRemove the SmartKey from the ignition
lock.XFold the wiper arm away from the
windshield until it engages.XPosition the wiper blade at right angles.XPress locking spring :.XSlide wiper blade = with hinge piece ?
from wiper arm ;.
Installing the wiper blade
:Locking spring;Wiper arm=Wiper blade?Hinge pieceXSlide new wiper blade = with the recess
onto wiper arm ;.XEngage locking spring : into the end of
the wiper arm.XMake sure that wiper blade = is seated
correctly.XFold wiper arm ; back onto the
windshield.Windshield wipers103Lights and windshield wipersZProCarManuals.com
Page 115 of 288
In order to ensure the direct flow of fresh air
through the air vents into the vehicle interior,
please observe the following notes:
R keep the air intake grille on the hood free
of blockages, such as ice, snow or leaves
R never cover the air vents or air intake grille
in the vehicle interior.
i For virtually draft-free ventilation, adjust
the sliders of the air vents to the center
position.
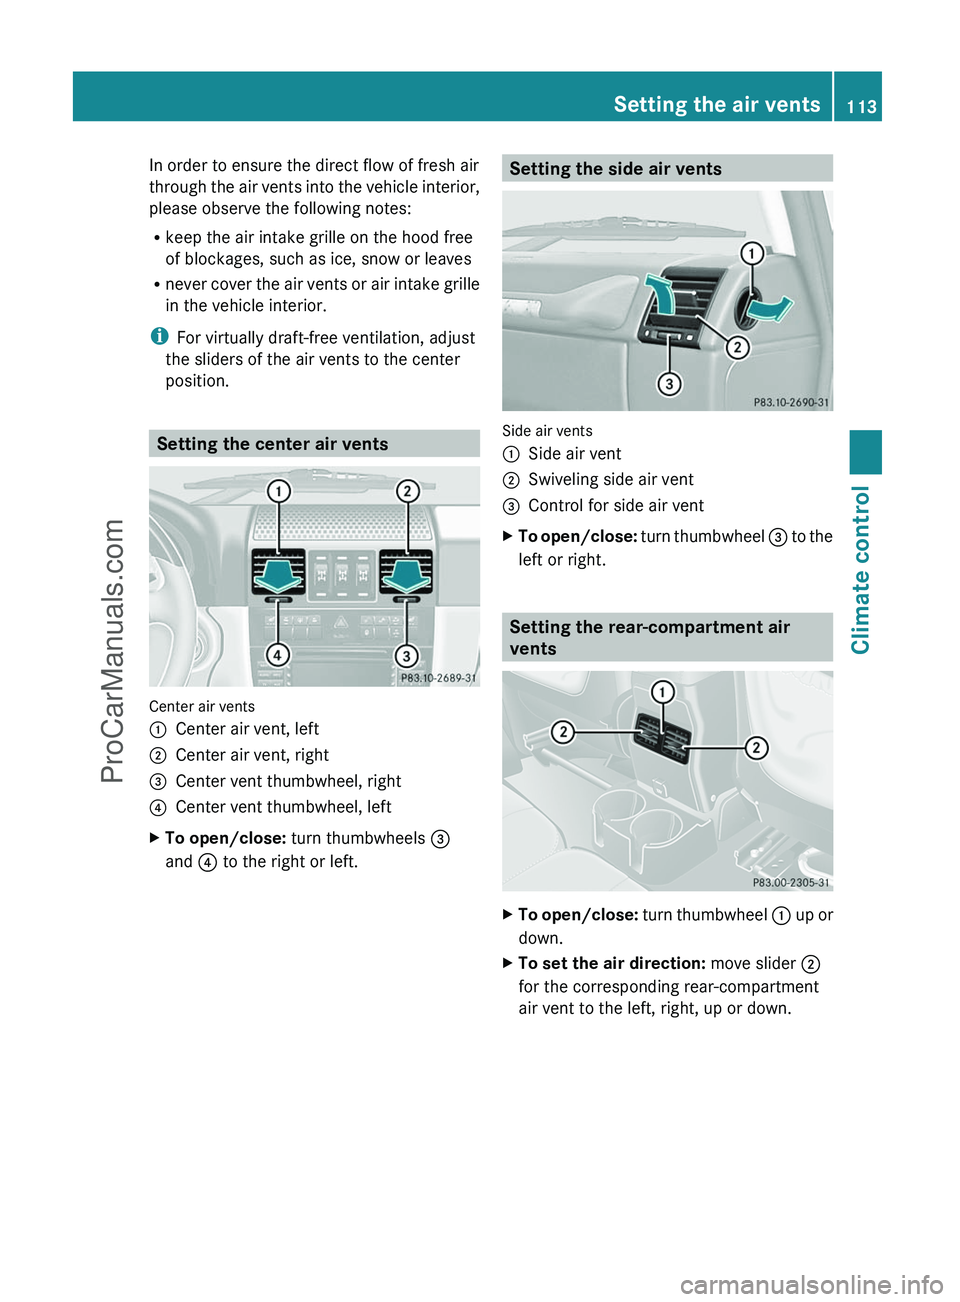
Setting the center air vents
Center air vents
:Center air vent, left;Center air vent, right=Center vent thumbwheel, right?Center vent thumbwheel, leftXTo open/close: turn thumbwheels =
and ? to the right or left.Setting the side air vents
Side air vents
:Side air vent;Swiveling side air vent=Control for side air ventXTo open/close: turn thumbwheel = to the
left or right.
Setting the rear-compartment air
vents
XTo open/close: turn thumbwheel : up or
down.XTo set the air direction: move slider ;
for the corresponding rear-compartment
air vent to the left, right, up or down.Setting the air vents113Climate controlZProCarManuals.com
Page 158 of 288
Vehicle equipment
i This manual describes all the standard
and optional equipment of your vehicle
which was available at the time of
purchase. Country-specific differences are
possible. Please note that your vehicle may
not be equipped with all features
described. This also applies to safety-
relevant systems and functions.
Important safety notes
You will find an illustration of the instrument
cluster in the "At a glance" section
( Y page 26).
GWarning
A driver's attention to the road and traffic
conditions must always be his/her primary
focus when driving.
For your safety and the safety of others,
selecting features through the multifunction
steering wheel should only be done by the
driver when traffic and road conditions permit
it to be done safely.
Bear in mind that at a speed of just 30 mph
(approximately 50 km/h ), your vehicle is
covering a distance of 44 feet (approximately
14 m) every second.
GWarning!
No messages will be displayed if either the
instrument cluster or the multifunction
display is inoperative.
As a result, you will not be able to see
information about your driving conditions,
such as
R speed
R outside temperature
R warning/indicator lamps
R malfunction/warning messages
R failure of any systems
Driving characteristics may be impaired.
If you must continue to drive, do so with added
caution. Contact an authorized Mercedes-
Benz Center as soon as possible.GWarning
Malfunction and warning messages are only
indicated for certain systems and are
intentionally not very detailed. The
malfunction and warning messages are
simply a reminder with respect to the
operation of certain systems. They do not
replace the owner's and/or driver's
responsibility to maintain the vehicle's
operating safety. Have all required
maintenance and safety checks performed on
the vehicle. Bring the vehicle to an authorized
Mercedes-Benz Center to address the
malfunction and warning messages.
Displays and operation
Tachometer
The red band in the tachometer indicates the
engine's overrevving range.
! Do not drive in the overrevving range, as
this could damage the engine.
The fuel supply is interrupted to protect the
engine when the red band is reached.
Displaying the coolant temperature
GWarning
Driving when your engine is overheated can
cause some fluids which may have leaked into
the engine compartment to catch fire. You
could be seriously burned.
Steam from an overheated engine can cause
serious burns which can occur just by opening
the engine hood. Stay away from the engine
if you see or hear steam coming from it.
Stop the vehicle in a safe location away from
other traffic. Turn off the engine, get out of the
vehicle and do not stand near the vehicle until
the engine has cooled down.
156Displays and operationOn-board computer and displays
ProCarManuals.com
Page 177 of 288
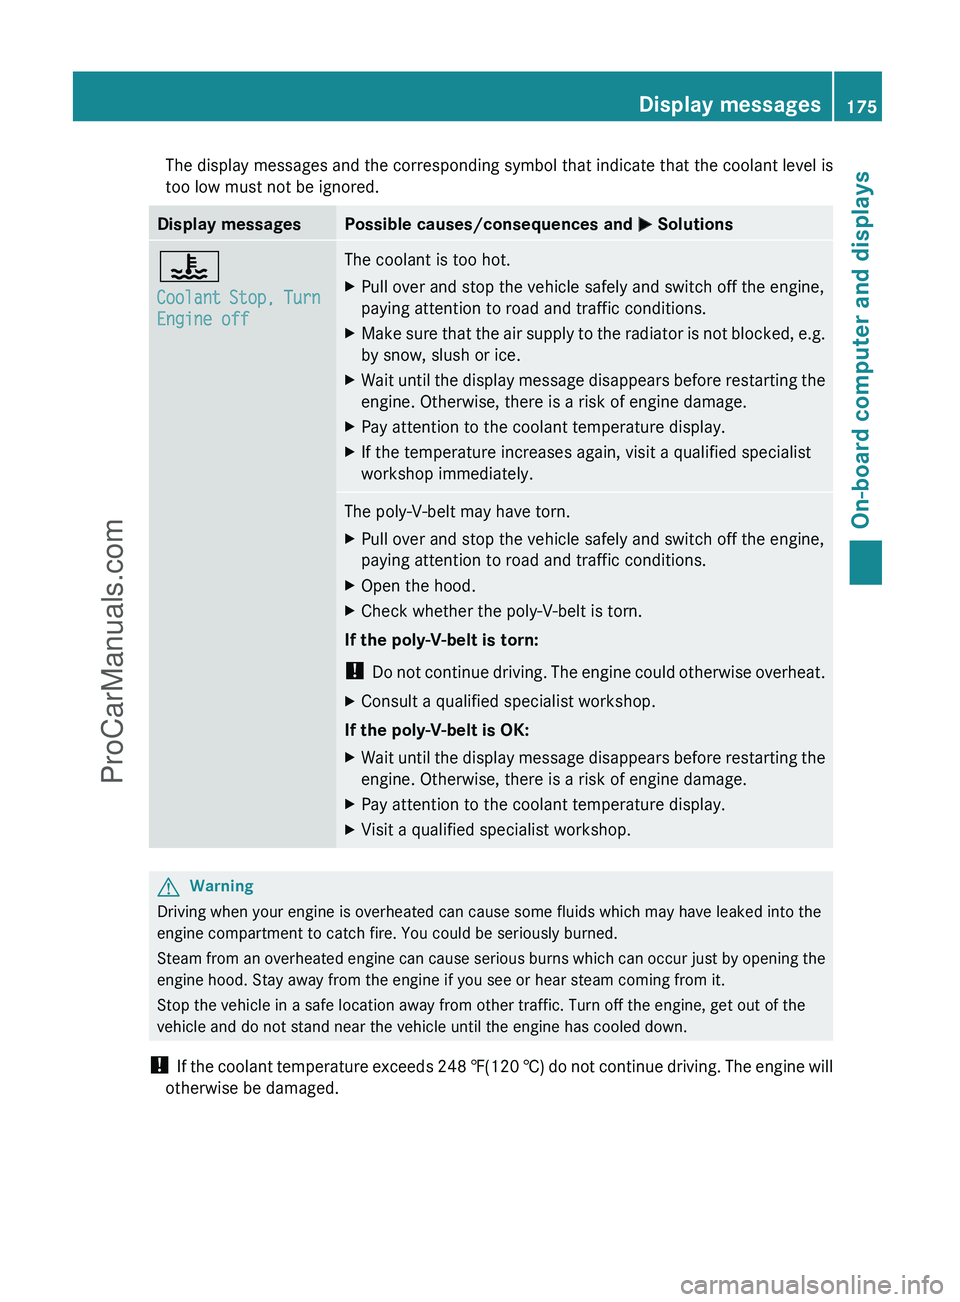
The display messages and the corresponding symbol that indicate that the coolant level is
too low must not be ignored.Display messagesPossible causes/consequences and M Solutions?
Coolant Stop, Turn
Engine offThe coolant is too hot.XPull over and stop the vehicle safely and switch off the engine,
paying attention to road and traffic conditions.XMake sure that the air supply to the radiator is not blocked, e.g.
by snow, slush or ice.XWait until the display message disappears before restarting the
engine. Otherwise, there is a risk of engine damage.XPay attention to the coolant temperature display.XIf the temperature increases again, visit a qualified specialist
workshop immediately.The poly-V-belt may have torn.XPull over and stop the vehicle safely and switch off the engine,
paying attention to road and traffic conditions.XOpen the hood.XCheck whether the poly-V-belt is torn.
If the poly-V-belt is torn:
! Do not continue driving. The engine could otherwise overheat.
XConsult a qualified specialist workshop.
If the poly-V-belt is OK:
XWait until the display message disappears before restarting the
engine. Otherwise, there is a risk of engine damage.XPay attention to the coolant temperature display.XVisit a qualified specialist workshop.GWarning
Driving when your engine is overheated can cause some fluids which may have leaked into the
engine compartment to catch fire. You could be seriously burned.
Steam from an overheated engine can cause serious burns which can occur just by opening the
engine hood. Stay away from the engine if you see or hear steam coming from it.
Stop the vehicle in a safe location away from other traffic. Turn off the engine, get out of the
vehicle and do not stand near the vehicle until the engine has cooled down.
! If the coolant temperature exceeds 248 ‡(120 †) do not continue driving. The engine will
otherwise be damaged.
Display messages175On-board computer and displaysZProCarManuals.com