2011 MERCEDES-BENZ G-CLASS warning lights
[x] Cancel search: warning lightsPage 119 of 288

Only shift the automatic transmission to
the desired drive position when the vehicle
is stationary.
Where possible, avoid spinning the drive
wheels when pulling away on slippery
roads. You could otherwise damage the
drive train.
! Avoid high engine speeds when the
engine is cold. The engine's service life
could otherwise be significantly shortened.
Do not use the engine's full performance
until it has reached operating temperature.
SmartKey positions
gTo remove the SmartKey1Power supply for some consumers, such
as the windshield wipers2Ignition (power supply for all consumers)
and drive position3To start the engine
i You can only remove the SmartKey if:
R the SmartKey is in position 0 in the
ignition lock.
R the automatic transmission selector
lever is in P.
As soon as the ignition is switched on, all the
indicator lamps in the instrument cluster light
up. If an indicator lamp does not go out after
the engine is started or if it lights up while the
vehicle is in motion, see ( Y page 183).
If the SmartKey is in position 0 in the ignition
lock for an extended period of time, it can no
longer be turned in the ignition lock. The
steering is then locked. To unlock, remove the
SmartKey and reinsert it into the ignition lock.
The steering is locked when you remove the
SmartKey from the ignition lock.XRemove the SmartKey when the engine is
switched off.
The starter battery could otherwise be
discharged.
If you cannot turn the SmartKey in the ignition
lock, the starter battery may not be charged
sufficiently.
XCheck the starter battery and charge if
necessary ( Y page 236).
or
XJump-start the vehicle ( Y page 238).
Starting the engine
Important safety notes
GWarning
Inhalation of exhaust gas is hazardous to your
health. All exhaust gas contains carbon
monoxide (CO), and inhaling it can cause
unconsciousness and possible death.
Do not run the engine in confined areas (such
as a garage) which are not properly ventilated.
If you think that exhaust gas fumes are
entering the vehicle while driving, have the
cause determined and corrected
immediately. If you must drive under these
conditions, drive only with at least one
window fully open at all times.
! Do not depress the accelerator pedal
when starting the engine.
Starting procedure
XShift the automatic transmission to
position P.
The transmission position display in the
multifunction display shows P.Driving117Driving and parkingZProCarManuals.com
Page 132 of 288
locks, vehicle steerability is severely
restricted.
For your own safety, the safety of others, and
in order to avoid damage to the vehicle, the
differential locks must not be engaged when
driving on a firm road surface. Keep in mind
that when driving on firm road surfaces, the
unimpeded function of the differential is
necessary and must never be locked on firm
road surfaces. Vehicle steerability may
otherwise be lost and you may no longer be
able to steer the vehicle. For this reason, the
differential locks must be engaged
exclusively during off-road driving, and only
when activating the other driving systems
(4ETS, ESP ®
and off-road gear LOW) is no
longer sufficient.
Activating the differential lock
General notes
GWarning!
Never drive on firm road surfaces with
differential locks engaged. Never drive on
narrow bends with front-axle differential locks
engaged. With differential locks engaged, the
vehicle's ability to steer is severely restricted
and the danger of accidents is therefore
higher.
Do not engage or disengage differential locks
while driving on a bend. The vehicle may
otherwise make a jerking movement. You
could thus lose control of the vehicle and
cause an accident.
If you select a differential lock, ABS, 4ETS,
ESP ®
and BAS will be deactivated.
Activate the differential locks:
R off-road
R to deactivate ABS, 4ETS, ESP ®
and BAS
while off-road
R when fording
R on snow-covered, icy or dirty road surfaces
For further information on driving off-road,
see ( Y page 142).
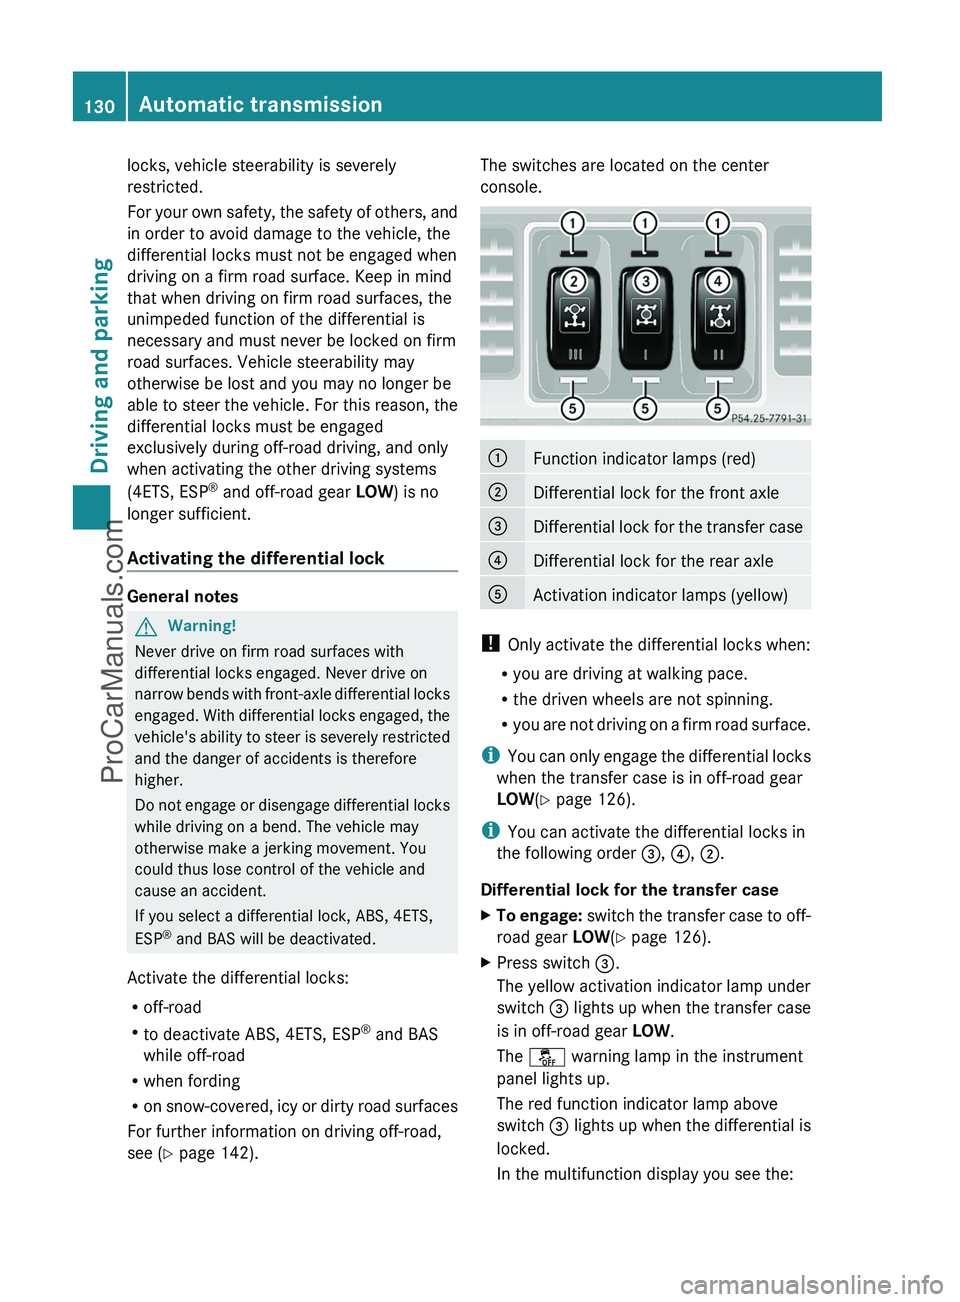
The switches are located on the center
console.:Function indicator lamps (red);Differential lock for the front axle=Differential lock for the transfer case?Differential lock for the rear axleAActivation indicator lamps (yellow)
! Only activate the differential locks when:
R you are driving at walking pace.
R the driven wheels are not spinning.
R you are not driving on a firm road surface.
i You can only engage the differential locks
when the transfer case is in off-road gear
LOW (Y page 126).
i You can activate the differential locks in
the following order =, ? , ; .
Differential lock for the transfer case
XTo engage: switch the transfer case to off-
road gear LOW(Y page 126).XPress switch =.
The yellow activation indicator lamp under
switch = lights up when the transfer case
is in off-road gear LOW.
The å warning lamp in the instrument
panel lights up.
The red function indicator lamp above
switch = lights up when the differential is
locked.
In the multifunction display you see the:130Automatic transmissionDriving and parking
ProCarManuals.com
Page 133 of 288
ABS not available Differential
Locked message.
The å!÷ warning lamps light up
in the instrument cluster.
The differential lock for the transfer case is
engaged.
4ETS, ESP ®
, BAS and ABS are deactivated.
The vehicle's ability to steer is severely
restricted. Drive carefully and accelerate
gently for optimum traction.
i You can now engage differential lock for
the rear axle ? and differential lock for the
front axle ; as desired.
Differential lock for the rear axle
XTo engage: press switch ?.
First, the yellow activation indicator lamp
lights up, followed by the red function
indicator lamp.
The differential lock for the rear axle is
engaged.
Differential lock for the front axle
XTo engage: press switch ;.
First, the yellow activation indicator lamp
lights up, followed by the red function
indicator lamp.
The differential lock for the front axle is
engaged.
Deactivating the differential lock
You can deactivate the differential locks in
the reverse order: ;, ? , = .
XTo simultaneously deactivate all
differential locks: press switch =.
Yellow activation indicator lamps A go
out. Red function indicator lamps : go out
once the differential locks have
disengaged.
After approximately three seconds of
normal driving, ABS, 4ETS, ESP ®
and BAS
are activated.
The ABS not available Differential
Locked message disappears from themultifunction display and the å, !
and ÷ warning lamps in the instrument
cluster go out.XSwitch the transfer case to road gear
HIGH (Y page 126).
i
If red function indicator lamps : do not
go out when you disengage the differential
locks, bring the vehicle to a stop in
accordance with the traffic conditions,
then begin driving again. The load change
can disengage the differential locks.
GWarning!
Always remember to disengage the
differential locks when returning to drive on
paved roads, see “A few words about
differentials and differential locks”.
Refueling
Important safety notes
GWarning
Gasoline is highly flammable and poisonous.
It burns violently and can cause serious
personal injury.
Never allow sparks, flames or smoking
materials near gasoline.
Turn off the engine before refueling.
Whenever you are around gasoline, avoid
inhaling fumes and any skin or clothing
contact.
Direct skin contact with fuels and the
inhalation of fuel vapors are damaging to your
health.
GWarning
Overfilling of the fuel tank may create
pressure in the system which could cause a
gas discharge. This could cause the gasoline
to spray back out when removing the fuel
pump nozzle, which could cause personal
injury.
Refueling131Driving and parkingZProCarManuals.com
Page 137 of 288
Rturn the SmartKey in the ignition lock to
position 0 and remove the SmartKey from
the ignition lock.
R take the SmartKey with you and lock the
vehicle when leaving.
Switching off the engine
GWarning
Do not turn off the engine before the vehicle
has come to a complete stop. With the engine
not running, there is no power assistance for
the brake and steering systems. In this case,
it is important to keep in mind that a
considerably higher degree of effort is
necessary to brake and steer the vehicle.
GWarning!
Keep in mind that turning off the engine alone
only will shift AUTOTRONIC into neutral
position N automatically.
Always shift AUTOTRONIC into park position
P before turning off the engine.
Otherwise the vehicle could roll away which
could result in an accident and/or serious
personal injury.
XShift the transmission to position P.XTurn the SmartKey to position 0 in the
ignition lock and remove it.
The immobilizer is activated.XApply the parking brake firmly.
i The SmartKey can only be removed if the
automatic transmission is in position P.
Parking brake
GWarning
Engaging the parking brake while the vehicle
is in motion can cause the rear wheels to lock
up. You could lose control of the vehicle and
cause an accident. In addition, the vehicle's
brake lights do not light up when the parking
brake is engaged.
GWarning!
When leaving the vehicle, always remove the
SmartKey from the starter switch, take it with
you, and lock the vehicle. Do not leave
children unattended in the vehicle, or with
access to an unlocked vehicle. Children could
release the parking brake and/or shift the
automatic transmission out of park position
P , either of which could result in an accident
and/or serious personal injury.
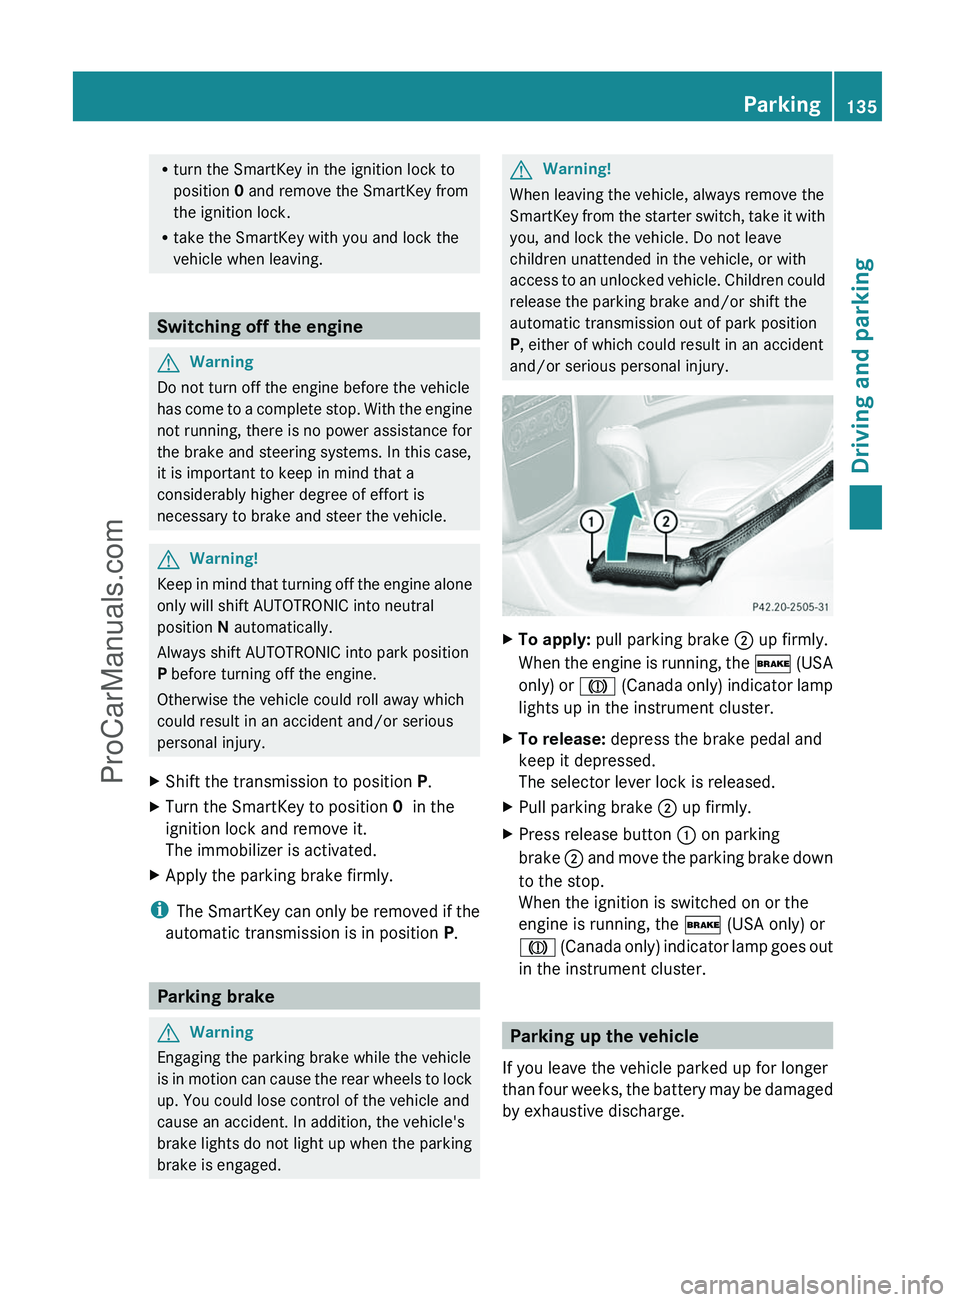
XTo apply: pull parking brake ; up firmly.
When the engine is running, the $ (USA
only) or J (Canada only) indicator lamp
lights up in the instrument cluster.XTo release: depress the brake pedal and
keep it depressed.
The selector lever lock is released.XPull parking brake ; up firmly.XPress release button : on parking
brake ; and move the parking brake down
to the stop.
When the ignition is switched on or the
engine is running, the $ (USA only) or
J (Canada only) indicator lamp goes out
in the instrument cluster.
Parking up the vehicle
If you leave the vehicle parked up for longer
than four weeks, the battery may be damaged
by exhaustive discharge.
Parking135Driving and parkingZProCarManuals.com
Page 140 of 288
Wet road surfaceGWarning
After driving in heavy rain for some time
without applying the brakes or through water
deep enough to wet brake components, the
first braking action may be somewhat
reduced. You have to depress the brake pedal
more firmly. Maintain a safe distance from
vehicles in front.
After driving on a wet road or having the
vehicle washed, brake firmly while paying
attention to the traffic conditions. This will
warm up the brake discs, thereby drying them
more quickly and protecting them against
corrosion.
GWarning
Make sure that you do not endanger other
road users when you apply the brakes.
Limited braking performance on salt
treated roads
GWarning
The layer of salt on the brake discs and the
brake pads/linings may cause a delay in the
braking effect, resulting in a significantly
longer braking distance, which could lead to
an accident.
To avoid this danger, you should:
R occasionally brake carefully, without
putting other road users at risk, when you
are driving on salted roads. This helps to
remove any salt that may have started to
build up on the brake discs and the brake
pads/linings.
R maintain a greater distance to the vehicle
ahead and drive with particular care.
R carefully apply the brakes at the end of a
trip and immediately after commencing a
new trip, so that salt residues are removed
from the brake discs.
Brake maintenance
! If the brake warning lamp lights up in the
instrument cluster and you hear a warning
tone, even though the parking brake has
been released, the brake fluid level may be
too low. Observe additional warning
messages in the multifunction display.
The brake fluid level may be too low due to
brake pad wear or leaking brake lines.
Have the brake system checked
immediately. This work should be carried
out at an authorized Mercedes-Benz
Center.
All checks and maintenance work on the
brake system must be carried out at a
qualified specialist workshop only. Consult an
authorized Mercedes-Benz Center for this
purpose.
Have the brake pads and the brake fluid
replaced at a qualified specialist workshop,
e.g. an authorized Mercedes-Benz Center.
GWarning
If other than recommended brake pads are
installed, or other than recommended brake
fluid is used, the braking properties of the
vehicle can be degraded to an extent that safe
braking is substantially impaired. This could
result in an accident.
! A function or performance test may only
be carried out on a two-axle dynamometer.
If you are planning to have the vehicle
tested on such a dynamometer, contact an
authorized Mercedes-Benz Center to
obtain further information first. Otherwise,
the drive train or the brake system may
suffer damage.
! As the ESP ®
system operates
automatically, the engine and the ignition
must be switched off (the key must be in
position 0 or 1 in the ignition lock) if the
parking brake is tested on a brake
dynamometer (for a maximum of ten
seconds).
138Driving tipsDriving and parking
ProCarManuals.com
Page 141 of 288
Braking applications triggered
automatically by ESP ®
may otherwise
seriously damage the brake system.
If your brake system is subject only to
moderate loads, you should test the
functionality of your brakes at regular
intervals by pressing firmly on the brake pedal
at high speeds. This improves the grip of the
brake pads.GWarning
Make sure that you do not endanger other
road users when you apply the brakes.
You can find a description of Brake Assist
(BAS) on ( Y page 56).
High-performance brake system for
AMG vehicles
The high-performance brake system is
installed only on the G 55 AMG.
GWarning
New vehicle brake pads and discs, and
replacement brake pads and discs may take
several hundred miles of driving until they
provide optimum braking efficiency. Until that
time, you may need to use increased brake
pedal pressure while braking. Please be aware
of this and adjust your driving and braking
accordingly during this break-in period.
Excessive high-demand braking will cause
correspondingly high brake wear. Please be
attentive to the brake warning lamp in the
instrument cluster and brake condition
messages in the multifunction display.
Especially for high performance driving, it is
important to maintain and have the brake
system checked regularly.
The high-performance brake system is
designed for heavy loads. This may lead to
noise when braking. This will depend on:
R speed
R braking force
R environmental conditions, such as
temperature and humidity
The wear of individual components of the
brake system, such as the brake pads/linings
or brake discs, depends on the individual
driving style and operating conditions.
For this reason, it is impossible to state a
mileage that will be valid under all
circumstances. An aggressive driving style
will lead to high wear. You can obtain further
information about this from your authorized
Mercedes-Benz Center.
Parking brakeGWarning!
While performing this procedure please
assure that the vehicle is stopped before
applying the parking brake. Otherwise the
rear wheels could lock up. You could lose
control of the vehicle and cause an accident.
In addition, the vehicle’s brake lights do not
light up when the parking brake is engaged.
Make sure not to endanger any other road
users when you engage the parking brake.
To maintain the braking effect of the parking
brake between the service intervals, you can
briefly apply the parking brake while driving.
XDrive about 20 mph (30 km/h) on a dry,
even road.XPull the parking brake upwards with the
release button depressed ( Y page 135),
until the vehicle brakes noticeably.XHold the lever in this position for
approximately ten seconds and then push
it all the way down again.
! Do not drive faster than 25 mph
(40 km/h). Otherwise, you could damage
the brakes.
Driving tips139Driving and parkingZProCarManuals.com
Page 145 of 288
RCheck the depth of water before fording
rivers and streams.
R When fording, do not stop and do not
switch off the engine.
R Look out for obstacles such as rocks, holes,
tree stumps and furrows.
R Always keep the doors, rear door, windows
and the sliding sunroof closed while the
vehicle is in motion.
R Switch off cruise control.
R Do not stray from marked routes or paths.
R Adapt your speed to the terrain. The
rougher, steeper or more ruts on the
terrain, the slower your speed should be.
R Drive slowly and at an even speed through
the water. Ensure that a bow wave does not
form as you drive.
R On sand, drive quickly to overcome the
rolling resistance. Otherwise, the vehicle
could dig itself into the sand.
R Do not jump with the vehicle as this will
interrupt the vehicle's propulsion.
R Avoid high engine speeds. Drive at
reasonable engine speeds (maximum
3000 rpm).
R Do not shift the automatic transmission to
transmission position N.
R Always check the vehicle for damage after
off-road driving.
i Information about retrofitting special all-
terrain tires is available from any
authorized Mercedes-Benz Center.HEnvironmental note
Protection of the environment is of primary
importance. Treat nature with respect.
Observe all prohibiting signs.
Checklist before driving off-road
XEngine oil level: check the engine oil and
top it up if necessary.
Only then does the engine receive enough
oil when the vehicle is standing on a steep
incline.! If the engine oil warning lamp lights up
while the vehicle is in motion, stop the
vehicle in a safe place as soon as possible.
Check the engine oil level. The engine oil
warning lamp warning must not be ignored.
Continuing the journey while the symbol is
displayed could lead to engine damage.XWheel-changing tool kit: check that the
jack is working and make sure you have the
wheelbrace, a robust tow cable and a
folding spade in the vehicle.XWheels and tires: check the tire tread
depth and tire pressure.XCheck for damage and remove any foreign
objects, e.g. small stones, from the
wheels/tires.XReplace any missing valve caps.XReplace dented or damaged wheels.XCarry a sound spare wheel.
Checklist after driving off-road
GWarning
If you feel a sudden significant vibration or
ride disturbance, or you suspect that possible
damage to your vehicle has occurred, you
should turn on the hazard warning flashers,
carefully slow down, and drive with caution to
an area which is a safe distance from the road.
Inspect the tires and the vehicle underbody
for possible damage. If the vehicle appears
unsafe, have the vehicle towed to the nearest
authorized Mercedes-Benz Center or tire
dealer for repairs.
Driving over rough terrain places greater
demands on your vehicle than driving on
normal roads. After driving off-road, check
the vehicle. This allows you to detect damage
promptly and reduce the risk of an accident
to yourself and other road users.
XShift the transfer case to HIGH
( Y page 126).XDisengage the differential locks
( Y page 129).Driving tips143Driving and parkingZProCarManuals.com
Page 146 of 288
XClean the headlamps and rear lights and
check for damage.XClean the front and rear license plates.XClean the wheels and tires with a water jet
and remove any foreign objects.XClean the wheels, tires, wheel arches and
the vehicle underside with a water jet;
check for any foreign objects and damage.XCheck whether twigs or other parts of
plants have become trapped. These
increase the risk of fire and can damage
fuel pipes, brake hoses or the rubber
bellows of the axle joints and propeller
shafts.XAfter the trip, examine without fail the
entire undercarriage, wheels, tires, brakes,
bodywork structure, steering, chassis and
exhaust system for damage.XAfter driving for extended periods across
sand, mud, gravel, water or in similarly dirty
conditions, have the brake discs, wheels,
brake pads/linings and axle joints checked
and cleaned.XIf you detect strong vibrations after off-road
driving, check for foreign objects in the
wheels and drivetrain and remove any that
you find. Foreign objects can disturb the
balance and cause vibrations.XTest the brakes.
Driving on sand
GWarning!
Do not reduce the tire inflation pressure
before driving through sand. However, if you
do so, remember to correct the tire inflation
pressure before continuing your trip. Driving
with reduced tire inflation pressure increases
the risk of losing control of the vehicle and
rolling over.
Observe the following rules when driving on
sand:
R shift the transfer case to
LOW (Y page 126).
R avoid high engine speeds.
R limit the shift range of the automatic
transmission according to the off-road
conditions.
R drive quickly to overcome the rolling
resistance. Otherwise, the vehicle could dig
itself into the sand.
R drive in the tracks of other vehicles if
possible. Make sure that the ruts are not
too deep, that the sand is firm enough and
that your vehicle has sufficient ground
clearance.
Tire ruts and gravel roads
Observe the following rules when driving
along ruts in off-road terrain or on roads with
loose gravel:
! Check that the ruts are not too deep and
that your vehicle has sufficient clearance.
Otherwise, your vehicle could be damaged
or bottom out and get stuck.
R shift the transfer case to
LOW (Y page 126).
R avoid high engine speeds.
R observe the safety notes (Y page 142) and
the general notes (Y page 142) on off-road
driving.
R restrict the shift range of the automatic
transmission to 1 (Y page 123).
R drive slowly.
R where ruts are too deep, drive with the
wheels of one side on the center grassy
area, if possible.
144Driving tipsDriving and parking
ProCarManuals.com