2011 MERCEDES-BENZ G-CLASS ECU
[x] Cancel search: ECUPage 217 of 288
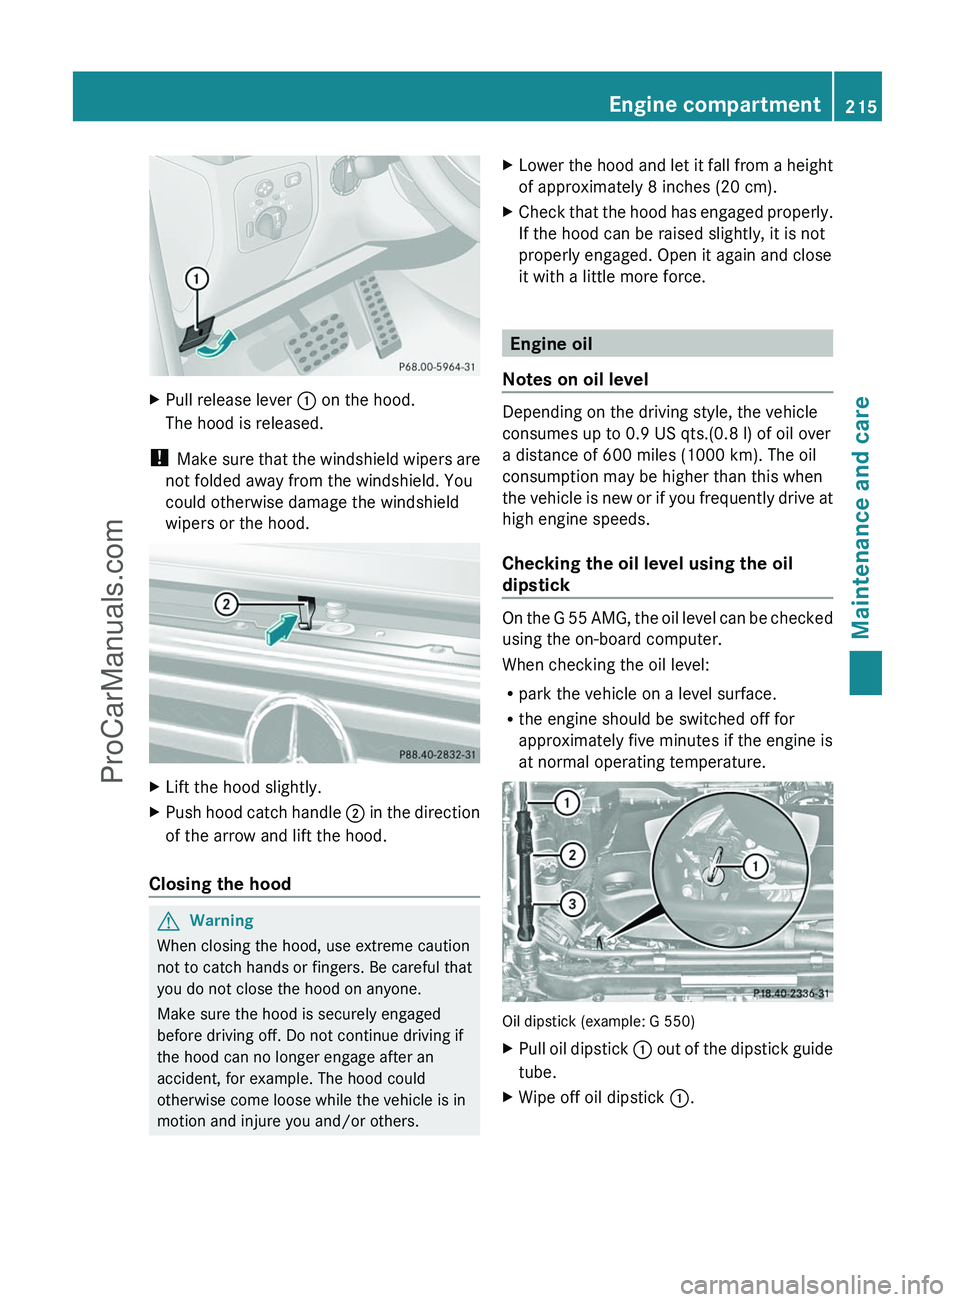
XPull release lever : on the hood.
The hood is released.
! Make sure that the windshield wipers are
not folded away from the windshield. You
could otherwise damage the windshield
wipers or the hood.
XLift the hood slightly.XPush hood catch handle ; in the direction
of the arrow and lift the hood.
Closing the hood
GWarning
When closing the hood, use extreme caution
not to catch hands or fingers. Be careful that
you do not close the hood on anyone.
Make sure the hood is securely engaged
before driving off. Do not continue driving if
the hood can no longer engage after an
accident, for example. The hood could
otherwise come loose while the vehicle is in
motion and injure you and/or others.
XLower the hood and let it fall from a height
of approximately 8 inches (20 cm).XCheck that the hood has engaged properly.
If the hood can be raised slightly, it is not
properly engaged. Open it again and close
it with a little more force.
Engine oil
Notes on oil level
Depending on the driving style, the vehicle
consumes up to 0.9 US qts.(0.8 l) of oil over
a distance of 600 miles (1000 km). The oil
consumption may be higher than this when
the vehicle is new or if you frequently drive at
high engine speeds.
Checking the oil level using the oil
dipstick
On the G 55 AMG, the oil level can be checked
using the on-board computer.
When checking the oil level:
R park the vehicle on a level surface.
R the engine should be switched off for
approximately five minutes if the engine is
at normal operating temperature.
Oil dipstick (example: G 550)
XPull oil dipstick : out of the dipstick guide
tube.XWipe off oil dipstick :.Engine compartment215Maintenance and careZProCarManuals.com
Page 219 of 288
! Only use engine oils and oil filters which
have been approved for vehicles with a
service system. A list of the engine oils and
oil filters that have been tested and
approved according to the Mercedes-Benz
specifications for service products can be
found on the Internet at http://
www.mbusa.com (USA only). Further
information on tested and approved engine
oils and oil filters can be obtained from any
authorized Mercedes-Benz Center.
The following causes engine failure or
damage to the exhaust system:
Rusing engine oils and oil filters that are
not specifically approved for the service
system
Rreplacing the engine oil and oil filter after
having exceeded the interval for
replacement prescribed by the
maintenance system
Rusing engine oil additives
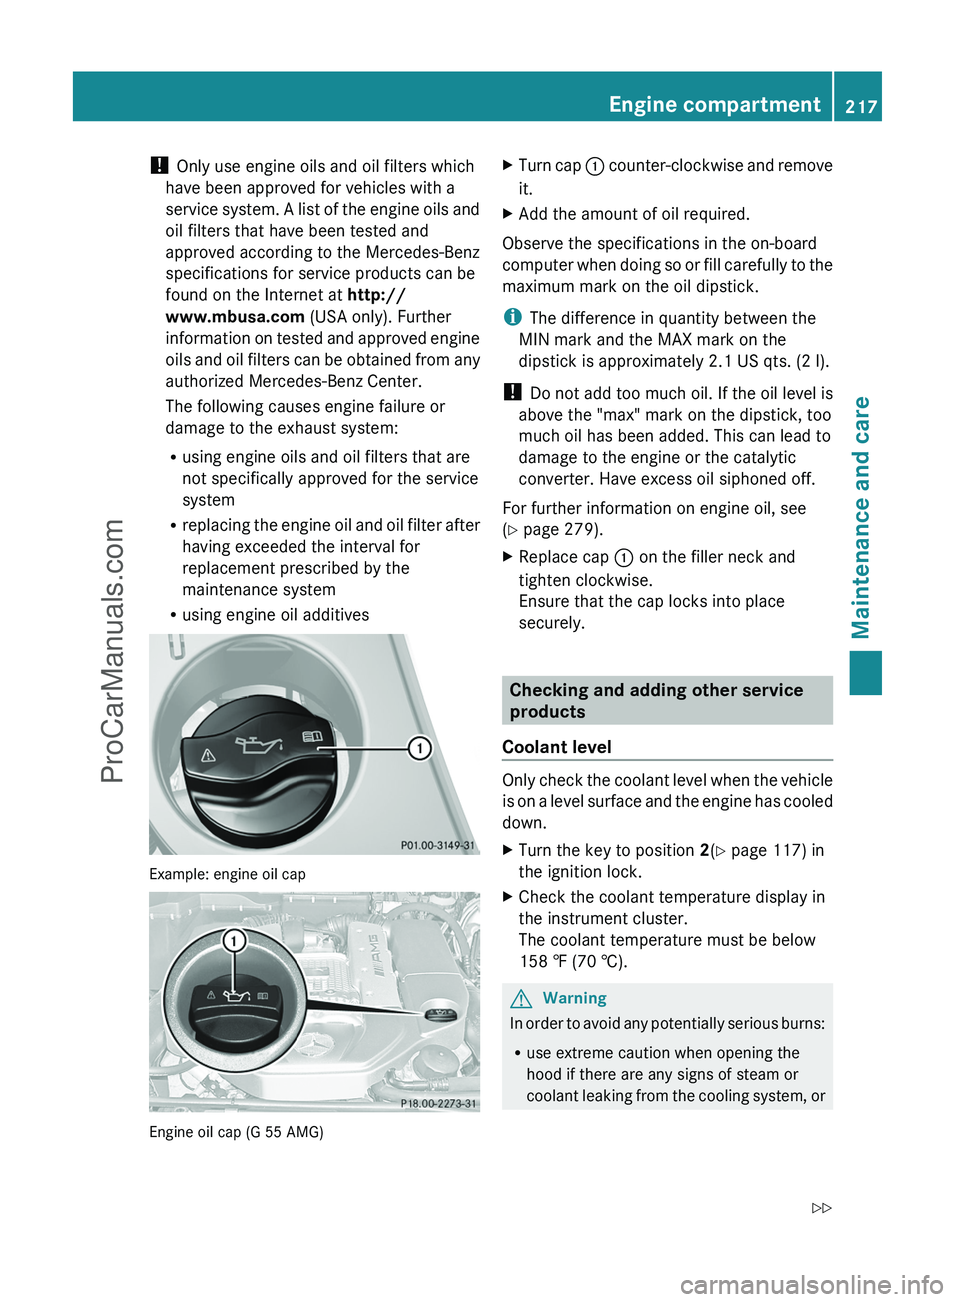
Example: engine oil cap
Engine oil cap (G 55 AMG)
XTurn cap : counter-clockwise and remove
it.
XAdd the amount of oil required.
Observe the specifications in the on-board
computer when doing so or fill carefully to the
maximum mark on the oil dipstick.
iThe difference in quantity between the
MIN mark and the MAX mark on the
dipstick is approximately 2.1 US qts. (2 l).
! Do not add too much oil. If the oil level is
above the "max" mark on the dipstick, too
much oil has been added. This can lead to
damage to the engine or the catalytic
converter. Have excess oil siphoned off.
For further information on engine oil, see
(Y page 279).
XReplace cap : on the filler neck and
tighten clockwise.
Ensure that the cap locks into place
securely.
Checking and adding other service
products
Coolant level
Only check the coolant level when the vehicle
is on a level surface and the engine has cooled
down.
XTurn the key to position 2(Y page 117) in
the ignition lock.
XCheck the coolant temperature display in
the instrument cluster.
The coolant temperature must be below
158 ‡ (70 †).
GWarning
In order to avoid any potentially serious burns:
Ruse extreme caution when opening the
hood if there are any signs of steam or
coolant leaking from the cooling system, or
Engine compartment217Maintenance and careZProCarManuals.com
Page 226 of 288

graphite coating could be damaged. This
could cause wiper noise.XFold the wiper arms away from the
windshield.XCarefully clean the wiper blades with a
damp cloth.XFold the windshield wipers back again
before switching on the ignition.
! Hold the wiper arm securely when folding
back. The windshield could be damaged if
the wiper arm smacks against it suddenly.
Cleaning the headlamps
XClean the plastic lamp lenses on the
headlamps using a wet sponge and a mild
cleaning agent, e.g. Mercedes-Benz car
shampoo or cleaning cloths.
! Only use cleaning agents or cleaning
cloths which are suitable for plastic
headlamp lenses. Unsuitable cleaning
agents or cleaning cloths could scratch or
damage the plastic headlamp lenses.
Cleaning the sensors
XClean sensors : of the driving systems
with water, car shampoo and a soft cloth.
! When cleaning the sensors with a power
washer, maintain a distance between the
vehicle and the nozzle of the power washer
of at least 11.8 in (30 cm). Information
about the correct distance is available from
the equipment manufacturer.
Cleaning the rear view cameraXUse clear water and a soft cloth to clean
camera lens :.
!
Do not clean the camera lens and the area
around the rear view camera with a power
washer.
Cleaning chrome parts
Impurities combined with the effects of road
grit and corrosive environmental factors may
cause flash rust to form on the surface. You
can restore the original shine of the chrome
parts by cleaning them regularly, especially in
winter and after washing.
! Do not clean chrome parts e.g. the
exhaust tail pipes (G 55 AMG) or stainless-
steel spare hub cap with alkaline-based
cleaning agents such as wheel cleaner.
XClean the chrome parts with a chrome care
product tested and approved by Mercedes-
Benz.
Interior care
Cleaning the display
XBefore cleaning the display, make sure that
it is switched off and has cooled down.XClean the display surface using a
commercially available microfiber cloth
and TFT/LCD display cleaner.XDry the display surface using a dry
microfiber cloth.
! For cleaning, do not use any of the
following:
R alcohol-based thinner or gasoline
R abrasive cleaning agents
R commercially-available household
cleaning agents
These may damage the display surface. Do
not put pressure on the display surface
when cleaning. This could lead to
irreparable damage to the display.
224CareMaintenance and care
ProCarManuals.com
Page 233 of 288
Removing the cover
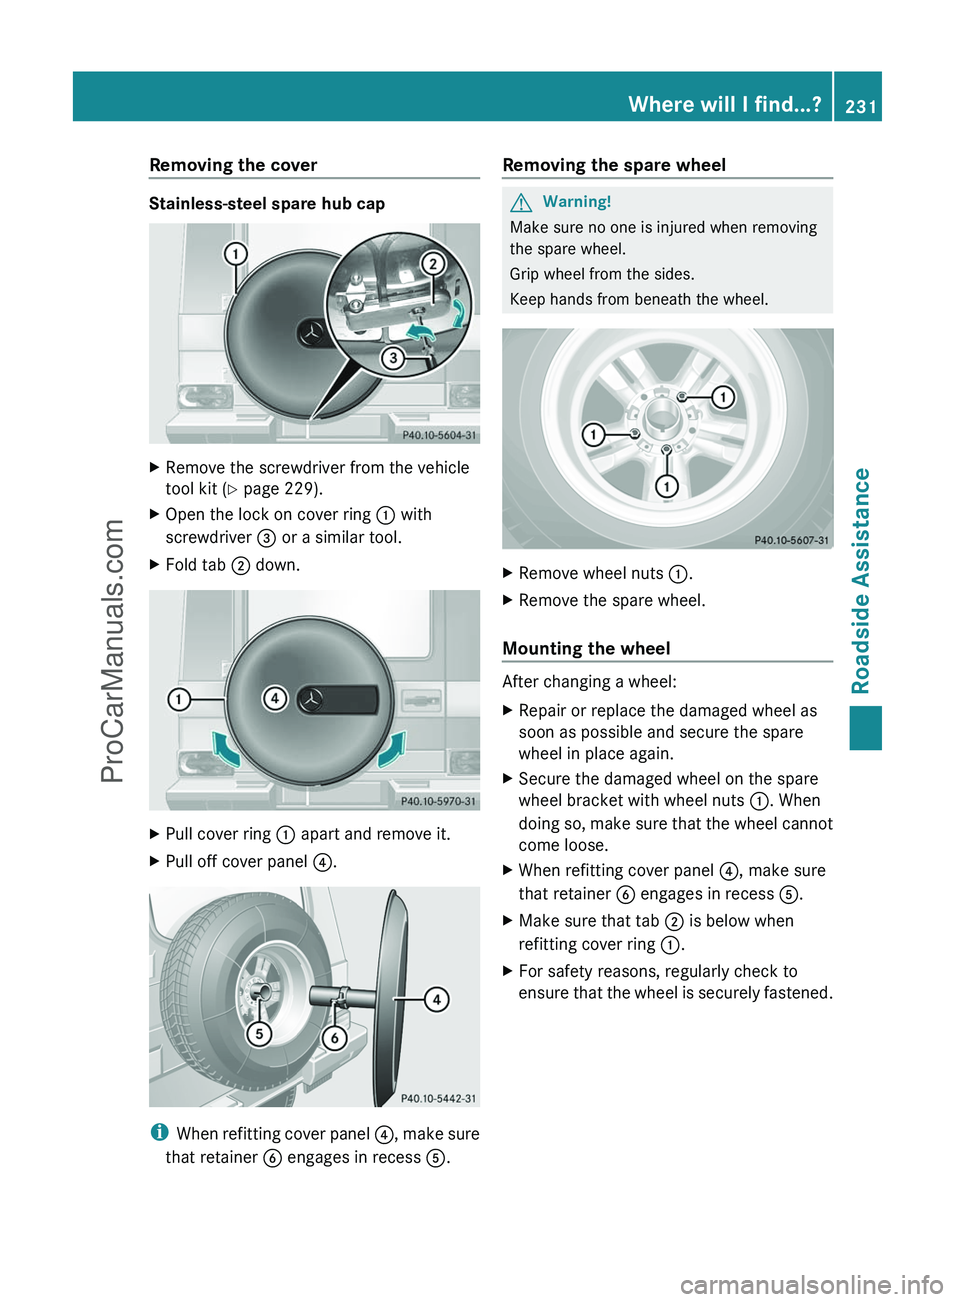
Stainless-steel spare hub cap
XRemove the screwdriver from the vehicle
tool kit ( Y page 229).XOpen the lock on cover ring : with
screwdriver = or a similar tool.XFold tab ; down.XPull cover ring : apart and remove it.XPull off cover panel ?.
i
When refitting cover panel ?, make sure
that retainer B engages in recess A.
Removing the spare wheelGWarning!
Make sure no one is injured when removing
the spare wheel.
Grip wheel from the sides.
Keep hands from beneath the wheel.
XRemove wheel nuts :.XRemove the spare wheel.
Mounting the wheel
After changing a wheel:
XRepair or replace the damaged wheel as
soon as possible and secure the spare
wheel in place again.XSecure the damaged wheel on the spare
wheel bracket with wheel nuts :. When
doing so, make sure that the wheel cannot
come loose.XWhen refitting cover panel ?, make sure
that retainer B engages in recess A.XMake sure that tab ; is below when
refitting cover ring :.XFor safety reasons, regularly check to
ensure that the wheel is securely fastened.Where will I find...?231Roadside AssistanceZProCarManuals.com
Page 234 of 288
Flat tire
Preparing the vehicle
XStop the vehicle as far away as possible
from traffic on solid, non-slippery and level
ground.XSwitch on the hazard warning lamps.XApply the parking brake.XBring the front wheels into the straight-
ahead position.XMove the selector lever to P.XSwitch off the engine.XRemove the SmartKey from the ignition
lock.XAll occupants must get out of the vehicle.
Make sure that they are not endangered as
they do so.XMake sure that no one is near the danger
area while a wheel is being changed.
Anyone who is not directly assisting in the
wheel change should, for example, stand
behind the barrier.XGet out of the vehicle. Pay attention to
traffic conditions when doing so.XClose the driver's door.
Changing a wheel and mounting the
spare wheel
Important safety notes
GWarning!
If the spare tire is more than 6 years old or is
not the same model as the regular tires, have
the spare tire replaced with a new tire at the
nearest Mercedes-Benz Center.
Never operate the vehicle with more than one
spare wheel mounted.
GWarning
G 55 AMG:
Rim and tire sizes are different for the spare
wheel and the normal wheel. With the spare
wheel mounted, handling is impaired.
Do not exceed a maximum speed of
50 mph(80 km/h).
Preparing the vehicleXPrepare the vehicle as described
( Y page 232).GWarning!
You must remove the spare wheel from the
spare wheel carrier before lifting the vehicle.
Otherwise the vehicle could fall off the jack
and injure you or others.
XRemove the vehicle tool kit and the jack
( Y page 229).XRemove the spare wheel from the spare
wheel bracket ( Y page 230).
i
Vehicles without an emergency spare
wheel/spare wheel are not equipped with
a wheel-changing tool kit at the factory. For
more information on which tools are
required to perform a wheel change on your
vehicle e.g. lug wrench or jack, consult an
authorized Mercedes-Benz Center.
Securing the vehicle to prevent it from
rolling away
XSecure the vehicle to prevent it from rolling
away.
On level ground: place chocks or similar
items under the front and rear of the wheel
that is diagonally opposite to the wheel you
wish to change.XOn downhill gradients: place chocks or
similar items behind both wheels of the
other axle.GWarning
Only jack up the vehicle on level ground or on
slight inclines/declines. The vehicle could
otherwise fall off the jack and injure you or
others.
232Flat tireRoadside Assistance
ProCarManuals.com
Page 236 of 288

iNever turn pressure release screw = by
more than one to two revolutions.
Otherwise, hydraulic fluid could escape.
! The jack is designed exclusively for
jacking up the vehicle at the jacking points.
Otherwise, your vehicle could be damaged.XPlace the jack on solid ground.XPosition the jack at the front or rear axle
carrier tubes The jack must always stand
vertically, even on slopes.
Make sure that the jack is placed in the
correct position beneath the axle carrier
tube. The front or rear axle must fit into the
support on the jack.XRaise the vehicle by pumping (arrow) until
the tire is a maximum of 1.2 inches (3 cm)
above the ground.
Removing a wheel
XUnscrew the wheel bolts.
! Do not place wheel bolts in sand or on a
dirty surface. The bolt and wheel hub
threads could otherwise be damaged when
you screw them in.
XRemove the wheel.
Mounting a new wheel
GWarning!
Always replace wheel bolts that are damaged
or rusted.
Never apply oil or grease to wheel bolts.
Damaged wheel hub threads should be
repaired immediately. Do not continue to
drive under these circumstances! Contact an
authorized Mercedes-Benz Center or call
Roadside Assistance.
Incorrect wheel bolts or improperly tightened
wheel bolts can cause the wheel to come off.
This could cause an accident. Make sure to
use the correct wheel bolts.GWarning
Only use genuine Mercedes-Benz wheel bolts.
Other wheel bolts may come loose.
Do not tighten the wheel bolts when the
vehicle is raised. Otherwise, the vehicle could
fall off the jack.
XClean the wheel and wheel hub contact
surfaces.
! To prevent damage to the paintwork, hold
the wheel securely against the wheel hub
while screwing in the first wheel bolt.
XPlace the wheel on the wheel hub and push
it on.XTighten the wheel bolts until they are
finger-tight.
Lowering the vehicle
XOpen the pressure release screw on the
jack using the pump lever ( Y page 233) by
approximately one turn.XLower the vehicle until it is once again
standing firmly on the ground.XPlace the jack to one side.234Flat tireRoadside Assistance
ProCarManuals.com
Page 237 of 288
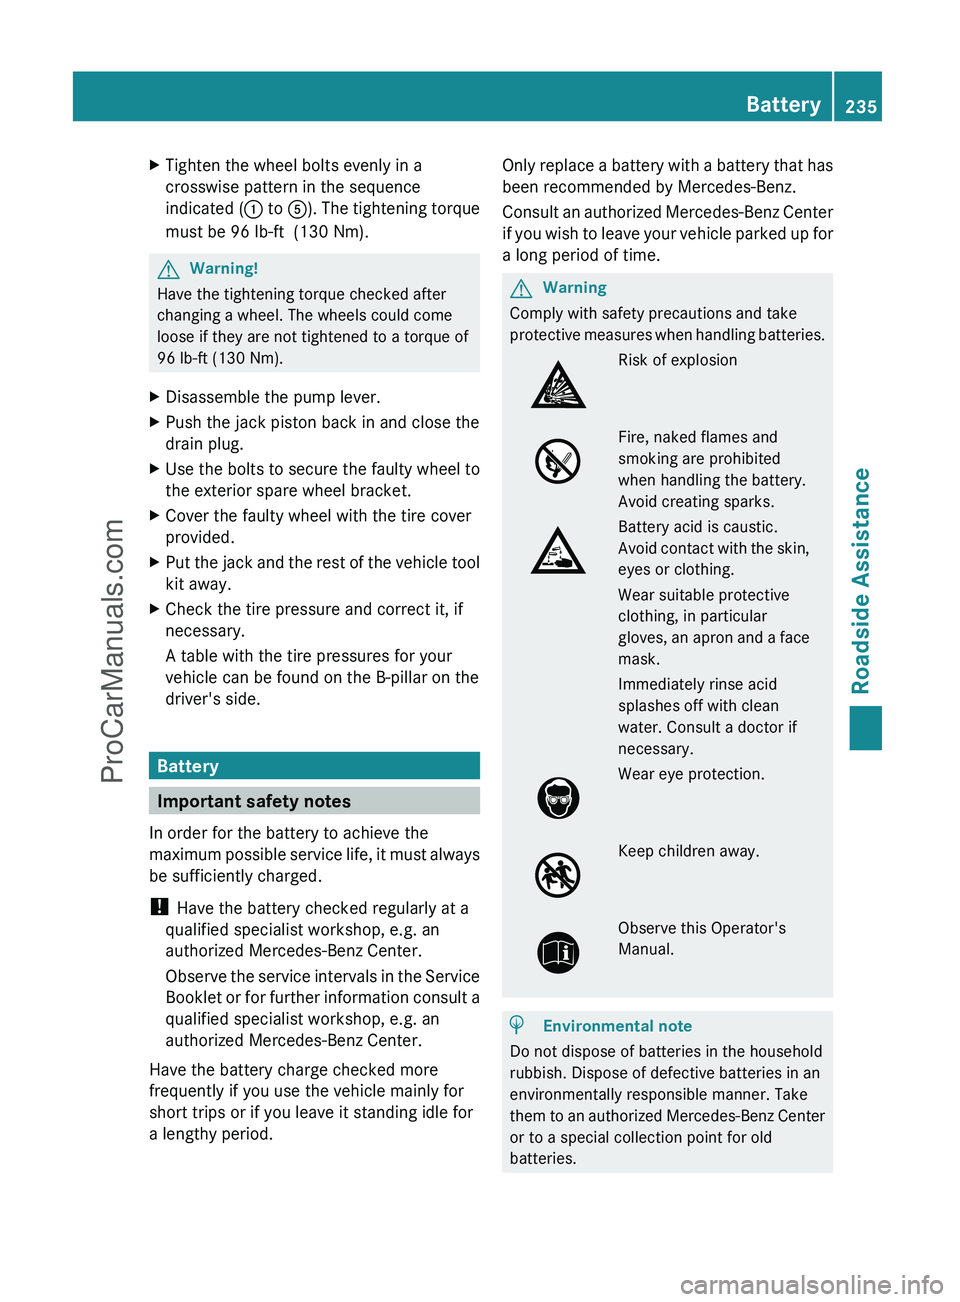
XTighten the wheel bolts evenly in a
crosswise pattern in the sequence
indicated (: to A). The tightening torque
must be 96 lb-ft (130 Nm).
GWarning!
Have the tightening torque checked after
changing a wheel. The wheels could come
loose if they are not tightened to a torque of
96 lb-ft (130 Nm).
XDisassemble the pump lever.XPush the jack piston back in and close the
drain plug.
XUse the bolts to secure the faulty wheel to
the exterior spare wheel bracket.
XCover the faulty wheel with the tire cover
provided.
XPut the jack and the rest of the vehicle tool
kit away.
XCheck the tire pressure and correct it, if
necessary.
A table with the tire pressures for your
vehicle can be found on the B-pillar on the
driver's side.
Battery
Important safety notes
In order for the battery to achieve the
maximum possible service life, it must always
be sufficiently charged.
! Have the battery checked regularly at a
qualified specialist workshop, e.g. an
authorized Mercedes-Benz Center.
Observe the service intervals in the Service
Booklet or for further information consult a
qualified specialist workshop, e.g. an
authorized Mercedes-Benz Center.
Have the battery charge checked more
frequently if you use the vehicle mainly for
short trips or if you leave it standing idle for
a lengthy period.
Only replace a battery with a battery that has
been recommended by Mercedes-Benz.
Consult an authorized Mercedes-Benz Center
if you wish to leave your vehicle parked up for
a long period of time.
GWarning
Comply with safety precautions and take
protective measures when handling batteries.
Risk of explosionFire, naked flames and
smoking are prohibited
when handling the battery.
Avoid creating sparks.
Battery acid is caustic.
Avoid contact with the skin,
eyes or clothing.
Wear suitable protective
clothing, in particular
gloves, an apron and a face
mask.
Immediately rinse acid
splashes off with clean
water. Consult a doctor if
necessary.
Wear eye protection.Keep children away.Observe this Operator's
Manual.
HEnvironmental note
Do not dispose of batteries in the household
rubbish. Dispose of defective batteries in an
environmentally responsible manner. Take
them to an authorized Mercedes-Benz Center
or to a special collection point for old
batteries.
Battery235Roadside AssistanceZProCarManuals.com
Page 238 of 288
GWarning
Failure to follow these instructions can result
in severe injury or death.
Never lean over batteries while connecting.
You might get injured.
Battery fluid contains sulfuric acid. Do not
allow this fluid to come in contact with eyes,
skin or clothing. In case it does, immediately
flush affected area with water and seek
medical help if necessary.
A battery will also produce hydrogen gas,
which is flammable and explosive. Keep
flames or sparks away from battery, avoid
improper connection of jumper cables,
smoking etc.
GWarning
Do not place any metal objects on the battery
as this could result in a short circuit.
Use leak-proof batteries only to avoid the risk
of acid burns in the event of an accident.
Take care that you do not become statically
charged, e.g. by wearing synthetic clothing or
rubbing against textiles. For this reason, you
also should not pull or push the battery over
carpets or other synthetic materials.
Never touch the battery first. First, touch the
outside body of the vehicle in order to release
any possible electrostatic charges.
Do not rub the battery with rags or cloths. The
battery could explode if touched due to
electrostatic charge or due to spark
formation.
! Switch off the engine and remove the
SmartKey before disconnecting the
terminal clamps from the battery. You may
otherwise destroy electronic components,
such as the alternator.
! Like other batteries, the vehicle battery
may discharge over time if you do not use
the vehicle. In this case, have the battery
disconnected at a qualified specialist
workshop, e.g. an authorized Mercedes-
Benz Center. You can also charge the
battery with a charger recommended by
Mercedes-Benz. Contact an authorized
Mercedes-Benz Center for further
information.
The battery, breather hose and cover of the
positive terminal clamp must be installed
securely during operation.
i Remove the SmartKey if you park the
vehicle and do not require any electrical
consumers. The vehicle will then use very
little energy, thus conserving battery
power.
Mercedes-Benz recommends that you do not
carry out work on batteries yourself, e.g.
removing, charging or replacing. Always have
this work performed at a qualified specialist
workshop, e.g. an authorized Mercedes-Benz
Center.
i If the power supply has been interrupted,
e.g. if the battery has been reconnected,
you must carry out the following tasks:
R reset the head restraints on the front
seats ( Y page 80).
Charging the battery
GWarning
Never charge a battery while still installed in
the vehicle unless the accessory battery
charge unit approved by Mercedes-Benz is
being used. Gases may escape during
charging and cause explosions that may
result in paint damage, corrosion or personal
injury.
An accessory battery charge unit specially
adapted for Mercedes-Benz vehicles and
tested and approved by Mercedes-Benz is
available. It permits the charging of the
battery in its installed position. Contact an
authorized Mercedes-Benz Center for
information and availability.
Charge the battery in accordance with the
separate instructions for the accessory
battery charger.
236BatteryRoadside Assistance
ProCarManuals.com