2011 MERCEDES-BENZ G-CLASS ECU
[x] Cancel search: ECUPage 194 of 288
Vehicle equipment
i This manual describes all the standard
and optional equipment of your vehicle
which was available at the time of
purchase. Country-specific differences are
possible. Please note that your vehicle may
not be equipped with all features
described. This also applies to safety-
relevant systems and functions.
Loading guidelines
GWarning!
Always fasten items being carried as securely
as possible using cargo tie-down rings and
fastening materials appropriate for the weight
and size of the load.
In an accident, during hard braking or sudden
maneuvers, loose items will be thrown around
inside the vehicle. This can cause injury to
vehicle occupants unless the items are
securely fastened in the vehicle.
To help avoid personal injury during a collision
or sudden maneuver, exercise care when
transporting cargo. Do not pile luggage or
cargo higher than the seat backrests.
Never drive a vehicle with the tailgate open.
Deadly carbon monoxide (CO) gases may
enter vehicle interior resulting in
unconsciousness and death.
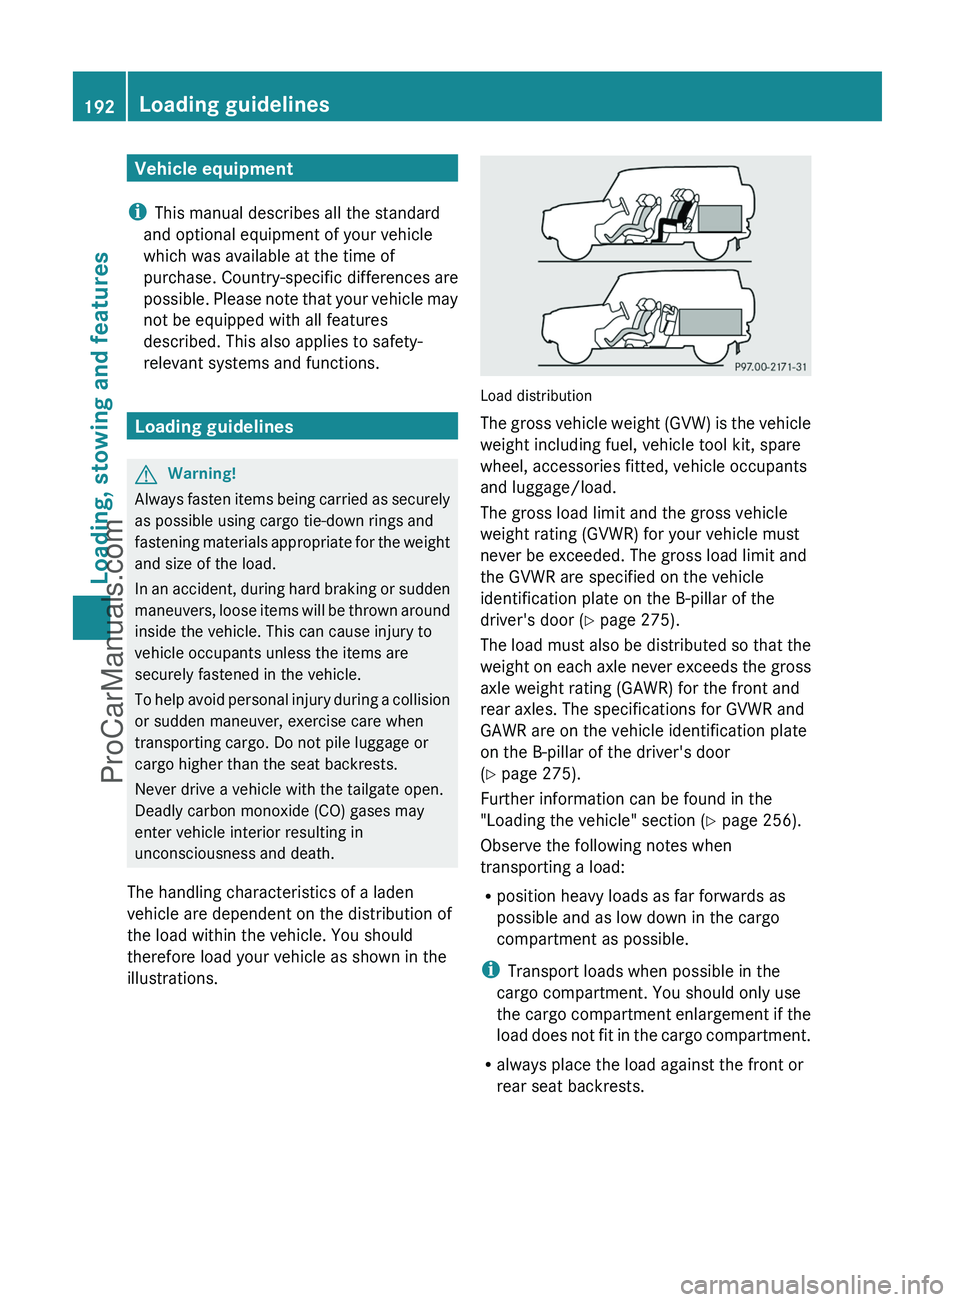
The handling characteristics of a laden
vehicle are dependent on the distribution of
the load within the vehicle. You should
therefore load your vehicle as shown in the
illustrations.
Load distribution
The gross vehicle weight (GVW) is the vehicle
weight including fuel, vehicle tool kit, spare
wheel, accessories fitted, vehicle occupants
and luggage/load.
The gross load limit and the gross vehicle
weight rating (GVWR) for your vehicle must
never be exceeded. The gross load limit and
the GVWR are specified on the vehicle
identification plate on the B-pillar of the
driver's door ( Y page 275).
The load must also be distributed so that the
weight on each axle never exceeds the gross
axle weight rating (GAWR) for the front and
rear axles. The specifications for GVWR and
GAWR are on the vehicle identification plate
on the B-pillar of the driver's door
( Y page 275).
Further information can be found in the
"Loading the vehicle" section ( Y page 256).
Observe the following notes when
transporting a load:
R position heavy loads as far forwards as
possible and as low down in the cargo
compartment as possible.
i Transport loads when possible in the
cargo compartment. You should only use
the cargo compartment enlargement if the
load does not fit in the cargo compartment.
R always place the load against the front or
rear seat backrests.
192Loading guidelinesLoading, stowing and features
ProCarManuals.com
Page 195 of 288
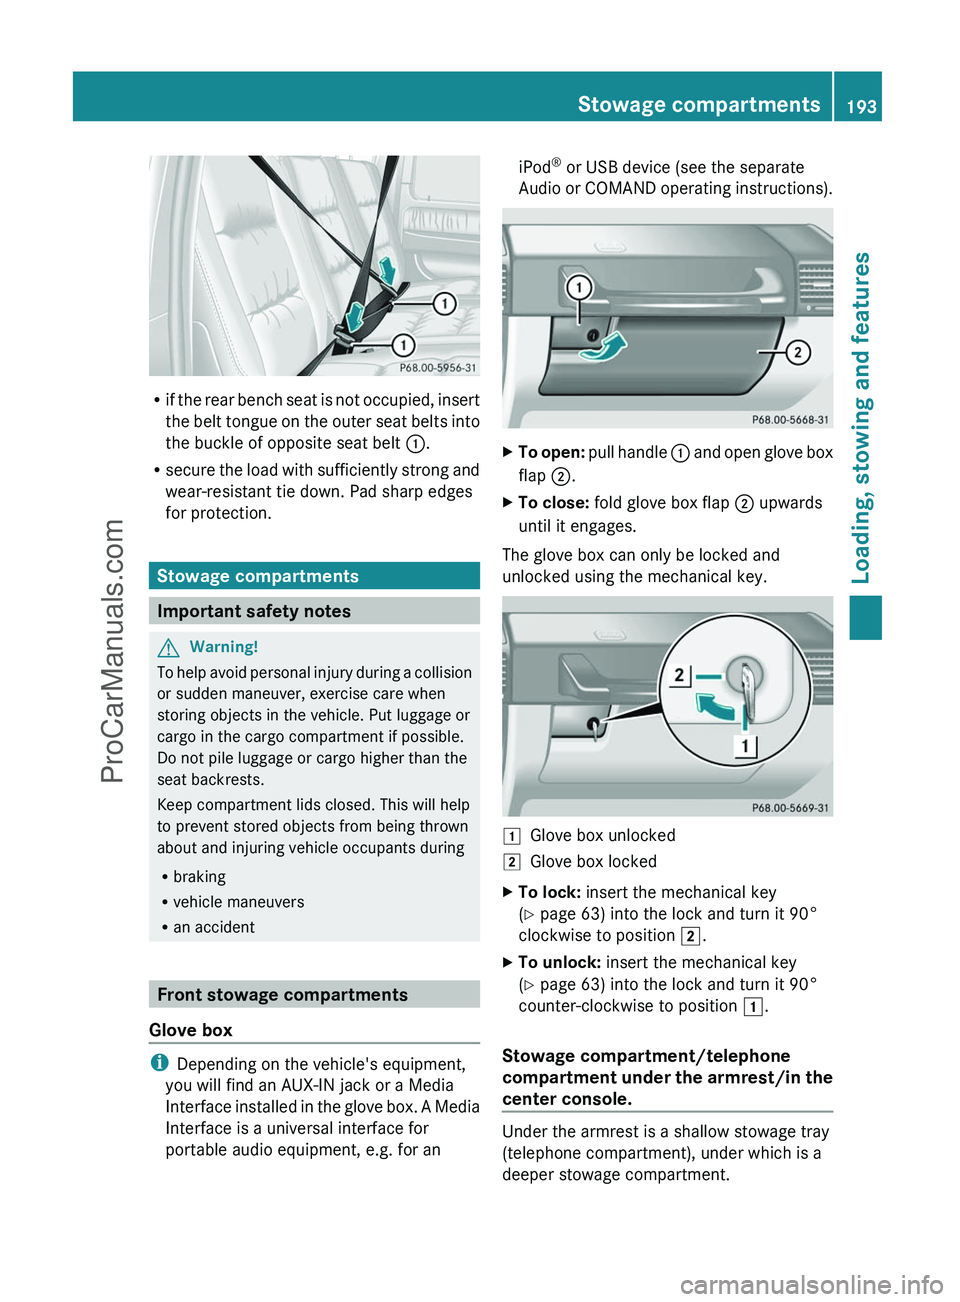
Rif the rear bench seat is not occupied, insert
the belt tongue on the outer seat belts into
the buckle of opposite seat belt :.
R secure the load with sufficiently strong and
wear-resistant tie down. Pad sharp edges
for protection.
Stowage compartments
Important safety notes
GWarning!
To help avoid personal injury during a collision
or sudden maneuver, exercise care when
storing objects in the vehicle. Put luggage or
cargo in the cargo compartment if possible.
Do not pile luggage or cargo higher than the
seat backrests.
Keep compartment lids closed. This will help
to prevent stored objects from being thrown
about and injuring vehicle occupants during
R braking
R vehicle maneuvers
R an accident
Front stowage compartments
Glove box
i Depending on the vehicle's equipment,
you will find an AUX-IN jack or a Media
Interface installed in the glove box. A Media
Interface is a universal interface for
portable audio equipment, e.g. for an
iPod ®
or USB device (see the separate
Audio or COMAND operating instructions).XTo open: pull handle : and open glove box
flap ;.XTo close: fold glove box flap ; upwards
until it engages.
The glove box can only be locked and
unlocked using the mechanical key.
1Glove box unlocked2Glove box lockedXTo lock: insert the mechanical key
( Y page 63) into the lock and turn it 90°
clockwise to position 2.XTo unlock: insert the mechanical key
( Y page 63) into the lock and turn it 90°
counter-clockwise to position 1.
Stowage compartment/telephone
compartment under the armrest/in the
center console.
Under the armrest is a shallow stowage tray
(telephone compartment), under which is a
deeper stowage compartment.
Stowage compartments193Loading, stowing and featuresZProCarManuals.com
Page 196 of 288
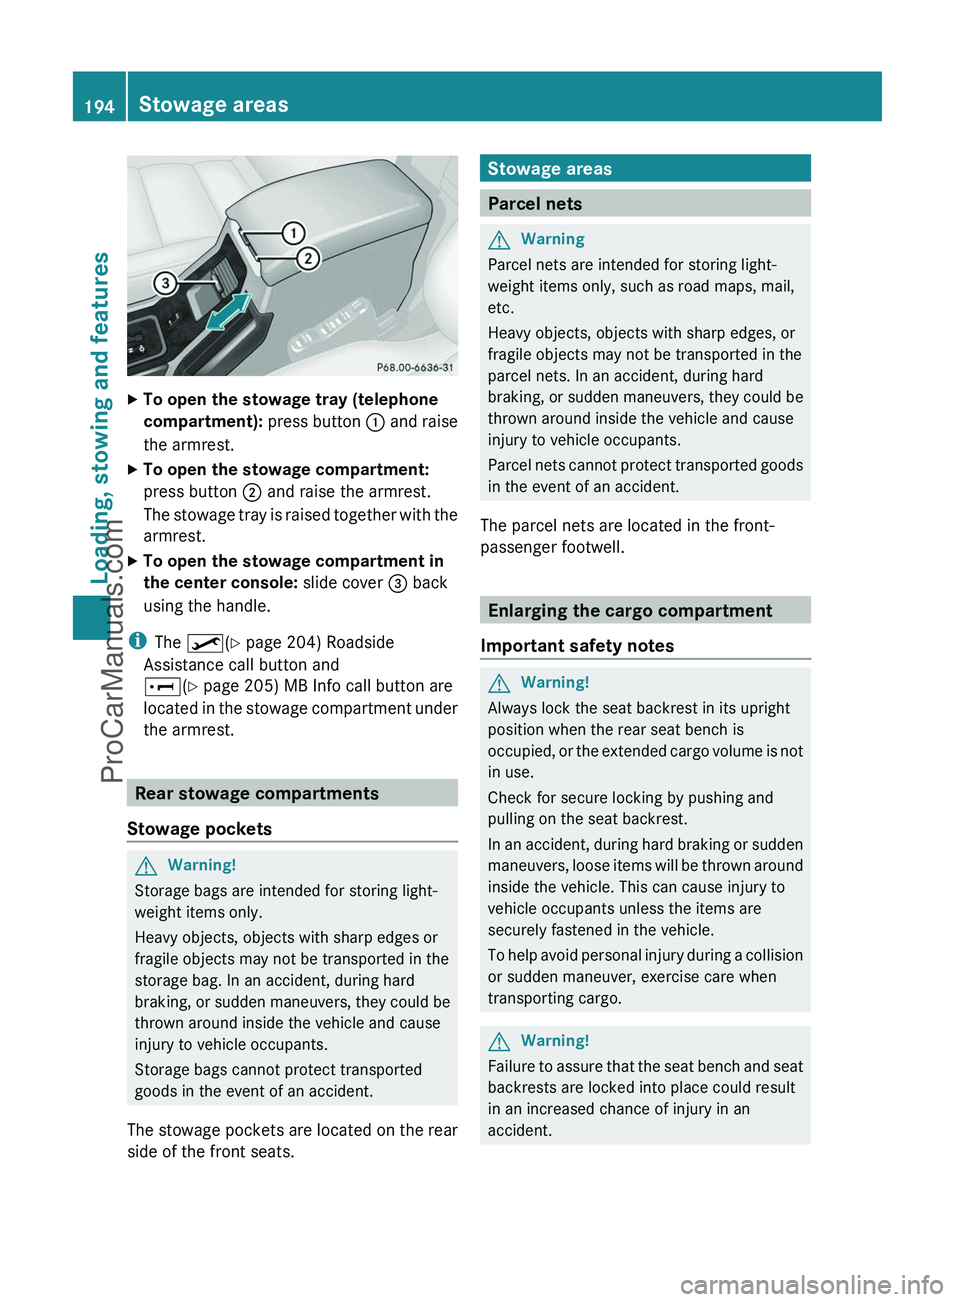
XTo open the stowage tray (telephone
compartment): press button : and raise
the armrest.XTo open the stowage compartment:
press button ; and raise the armrest.
The stowage tray is raised together with the
armrest.XTo open the stowage compartment in
the center console: slide cover = back
using the handle.
i The º (Y page 204) Roadside
Assistance call button and
E (Y page 205) MB Info call button are
located in the stowage compartment under
the armrest.
Rear stowage compartments
Stowage pockets
GWarning!
Storage bags are intended for storing light-
weight items only.
Heavy objects, objects with sharp edges or
fragile objects may not be transported in the
storage bag. In an accident, during hard
braking, or sudden maneuvers, they could be
thrown around inside the vehicle and cause
injury to vehicle occupants.
Storage bags cannot protect transported
goods in the event of an accident.
The stowage pockets are located on the rear
side of the front seats.
Stowage areas
Parcel nets
GWarning
Parcel nets are intended for storing light-
weight items only, such as road maps, mail,
etc.
Heavy objects, objects with sharp edges, or
fragile objects may not be transported in the
parcel nets. In an accident, during hard
braking, or sudden maneuvers, they could be
thrown around inside the vehicle and cause
injury to vehicle occupants.
Parcel nets cannot protect transported goods
in the event of an accident.
The parcel nets are located in the front-
passenger footwell.
Enlarging the cargo compartment
Important safety notes
GWarning!
Always lock the seat backrest in its upright
position when the rear seat bench is
occupied, or the extended cargo volume is not
in use.
Check for secure locking by pushing and
pulling on the seat backrest.
In an accident, during hard braking or sudden
maneuvers, loose items will be thrown around
inside the vehicle. This can cause injury to
vehicle occupants unless the items are
securely fastened in the vehicle.
To help avoid personal injury during a collision
or sudden maneuver, exercise care when
transporting cargo.
GWarning!
Failure to assure that the seat bench and seat
backrests are locked into place could result
in an increased chance of injury in an
accident.
194Stowage areasLoading, stowing and features
ProCarManuals.com
Page 198 of 288
being thrown forwards from the cargo
compartment.
Securing a load
Lashing eyelets
GWarning
Distribute the load on the cargo tie down rings
evenly.
Otherwise, vehicle occupants could be
injured by objects being thrown around if you:
R brake sharply
R change direction suddenly
R are involved in an accident
Please observe the loading guidelines.
Observe the following notes on securing
loads:
R secure the load using the cargo tie down
rings.
R do not use elastic straps or nets to secure
a load, as these are only intended as an
anti-slip protection for light loads.
R do not route tie downs across sharp edges
or corners.
R pad sharp edges for protection.
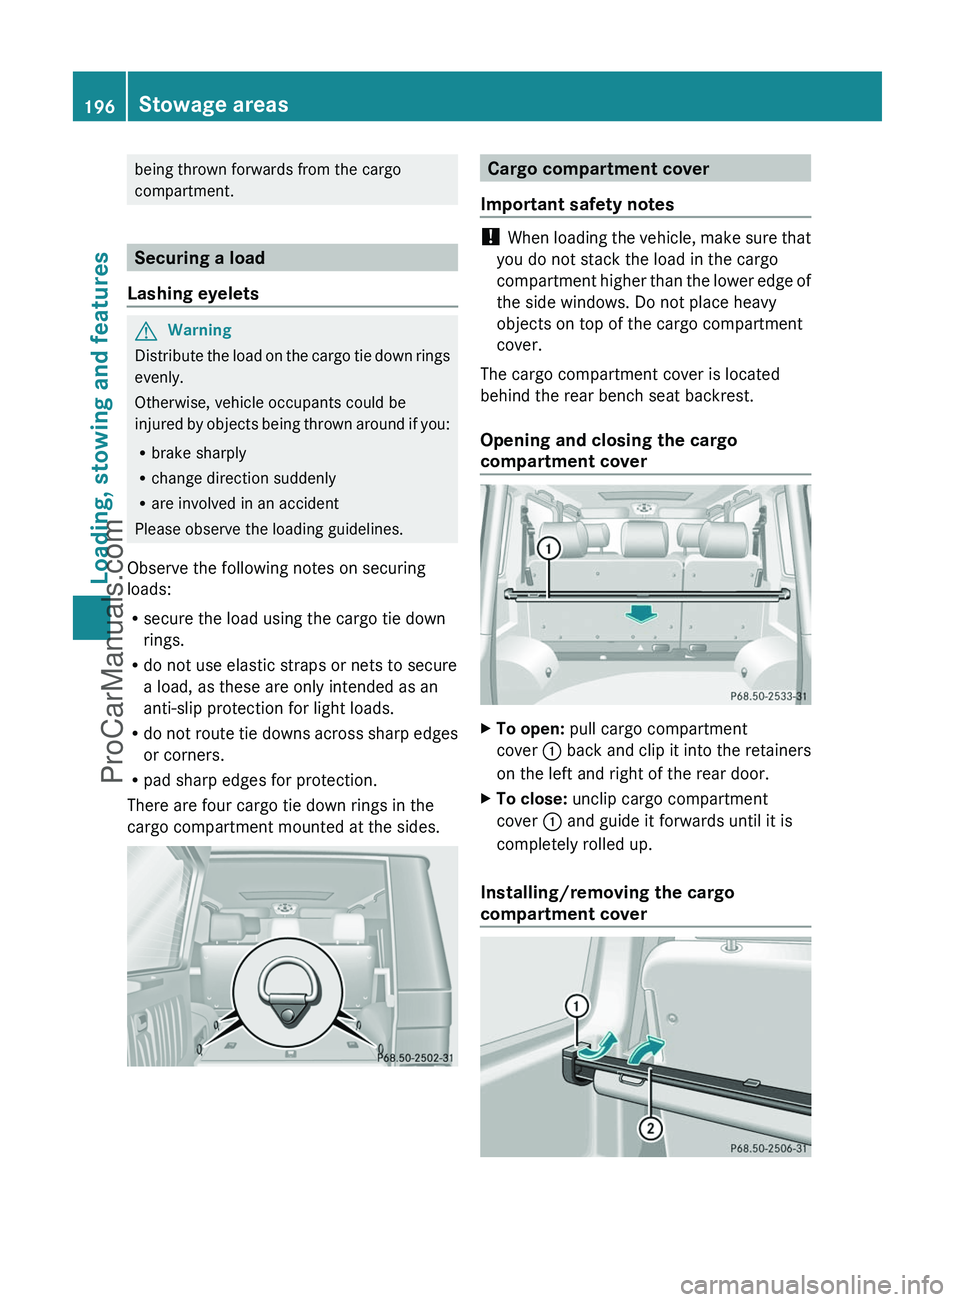
There are four cargo tie down rings in the
cargo compartment mounted at the sides.
Cargo compartment cover
Important safety notes
! When loading the vehicle, make sure that
you do not stack the load in the cargo
compartment higher than the lower edge of
the side windows. Do not place heavy
objects on top of the cargo compartment
cover.
The cargo compartment cover is located
behind the rear bench seat backrest.
Opening and closing the cargo
compartment cover
XTo open: pull cargo compartment
cover : back and clip it into the retainers
on the left and right of the rear door.XTo close: unclip cargo compartment
cover : and guide it forwards until it is
completely rolled up.
Installing/removing the cargo
compartment cover
196Stowage areasLoading, stowing and features
ProCarManuals.com
Page 200 of 288
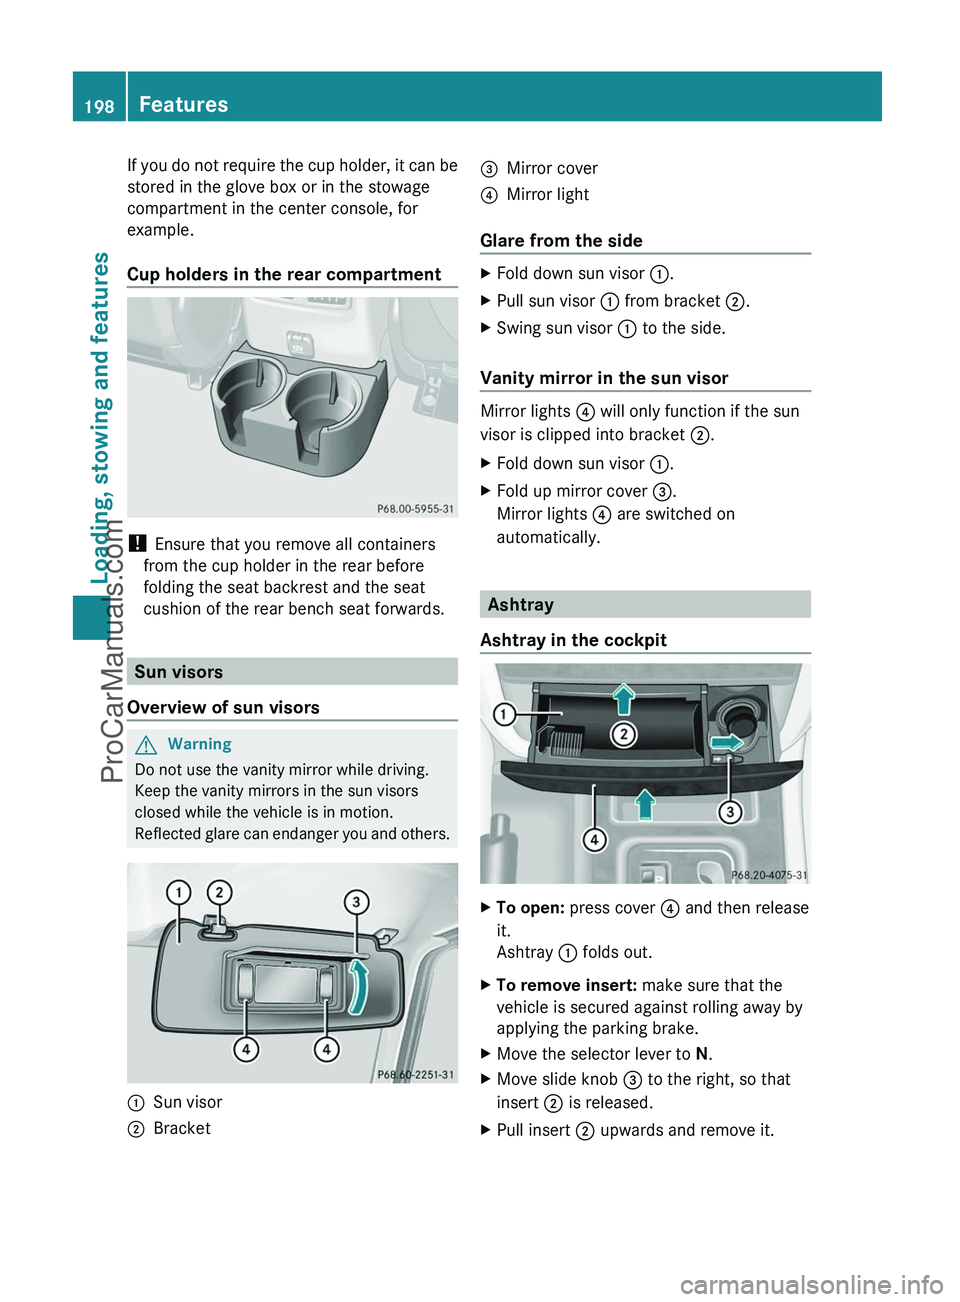
If you do not require the cup holder, it can be
stored in the glove box or in the stowage
compartment in the center console, for
example.
Cup holders in the rear compartment
! Ensure that you remove all containers
from the cup holder in the rear before
folding the seat backrest and the seat
cushion of the rear bench seat forwards.
Sun visors
Overview of sun visors
GWarning
Do not use the vanity mirror while driving.
Keep the vanity mirrors in the sun visors
closed while the vehicle is in motion.
Reflected glare can endanger you and others.
:Sun visor;Bracket=Mirror cover?Mirror light
Glare from the side
XFold down sun visor :.XPull sun visor : from bracket ;.XSwing sun visor : to the side.
Vanity mirror in the sun visor
Mirror lights ? will only function if the sun
visor is clipped into bracket ;.
XFold down sun visor :.XFold up mirror cover =.
Mirror lights ? are switched on
automatically.
Ashtray
Ashtray in the cockpit
XTo open: press cover ? and then release
it.
Ashtray : folds out.XTo remove insert: make sure that the
vehicle is secured against rolling away by
applying the parking brake.XMove the selector lever to N.XMove slide knob = to the right, so that
insert ; is released.XPull insert ; upwards and remove it.198FeaturesLoading, stowing and features
ProCarManuals.com
Page 201 of 288
XTo re-install the insert: press insert ;
into the holder until it engages.XTo close: press cover ? until it engages.
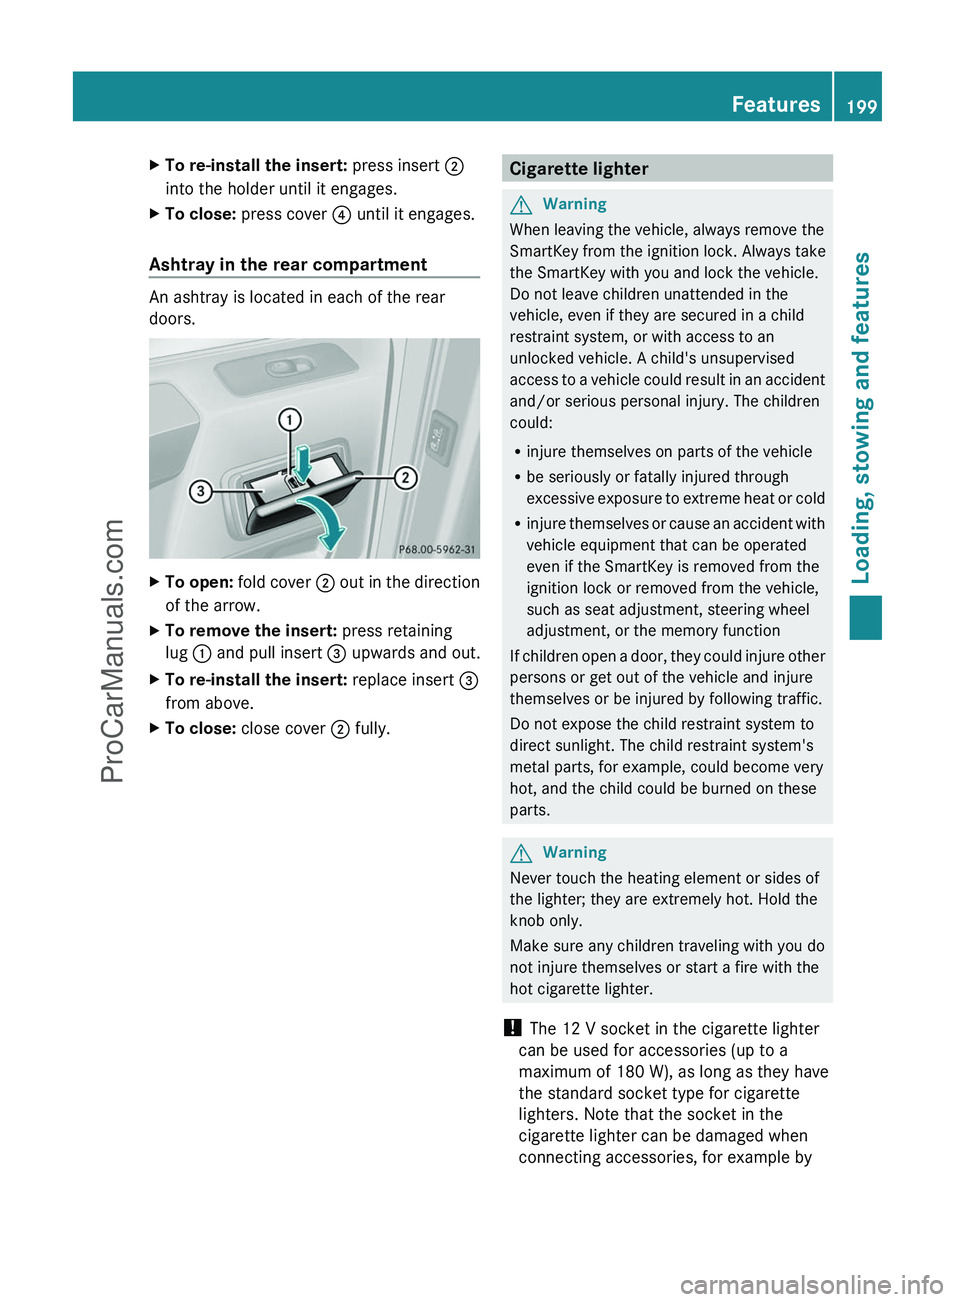
Ashtray in the rear compartment
An ashtray is located in each of the rear
doors.
XTo open: fold cover ; out in the direction
of the arrow.XTo remove the insert: press retaining
lug : and pull insert = upwards and out.XTo re-install the insert: replace insert =
from above.XTo close: close cover ; fully.Cigarette lighterGWarning
When leaving the vehicle, always remove the
SmartKey from the ignition lock. Always take
the SmartKey with you and lock the vehicle.
Do not leave children unattended in the
vehicle, even if they are secured in a child
restraint system, or with access to an
unlocked vehicle. A child's unsupervised
access to a vehicle could result in an accident
and/or serious personal injury. The children
could:
R injure themselves on parts of the vehicle
R be seriously or fatally injured through
excessive exposure to extreme heat or cold
R injure themselves or cause an accident with
vehicle equipment that can be operated
even if the SmartKey is removed from the
ignition lock or removed from the vehicle,
such as seat adjustment, steering wheel
adjustment, or the memory function
If children open a door, they could injure other
persons or get out of the vehicle and injure
themselves or be injured by following traffic.
Do not expose the child restraint system to
direct sunlight. The child restraint system's
metal parts, for example, could become very
hot, and the child could be burned on these
parts.
GWarning
Never touch the heating element or sides of
the lighter; they are extremely hot. Hold the
knob only.
Make sure any children traveling with you do
not injure themselves or start a fire with the
hot cigarette lighter.
! The 12 V socket in the cigarette lighter
can be used for accessories (up to a
maximum of 180 W), as long as they have
the standard socket type for cigarette
lighters. Note that the socket in the
cigarette lighter can be damaged when
connecting accessories, for example by
Features199Loading, stowing and featuresZProCarManuals.com
Page 210 of 288
XTo swing up and secure: swing the brush
guard up to stop joint ? and hold it in
place.
The pins of quick-release fasteners ;
need to engage in the openings in lock =.XLock quick-release fasteners ; on both
sides using wrench :.
!
Make sure that the pins of the quick-
release fasteners are securely engaged in
the lock on both sides.
Garage door opener
Important safety notes
You can use the HomeLink ®
garage door
opener integrated into the rear-view mirror to
operate up to three different gate/garage
door opener systems.
i Certain garage door drives are
incompatible with the integrated garage
door opener. If you experience difficulties
programming the integrated garage door
opener, contact an authorized Mercedes-
Benz Center. You can also contact the
following service hotlines:
R USA: Mercedes-Benz Customer
Assistance Center under
1-800-FOR-MERCedes
R Canada: Customer Service under
1-800-387-0100
GWarning
Before programming the integrated remote
control to a garage door opener or gate
operator, make sure people and objects are
out of the way of the device to prevent
potential harm or damage. When
programming a garage door opener, the door
moves up or down. When programming a gate
operator, the gate opens or closes.
Do not use the integrated remote control with
any garage door opener that lacks safety stop
and reverse features as required by U.S.
federal safety standards (this includes any
garage door opener model manufactured
before April 1, 1982). A garage door that
cannot detect an object - signaling the door
to stop and reverse - does not meet current
U.S. federal safety standards.
When programming a garage door opener,
park vehicle outside the garage.
Do not run the engine while programming the
integrated remote control. Inhalation of
exhaust gas is hazardous to your health. All
exhaust gas contains carbon monoxide (CO),
and inhaling it can cause unconsciousness
and possible death. All exhaust gas contains
carbon monoxide (CO), and inhaling it can
cause unconsciousness and possible death.
i USA only:
This device complies with part 15 of the
FCC requirements. Operation is subject to
the following two conditions:
1. The device must not cause harmful
interference.
2. The device must withstand any
interference received, including
interference that may cause undesired
operation.
Unauthorized modification of this device
could void the device's operating permit.
i Canada only:
This device complies with the RSS-210
requirements of Industry Canada.
Operation is subject to the following two
conditions:
1. The device must not cause harmful
interference.
2. The device must withstand any
interference received, including
interference that may cause undesired
operation.
Unauthorized modification of this device
could void the user's authority to legally
operate the device.208FeaturesLoading, stowing and features
ProCarManuals.com
Page 213 of 288
Clearing the remote control memoryXTurn the SmartKey to position 2 in the
ignition lock.XPress and hold transmitter buttons ;
and ? for approximately 20 seconds until
indicator lamp : flashes rapidly.
The memory is cleared.
i You should clear the remote control
memory before selling the vehicle.
Floormat on the driver's side
GWarning!
Whenever you are using a floormat, make sure
there is enough clearance and that the
floormat is securely fastened.
The floormat should always be securely
fastened using the fastening equipment.
Before driving off, check that the floormat is
securely in place and adjust it if necessary. A
loose floormat could slip and hinder proper
functioning of the pedals.
Do not place several floormats on top of each
other as this may impair pedal movement.
Features211Loading, stowing and featuresZProCarManuals.com