2011 MERCEDES-BENZ G-CLASS fog light
[x] Cancel search: fog lightPage 100 of 288

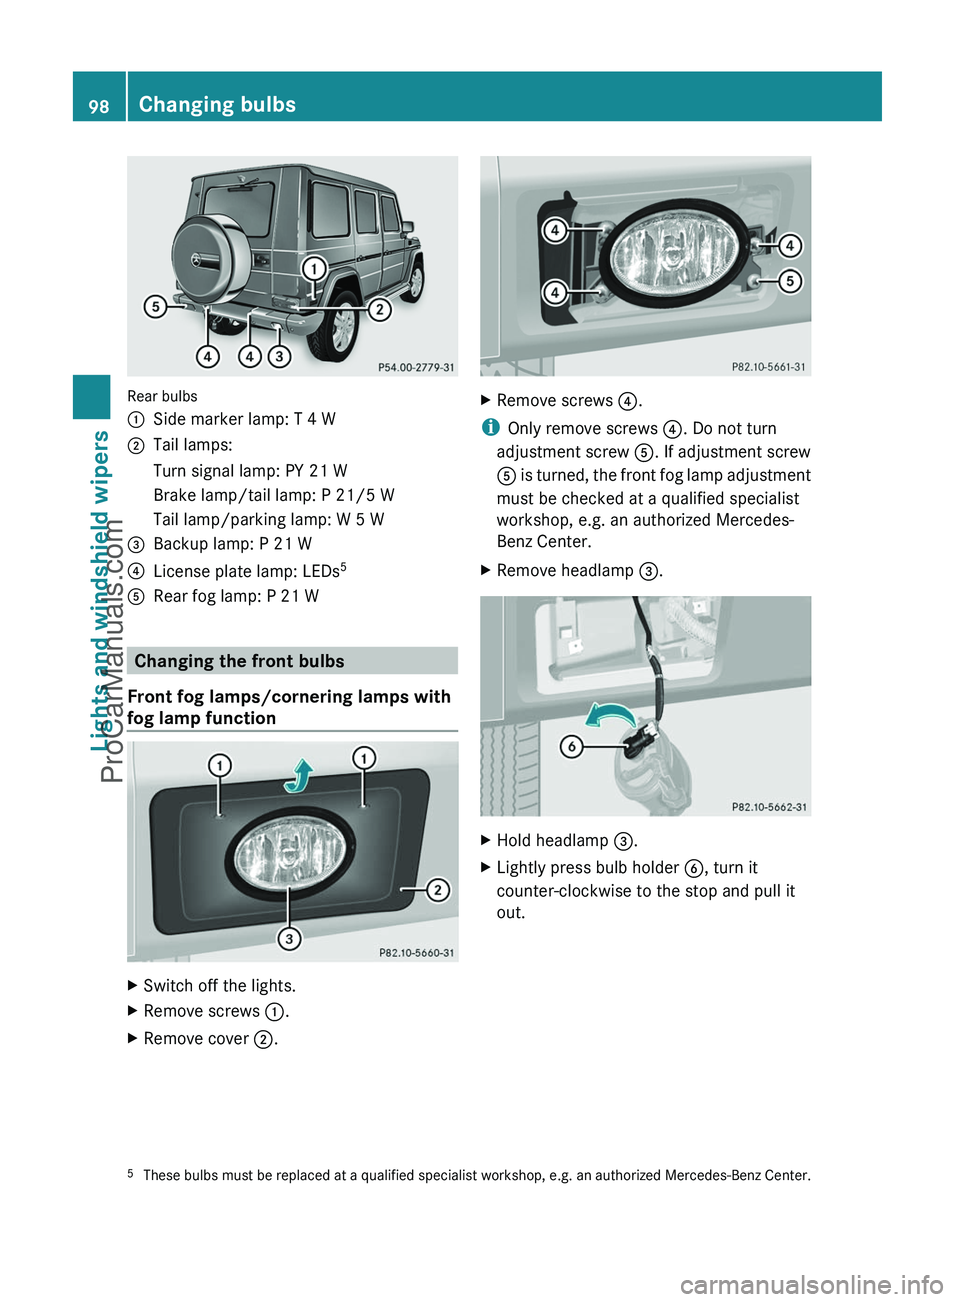
Rear bulbs
:Side marker lamp: T 4 W;Tail lamps:Turn signal lamp: PY 21 WBrake lamp/tail lamp: P 21/5 WTail lamp/parking lamp: W 5 W=Backup lamp: P 21 W?License plate lamp: LEDs5ARear fog lamp: P 21 W
Changing the front bulbs
Front fog lamps/cornering lamps with
fog lamp function
XSwitch off the lights.XRemove screws :.XRemove cover ;.XRemove screws ?.
i
Only remove screws ?. Do not turn
adjustment screw A. If adjustment screw
A is turned, the front fog lamp adjustment
must be checked at a qualified specialist
workshop, e.g. an authorized Mercedes-
Benz Center.
XRemove headlamp =.XHold headlamp =.XLightly press bulb holder B, turn it
counter-clockwise to the stop and pull it
out.5 These bulbs must be replaced at a qualified specialist workshop, e.g. an authorized Mercedes-Benz Center.98Changing bulbsLights and windshield wipers
ProCarManuals.com
Page 103 of 288

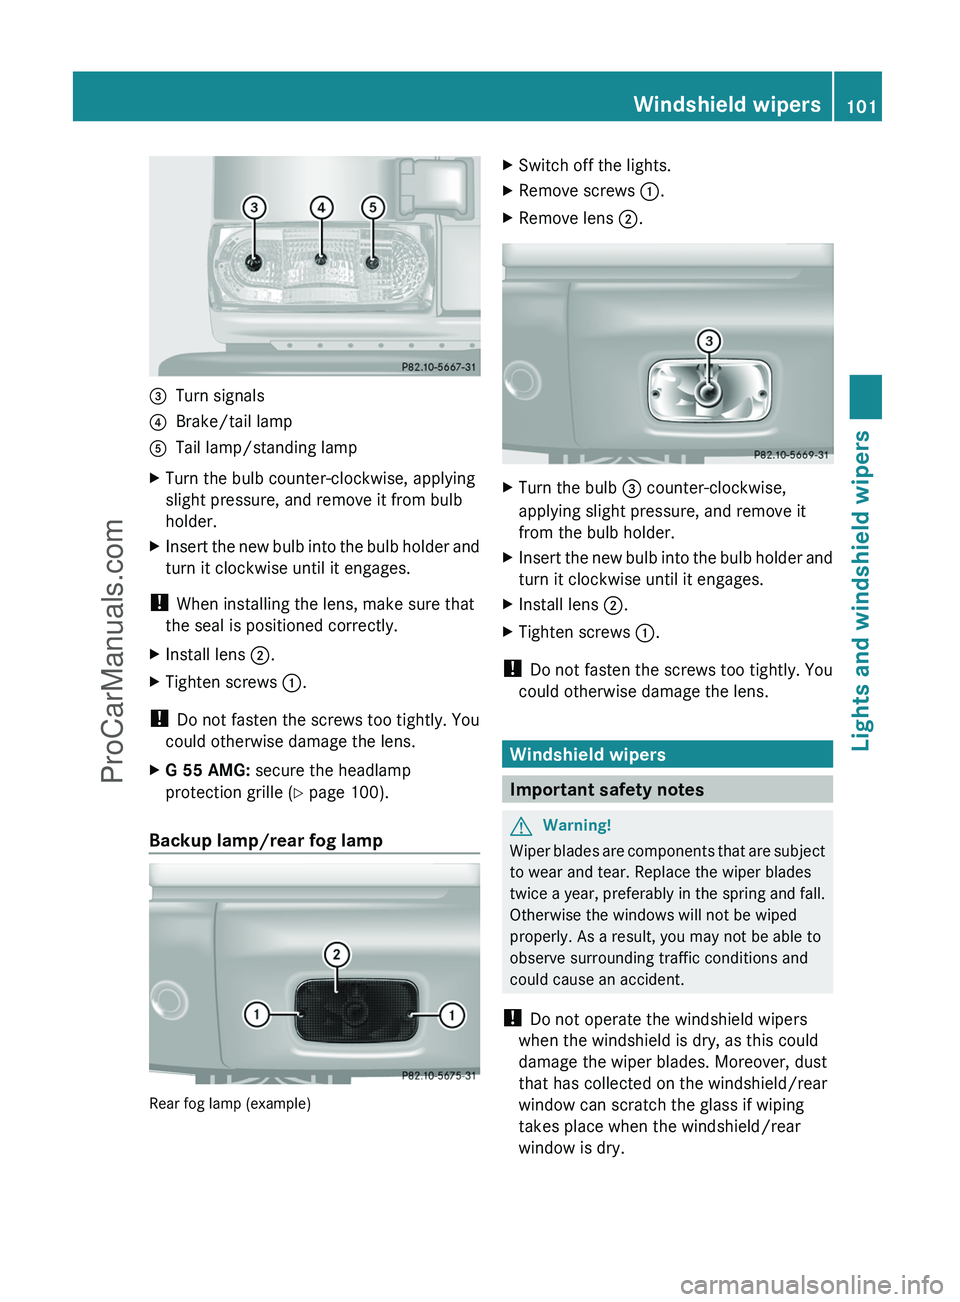
=Turn signals?Brake/tail lampATail lamp/standing lampXTurn the bulb counter-clockwise, applying
slight pressure, and remove it from bulb
holder.XInsert the new bulb into the bulb holder and
turn it clockwise until it engages.
! When installing the lens, make sure that
the seal is positioned correctly.
XInstall lens ;.XTighten screws :.
!
Do not fasten the screws too tightly. You
could otherwise damage the lens.
XG 55 AMG: secure the headlamp
protection grille ( Y page 100).
Backup lamp/rear fog lamp
Rear fog lamp (example)
XSwitch off the lights.XRemove screws :.XRemove lens ;.XTurn the bulb = counter-clockwise,
applying slight pressure, and remove it
from the bulb holder.XInsert the new bulb into the bulb holder and
turn it clockwise until it engages.XInstall lens ;.XTighten screws :.
!
Do not fasten the screws too tightly. You
could otherwise damage the lens.
Windshield wipers
Important safety notes
GWarning!
Wiper blades are components that are subject
to wear and tear. Replace the wiper blades
twice a year, preferably in the spring and fall.
Otherwise the windows will not be wiped
properly. As a result, you may not be able to
observe surrounding traffic conditions and
could cause an accident.
! Do not operate the windshield wipers
when the windshield is dry, as this could
damage the wiper blades. Moreover, dust
that has collected on the windshield/rear
window can scratch the glass if wiping
takes place when the windshield/rear
window is dry.
Windshield wipers101Lights and windshield wipersZProCarManuals.com
Page 110 of 288

otherwise fog up as, in air-recirculation
mode, no fresh air is drawn into the vehicle.
R Use the residual heat function if you want
to heat or ventilate the vehicle interior
when the ignition is switched off. The
"residual heat" function can only be
activated or deactivated with the ignition
switched off.
R At very low temperatures, the rear window
defroster is only switched on once the
vehicle interior has warmed up.
Activating/deactivating climate
control
Important information
GWarning!
When the climate control system is
deactivated, the outside air supply and
circulation are also deactivated. Only choose
this setting for a short time. Otherwise the
windows could fog up, impairing visibility and
endangering you and others.
i Switch on climate control primarily using
the à button ( Y page 109).
Activating/deactivating
XTurn the key to position 2 in the ignition
lock.XTo switch on: turn control : clockwise to
the desired position (except position 0)
( Y page 107).XThe previously selected settings come into
effect again.XTo switch off: turn control : counter-
clockwise to position 0(Y page 107).Switching cooling with air
dehumidification on/off
Important information
The cooling with air dehumidification function
is only available when the engine is running.
The air inside the vehicle is cooled and
dehumidified according to the temperature
selected.
GWarning
If you switch off the cooling function, the
vehicle will not be cooled when weather
conditions are warm. The windows can fog up
more quickly. Window fogging may impair
visibility and endanger you and others.
Condensation may drip from the underside of
the vehicle when it is in cooling mode. This is
normal and not a sign that there is a
malfunction.
i The cooling with air dehumidification
function uses refrigerant R134a. This
coolant does not contain
chlorofluorocarbons, and therefore does
not damage the ozone layer.
Activating/deactivating
! If the cooling with air dehumidification
does not switch on, it is possible that the
climate control system has lost coolant.
Have the cooling with air dehumidification
checked at a qualified specialist workshop.
XTo activate: press the Á button.
The indicator lamp in the Á button lights
up.XTo switch off: press the Á button.
The indicator lamp in the Á button goes
out. The cooling with air dehumidification
function has a delayed switch-off feature.108Operating the climate control systemClimate control
ProCarManuals.com
Page 111 of 288

Problems with the cooling with air
dehumidification function
If the indicator lamp in the Á button does
not go out or flashes when switched on, the
cooling with air dehumidification function is
switched off due to a malfunction. You can no
longer switch on the cooling with air
dehumidification function.
XConsult a qualified specialist workshop.
Setting climate control to automatic
GWarning
If you switch off the cooling function, the
vehicle will not be cooled when weather
conditions are warm. The windows can fog up
more quickly. Window fogging may impair
visibility and endanger you and others.
In automatic mode, the set temperature is
maintained automatically at a constant level.
The system automatically regulates the
temperature of the dispensed air, the airflow
and the air distribution.
Automatic mode will achieve optimal
operation if cooling with air dehumidification
is also activated. If desired, cooling with air
dehumidification can be deactivated.
XTurn the key to position 2 in the ignition
lock.XSet the desired temperature.XTo switch on: press the à button.
The indicator lamp in the à button lights
up. Automatic air distribution and airflow
are activated.XTo switch off: press the à button.
The indicator lamp in the à button goes
out. Automatic air distribution and airflow
are deactivated.
Setting the temperature
Different temperatures can be set for the
driver's and front-passenger sides.
XTurn the key to position 2 in the ignition
lock.XTo increase/reduce: turn controls ; and
= clockwise or counter-clockwise
( Y page 107).
Only change the temperature setting in
small increments. Start at 72 ‡ (22 †).
i If you turn the temperature control on one
side of the vehicle fully clockwise or
counter-clockwise, you will increase or
reduce the temperature on the other side
of the vehicle at the same time.
Setting the air distribution
You can set the air distribution for the entire
vehicle.
The symbols for the air distribution have the
following meanings:
SymbolMeaningMDirects the airflow through the
defroster vents to the
windshield and side windowsQDirects the airflow to the entire
vehicle interiorODirects the airflow through the
footwell and side air ventsPDirects the airflow through the
center and side air ventsXTurn the key to position 2 in the ignition
lock.XPress the à button.
The indicator lamp in the à button goes
out.XTurn control ?(Y page 107) to the
corresponding symbol. The control can
also be turned to the area between two
symbols.Operating the climate control system109Climate controlZProCarManuals.com
Page 112 of 288

Setting the airflowXTurn the key to position 2 in the ignition
lock.XPress the à button.
The indicator lamp in the à button goes
out.XTo increase/reduce: turn
thumbwheel : clockwise or counter-
clockwise ( Y page 107).
i
The airflow from the rear-compartment
vents and the center vents is the same.
Defrosting the windshield
You can use this function to defrost the
windshield or to defrost the inside of the
windshield and the side windows.
i You should only select the defrosting
function until the windshield is clear again.
i When you switch on the "defrosting"
function using the ¥7
or z 8
button,
you cannot adjust any of the other settings.
XTurn the key to position 2 in the ignition
lock.XTo switch on: press the ¥7
or z 8
button.
The indicator lamp in the ¥7
or z 8
button comes on.
The climate control system switches to the
following functions:
R cooling with air dehumidification on
R high airflow
R high temperature
R air distribution to the windshield and
front side windows
R air-recirculation mode off
i If necessary, also activate the windshield
defroster ( Y page 110).
XTo deactivate: press the ¥7
or z 8
button.
The indicator lamp in the ¥7
or z 8
button goes off. The previously selected
settings come into effect again.
or
XPress the à button.
The indicator lamp in the à button lights
up. The indicator lamp in the z button
goes out. Airflow and air distribution are set
to automatic mode.
Defrosting the windows
Windows fogged up on the inside
XActivate the "defrosting" function.XIf necessary, activate the windshield
defroster ( Y page 110).
i
You should only select this setting until
the windshield is clear again.
Windows fogged up on the outside
XSwitch on the windshield wipers.XClose the center air vents.
When automatic air distribution is switched
off:
XTurn the air distribution thumbwheel to the
O or P symbol.
i
You should only select this setting until
the windshield is clear again.
XIf necessary, activate the windshield
defroster ( Y page 110).
Activating/deactivating windshield
heating
GWarning
Any accumulation of snow and ice should be
removed from the windshield before driving.
7 USA only.
8 Canada only.110Operating the climate control systemClimate control
ProCarManuals.com
Page 114 of 288

from outside. The air already inside the
vehicle will then be recirculated.GWarning!
Fogged windows impair visibility,
endangering you and others. If the windows
begin to fog on the inside, switching off the
air recirculation mode immediately should
clear interior window fogging. If interior
window fogging persists, make sure the air
conditioning is activated, or press button
z or ¥ .
XTurn the key to position 2 in the ignition
lock.XTo switch on: press the g button.
The indicator lamp in the g button lights
up.
i Air-recirculation mode is activated
automatically at high outside
temperatures. When air-recirculation mode
is activated automatically, the indicator
lamp in the g button is not lit.
Outside air is added after about 30
minutes.
XTo switch off: press the g button.
The indicator lamp in the g button goes
out.
i Air-recirculation mode switches off
automatically:
R after approximately five minutes if
outside temperatures are less than about
41 ‡ (5 †)
R after approximately five minutes if
cooling with air dehumidification is
deactivated
R after approximately 30 minutes if outside
temperatures are over about
41 ‡ (5 †)
Activating/deactivating the residual
heat function
It is possible to make use of the residual heat
of the engine to continue heating the
stationary vehicle for up to 30 minutes after
the engine has been switched off. The heating
time depends on the coolant temperature and
on the interior temperature that has been set.
i The blower will run at a low speed
regardless of the airflow setting.
i If you activate the residual heat function
at high temperatures, only the ventilation
will be activated.XTurn the key to position 0 in the ignition
lock or remove it.XTo activate: press the Á button.
The indicator lamp in the Á button lights
up.XTo switch off: press the Á button.
The indicator lamp in the Á button goes
out.
i Residual heat is deactivated
automatically:
R after about 30 minutes
R when the ignition is switched on
R if the battery voltage drops
R if the coolant temperature is too low
Setting the air vents
Important safety notes
GWarning
When operating the climate control, the air
that enters the passenger compartment
through the air vents can be very hot or very
cold (depending on the set temperature). This
could cause burns or frostbite to unprotected
skin in the immediate area of the air vents.
Always keep sufficient distance between
unprotected parts of the body and the air
vents. If necessary, use the air distribution
adjustment to direct the air to air vents in the
vehicle interior that are not in the immediate
area of unprotected skin.
112Setting the air ventsClimate control
ProCarManuals.com
Page 155 of 288

The rear view camera does not relieve you of
the responsibility to be cautious. Take care
and pay careful attention. The rear view
camera may not show objects which are
R very close to the rear bumper
R under the rear bumper
R under the spare wheel
R nearby behind the spare wheel
You are responsible for safety at all times and
must continue to pay attention to the
immediate surroundings when parking and
maneuvering. This includes the area behind,
in front of, and beside the vehicle. Otherwise
you could endanger yourself and/or others.GWarning!
The rear view camera either will not function
or will not function to its full capability if
R the tailgate is open
R it is raining very hard, snowing or foggy
R it is night or you are parking/maneuvering
your vehicle in an area where it is very dark
R the camera is exposed to a very bright white
light
R the immediate surroundings are
illuminated with fluorescent light (the
display may flicker)
R there is a sudden change in temperature,
e.g. if you drive into a heated garage from
the cold (lens condensation)
R the camera lens is dirty or covered
R the rear of your vehicle is damaged
In this case, have the position and setting
of the camera checked by a qualified
specialist workshop. Mercedes-Benz
recommends that you contact a Mercedes-
Benz Center for this purpose.
Do not use the rear view camera in these
situations. Otherwise you could injure
yourself or others and/or damage property
including your vehicle while parking/
maneuvering.
Activating the rear view cameraXMake sure that the SmartKey is in
position 2 in the ignition lock.XMake sure that the "rear view camera"
function is selected in COMAND (see the
separate operating instructions for
COMAND).XEngage reverse gear.
The area behind the vehicle is shown in the
COMAND display.Driving systems153Driving and parkingZProCarManuals.com
Page 166 of 288

Switching the daytime running lamps on/
off
This function is not available in Canada.
If you have activated the daytime running
lamps function and the light switch is in the
$ or à position, the low-beam
headlamps are switched on automatically
when the engine is running.
In the dark, the following also light up:
R the low-beam headlamps
R the standing lamps
R the tail lamps
R the license plate lamp
R the side marker lamp
In countries where daytime running lamps are
legally required, Constant is the factory
setting.XPress the V or U button on the
steering wheel to select the Settings
menu.XPress the & button to select submenus.XPress the W or X button to select the
Lighting submenu.XPress the & button to select Headlamp
mode .XPress the W or X button to set the
mode for the headlamps to Manual or
Constant (daytime running lamps).XPress the &, V or U button to
select a different display.
Switching the surround lighting on or off
If you activate the surround lighting function
and the light switch is set to Ã, the
following will light up if it is dark and you
unlock the vehicle using the key:
R the standing lamps
R the license plate lamp
R the tail lamps
R the fog lamps
R the side marker lamp
The surround lighting switches off
automatically after 40 seconds or when the
driver's door is opened.XPress the V or U button on the
steering wheel to select the Settings
menu.XPress the & button to select submenus.XPress the W or X button to select the
Lighting submenu.XPress the & button to select Surround
lighting .XPress the W or X button to switch
the Surround lighting on or off.XWhen leaving the vehicle, turn the light
switch to position Ã.
The surround lighting is activated.XPress the &, V or U button to
select a different display.
Activating/deactivating the exterior
lighting delayed switch-off
If you have activated the delayed switch-off
function, the light switch is set to à and
you switch off the engine, the following
remain lit:
R the standing lamps
R the license plate lamp
R the tail lamps
R the fog lamps
R the side marker lamp
If the engine is switched off and then none of
the doors are opened, or if an open door is
not closed, the exterior lighting goes out after
60 seconds.
XPress the V or U button on the
steering wheel to select the Settings
menu.XPress the & button to select submenus.XPress the W or X button to select the
Lighting submenu.XPress the & button to select Headl.
Delayed Switch Off .164Menus and submenusOn-board computer and displays
ProCarManuals.com