2011 MERCEDES-BENZ G-CLASS buttons
[x] Cancel search: buttonsPage 89 of 288

Problems with the exterior mirrorsProblemPossible causes/consequences and M SolutionsAn exterior mirror has
been pushed out of
position.XMove the exterior mirror into the correct position manually.Automatic anti-glare mirrorsGWarning!
The auto-dimming function does not react if
incoming light is not aimed directly at sensors
in the interior rear view mirror.
The interior rear view mirror and the exterior
rear view mirror on the driver’s side do not
react, for example, when transporting cargo
which covers the rear window.
Light hitting the mirror(s) at certain angles
(incident light) could blind you. As a result,
you may not be able to observe traffic
conditions and could cause an accident.
The rear-view mirror and the exterior mirror
on the driver's side automatically go into anti-
glare mode if the ignition is switched on and
incident light from headlamps strikes the
sensor in the rear-view mirror.
The mirrors do not go into anti-glare mode if
reverse gear is engaged or the interior lighting
is switched on.
Parking position for the exterior
mirror on the front-passenger side
General notes
To make it easier to park, you can store the
front-passenger side exterior mirror position
in such a way that you can see the rear wheel
on that side as soon as you engage reverse
gear R.
Using the memory buttons on the driver's
side, you can store three parking positions
per key.
Setting and storing the parking position:Adjustment button;Right-hand exterior mirror=Left-hand exterior mirror?Memory buttonXMake sure that the vehicle is stationary and
that the key is in position 1 or 2 in the
ignition lock.XPress button ; for the exterior mirror on
the front-passenger side.XEngage reverse gear R.
The exterior mirror on the front-passenger
side moves to the preset parking position.XUse adjustment button : to adjust the
exterior mirror to a position which allows
you to see the rear wheel and the curb.XPress memory button ? and adjustment
button : within three seconds.
The parking position is stored if the exterior
mirror does not move.
i If the mirror moves out of position, repeat
the steps.
i If you shift the transmission to another
position, the exterior mirror on the front-
Mirrors87Seats, steering wheel and mirrorsZProCarManuals.com
Page 90 of 288
passenger side returns to the driving
position.
Calling up a stored parking position
settingXWith the key in position 2 in the ignition
lock and the exterior mirror on the front-
passenger side activated, engage reverse
gear.
The exterior mirror on the front-passenger
side moves to the stored parking position.
The exterior mirror on the front-passenger
side moves back to its original position:
R as soon as you exceed a speed of
10 km/h
R about ten seconds after you have
disengaged reverse gear R
R if you press button = for the exterior
mirror on the driver's side
Memory functions
Storing settings
With the memory function, you can store up
to three different settings, e.g. for three
different people.
The following settings are stored as a single
memory preset:
R position of the seat, backrest and head
restraint
R driver's side: steering wheel position
R driver's side: position of the exterior
mirrors on the driver's and front-passenger
sides
GWarning
Do not activate the memory function while
driving. Activating the memory function while
driving could cause the driver to lose control
of the vehicle.
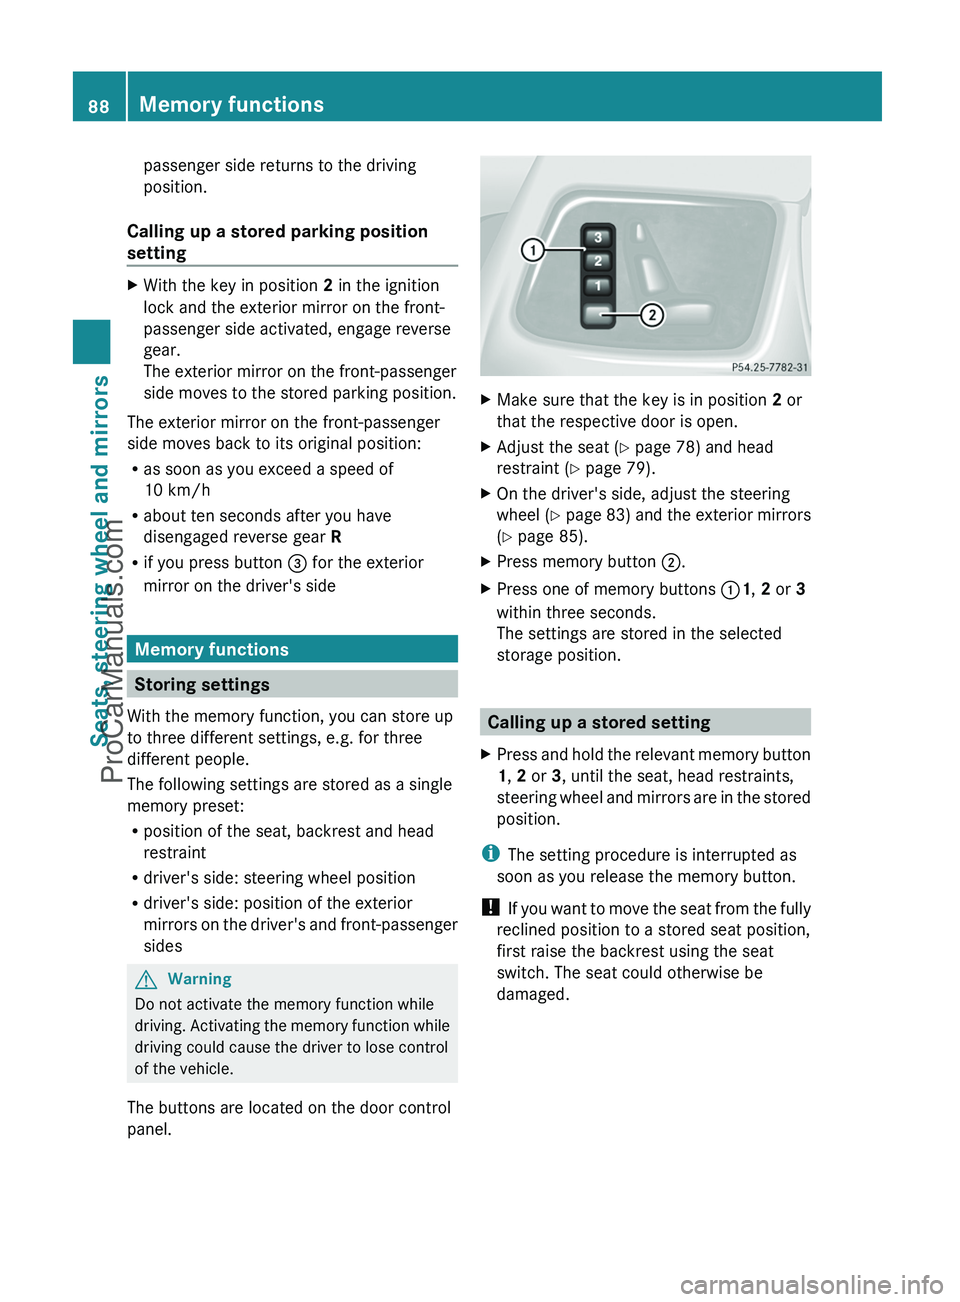
The buttons are located on the door control
panel.
XMake sure that the key is in position 2 or
that the respective door is open.XAdjust the seat ( Y page 78) and head
restraint ( Y page 79).XOn the driver's side, adjust the steering
wheel ( Y page 83) and the exterior mirrors
( Y page 85).XPress memory button ;.XPress one of memory buttons :1, 2 or 3
within three seconds.
The settings are stored in the selected
storage position.
Calling up a stored setting
XPress and hold the relevant memory button
1 , 2 or 3, until the seat, head restraints,
steering wheel and mirrors are in the stored
position.
i The setting procedure is interrupted as
soon as you release the memory button.
! If you want to move the seat from the fully
reclined position to a stored seat position,
first raise the backrest using the seat
switch. The seat could otherwise be
damaged.
88Memory functionsSeats, steering wheel and mirrors
ProCarManuals.com
Page 109 of 288
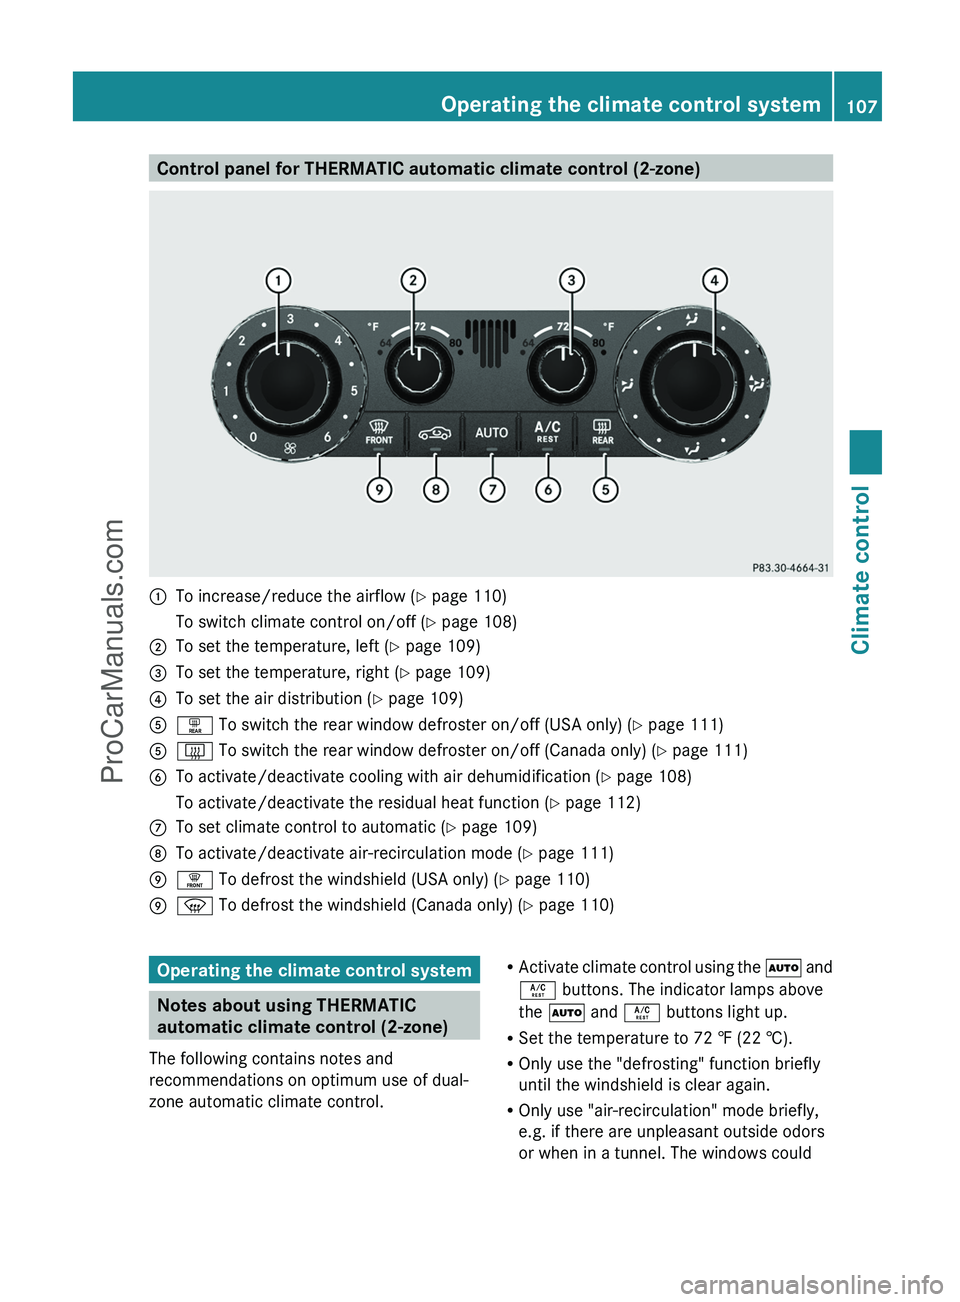
Control panel for THERMATIC automatic climate control (2-zone):To increase/reduce the airflow (Y page 110)To switch climate control on/off ( Y page 108);To set the temperature, left ( Y page 109)=To set the temperature, right ( Y page 109)?To set the air distribution ( Y page 109)Aª To switch the rear window defroster on/off (USA only) ( Y page 111)A£ To switch the rear window defroster on/off (Canada only) ( Y page 111)BTo activate/deactivate cooling with air dehumidification ( Y page 108)To activate/deactivate the residual heat function ( Y page 112)CTo set climate control to automatic ( Y page 109)DTo activate/deactivate air-recirculation mode ( Y page 111)E¥ To defrost the windshield (USA only) ( Y page 110)Ez To defrost the windshield (Canada only) ( Y page 110)Operating the climate control system
Notes about using THERMATIC
automatic climate control (2-zone)
The following contains notes and
recommendations on optimum use of dual-
zone automatic climate control.
R Activate climate control using the à and
Á buttons. The indicator lamps above
the à and Á buttons light up.
R Set the temperature to 72 ‡ (22 †).
R Only use the "defrosting" function briefly
until the windshield is clear again.
R Only use "air-recirculation" mode briefly,
e.g. if there are unpleasant outside odors
or when in a tunnel. The windows couldOperating the climate control system107Climate controlZProCarManuals.com
Page 159 of 288
The coolant temperature gauge is in the
instrument cluster on the left-hand side.
Under normal driving conditions, with the
correct anti-corrosion and antifreeze additive
concentration, the reading may rise to
248 ‡(120 †).
! If the coolant temperature exceeds
248 ‡(120 †) do not continue driving. The
engine will otherwise be damaged.
Outside temperature display
The outside temperature display is in the
multifunction display ( Y page 158).
GWarning!
The outside temperature indicator is not
designed to serve as an ice-warning device
and is therefore unsuitable for that purpose.
Indicated temperatures just above the
freezing point do not guarantee that the road
surface is free of ice. The road may still be icy,
especially in wooded areas or on bridges.
Changes in the outside temperature are
displayed after a short delay.
Operating the on-board computer
The on-board computer is activated as soon
as you turn the SmartKey to position 1 in the
ignition lock.
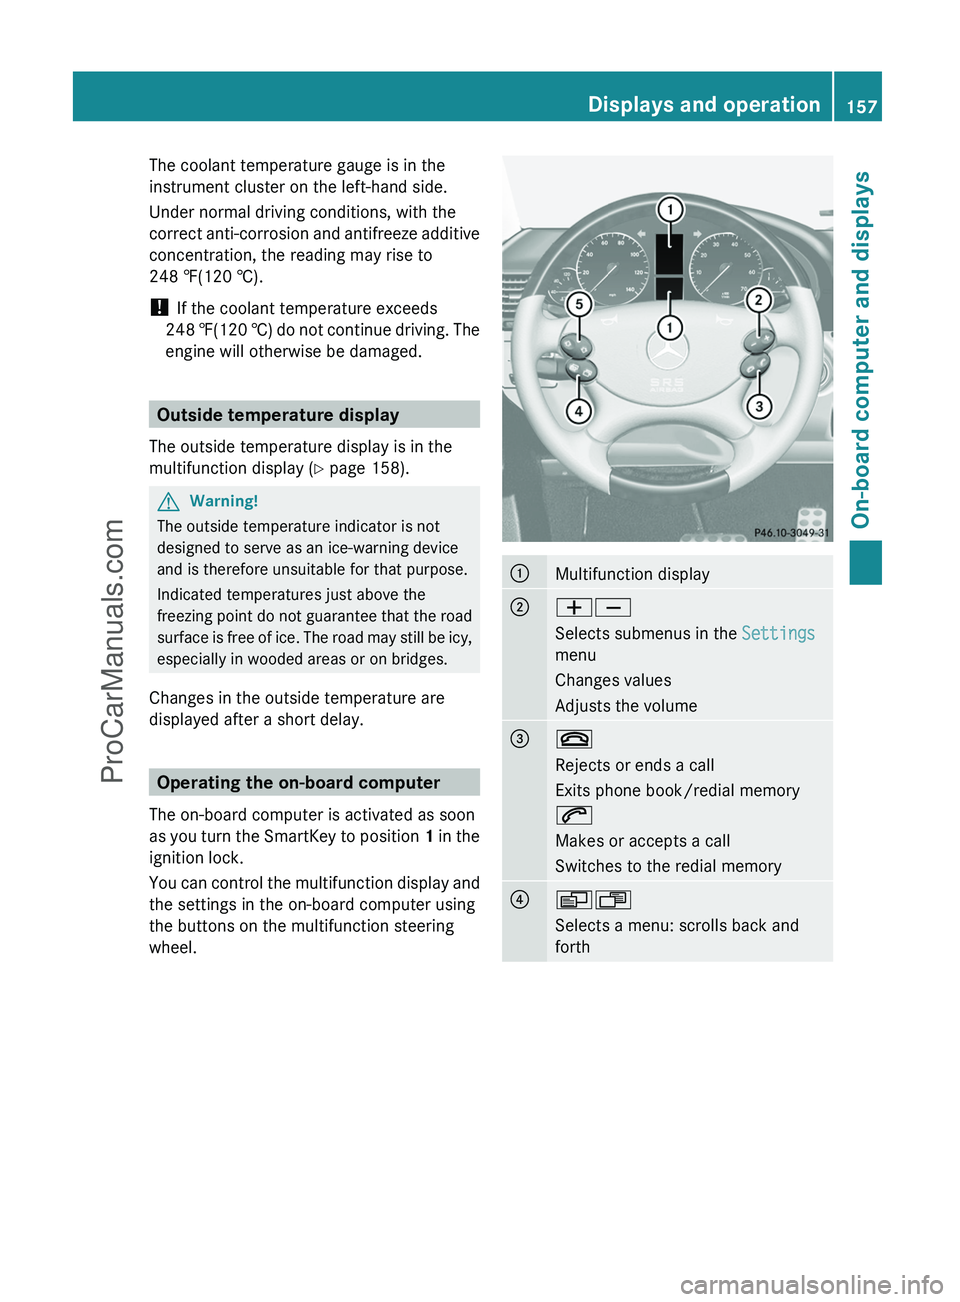
You can control the multifunction display and
the settings in the on-board computer using
the buttons on the multifunction steering
wheel.
:Multifunction display;WX
Selects submenus in the Settings
menu
Changes values
Adjusts the volume=~
Rejects or ends a call
Exits phone book/redial memory
6
Makes or accepts a call
Switches to the redial memory?VU
Selects a menu: scrolls back and
forthDisplays and operation157On-board computer and displaysZProCarManuals.com
Page 167 of 288
XPress the W or X button to activate
or deactivate the Headl. Delayed
Switch Off function.XBefore switching off the engine, turn the
light switch to position Ã.
The exterior lighting delayed switch-off is
activated.XPress the &, V or U button to
select a different display.
Deactivating the delayed switch-off
temporarily:
XBefore leaving the vehicle, turn the key to
position 0 in the ignition lock.XTurn the key to position 2 in the ignition
lock and back to position 0.
The delayed switch-off is deactivated.
Delayed switch-off is reactivated the next
time you start the engine.
Activating/deactivating the interior
lighting delayed switch-off
If the Interior Light. Delay. Sw. Off:
function is activated and you pull the key out
of the ignition lock, the interior lighting
remains on for around 10 seconds.
XPress the V or U button on the
steering wheel to select the Settings
menu.XPress the & button to select submenus.XPress the W or X button to select the
Lighting submenu.XPress the & button to select Interior
Light. Delay Sw. Off .XPress the W or X button to activate
or deactivate Interior Light. Delay.
Sw. Off .XPress the &, V or U button to
select a different display.Vehicle
Activating/deactivating the automatic
door locking feature
If you select the Automatic Locking
function, the vehicle is centrally locked above
a speed of around 9 mph (15 km/h).
i For more information on the automatic
locking feature, see ( Y page 68).
XPress the V or U button on the
steering wheel to select the Settings
menu.XPress the & button to select submenus.XPress the W or X button to select the
Vehicle submenu.XPress the & button to select
Automatic Door Lock .XPress the W or X button to switch
the Automatic Door Lock feature on or
off.XPress the &, V or U button to
select a different display.
Convenience
Activating/deactivating the EASY-
ENTRY/EXIT feature
You can use the Easy-entry Function to
activate or deactivate the EASY-ENTRY/EXIT
feature ( Y page 84).
GWarning!
You must make sure no one can become
trapped or injured by the moving steering
wheel when the easy-entry/exit feature is
activated.
To stop steering wheel movement do one of
the following:
R Move steering wheel adjustment stalk.
R Press one of the memory position buttons.
R Press the memory button.
Do not leave children unattended in the
vehicle, or with access to an unlocked vehicle.
Children could open the driver’s door and
Menus and submenus165On-board computer and displaysZProCarManuals.com
Page 211 of 288
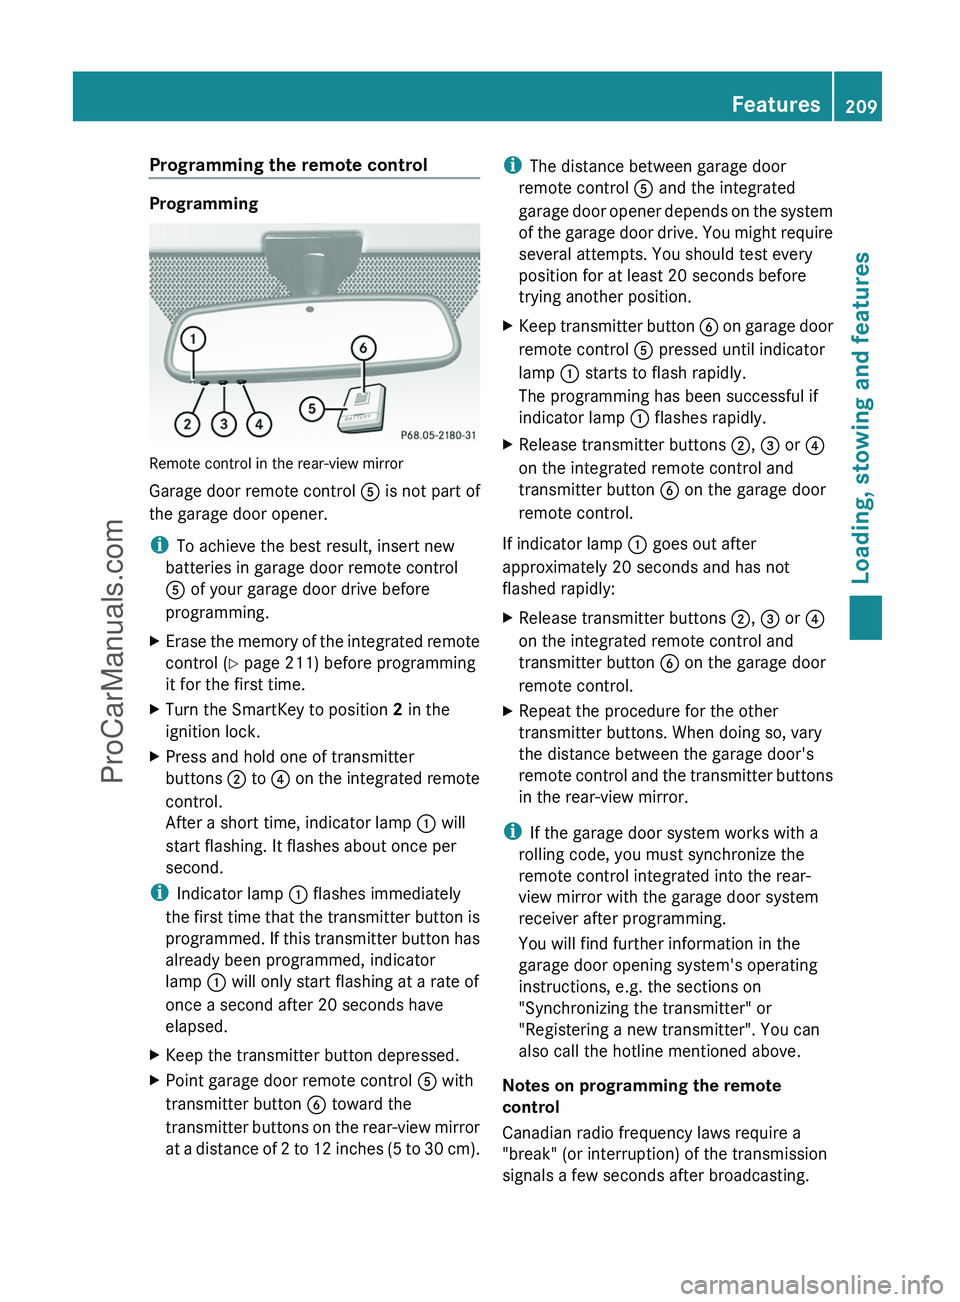
Programming the remote control
Programming
Remote control in the rear-view mirror
Garage door remote control A is not part of
the garage door opener.
i To achieve the best result, insert new
batteries in garage door remote control
A of your garage door drive before
programming.
XErase the memory of the integrated remote
control ( Y page 211) before programming
it for the first time.XTurn the SmartKey to position 2 in the
ignition lock.XPress and hold one of transmitter
buttons ; to ? on the integrated remote
control.
After a short time, indicator lamp : will
start flashing. It flashes about once per
second.
i Indicator lamp : flashes immediately
the first time that the transmitter button is
programmed. If this transmitter button has
already been programmed, indicator
lamp : will only start flashing at a rate of
once a second after 20 seconds have
elapsed.
XKeep the transmitter button depressed.XPoint garage door remote control A with
transmitter button B toward the
transmitter buttons on the rear-view mirror
at a distance of 2 to 12 inches (5 to 30 cm).i The distance between garage door
remote control A and the integrated
garage door opener depends on the system
of the garage door drive. You might require
several attempts. You should test every
position for at least 20 seconds before
trying another position.XKeep transmitter button B on garage door
remote control A pressed until indicator
lamp : starts to flash rapidly.
The programming has been successful if
indicator lamp : flashes rapidly.XRelease transmitter buttons ;, = or ?
on the integrated remote control and
transmitter button B on the garage door
remote control.
If indicator lamp : goes out after
approximately 20 seconds and has not
flashed rapidly:
XRelease transmitter buttons ;, = or ?
on the integrated remote control and
transmitter button B on the garage door
remote control.XRepeat the procedure for the other
transmitter buttons. When doing so, vary
the distance between the garage door's
remote control and the transmitter buttons
in the rear-view mirror.
i If the garage door system works with a
rolling code, you must synchronize the
remote control integrated into the rear-
view mirror with the garage door system
receiver after programming.
You will find further information in the
garage door opening system's operating
instructions, e.g. the sections on
"Synchronizing the transmitter" or
"Registering a new transmitter". You can
also call the hotline mentioned above.
Notes on programming the remote
control
Canadian radio frequency laws require a
"break" (or interruption) of the transmission
signals a few seconds after broadcasting.
Features209Loading, stowing and featuresZProCarManuals.com
Page 213 of 288
Clearing the remote control memoryXTurn the SmartKey to position 2 in the
ignition lock.XPress and hold transmitter buttons ;
and ? for approximately 20 seconds until
indicator lamp : flashes rapidly.
The memory is cleared.
i You should clear the remote control
memory before selling the vehicle.
Floormat on the driver's side
GWarning!
Whenever you are using a floormat, make sure
there is enough clearance and that the
floormat is securely fastened.
The floormat should always be securely
fastened using the fastening equipment.
Before driving off, check that the floormat is
securely in place and adjust it if necessary. A
loose floormat could slip and hinder proper
functioning of the pedals.
Do not place several floormats on top of each
other as this may impair pedal movement.
Features211Loading, stowing and featuresZProCarManuals.com
Page 222 of 288
Maintaining the time-dependent service
schedule:XNote down the service due date displayed
before disconnecting the battery.
or:
XSubtract the battery disconnection periods
from the service date shown on the display
after reconnecting the battery.
i The service interval display should not be
confused with the 4 engine oil level
display.
Hiding a service message
XPress the reset button on the left of the
instrument cluster ( Y page 26).
Displaying service messages
Use the buttons on the multifunction steering
wheel.
XSwitch on the ignition.XPress V or U to select the standard
display menu on the steering wheel
( Y page 160).XSelect & or * to select the service
interval display.
The ¯ or ± service symbol and the
service due date are displayed.
Please bear the following in mind
A qualified specialist workshop, e.g. an
authorized Mercedes-Benz Center, will reset
the service interval display after the
necessary service work has been carried out.
You can obtain further information, e.g.
regarding service work, at an authorized
Mercedes-Benz Center or directly from
Mercedes-Benz.
! If the service interval indicator has been
inadvertently reset, this setting can be
corrected at an authorized Mercedes-Benz
Center.
Have the service work carried out as
described in the Service Booklet. There
may otherwise be increased wear, resulting
in damage to the vehicle or to the major
assemblies.
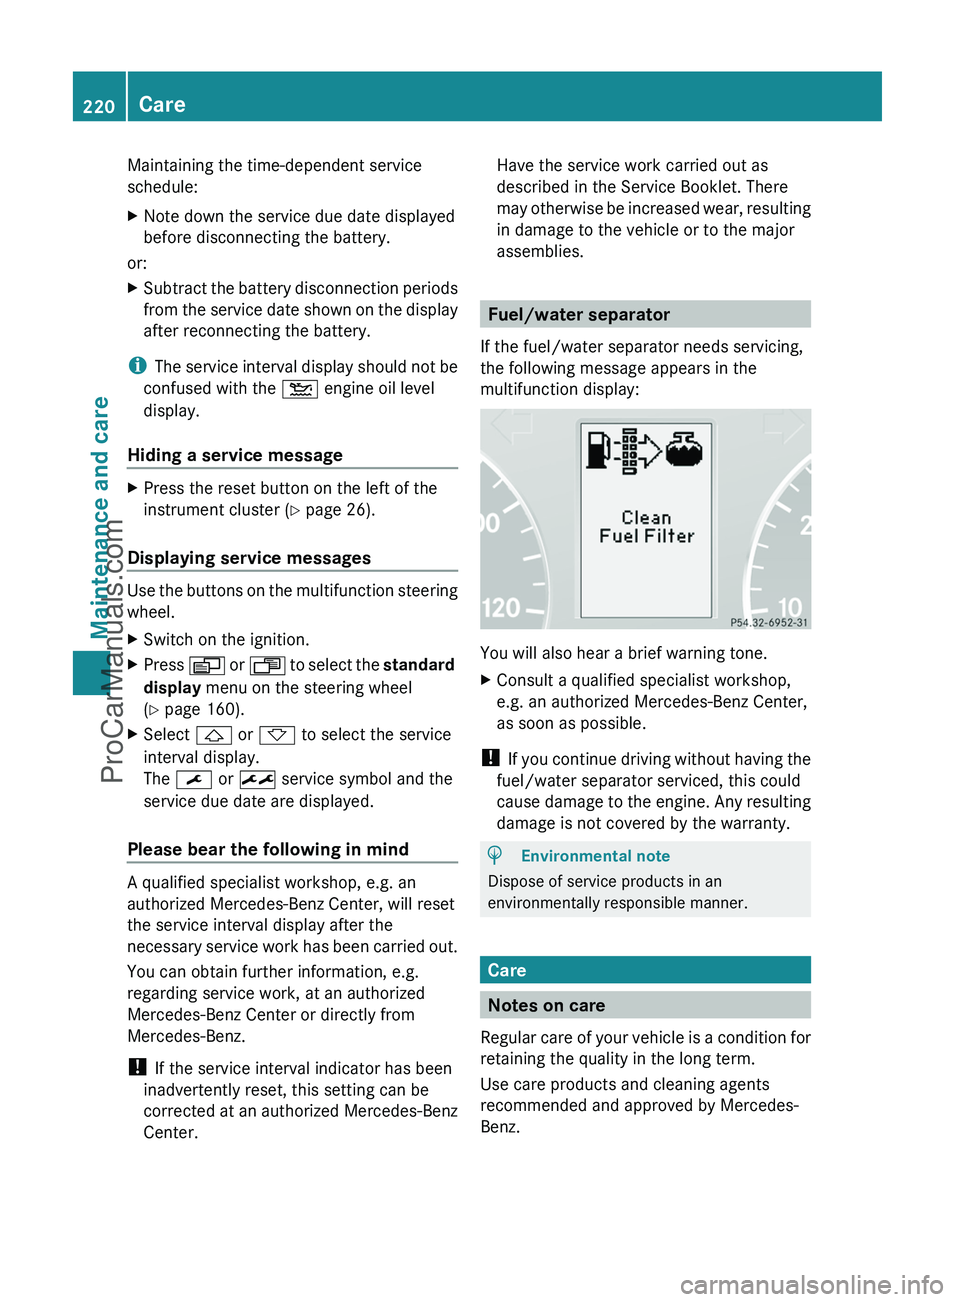
Fuel/water separator
If the fuel/water separator needs servicing,
the following message appears in the
multifunction display:
You will also hear a brief warning tone.
XConsult a qualified specialist workshop,
e.g. an authorized Mercedes-Benz Center,
as soon as possible.
! If you continue driving without having the
fuel/water separator serviced, this could
cause damage to the engine. Any resulting
damage is not covered by the warranty.
HEnvironmental note
Dispose of service products in an
environmentally responsible manner.
Care
Notes on care
Regular care of your vehicle is a condition for
retaining the quality in the long term.
Use care products and cleaning agents
recommended and approved by Mercedes-
Benz.
220CareMaintenance and care
ProCarManuals.com