2011 MERCEDES-BENZ G-CLASS buttons
[x] Cancel search: buttonsPage 15 of 288

Loss ................................................. 66
Malfunction ...................................... 66
Starting the engine ........................117
Snow chains ...................................... 248
Socket Front-passenger footwell ...............200
Luggage compartment ...................200
Rear compartment .........................200
SOS
see mbrace
Spare fuses ........................................ 243
Spare wheel Exterior spare wheel bracket .........230
Installing ........................................ 232
Notes/data .................................... 272
Speedometer
Additional speedometer (on-
board computer) ............................ 160
Setting the unit (on-board
computer) ...................................... 163
SPEEDTRONIC
Display-Meldung ............................ 178
SRS (Supplemental Restraint
System) Display message ............................ 170
Introduction ..................................... 34
Warning lamp ................................. 187
Warning lamp (function) ................... 34
Standard display (on-board
computer) .......................................... 160
Starting the engine Important safety notes ..................117
Station
see Radio
Status line (on-board computer) ...... 158
Selecting the display ...................... 163
Steering wheel
Adjusting ......................................... 83
Buttons (on-board computer) ......... 157
Cleaning ......................................... 225
Important safety notes ....................83
Steering wheel heating ....................83
Storing settings (memory
function) .......................................... 88
Steering wheel heating
Indicator lamp (Malfunction) ............84Stowage compartments
Armrest (under) ............................. 193
Glove box ....................................... 193
Stowage pockets ........................... 194
Stowage space
Cup holders ................................... 197
Important safety information .........193
Submenu (on-board computer)
Convenience .................................. 165
Vehicle ........................................... 165
Summer opening
see Convenience opening feature
Summer tires ..................................... 248
Sun visor ............................................ 198
Supplemental Restraint System see SRS
Surround lighting
Switching on/off (on-board
computer) ...................................... 164
SUV
(Sport Utility Vehicle) .......................19
Switching air-recirculation mode
on/off ................................................. 111
Switching off the alarm (ATA) ............ 59
T
Tachometer ........................................ 156
Tail lamps Changing ....................................... 100
Tail lamps (Display message) ........... 174
Technical data G 500 ............................................. 281
G 55 AMG ...................................... 282
Tires ............................................... 272
Wheels ........................................... 272
TELEAID
Call priority .................................... 206
Display message ............................ 170
Downloading destinations
(COMAND) ..................................... 206
Emergency call .............................. 203
Important safety notes ..................202
Locating a stolen vehicle ...............207
MB info call button ........................205
Roadside Assistance button ..........204
Self-test ......................................... 202
Index13ProCarManuals.com
Page 32 of 288
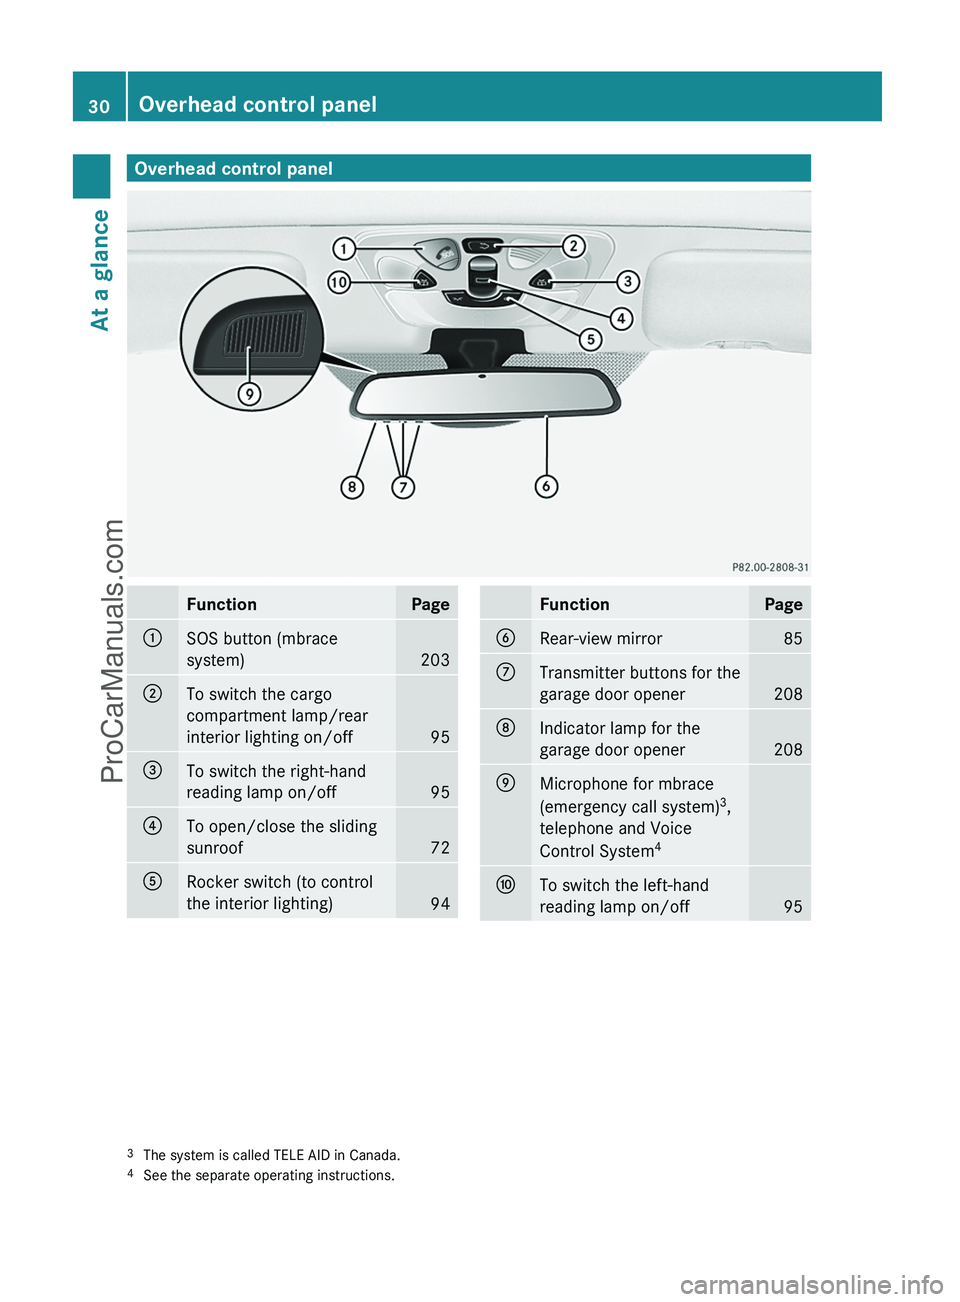
Overhead control panelFunctionPage:SOS button (mbrace
system)
203
;To switch the cargo
compartment lamp/rear
interior lighting on/off
95
=To switch the right-hand
reading lamp on/off
95
?To open/close the sliding
sunroof
72
ARocker switch (to control
the interior lighting)
94
FunctionPageBRear-view mirror85CTransmitter buttons for the
garage door opener
208
DIndicator lamp for the
garage door opener
208
EMicrophone for mbrace
(emergency call system) 3
,
telephone and Voice
Control System 4FTo switch the left-hand
reading lamp on/off
953 The system is called TELE AID in Canada.
4 See the separate operating instructions.30Overhead control panelAt a glance
ProCarManuals.com
Page 49 of 288
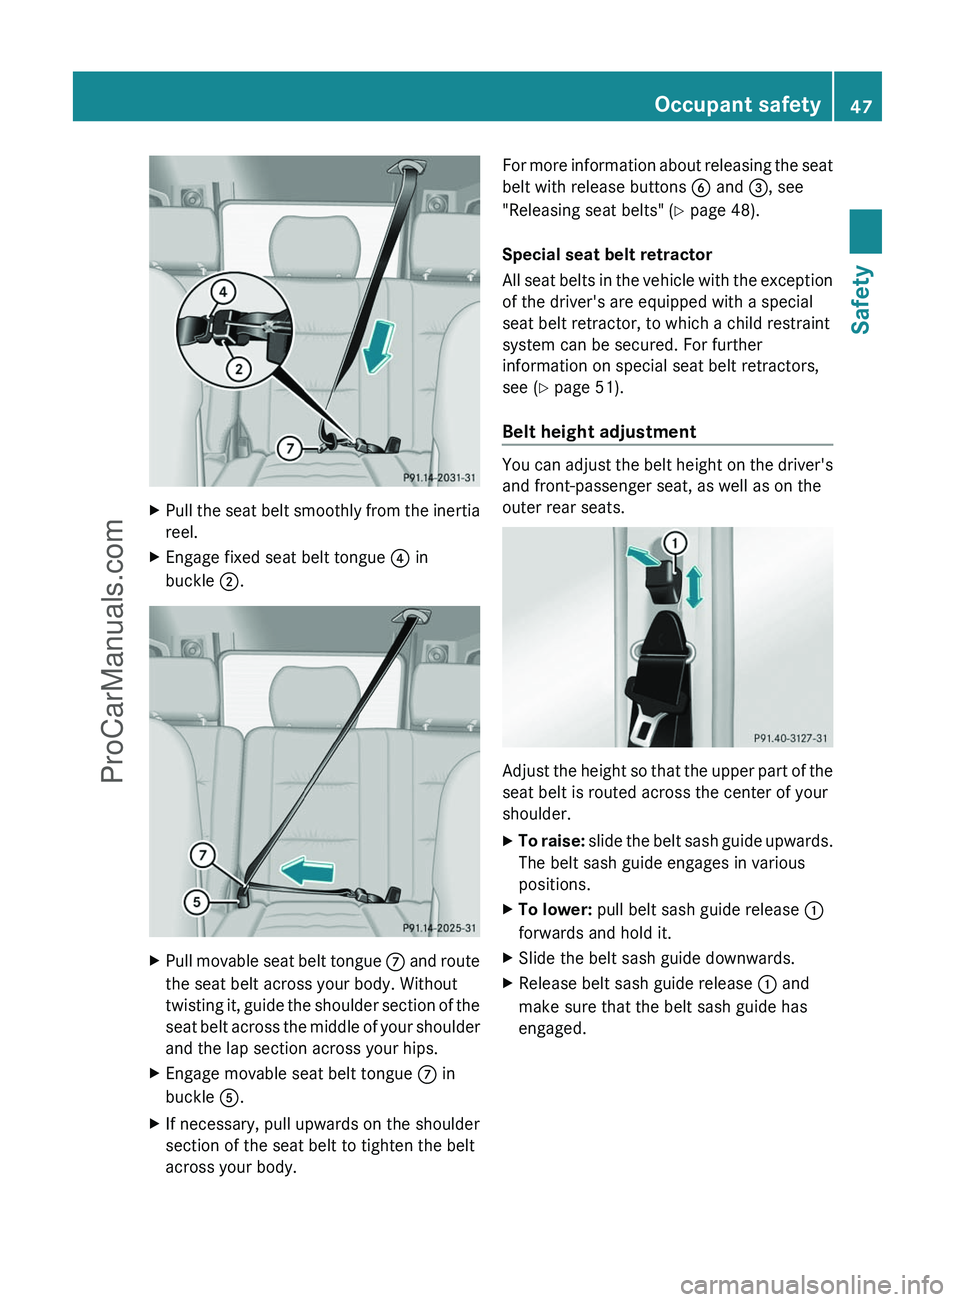
XPull the seat belt smoothly from the inertia
reel.XEngage fixed seat belt tongue ? in
buckle ;.XPull movable seat belt tongue C and route
the seat belt across your body. Without
twisting it, guide the shoulder section of the
seat belt across the middle of your shoulder
and the lap section across your hips.XEngage movable seat belt tongue C in
buckle A.XIf necessary, pull upwards on the shoulder
section of the seat belt to tighten the belt
across your body.For more information about releasing the seat
belt with release buttons B and =, see
"Releasing seat belts" ( Y page 48).
Special seat belt retractor
All seat belts in the vehicle with the exception
of the driver's are equipped with a special
seat belt retractor, to which a child restraint
system can be secured. For further
information on special seat belt retractors,
see ( Y page 51).
Belt height adjustment
You can adjust the belt height on the driver's
and front-passenger seat, as well as on the
outer rear seats.
Adjust the height so that the upper part of the
seat belt is routed across the center of your
shoulder.
XTo raise: slide the belt sash guide upwards.
The belt sash guide engages in various
positions.XTo lower: pull belt sash guide release :
forwards and hold it.XSlide the belt sash guide downwards.XRelease belt sash guide release : and
make sure that the belt sash guide has
engaged.Occupant safety47SafetyZProCarManuals.com
Page 65 of 288
received, including interference which
could cause unwanted functions.
Unapproved modifications to this device
may lead to withdrawal of permission to
operate it.
i Canada only:
This device complies with Industry
Canada's RSS210 regulations. Operation is
subject to the following conditions:
1. This device must not cause any harmful
interference, and
2. This device must be able to
accommodate interference that is
received, including interference which
could cause unwanted functions.
Unapproved modifications to this device
may lead to withdrawal of permission to
operate it.
Locking and unlocking centrally
The SmartKey centrally locks/unlocks:
R the doors
R the rear door
R the fuel filler flap
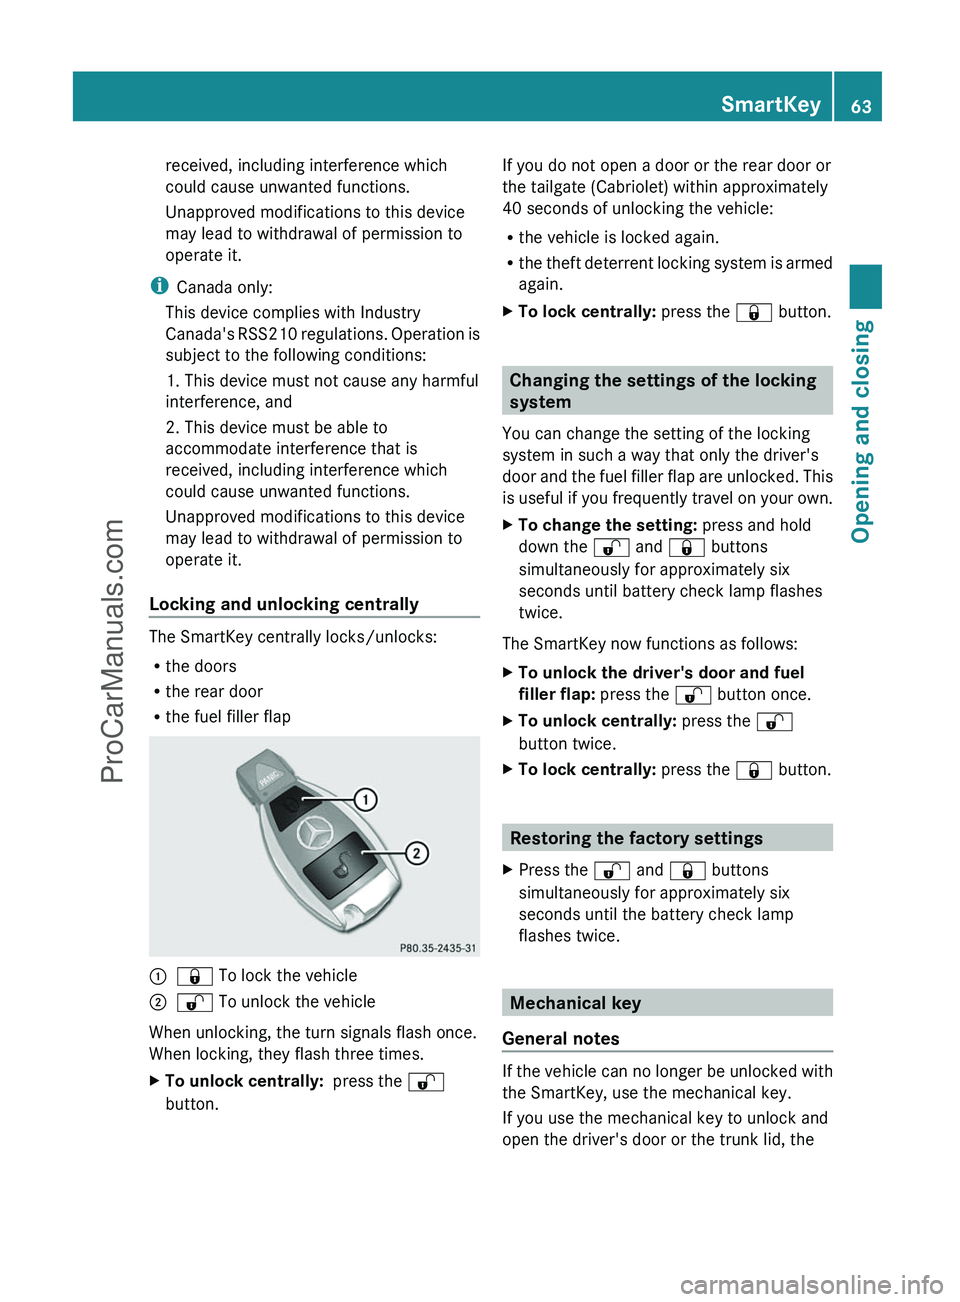
:& To lock the vehicle;% To unlock the vehicle
When unlocking, the turn signals flash once.
When locking, they flash three times.
XTo unlock centrally: press the %
button.If you do not open a door or the rear door or
the tailgate (Cabriolet) within approximately
40 seconds of unlocking the vehicle:
R the vehicle is locked again.
R the theft deterrent locking system is armed
again.XTo lock centrally: press the & button.
Changing the settings of the locking
system
You can change the setting of the locking
system in such a way that only the driver's
door and the fuel filler flap are unlocked. This
is useful if you frequently travel on your own.
XTo change the setting: press and hold
down the % and & buttons
simultaneously for approximately six
seconds until battery check lamp flashes
twice.
The SmartKey now functions as follows:
XTo unlock the driver's door and fuel
filler flap: press the % button once.XTo unlock centrally: press the %
button twice.XTo lock centrally: press the & button.
Restoring the factory settings
XPress the % and & buttons
simultaneously for approximately six
seconds until the battery check lamp
flashes twice.
Mechanical key
General notes
If the vehicle can no longer be unlocked with
the SmartKey, use the mechanical key.
If you use the mechanical key to unlock and
open the driver's door or the trunk lid, the
SmartKey63Opening and closingZProCarManuals.com
Page 67 of 288
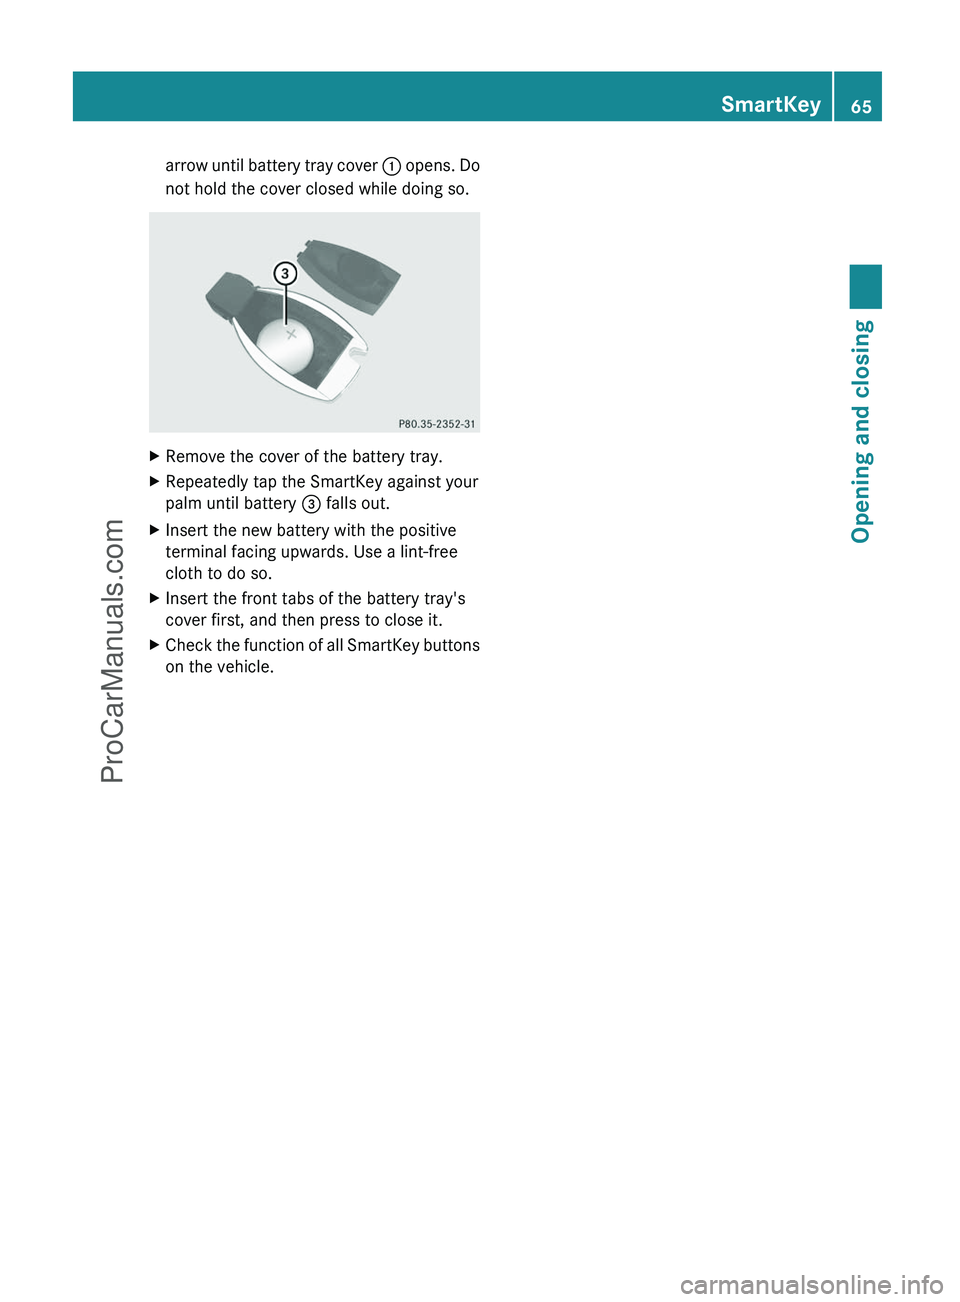
arrow until battery tray cover : opens. Do
not hold the cover closed while doing so.XRemove the cover of the battery tray.XRepeatedly tap the SmartKey against your
palm until battery = falls out.XInsert the new battery with the positive
terminal facing upwards. Use a lint-free
cloth to do so.XInsert the front tabs of the battery tray's
cover first, and then press to close it.XCheck the function of all SmartKey buttons
on the vehicle.SmartKey65Opening and closingZProCarManuals.com
Page 80 of 288
Do not drive the vehicle without the seat head
restraints. Head restraints are intended to
help reduce injuries during an accident.
! To avoid damage to the seats and the seat
heating, observe the following information:
R do not spill any liquids on the seats. If
liquid is spilled on the seats, dry them as
soon as possible.
R if the seat covers are damp or wet, do not
switch on the seat heating. The seat
heating should also not to be used to dry
the seats.
R clean the seat covers as recommended;
see the "Interior care" section.
R do not transport heavy loads on the
seats. Do not place sharp objects on the
seat cushions, e.g. knives, nails or tools.
The seats should only be occupied by
passengers, if possible.
R when the seat heating is in operation, do
not cover the seats with insulating
materials, e.g. blankets, coats, bags,
seat covers, child seats or booster seats.
! Make sure that there are no objects in the
footwell or behind the seats when resetting
the seats. There is a risk that the seats
and/or the objects could be damaged.
! When the rear bench seat is folded
forwards, the front seats cannot be moved
to their rearmost position. You could
otherwise damage the seats and the rear
bench seat.
! Make sure that the sun visor is folded up
before adjusting the backrest and head
restraint height. The head restraint and sun
visor could otherwise collide when the head
restraint is fully extended.
i If the front door is open, the seats can be
adjusted for up 30 minutes after the
ignition has been switched off.
i The head restraints in the front and rear
seats can be removed ( Y page 80).Please contact an authorized Mercedes-
Benz Center for more information.
i You can find further information about
enlarging the cargo compartment (folding
the rear bench seat forwards) on
( Y page 194).
Adjusting the seat electrically
Front seat adjustment
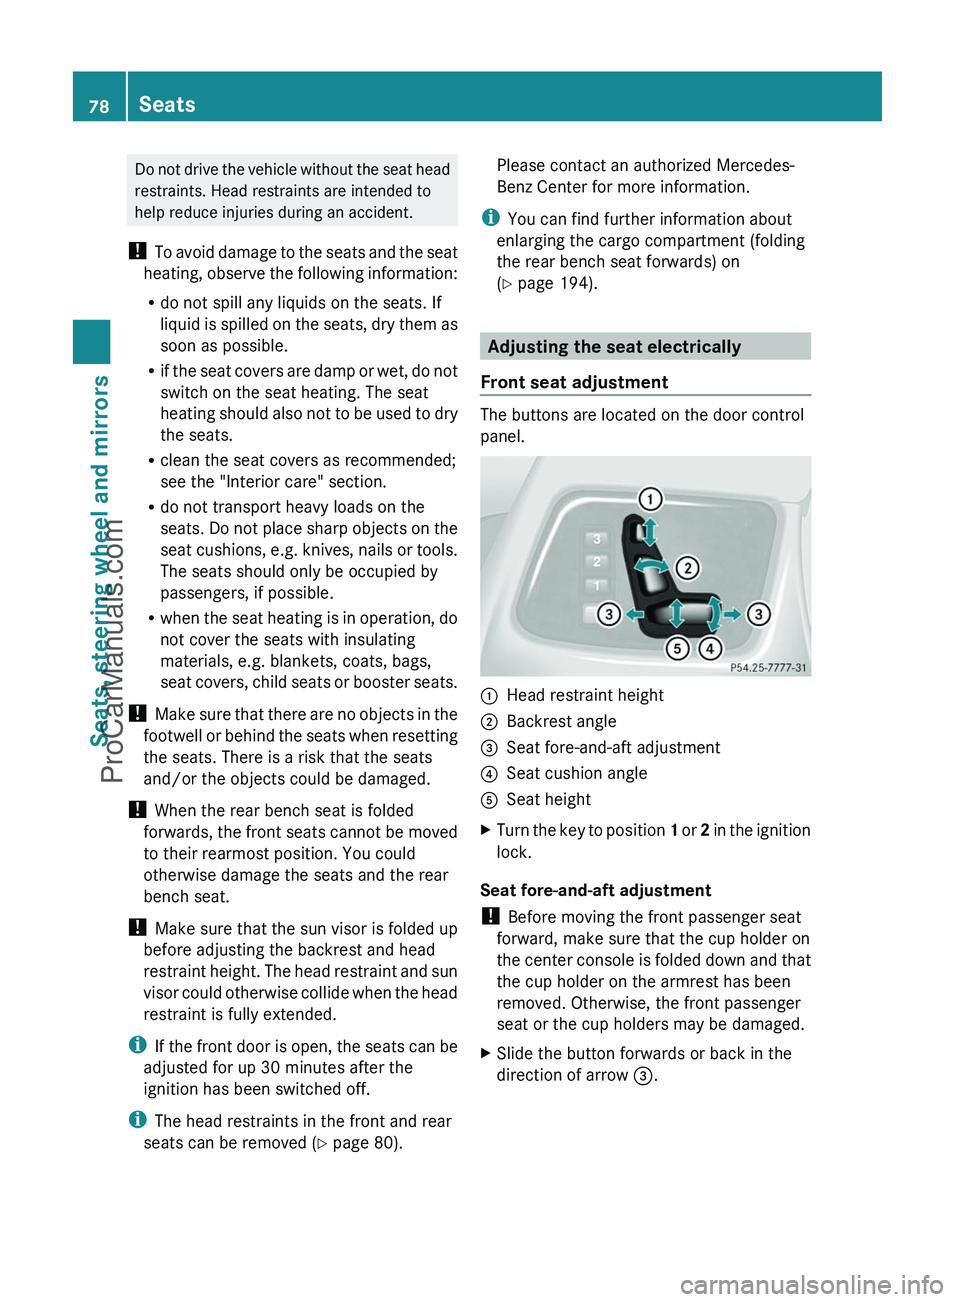
The buttons are located on the door control
panel.
:Head restraint height;Backrest angle=Seat fore-and-aft adjustment?Seat cushion angleASeat heightXTurn the key to position 1 or 2 in the ignition
lock.
Seat fore-and-aft adjustment
! Before moving the front passenger seat
forward, make sure that the cup holder on
the center console is folded down and that
the cup holder on the armrest has been
removed. Otherwise, the front passenger
seat or the cup holders may be damaged.
XSlide the button forwards or back in the
direction of arrow =.78SeatsSeats, steering wheel and mirrors
ProCarManuals.com
Page 84 of 288
iThe system automatically switches down
from level 3 to level 2 after approximately
five minutes.
The system automatically switches down
from level 2 to level 1 after approximately
ten minutes.
The system automatically switches off
approximately 20 minutes after it is set to
level 1.XTo switch on: press button : repeatedly
until the desired heating level is set.XTo switch off: press button : repeatedly
until all the indicator lamps go out.
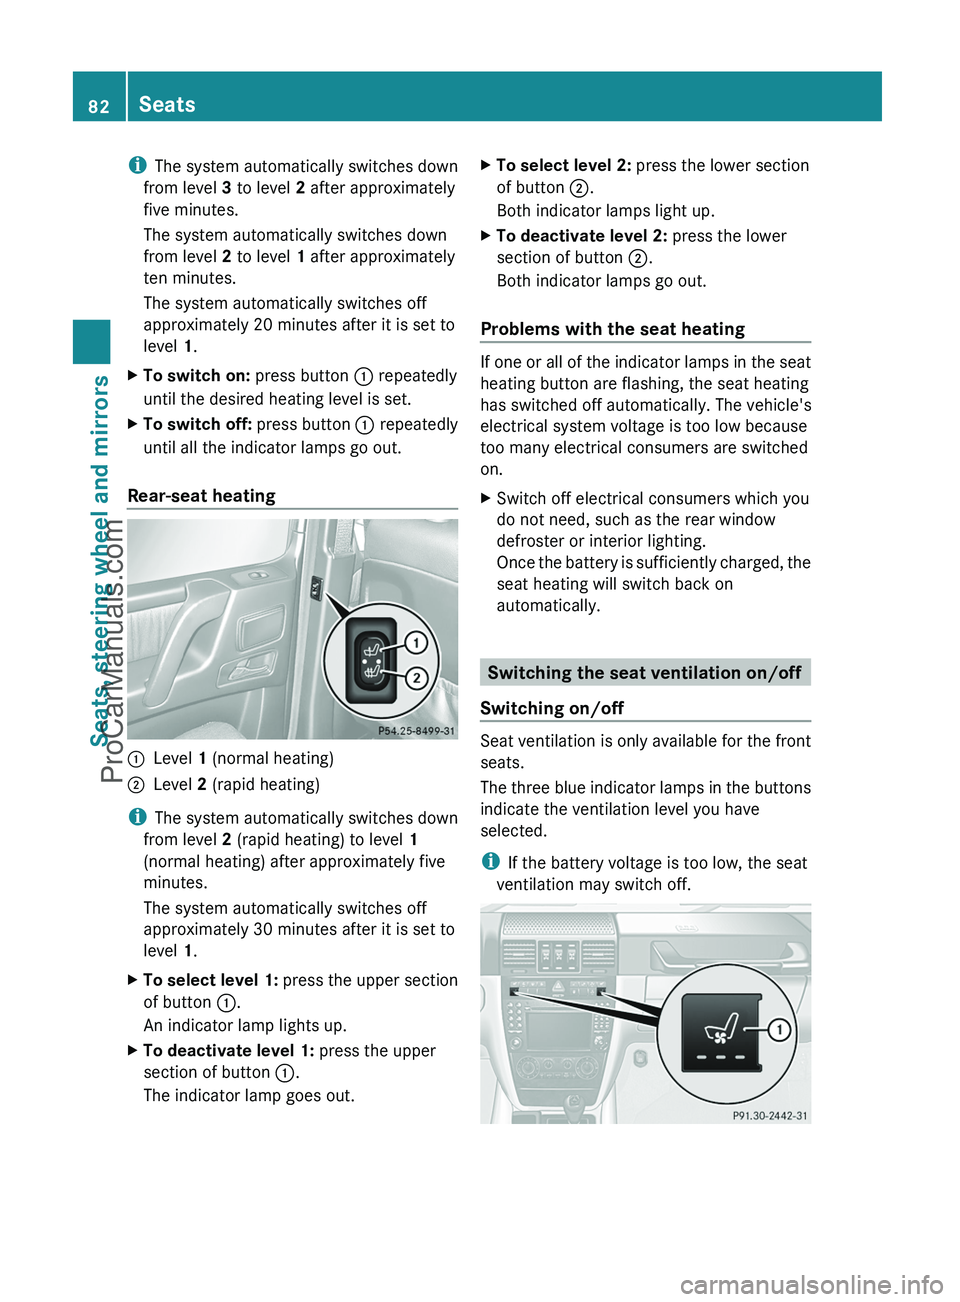
Rear-seat heating
:Level 1 (normal heating);Level 2 (rapid heating)
i
The system automatically switches down
from level 2 (rapid heating) to level 1
(normal heating) after approximately five
minutes.
The system automatically switches off
approximately 30 minutes after it is set to
level 1.
XTo select level 1: press the upper section
of button :.
An indicator lamp lights up.XTo deactivate level 1: press the upper
section of button :.
The indicator lamp goes out.XTo select level 2: press the lower section
of button ;.
Both indicator lamps light up.XTo deactivate level 2: press the lower
section of button ;.
Both indicator lamps go out.
Problems with the seat heating
If one or all of the indicator lamps in the seat
heating button are flashing, the seat heating
has switched off automatically. The vehicle's
electrical system voltage is too low because
too many electrical consumers are switched
on.
XSwitch off electrical consumers which you
do not need, such as the rear window
defroster or interior lighting.
Once the battery is sufficiently charged, the
seat heating will switch back on
automatically.
Switching the seat ventilation on/off
Switching on/off
Seat ventilation is only available for the front
seats.
The three blue indicator lamps in the buttons
indicate the ventilation level you have
selected.
i If the battery voltage is too low, the seat
ventilation may switch off.
82SeatsSeats, steering wheel and mirrors
ProCarManuals.com
Page 86 of 288
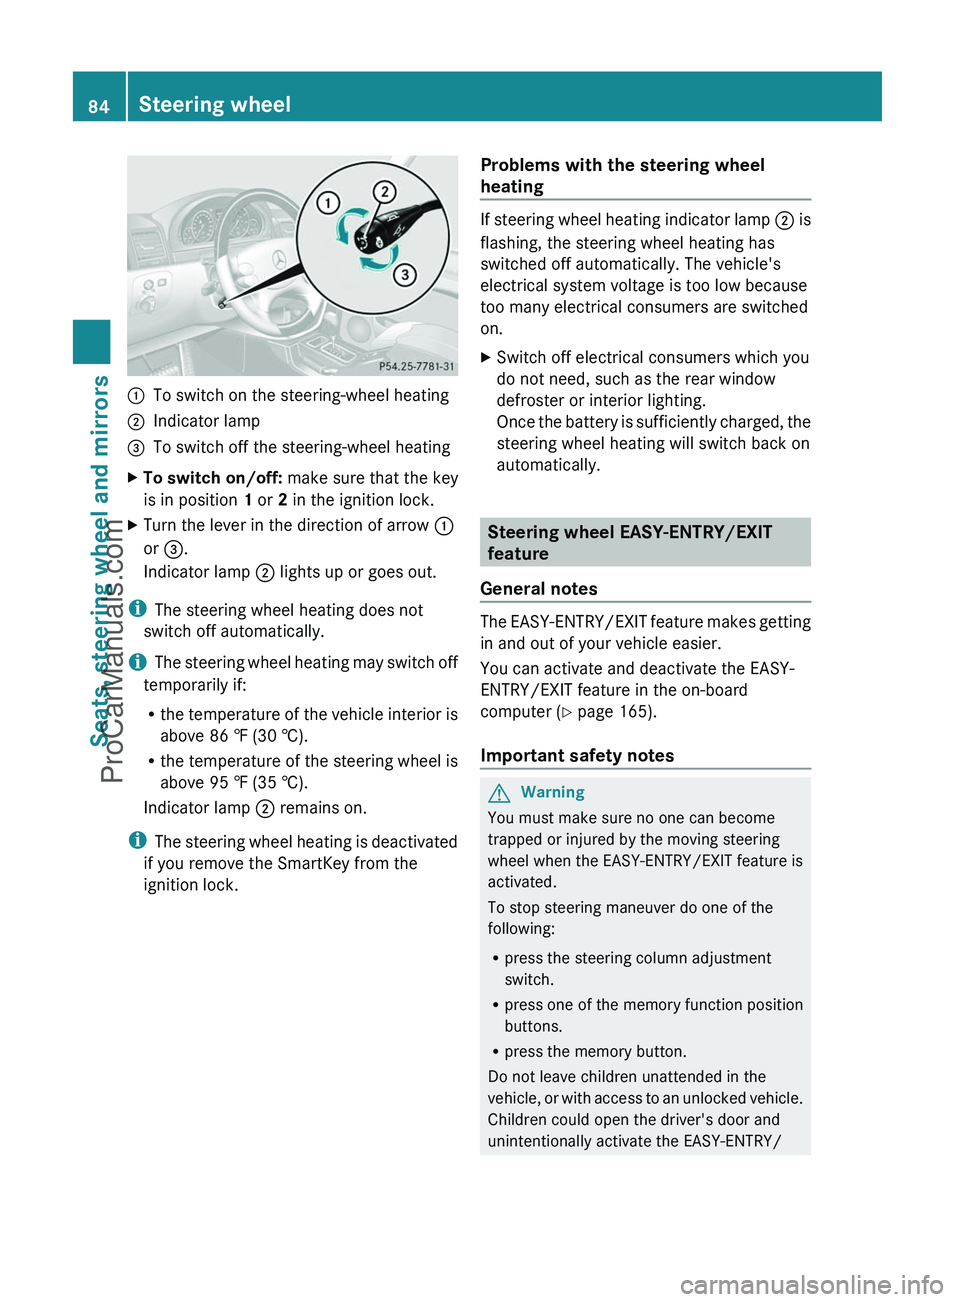
:To switch on the steering-wheel heating;Indicator lamp=To switch off the steering-wheel heatingXTo switch on/off: make sure that the key
is in position 1 or 2 in the ignition lock.XTurn the lever in the direction of arrow :
or = .
Indicator lamp ; lights up or goes out.
i
The steering wheel heating does not
switch off automatically.
i The steering wheel heating may switch off
temporarily if:
R the temperature of the vehicle interior is
above 86 ‡ (30 †).
R the temperature of the steering wheel is
above 95 ‡ (35 †).
Indicator lamp ; remains on.
i The steering wheel heating is deactivated
if you remove the SmartKey from the
ignition lock.
Problems with the steering wheel
heating
If steering wheel heating indicator lamp ; is
flashing, the steering wheel heating has
switched off automatically. The vehicle's
electrical system voltage is too low because
too many electrical consumers are switched
on.
XSwitch off electrical consumers which you
do not need, such as the rear window
defroster or interior lighting.
Once the battery is sufficiently charged, the
steering wheel heating will switch back on
automatically.
Steering wheel EASY-ENTRY/EXIT
feature
General notes
The EASY-ENTRY/EXIT feature makes getting
in and out of your vehicle easier.
You can activate and deactivate the EASY-
ENTRY/EXIT feature in the on-board
computer ( Y page 165).
Important safety notes
GWarning
You must make sure no one can become
trapped or injured by the moving steering
wheel when the EASY-ENTRY/EXIT feature is
activated.
To stop steering maneuver do one of the
following:
R press the steering column adjustment
switch.
R press one of the memory function position
buttons.
R press the memory button.
Do not leave children unattended in the
vehicle, or with access to an unlocked vehicle.
Children could open the driver's door and
unintentionally activate the EASY-ENTRY/
84Steering wheelSeats, steering wheel and mirrors
ProCarManuals.com