2011 MERCEDES-BENZ E-CLASS CABRIOLET service
[x] Cancel search: servicePage 90 of 353

Opening and closing with the key
Important safet ynotes G
WARNING
Make sure nobody can be trapped or injured
by movin gparts such as the soft-top linkage
or soft-top compartment cover when opening
or closing the soft top.
If there is arisk of entrapment ,immediately
release the %or& button on the key.
The soft-top mechanism stops immediately.
Opening and closing i
The key must be close to the driver's door
handle.
X Point the tip of the key at the driver's door
handle.
X To open: press and hold the %button
on the key until the soft top is fully opened.
The Top in operation message appears
in the multifunction display. The seat ven-
tilation is switched on. The rear side win-
dows open.
X To close: press and hold the &button
on the key until the soft top is fully closed.
The Top in operation message appears
in the multifunction display. The soft top
and the side windows close. Closing the soft top manually
If the soft top cannot be closed automatically,
chec kthe following points:
R Is the boot separator engaged
(Y page 92)?
R Are the head restraintsont he rear bench
seats extended?
R Is the boot lid closed?
R Is the on-board voltage sufficient?
Start the engine if necessary.
If automatic operation still does not work, the
soft top can be closed manually.
This work must be performed by two persons. i
Closing the soft top manually is acom-
plex, technically demanding process which
requires agreat deal of force. Only close
the soft top manually in extreme emergen-
cies. In these situations, it is better to get
in touch with aqualified specialist work-
shop, e.g. aMercedes-Ben zService
Centre. G
WARNING
Remove wristwatches and any jewellery such
as rings or bracelets .You could otherwise get
caught, injured and damage the vehicle.
Always grip the soft top at the indicated grip-
ping points when closing the soft top man-
ually.Y ou could otherwise be injured.
X Depress the parking brake.
X Open the side windows.
X Lower the head restraint s(automatically
(Y page 103) or manually (Y page 103)).
X Remove the key from the ignition lock.
X Open the boot.
X Take the two straps out of the vehicle tool
kit (Y page 295).
X Take the hex-socket wrench out of the
Owner's Manual walleta nd keepitwith
you. X
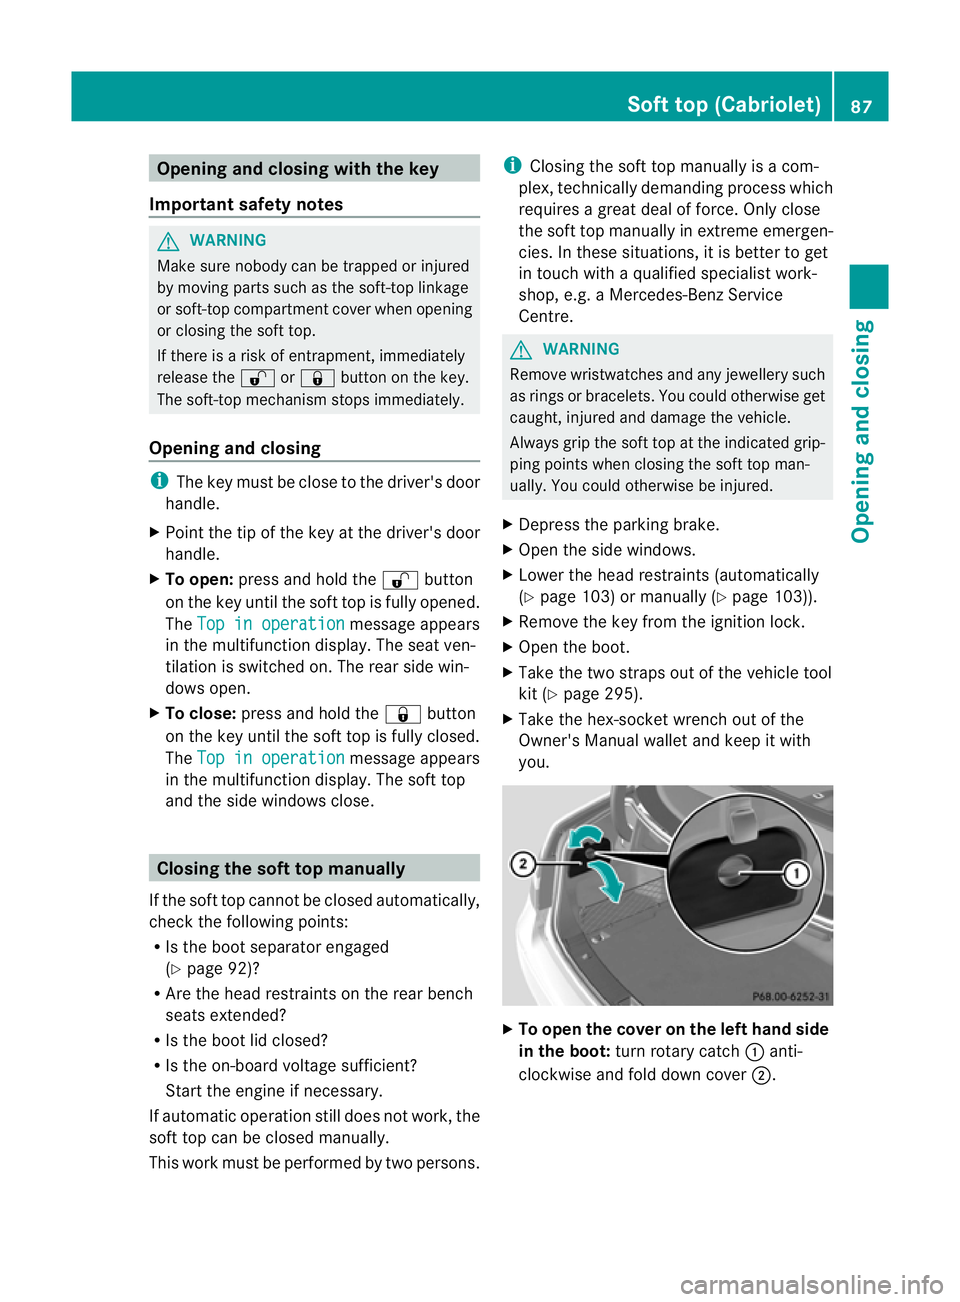
To ope nthe cove ronthe left hand side
in the boot: turn rotary catch :anti-
clockwise and fold down cover ;. Soft top (Cabriolet)
87Opening and closing Z
Page 94 of 353

X
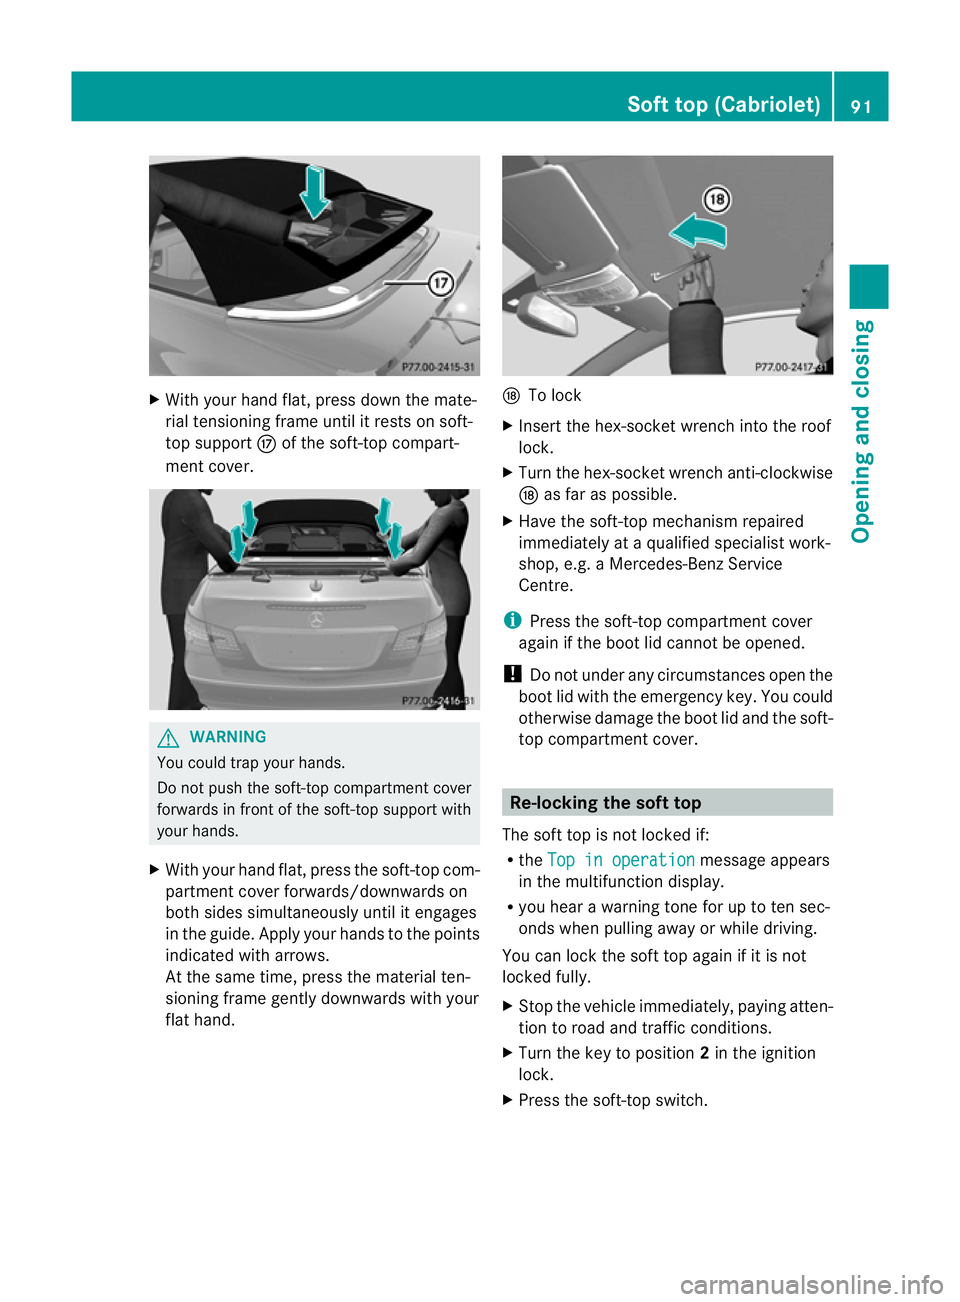
With your hand flat, press down the mate-
rial tensioning frame until it rests on soft-
top support Mof the soft-top compart-
ment cover. G
WARNING
You could trap your hands.
Do not push the soft-top compartment cover
forwards in fron tofthe soft-top support with
your hands.
X With your hand flat, press the soft-top com-
partmen tcover forwards/downwards on
both sides simultaneously until it engages
in the guide. Apply your hands to the points
indicated with arrows.
At the same time, press the material ten-
sioning frame gently downwards with your
flat hand. N
To lock
X Insert the hex-socket wrench into the roof
lock.
X Turn the hex-socket wrench anti-clockwise
N as far as possible.
X Have the soft-top mechanism repaired
immediately at aqualified specialist work-
shop, e.g. aMercedes-Benz Service
Centre.
i Press the soft-top compartment cover
again if the boot lid cannot be opened.
! Do not under any circumstances open the
boot lid with the emergenc ykey. You could
otherwise damage the boot lid and the soft-
top compartment cover. Re-locking the soft top
The soft top is not locked if:
R the Top in operation message appears
in the multifunction display.
R you hear awarning tonef or up to ten sec-
onds when pulling away or while driving.
You can lock the soft top again if it is not
locked fully.
X Stop the vehicle immediately, paying atten-
tion to road and traffic conditions.
X Turn the key to position 2in the ignition
lock.
X Press the soft-top switch. Soft top (Cabriolet)
91Opening and closing Z
Page 105 of 353

rials, e.g. blankets, coats, bags, seat cov-
ers, child seats or booster seats.
! When you move the seats, make sure that
there are no objects in the footwel lor
behind the seats. Otherwise, you could
damage the seats and the objects.
i The headr estraints in the front seats are
fitted with the NECK-PRO system
(Y page4 5). For this reason, it is not pos-
sibl etor emove the headr estraints from
the front seats.
Please contact aMercedes-Benz Service
Centre for more information.
i Related topics:
R Through-loading feature in the rear
bench seat 6
(folding the rear bench seat
forwards) Adjusting the seats manually and
electrically :
Backrest angle
; Seat height
= Seat cushion angle
? Seat fore-and-aft adjustment
i Adjust the seat cushion angle so that your
thighs are lightly supported. Seat fore-and-aft adjustment X
Lift handle ?and slid ethe seat forwards
or backwards.
X Release lever ?again.
Make sure that you heart he seat engage in
position.
Seat cushion angle X
Turn handwheel =in the desired direction. Adjusting the seat electrically
:
Head restraint height
; Seat cushion angle
= Seat height
? Seat fore-and-aft adjustment
A Backrest angle
i Vehicles with memory function: if PRE-
SAFE ®
has been triggered, the front-
passenger seat will be moved to abetter
6 Only in the Coupé. 102
SeatsSeats, steering wheela
nd mirrors
Page 124 of 353

The interior lighting automatically switches
on if you:
R unlock the vehicle
R open adoor
R remove the key from the ignition lock
The interior light is activated for ashort while
when the key is removed from the ignition
lock. You can activat ethis delayed switch-off
using the on-board computer (Y page 228).
Manual interior lighting control X
To switch the interior lighting on/off:
press the cbutton.
X To switch the reading lamps on/off:
press the pbutton. Crash-responsive emergency lighting
The interior lighting is activated automatically
if the vehicle is involved in an accident.
X To switch off the crash-responsive
emergency lighting: press the hazard
warning lamp button.
or
X Lock and then unlock the vehicle using the
key. Changing bulbs
Important safety notes
Xenon bulbs If your vehicle is equipped with xenon bulbs,
you can recognise this by the following: the
cone of light from the xenon bulbs moves
from the top to the bottom and back again
when you start the engine. For this to be
observed, the lights must be switched on
before startingt he engine. G
DANGER
Xenon bulbs carry ahigh voltage. You could
get an electric shock and be seriously or even
fatally injured if you touch the electric con- tacts on xenon bulbs. Therefore, never
remove the cover from xenon bulbs.
Do not change xenon bulbs yourself, but have
them replaced at
aqualified specialist work-
shop which has the necessary specialist
knowledge and tools to carry out the work
required.
Mercedes-Ben zrecommends that you use a
Mercedes-Benz Service Centr efor this pur-
pose. In particular, work relevant to safety or
on safety-related systems must be carried out
at aq ualified specialist workshop.
Bulbs and lamps are an important aspect of
vehicle safety. You must therefore make sure
that these function correctly at all times.
Have the headlamp setting checked regularly.
Other bulbs There are bulbs other than the xenon bulbs
that you cannot replace. Replace only the
bulbs listed (Y
page 122). Have the bulbs that
you cannot replace yourself changed at a
qualified specialist workshop.
Mercedes-Benz recommends that you use a
Mercedes-Benz Service Centr efor this pur-
pose. In particular, work relevant to safety or
on safety-related systems must be carried out
at aq ualified specialist workshop.
If you require assistanc echangin gbulbs, con-
sult aqualified specialist workshop.
Do not touch the glass tube of new bulbs with
your bare hands. Even minor contamination
can burn into the glass surface and reduce
the servic elife of the bulbs. Always use alint-
free cloth or only touch the base of the bulb
when fitting.
Only use bulbs of the correct type.
If the new bulb still does not light up, consult
aq ualified specialist workshop.
Bulbs and lamps are an important aspect of
vehicle safety. You must therefore make sure
that these function correctly at all times.
Have the headlamp setting checked regularly. Changing bulbs
121Lights and windscreen wipers Z
Page 125 of 353

G
WARNING
Bulb sand lights can become very hot. For this
reason, allow them to cool downb efore
changin gthem. Otherwise, you could burn
yourself when you touch them.
Keep bulbs out of the reach of children .Oth-
erwise, the ycould damage them, for example,
and injure themselves.
Never us eabulbw hich ha sbeend ropped.
Suc hab ulbm ayexplode and injure you.
Halogen bulb sarepressurised and could
explode when yo uchange them, especiall yif
the yarever yhot. Yo ushould therefore wear
eye protection and gloves when you are
changing them. Overview of bulb replacement
–bulbs
You can replace the following bulbs. The
details for the bul btype can be found in the
legend. Halogen headlamps
:
Dipped-bea mheadlamps 9
:H755W
; Main-beam headlamp: H7 55 W
= Side lamp/parkin glamp: W5W
? Turn signal lamp 9
:PY21W Bi-xenon headlamps
:
Cornering lamp: H7 55 W Changing the front bulbs
Dipped-beam headlamps (halogen
headlamps) Due to their location, have the bulbs in the
left-hand headlamp changed at
aqualified
specialist workshop, e.g. aMercedes-Benz
Service Centre.
X Switc hoff the lights.
X Open the bonnet.
X Turn housing cover :anti-clockwise and
pull it out.
X Turn bulb holder ;anti-clockwise and pull
it out.
X Take the bulb out of bulb holder ;.
X Inser tthe new bulb into bulb holder ;.
9 Due to their location, have the bulbs in the left-hand headlamp replaced at aqualified specialist workshop,
e.g. aMercedes-Ben zService Centre. 122
Changing bulbsLights and windscreen wipers
Page 126 of 353

X
Insert bulbh older;into the lamp and turn
it clockwise.
X Align housing cover :and turn it clock-
wise until it engages.
Main-beam headlamps (halogen head-
lamps)/cornering lamps (Intelligent
Light System) X
Switch off the lights.
X Open the bonnet.
X Turn housing cover :anti-clockwise and
pullito ut.
X Turn bulbh older;anti-clockwise and pull
it out.
X Take the bulbo ut of bulbholder;.
X Insert the new bulbi nto bulbholder;.
X Insert bulbh older;into the lamp and turn
it clockwise.
X Align housing cover :and turn it clock-
wise until it engages. Side lamps/parking lamps (halogen
headlamps) X
Switch off the lights.
X Open the bonnet.
X Turn housing cover :anti-clockwise and
pullito ut.
X Pullo ut bulbh older;.
X Take the bulbo ut of bulbholder;.
X Insert the new bulbi nto bulbholder;.
X Insert bulbh older;.
X Align housing cover :and turn it clock-
wise until it engages.
Turn signal lamp (halogen headlamps) Due to their location, have the bulbs in the
left-hand headlamp changed at aqualified
specialist workshop, e.g. aMercedes-Benz
Service Centre.
X Switc hoff the lights.
X Open the bonnet.
X Turn bulb holder :anti-clockwise and pull
it out. Changing bulbs
123Lights and windscreen wipers Z
Page 131 of 353

Useful information
i This Owner's Manual describes all models
and all standard and optional equipment
available to your vehicle at the time of pub-
lication of the Owner's Manual. Country-
specific deviation sare possible. Please
not ethat your vehicle may not be equipped
with all feature sdescribed. This also
applies to safety-relevan tsystems and
functions.
i Pleas ereadt he information on qualified
specialist workshop s(Ypage 22). Overview of climat
econtro lsystems Important safet
ynotes G
WARNING
Observ ethe setting srecommended on the
following pages. Otherwise ,the windows
could mist up. This may obstruct your view of
the traffic situation and, as aresult ,you may
cause an accident.
THERMATIC/THERMOTRONIC automatic cli-
mate control controls the temperature and
the humidit yofthe vehicle interior and filters
out undesirable substances fro mthe air.
THERMATIC/THERMOTRONIC automatic cli-
mate control is only operational when the
engine is running. 12
i Ventilate the vehicle for abrief period
during warm weather, e.g. using the con-
venience opening feature (Y page 83). This
will speed up the cooling process and the
desired vehicle interior temperature will be
reached more quickly.
i The integrated filter can filter out most
particles of dust and completely filters out
pollen. Aclogged filter reduces the amount
of air supplied to the vehicle interior .For
this reason, you should always observe the interval for replacing the filter, which is
specified in the Servic
eBooklet .Asit
depends on environmental conditions, e.g.
heavy air pollution, the interval may be
shorter than stated in the Service Booklet.
i It is possible that the residualh eat func-
tion may be activated automaticallyanh our
after the key is removed. The vehicle is then
ventilated for 30 minutes to dry the air-
conditioning system.
12 THERMOTRONIC automatic climate control: the residualh eat function can only be activated/deactivated
when the ignition is switched off. 128
Overview of climatec
ontrol systemsClimatecontrol
Page 141 of 353

You cannot use the auxiliary ventilation to
cool the vehicle interior to atemperature
lower than the outsid etemperature.
Befor eswitchin gon X
Turn the key to position 2in the ignition
lock.
X Set the temperature.
The auxiliary heating/ventilation can be acti-
vated even when the climat econtrol is being
controlled manually. Optimum comfor tcan
be attained when the system is set to auto-
matic mode. Set the temperature to 22 †.
The auxiliary heating/ventilation can be acti-
vated or deactivate dusing the remote control
or the button on the centr econsole.
The on-board computer can be used to spec-
ify up to three departure times, one of which
may be preselected (Y page 229).
Switchin gthe auxiliar yheating/venti-
lation on/off usin gthe centr econsole
button Butto
nont hecentr econsole
The colours of th eindicator lamps on th ebut-
to nh ave th efollowin gmeanings:
Blue Auxiliary ventilatio nswitched on
Red Auxiliary heating switche don
Yellow Departure tim epreselected
(Y page 229) Switching on auxiliary heating/ventila-
tion
X
Pres sbutton :.
The red or blue indicator lamp in but-
ton :light sup.
Switching off auxiliary heating/ventila-
tion
X Pres sbutton :.
The red or blue indicator lamp in but-
ton :goes out.
Switching th eauxiliary heating/venti-
lation on/off using th eremote control Your vehicle comes with one remot
econtrol.
You may use two additional remot econtrols
for your vehicle. For further information, con-
sult aqualified specialist workshop ,e.g.a
Mercedes-Ben zService Centre.
The remote control has amaximum range of
approximately 300 metres. This range is
reduced by:
R sources of radio interference
R solid objectsb etween the remote control
and the vehicle
R the remote control being in an unfavoura-
ble position in relation to the vehicle
R transmitting from an enclosed space
i The optimum range can be achieved if you
hold the remote control vertically, pointing
upwards when you press one of the but-
tons.
i Abattery symbol appear sinthedisplay
when th ebattery in th eremot econtro lis
low. Replac ethe remot econtro lbattery
(Y page 140). 138
Operatin
gthe climat econtrol systemClimat econtrol