2011 MERCEDES-BENZ E-CLASS CABRIOLET reset
[x] Cancel search: resetPage 113 of 353
X
Make sure that the key is in position 1or
2 in the ignition lock.
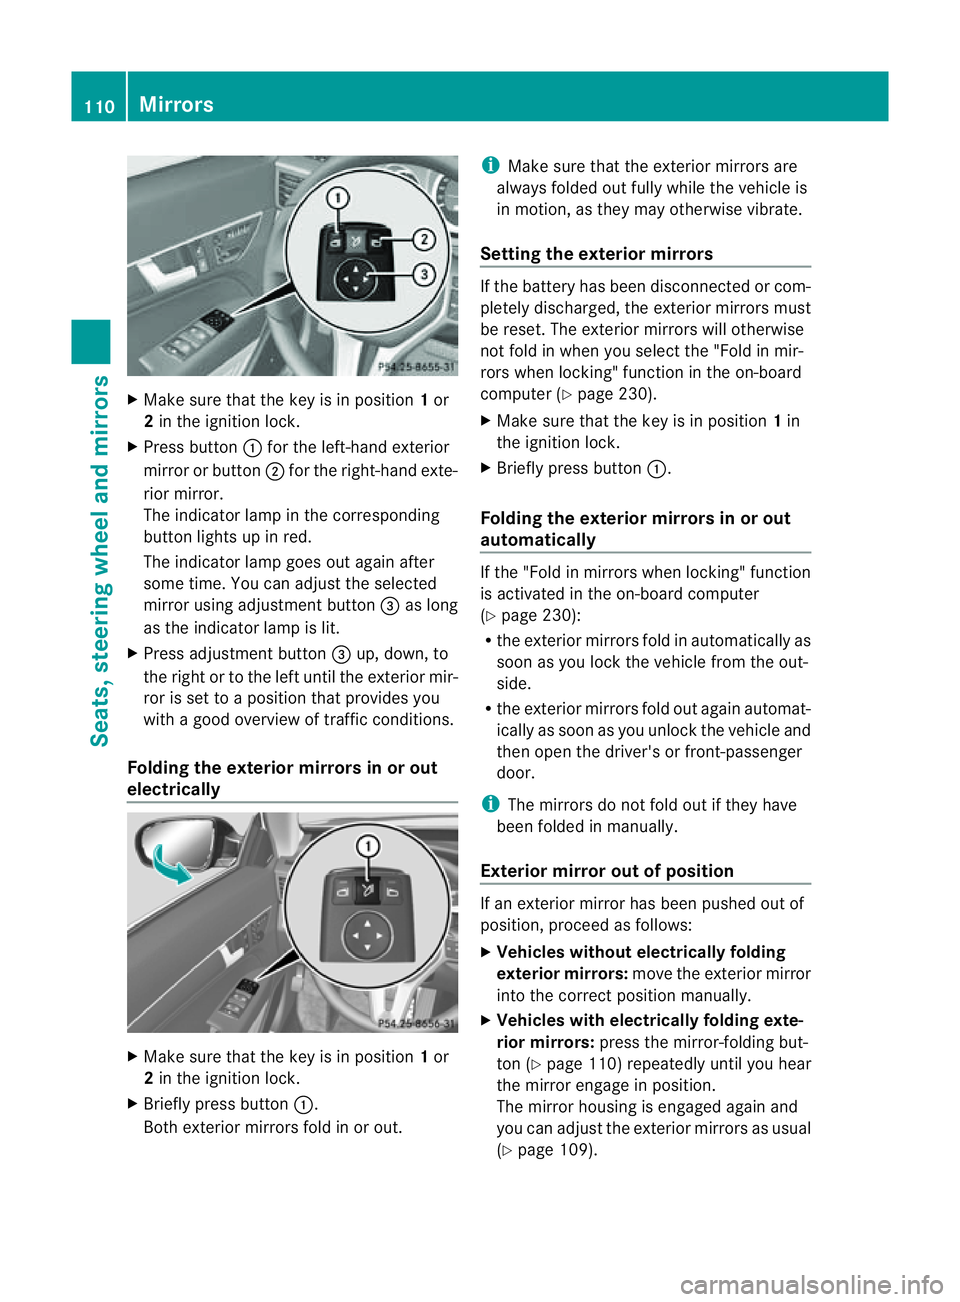
X Press button :for the left-hand exterior
mirror or button ;for the right-hand exte-
rior mirror.
The indicator lamp in the corresponding
button lights up in red.
The indicator lamp goes out again after
some time. You can adjust the selected
mirror using adjustment button =as long
as the indicator lamp is lit.
X Press adjustment button =up, down, to
the right or to the left until the exterior mir-
ror is set to aposition that provides you
with agood overview of traffic conditions.
Folding the exterior mirrors in or out
electrically X
Make sure that the key is in position 1or
2 in the ignition lock.
X Briefly press button :.
Both exterior mirrors fold in or out. i
Make sure that the exterior mirrors are
always folded out fully while the vehicle is
in motion, as they may otherwise vibrate.
Setting the exterior mirrors If the battery has been disconnected or com-
pletely discharged, the exterior mirrors must
be reset. The exterior mirrors will otherwise
not fold in when you select the "Fold in mir-
rors when locking" function in the on-board
computer (Y
page 230).
X Make sure that the key is in position 1in
the ignition lock.
X Briefly press button :.
Folding the exterior mirrors in or out
automatically If the "Fold in mirrors when locking" function
is activated in the on-board computer
(Y
page 230):
R the exterior mirrors fold in automatically as
soon as you lock the vehicle from the out-
side.
R the exterior mirrors fold out again automat-
ically as soon as you unlock the vehicle and
then open the driver's or front-passenger
door.
i The mirrors do not fold out if they have
been folded in manually.
Exterior mirror out of position If an exterior mirror has been pushed out of
position, proceed as follows:
X
Vehicles without electrically folding
exterior mirrors: move the exterior mirror
into the correct position manually.
X Vehicles with electrically folding exte-
rior mirrors: press the mirror-folding but-
ton (Y page 110) repeatedly until you hear
the mirror engage in position.
The mirror housing is engaged again and
you can adjust the exterior mirrors as usual
(Y page 109). 110
MirrorsSeats, steering wheela
nd mirrors
Page 114 of 353

Automati
canti-dazzle mirrors G
WARNING
If inciden tlight fro mheadlamps is prevented
from striking the sensor in the rear-view mir-
ror, for instance, by luggage piled too high in
the vehicle, the mirror's automatic anti-dazzle
function will not operate.
Incident light could then blind you. This may
distrac tyou from the traffic conditions and,
as aresult, you may cause an accident.
The rear-view mirror and the exterior mirror
on the driver's side automatically go into anti-
dazzle mode if the ignition is switched on and
inciden tlight fro mheadlamps strikes the sen-
sor in the rear-view mirror.
The mirror sdonot go intoa nti-dazzle mode if
revers egear is engaged. Parking position for the exterior mir-
ror on the front-passenger side
Setting and storing the parking position You can position the front-passenger side
exterior mirror in such away that you can see
the rear wheel on that side as soon as you
engage revers egear. You can stor ethis posi-
tion. X
Make sure that the vehicle is stationary and
that the key is in position 2in the ignition
lock.
X Press button ;for the exterior mirror on
the front-passenger side. X
Engage revers egear.
The exterior mirror on the front-passenger
side moves to the preset parkin gposition.
X Use adjustment button =to adjust the
exterior mirror to aposition that allows you
to see the rear wheel and the kerb.
The parkin gposition is stored.
i If you shift the transmission to another
position ,the exterior mirror on the front-
passenger side return stothe driving posi-
tion.
i You can also stor ethe parkin gposition
using memory button M?.
X Make sure that the key is in position
2in the ignition lock.
X With the exterior mirror on the front-
passenger side activated, use adjust-
ment button =to adjust the exterior
mirror to aposition which allows you
to see the rear wheel and the kerb.
X Press memory button M? and one of
the arrows on adjustment button =
within three seconds.
The parkin gposition is stored if the
exterior mirror does not move.
If the mirror moves out of position ,repeat
the steps.
Calling up astore dparking position set-
ting X
Tur nthe key to position 2in the ignition
lock.
X Adjust the exterior mirror on the front-
passenger side with the corresponding but-
ton (Y page 109).
X Engage reverse gear.
The exterior mirror on the front-passenger
side moves to the stored parking position. Mirrors
111Seats, steering wheela nd mirrors Z
Page 115 of 353
The exterior mirror on the front-passenger
side moves back to its original position:
R
as soon as you exceed aspeed of
10 km/h
R about ten seconds after you have disen-
gaged reverse gear
R if you press button :for the exterior mir-
ror on the driver's side Memory functions
Storing settings
With the memory function, you can store up
to three different settings, e.g. for three dif-
ferent people.
The following settings are stored as asingle
memory preset:
R position of the seat, backrest and head
restraint
R driver's side: steerin gwheel position
R driver's side: position of the exterior mir-
rors on the driver's and front-passenger
sides G
WARNING
The memory function can still be used when
the key has been removed. For this reason,
children should never be left unsupervised in
the vehicle. They could otherwise become
trapped when adjusting the seat or the steer-
ing wheel. G
WARNING
Only use the memory function on the driver's
side when the vehicle is stationary. Other-
wise, you could be distracted from the traffic
conditions by the steerin gwheel and seat
moving of their own accord, and as aresult
cause an accident. X
Adjust the seat (Y page 102).
X On the driver's side, adjust the steering
wheel (Y page 108) and the exterior mirrors
(Y page 109).
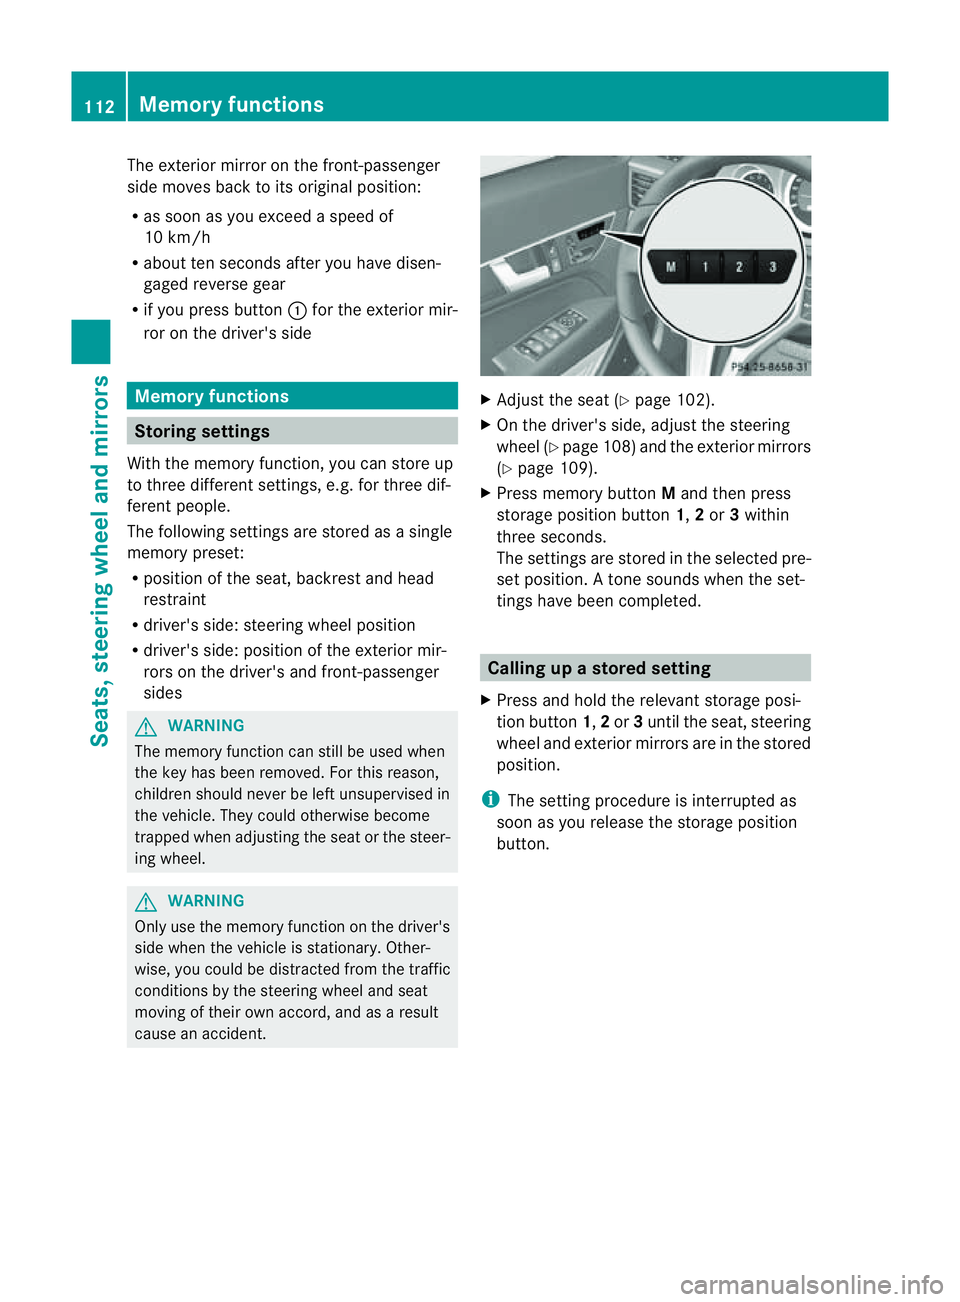
X Press memory button Mand then press
storage position button 1,2or 3within
three seconds.
The settings are stored in the selected pre-
set position. Atone sounds when the set-
tings have been completed. Calling up
astore dsetting
X Pres sand hold th erelevant storage posi-
tio nb utton 1,2or 3until th eseat ,steering
wheel and exterio rmirrors are in the stored
position.
i The settin gprocedure is interrupted as
soon as you release the storage position
button. 112
Memory functionsSeats, steering wheel and mirrors
Page 119 of 353

Rear foglamp
X
To switc honthe rear foglamp: turn the
key in the ignition lock to position 2or start
the engine.
X Turn the light switch to LorÃ.
X Press the Rbutton.
The yellow Rindicator lamp in the
instrument cluster lights up.
X To switc hoff the rear foglamp: press the
R button.
The yellow Rindicator lamp in the
instrument cluster goe sout.
Vehicles with front foglamps: when the light
switch is in the Tposition, the rea rfog-
lamp can only be switched on if the foglamps
(without dipped-beam headlamps) are
switched on.
i If you switch the engine off (key in posi-
tion 1in the ignition lock) and then restart
it, the previous rear foglamp settings are
restored.
Adjusting the headlam prange (halogen
headlamps) The headlamp range control allow
syou to
adjust the cone of light from the headlamps
to sui tthe vehicle load. g
Driver's seat and front-passenger seat
occupied
1 Driver's seat, front-passenger seat and
rear seats occupied 2
Driver's seat, front-passenger seat and
rear seats occupied, boot laden
3 Driver's and front-passenger seats occu-
pied and maximum permissible rear axle
load utilised, e.g. when towing atrailer
X Start the engine.
X Turn headlamp range control to the posi-
tion which corresponds to the load in your
vehicle.
Headlampc leaning system The headlamps are cleaned automatically if
the "Wipe with washer fluid" function is oper-
ated ten times while the light
sare on and the
engin eisrunning (Y page 124). When you
switc hoff the ignition, the automatic head-
lamp cleaning syste misreset and counting is
resumed from 0. Combination switch
Turns ignals :
Main-beam headlamps
; Turn signal, right
= Headlamp flasher
? Turn signal, left 116
Exterior lightingLights and windscreen wipers
Page 175 of 353

On long and steep downhill gradients, espe-
cially if the vehicle is laden or towing atrailer,
you must select shift range 1,2or 3in good
time. By doing so, you will make use of the
braking effect of the engine, which relieves
the load on the brake system and prevents
the brakes from overheating and wearing too
quickly.
If as lower-moving vehicle is detected in front,
DISTRONIC PLUS causes your vehicle to
brake and maintain apreset distance to the
vehicle in front. G
WARNING
Do not change down for additional engine
braking on aslippery road surface. This could
cause the drive wheels to lose their grip and
the vehicle could skid. G
WARNING
DISTRONIC PLUS is only an aid designed to
assist driving. The driver remains fully respon-
sible for the vehicle's distance from other
vehicles, the vehicle's speed and for braking
in good time.
DISTRONIC PLUS does not react in particular
to:
R pedestrians
R stationary obstacles on the road, e.g. stop-
ped or parked vehicles
R oncoming and crossing traffic
DISTRONIC PLUS may not detect narrow vehi-
cles driving in front,e .g. motorcycles, or vehi-
cle sd riving on adifferent line. Therefore,
always pa yattention to traffic conditions even
when DISTRONIC PLU Sisactivated. Other-
wise, yo umay fai ltorecognis edanger sin
time ,cause an accident and injure yourself
and others. G
WARNING
DISTRONIC PLU Scanno ttake account of road
and traffic conditions .IfDISTRONIC doe snot
recognise or no longer recognises the vehicle
in front,don ot activate DISTRONIC or, if it is
already active, deactivate it. This is especially
the case:
R before corners
R on filter lanes
R when changing to alane with faster moving
traffic
R in complex driving situations or where lanes
are diverted, e.g. at roadworks on amotor-
way
DISTRONIC PLUS otherwise maintains the
current speed set by you or accelerates up to
the set speed.
DISTRONIC PLUS cannot take account of
weather conditions. Deactivate, or do not
activate, DISTRONIC PLUS:
R if the roads are slippery, snow-covered or
icy. The wheels could lose their grip when
braking or accelerating. The vehicle could
start to skid.
R if the sensors are dirty or there is poor vis-
ibility, e.g. due to snow, rain or fog. Dis-
tancec ontrol may be impaired.
Always pay attention to traffic conditions
even when DISTRONIC PLUS is activated.
Otherwise, you may fail to recognise dangers
in time, cause an accident and injure yourself
and others.
! You must deactivate the radar sensor sys-
tem in certain countries and near radio
telescope facilities. You will find further
information under "Radar sensor system"
in the index.
The radar sensor system is automatically
deactivated near radio telescope facilities
(Y page 345).
If you want DISTRONIC PLUS to assist you,
the radar sensor system must be activated
(Y page 229) and operational. 172
Driving systemsDriving and parking
Page 177 of 353
To activat
ethe DISTRONIC PLUS, the follow-
ing conditions must be fulfilled:
R the engine must be running. It may take up
to two minutes of driving before DIS-
TRONIC PLUS is ready for use.
R the parking brake is not applied.
R ESP ®
is activated.
R the transmission is in position D.
R the bonnet is closed.
R the driver's door must be closed when you
shift from Pto Dor your seat belt must be
fastened.
R the frontp assenger door is closed.
R thev ehicle is no tskidding.
Activatin gwhile driving
When drivin gatspeeds below30k m/h,you
can onl yactivate DISTRONI CPLUSift he vehi-
cle in front has been detected and is shown
in the multifunction display. If the vehicle in
front is not shown in the multifunction display
and is no longer being detected, for example
because it has changed lanes, DISTRONIC
PLUS is deactivated and atone sounds.
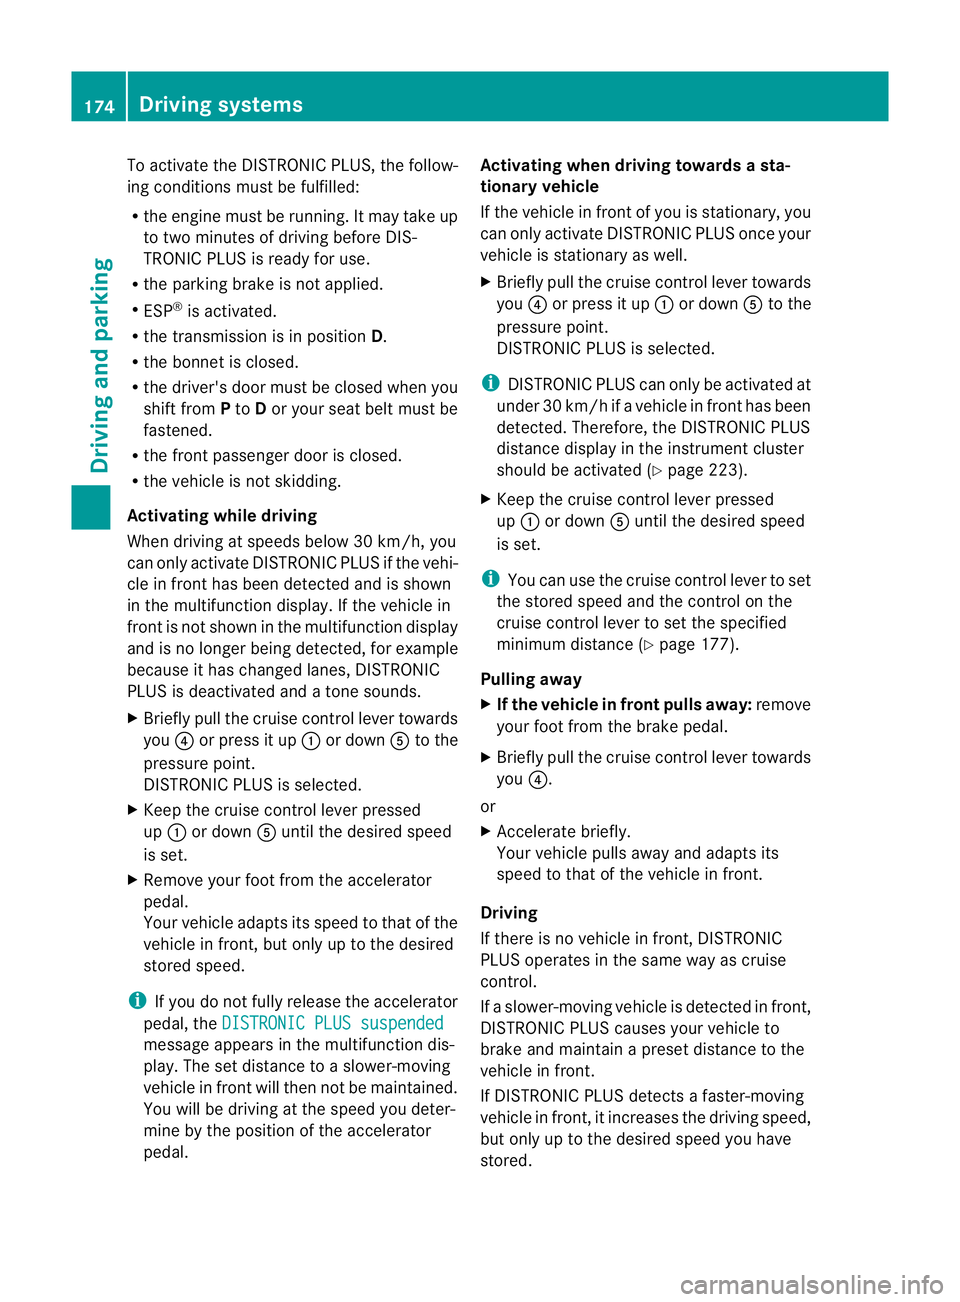
X Briefly pull the cruise control lever towards
you ?or press it up :or down Ato the
pressure point.
DISTRONIC PLUS is selected.
X Keep the cruise control lever pressed
up : or down Auntil the desired speed
is set.
X Remove your foot from the accelerator
pedal.
Your vehicle adapts its speed to that of the
vehicle in front,b ut only up to the desired
stored speed.
i If you do not fully release the accelerator
pedal, the DISTRONIC PLUS suspended message appears in the multifunction dis-
play. The set distance to
aslower-moving
vehicle in front will then not be maintained.
You will be driving at the speed you deter-
mine by the position of the accelerator
pedal. Activating when driving toward
sasta-
tionary vehicle
If the vehicl einfront of yo uisstationary, you
can onl yactivate DISTRONI CPLUSo nce your
vehicl eisstationar yaswell.
X Briefl ypullt he cruis econtro llev er towards
you ?or press it up :or down Ato the
pressure point.
DISTRONI CPLUSiss elected.
i DISTRONIC PLUS can only be activated at
under 30 km/h if avehicle in front has been
detected. Therefore, the DISTRONIC PLUS
distance displayint he instrument cluster
should be activated (Y page 223).
X Keep the cruise control lever pressed
up : or down Auntil the desired speed
is set.
i You can use the cruise control lever to set
the stored speed and the control on the
cruise control lever to set the specified
minimum distance (Y page 177).
Pulling away
X If the vehicleinf ront pulls away:remove
your foot from the brake pedal.
X Briefly pull the cruise control lever towards
you ?.
or
X Accelerate briefly.
Your vehicle pullsa wayand adapts its
speed to that of the vehicle in front.
Driving
If there is no vehicle in front,D ISTRONIC
PLUS operates in the same way as cruise
control.
If as lower-moving vehicle is detected in front,
DISTRONIC PLUS causes your vehicle to
brake and maintain apreset distance to the
vehicle in front.
If DISTRONIC PLUS detects afaster-moving
vehicle in front,iti ncreases the driving speed,
but only up to the desired speed you have
stored. 174
Driving systemsDriving and parking
Page 198 of 353
still detects typical indicators of fatigue or
increasing lapses in concentration, you will be
warned againa fter 15 minutes at the earliest.
ATTENTION ASSIST is reset whe nyou con-
tinue you rjourney and it startsa ssessing your
tiredness again if:
R you switch off the engine.
R you take off your seat belt and open the
driver's door, e.g. for achange of drivers or
to take abreak. Speed Limit Assist
Important safety notes i
Speed Limit Assist is not operational in all
countries.
Speed Limit Assist shows you detected speed
limits in the multifunction display .Data from
th en avigation system is also used for this
purpose. The display appear sifatraffic sign
indicating aspee dlimit or th eend ofas peed
limit is detected. If Speed Limit Assist does
no td etec tany traffic signs, the speed limit
from the digital roa dmap is take nand shown
in the display.
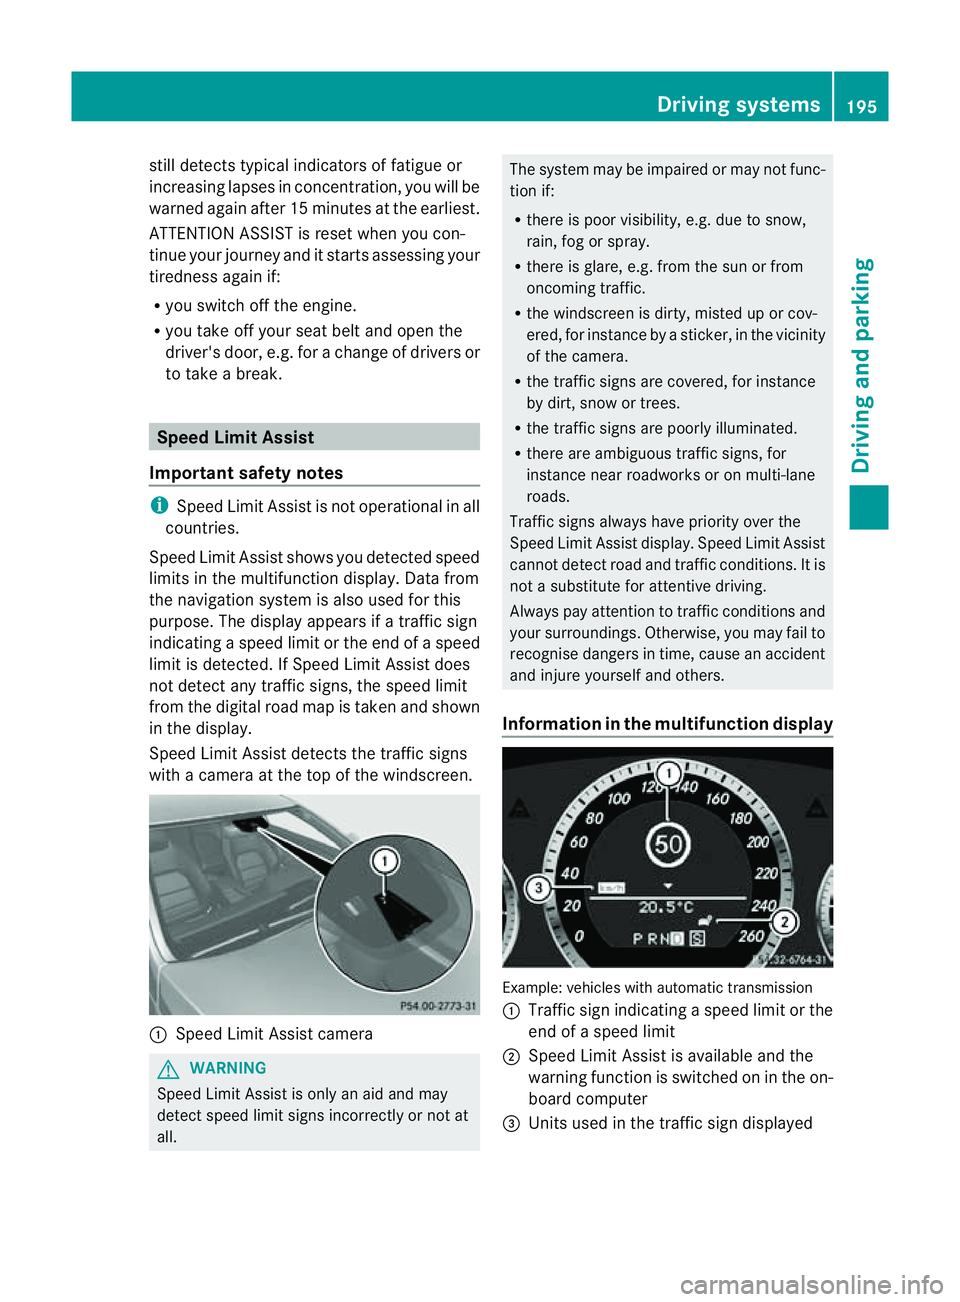
Speed Limit Assist detects the traffic signs
with acamera at the top of the windscreen. :
Speed Limit Assist camera G
WARNING
Speed Limit Assist is only an aid and may
detect speed limit signs incorrectly or not at
all. The system may be impaired or may not func-
tion if:
R
there is poor visibility, e.g. due to snow,
rain, fog or spray.
R there is glare, e.g. from the sun or from
oncoming traffic.
R the windscreen is dirty, misted up or cov-
ered, for instance by asticker, in the vicinity
of the camera.
R the traffic signs are covered, for instance
by dirt, snow or trees.
R the traffic signs are poorly illuminated.
R there are ambiguous traffic signs, for
instance near roadworks or on multi-lane
roads.
Traffic signs always have priority over the
Speed Limit Assist display. Speed Limit Assist
cannot detect road and traffic conditions. It is
not asubstitute for attentive driving.
Always pay attention to traffic conditions and
your surroundings. Otherwise, you may fail to
recognise dangers in time, cause an accident
and injure yourselfa nd others.
Information in the multifunctio ndisplay Example
:vehicles with automatic transmission
: Traffic sign indicatin gaspeed limit or the
end of aspeed limit
; Speed Limit Assist is available and the
warning function is switched on in the on-
board computer
= Unit sused in the traffic sign displayed Driving systems
195Driving and parking Z
Page 220 of 353
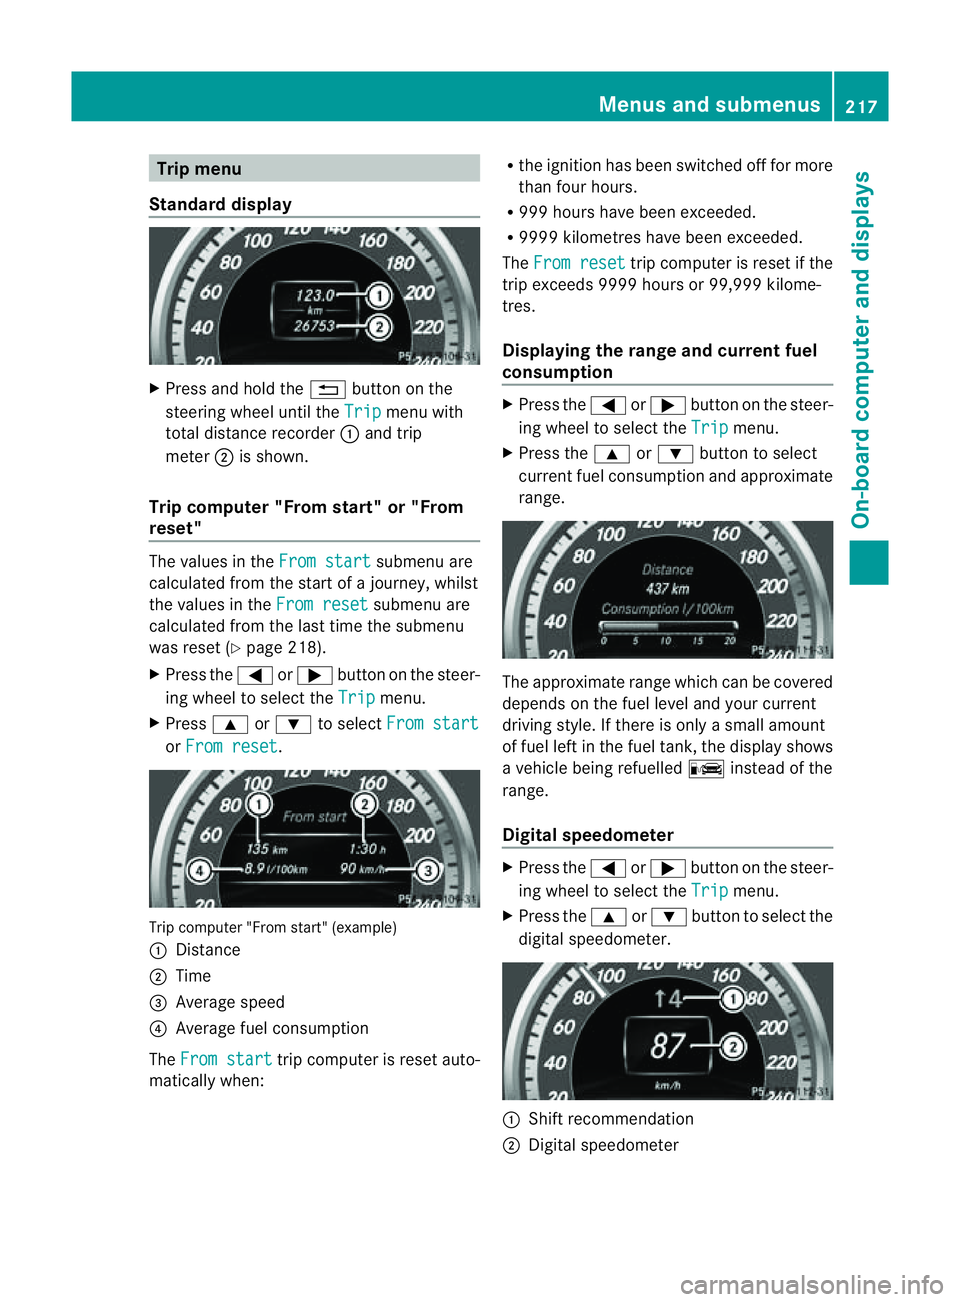
Trip menu
Standard display X
Press and hol dthe % button on the
steering whee lunti lthe Trip menu with
tota ldistance recorder :and trip
meter ;is shown.
Trip compute r"From start" or "From
reset" The values in the
Fromstart submenu are
calculate dfromt he start of ajourney, whilst
the values in the From reset submenu are
calculated from the last time the submenu
was reset (Y page 218).
X Press the =or; button on the steer-
ing wheel to select the Trip menu.
X Press 9or: to select From start or
From reset .
Trip computer "From start" (example)
:
Distance
; Time
= Average speed
? Average fuel consumption
The From start trip computer is reset auto-
matically when: R
the ignition has been switched off for more
than four hours.
R 999 hours have been exceeded.
R 9999 kilometres have been exceeded.
The From reset trip computer is reset if the
trip exceeds 9999 hours or 99,999 kilome-
tres.
Displaying the range and current fuel
consumption X
Press the =or; button on the steer-
ing wheel to select the Trip menu.
X Press the 9or: button to select
current fuel consumption and approximate
range. The approximate range which can be covered
depends on the fuel level and your current
driving style. If there is only
asmall amount
of fuel left in the fuel tank,t he displayshows
av ehicle being refuelled Cinstead of the
range.
Digital speedometer X
Press the =or; button on the steer-
ing wheel to select the Trip menu.
X Press the 9or: button to select the
digital speedometer. :
Shift recommendation
; Digital speedometer Menus and submenus
217On-board computer and displays Z