2011 MERCEDES-BENZ C-CLASS COUPE turn signal
[x] Cancel search: turn signalPage 197 of 373

Active Driving Assistance package
General notes The Active Driving Assistance package con-
sists of DISTRONIC PLU
S(Ypage 164), Active
Blind Spot Assist (Y page 194) and Active
Lane Keeping Assist (Y page 197).
Active Blind Spot Assist Important safety notes
Active Blind Spot Assist uses a radar sensor
system to monitor the side areas of your vehi-
cle that are behind the driver. Awarning dis-
play in the exterior mirrors draws your atten-
tio nt o detected vehicles in the monitored
area. If you then switch on the corresponding
turn signal to change lane, you will also
receive a visual and acoustic collision warn-
ing. If a risk of lateral collision is detected,
corrective braking may help you avoid a col-
lision. To support the course-correcting brake
application, Active Blind Spot Assist also uses
the forward-facing radar sensor system.
Active Blind Spot Assist provides assistance
at speeds higher than about 30 km/h. G
WARNING
Active Blind Spot Assist is only an aid and may
detect vehicles/obstacles incorrectly or not
at all.
The system may be impaired or may not func-
tion if:
R there is poor visibility, e.g. due to snow,
rain, fog or spray.
R the rear and/or front sensors are dirty.
Active Blind Spot Assist may not detect nar-
row vehicles, such as motorcycles or bicycles,
or only detect them too late. It cannot detect
vehicles which are overtaken at a small dis-
tance and then enter the blind spot area.
Active Blind Spot Assist cannot detect road
and traffic conditions. It is not a substitute for
attentive driving. You are responsible for the
vehicle's speed, braking in good time, and
steering correctly. Always adapt your driving style to suit the prevailing road and weather
conditions. Always pay attention to traffic
conditions and your surroundings. Otherwise,
you may fail to recognise dangers in time,
cause an accident and injure yourself and oth-
ers.
The radar sensor system is automatically
deactivated near radio telescope facilities
(Y page 363).
For Active Blind Spot Assist to assist you
when driving, the radar sensor system must
be activated (Y page 226) and operational.
Monitoring range
Active Blind Spot Assist monitors the area up
to three metres behind your vehicle and
directly next to your vehicle, as shown in the
diagram. For this purpose, Active Blind Spot
Assist uses radar sensors in the rear bumper. G
WARNING
Active Blind Spot Assist monitors certain
areas in the immediate vicinity of your vehicle.
Vehicles that approach and drive past at high
speeds are not detected. No visual nor audi-
ble warnings are emitted and the system does
not brake the vehicle to correct your course.
If the lanes are very wide, it may not be pos-
sible to monitor the complete width of the
neighbouring lane. For this reason, vehicles in 194
Driving systemsDriving and parking
Page 199 of 373

Visual and acoustic collision warning
If you switch on the appropriate turn signals
to change lanes, and a vehicle is detected in
the side monitoring range of Active Blind Spot
Assist, you will receive a visual and acoustic
collision warning .You will then hear a double
warning tone, and red warning lamp :
flashes. If the turn signal remains on, detec-
ted vehicles are indicated by the flashing of
red warning lamp :. There are no further
warning tones.
Course-correcting brake application
If Active Blind Spot Assist detects a risk of a
lateral collision in the monitoring range, a
course-correcting brake application is carried
out. This is designed to help you avoid a col-
lision.
The course-correcting brake application is
available in the range between 30 km/ha nd
200 km/h.
If a course-correcting brake application
occurs, red warning lamp :flashes in the
exterio rmirro rand the following is shown in
the multifunctio ndisplay, for example: Example: vehicles with automatic transmission
G
WARNING
Active Blind Spot Assist is only an aid
designed to assist driving. It is not a substitute
for attentive driving. Automatic braking by the
system may not always be sufficien tto avoid
a collision. In such cases, you need to steer,
brake or accelerate yourself.
In very rare cases, the system may detect a
risk of collision where there is none and brake
in error near crash barriers or similar road
boundaries. Active Blind Spot Assist cannot
detect all traffic situations and road users.
Ensure at all times that there is sufficient lat- eral distance between you and other road
users or obstacles. You can, for example,
countersteer gently or depress the accelera-
tor pedal at any time to cancel inappropriate
braking action.
You are responsible for the vehicle's speed,
correc
tsteering and for braking in good time.
Always adap tyour driving style to suit the
prevailing road and weather conditions.
Always pay attention to traffic conditions and
your surroundings. Otherwise, you may fail to
recognise dangers in time, cause an accident
and injure yourself and others.
Either a very slight course-correcting brake
application, or none at all, may occur if:
R there are vehicles or obstacles, e.g. crash
barriers, on both sides of your vehicle.
R a vehicle approaches too closely on the
side.
R you have adopted a sporty driving style with
high cornering speeds.
R you brake or accelerate decisively.
R a driving safety system intervenes, such as
ESP ®
or PRE-SAFE ®
Brake.
R ESP ®
is deactivated.
R a loss of tyre pressure or a defective tyre is
detected.
Activating Active Blind Spot Assist
X On vehicles without a navigation system,
make sure that the Becker ®
MAP PILOT is
connected; see the separate operating
instructions for Audio 20.
X Make sure that the radar sensor system
(Y page 226) and Active Blind Spot Assist
(Y page 222) are activated in the on-board
computer.
X Turn the key to position 2in the ignition
lock.
Warning lamps :light up red in the exte-
rior mirrors for approximately 1.5 seconds
and then turn yellow. 196
Driving systemsDriving and parking
Page 201 of 373
marking, the system recognises certain con-
ditions and warns you accordingly.
The warning vibration occurs earlier if:
R
you approach the outer lane marking on a
bend.
R the road has very wide lanes, e.g. a motor-
way.
R the system recognises solid lane markings.
The warning vibration occurs later if:
R the road has narrow lanes.
R you cut the corner on a bend.
No warning vibration occurs if:
R you clearly and actively steer, brake, or
accelerate.
R you cut the corner on a sharp bend.
R a driving safety system intervenes, such as
ABS, BAS or ESP ®
.
R you have switched on the turn signals. In
this event, the warnings are suppressed for
a certain period of time.
Lane-correcting brake application
If you leave your lane under certain circum-
stances, the vehicle will brake briefly on one
side .This is designed to help you bring the
vehicle back into the original lane.
This function is available in the range between
60 km/h and 200 km/h.
A lane-correcting brake application can only
be made after driving over a solid, recognis-
able lane marking. Before this, a warning
must be emitted by means of intermittent
vibration in the steering wheel. In addition, a
lane with lane markings on both sides must
be recognised. The brake application also
slightly reduces driving speed.
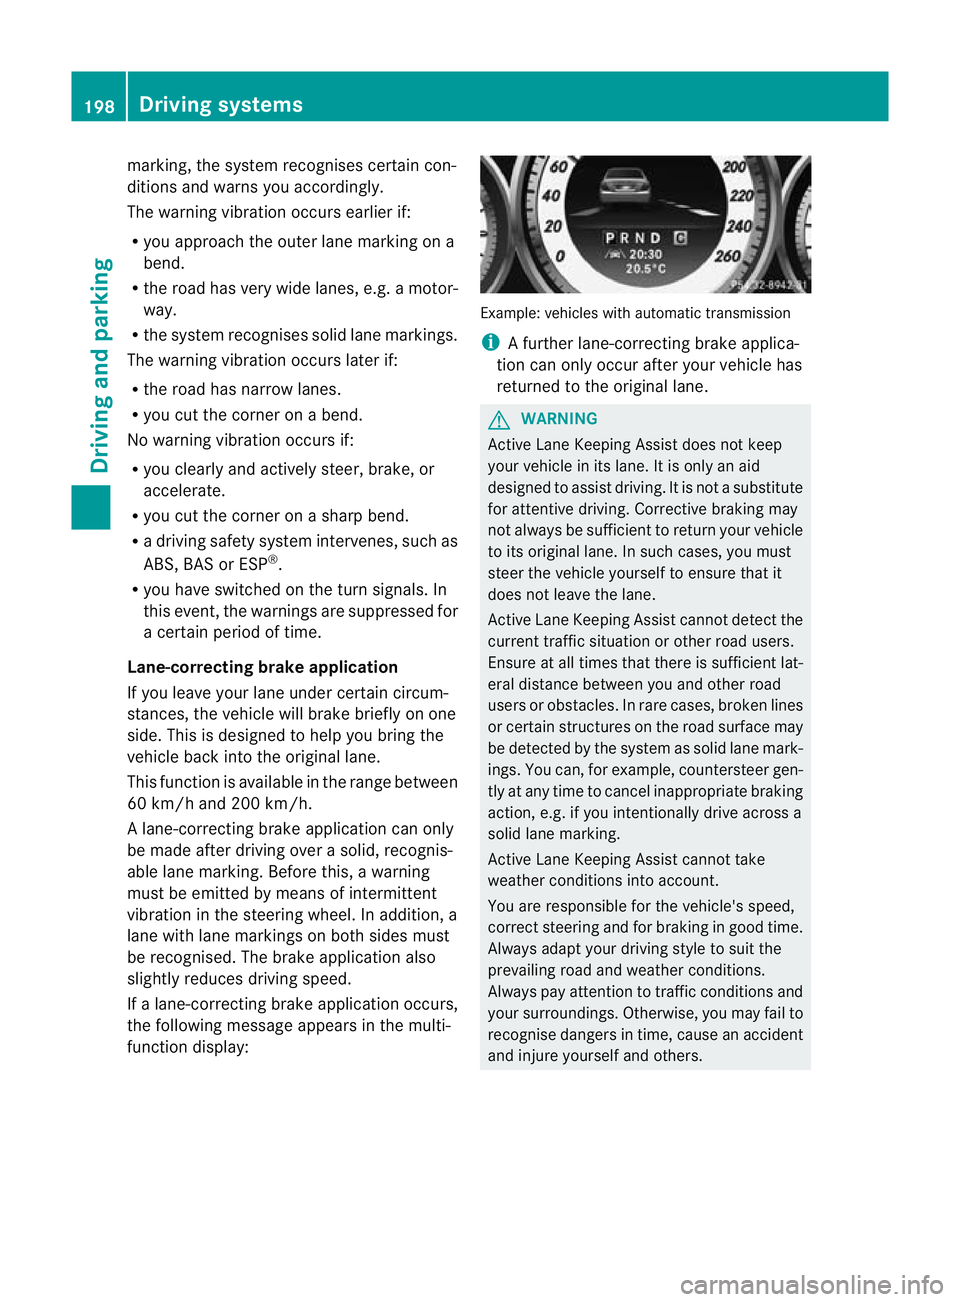
If a lane-correcting brake application occurs,
the following message appears in the multi-
function display: Example: vehicles with automatic transmission
i
A further lane-correcting brake applica-
tion can only occur after your vehicle has
returned to the original lane. G
WARNING
Active Lane Keeping Assist does not keep
your vehicle in its lane. It is only an aid
designed to assist driving. It is not a substitute
for attentive driving. Corrective braking may
not always be sufficient to return your vehicle
to its original lane. In such cases, you must
steer the vehicle yourself to ensure that it
does not leave the lane.
Active Lane Keeping Assist cannot detect the
current traffic situation or other road users.
Ensure at all times that there is sufficient lat-
eral distance between you and other road
users or obstacles. In rare cases, broken lines
or certain structures on the road surface may
be detected by the system as solid lane mark-
ings. You can, for example, countersteer gen-
tly at any time to cancel inappropriate braking
action, e.g. if you intentionally drive across a
solid lane marking.
Active Lane Keeping Assist cannot take
weather conditions into account.
You are responsible for the vehicle's speed,
correct steering and for braking in good time.
Always adapt your driving style to suit the
prevailing road and weather conditions.
Always pay attention to traffic conditions and
your surroundings. Otherwise, you may fail to
recognise dangers in time, cause an accident
and injure yourself and others. 198
Driving systemsDriving and parking
Page 202 of 373
No lane-correcting brake application occurs
if:
R you clearly and actively steer, brake, or
accelerate.
R you cut the corner on a sharp bend.
R you have switched on the turn signals.
R a driving safety system intervenes, such as
ESP ®
, PRE-SAFE ®
Brake or Active Blind
Spot Assist.
R you have adopted a sporty driving style with
high cornering speeds or high rates of
acceleration.
R on vehicles with a trailer tow hitch, the
electrical connection to the trailer has been
correctly established.
R ESP ®
is deactivated.
R the transmission is not in position D.
R a loss of tyre pressure or a defective tyre
has been detected and displayed.
Active Lane Keeping Assist does not detect
road and traffic conditions. An inappropriate
brake application may be interrupted at any
time if:
R you steer slightly in the opposite direction.
R you use a turn signal.
R you clearly brake or accelerate.
Al ane-correcting brake applicatio nis inter-
rupted automatically if:
R a driving safety system intervenes, such as
ESP ®
, PRE-SAFE ®
Brake or Active Blind
Spot Assist.
R lane markings can no longer be recognised.
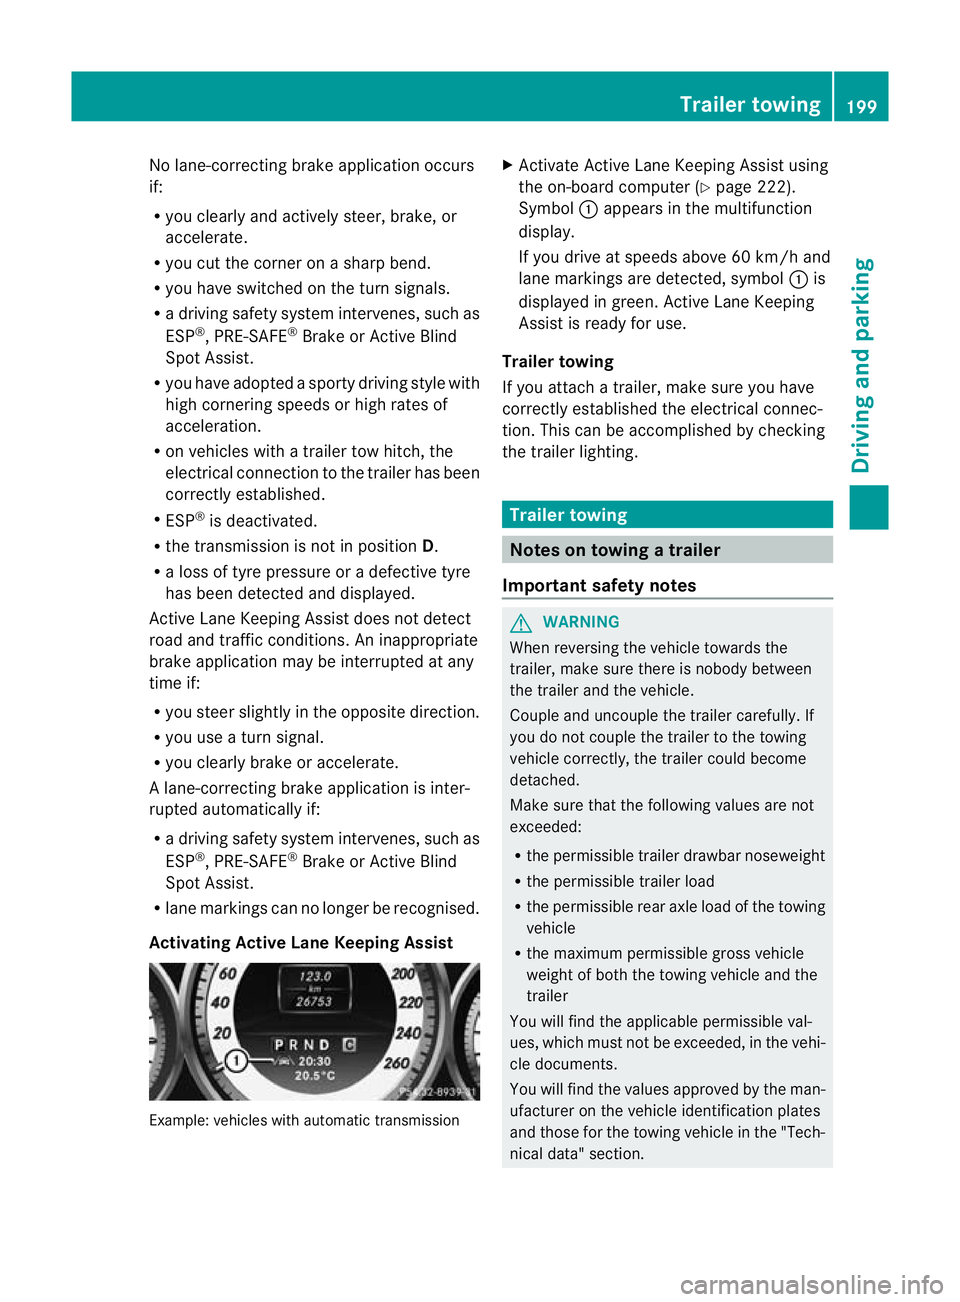
Activating Active Lane Keeping Assist Example: vehicles with automatic transmission X
Activate Active Lane Keeping Assist using
the on-board computer (Y page 222).
Symbol :appears in the multifunction
display.
If you drive at speeds above 60 km/h and
lane markings are detected, symbol :is
displayed in green. Active Lane Keeping
Assist is ready for use.
Trailer towing
If you attach a trailer, make sure you have
correctly established the electrical connec-
tion. This can be accomplished by checking
the trailer lighting. Trailer towing
Notes on towing
atrailer
Important safety notes G
WARNING
When reversing the vehicle towards the
trailer, make sure there is nobody between
the trailer and the vehicle.
Couple and uncouple the trailer carefully .If
you do no tcouple the trailer to the towing
vehicle correctly, the trailer could become
detached.
Make sure that the following values are not
exceeded:
R the permissible trailer drawbar noseweight
R the permissible trailer load
R the permissible rear axle load of the towing
vehicle
R the maximum permissible gross vehicle
weight of both the towing vehicle and the
trailer
You will find the applicable permissible val-
ues, which must not be exceeded, in the vehi-
cle documents.
You will find the values approved by the man-
ufacturer on the vehicle identification plates
and those for the towing vehicle in the "Tech-
nical data" section. Trailer towing
199Driving and parking Z
Page 248 of 373
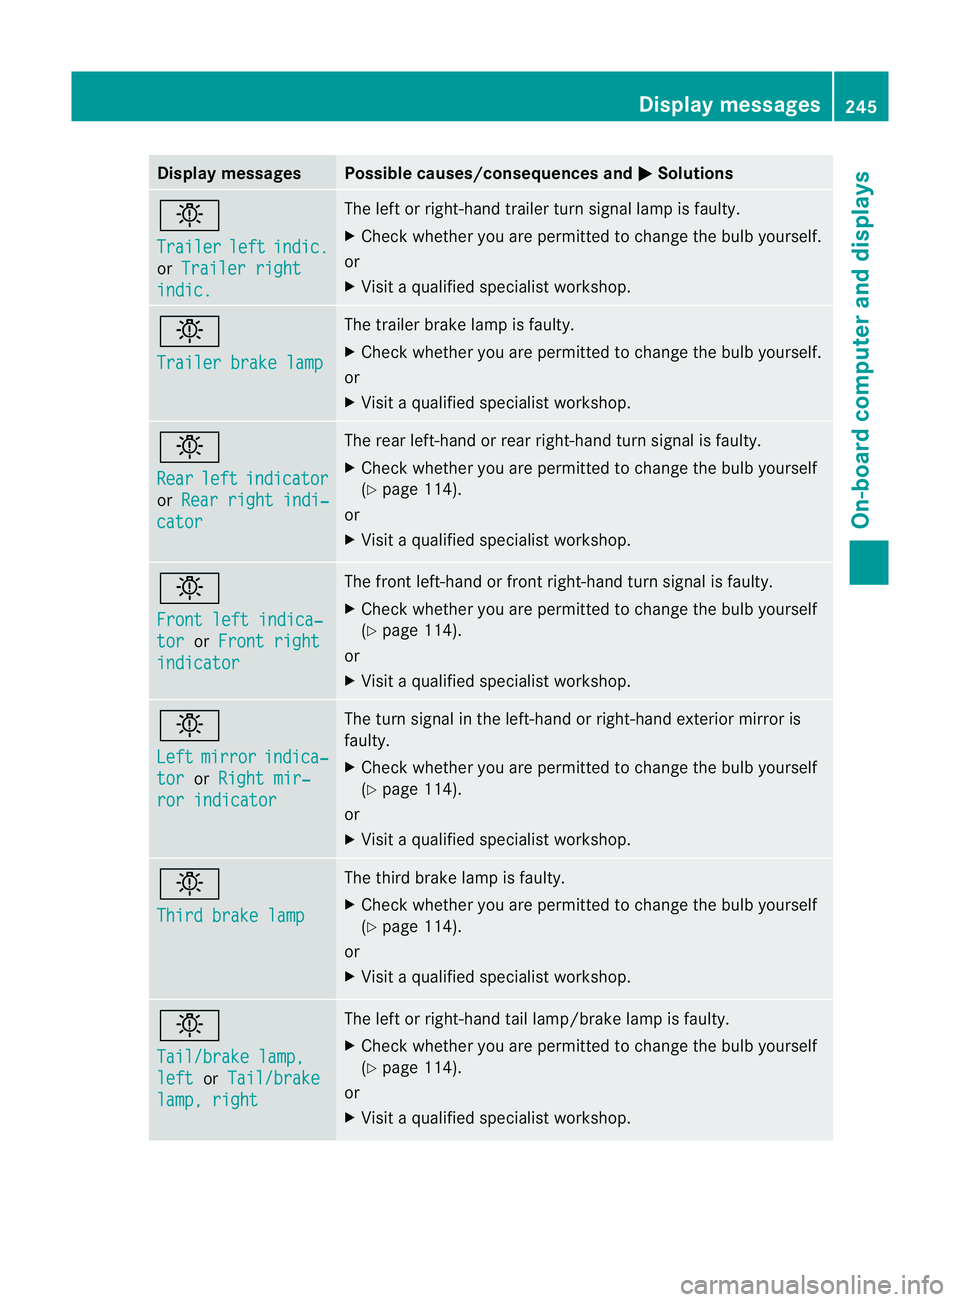
Display messages Possible causes/consequences and
M Solutions
b
Trailer
left indic.
or
Trailer right indic. The lef
torright-hand trailer tur nsignal lamp is faulty.
X Check whether you are permitted to change the bulb yourself.
or
X Visit a qualified specialist workshop. b
Trailer brake lamp The trailer brake lamp is faulty.
X
Check whether you are permitted to change the bulb yourself.
or
X Visit a qualified specialist workshop. b
Rear
left indicator
or
Rear right indi‐ cator The rear left-hand or rear right-hand tur
nsignal is faulty.
X Check whether you are permitted to change the bulb yourself
(Y page 114).
or
X Visit a qualified specialist workshop. b
Front left indica‐
tor or
Front right indicator The front left-hand or front right-hand turn signal is faulty.
X
Check whether you are permitted to change the bulb yourself
(Y page 114).
or
X Visit a qualified specialist workshop. b
Left
mirror indica‐
tor or
Right mir‐ ror indicator The turn signal in the left-hand or right-hand exterior mirror is
faulty.
X Check whether you are permitted to change the bulb yourself
(Y page 114).
or
X Visit a qualified specialist workshop. b
Third brake lamp The third brake lamp is faulty.
X
Check whether you are permitted to change the bulb yourself
(Y page 114).
or
X Visit a qualified specialist workshop. b
Tail/brake lamp,
left or
Tail/brake lamp, right The left or right-hand tail lamp/brake lamp is faulty.
X
Check whether you are permitted to change the bulb yourself
(Y page 114).
or
X Visit a qualified specialist workshop. Display messages
245On-board computer and displays Z
Page 251 of 373

Display messages Possible causes/consequences and
M Solutions
b
Left cornering
light or
Right cor‐ nering light The lef
torright-hand cornering light is faulty.
X Check whether you are permitted to change the bulb yourself
(Y page 114).
or
X Visit a qualified specialist workshop. b
Left dipped beam
or
Right dipped beam The left or right-hand dipped-beam headlamp is faulty.
X
Check whether you are permitted to change the bulb yourself
(Y page 114).
or
X Visit a qualified specialist workshop. b
Trailer left tail
lamp or
Trailer right tail lamp The left or right-hand trailer tail lamp is faulty.
X
Check whether you are permitted to change the bulb yourself.
or
X Visit a qualified specialist workshop. b
Trailer left indi‐
cator or
Trailer right indicator The left or right-hand trailer tur
nsignal lamp is faulty.
X Check whether you are permitted to change the bulb yourself.
or
X Visit a qualified specialist workshop. b
Trailer brake lamp The trailer brake lamp is faulty.
X
Check whether you are permitted to change the bulb yourself.
or
X Visit a qualified specialist workshop. b
Rear
left indicator
or
Rear right indi‐ cator The rear left-hand or rear right-hand tur
nsignal is faulty.
X Check whether you are permitted to change the bulb yourself
(Y page 114).
or
X Visit a qualified specialist workshop. b
Front left indica‐
tor or
Front right indicator The front left-hand or front right-hand turn signal is faulty.
X
Check whether you are permitted to change the bulb yourself
(Y page 114).
or
X Visit a qualified specialist workshop. 248
Display messagesOn-board computer and displays
Page 252 of 373
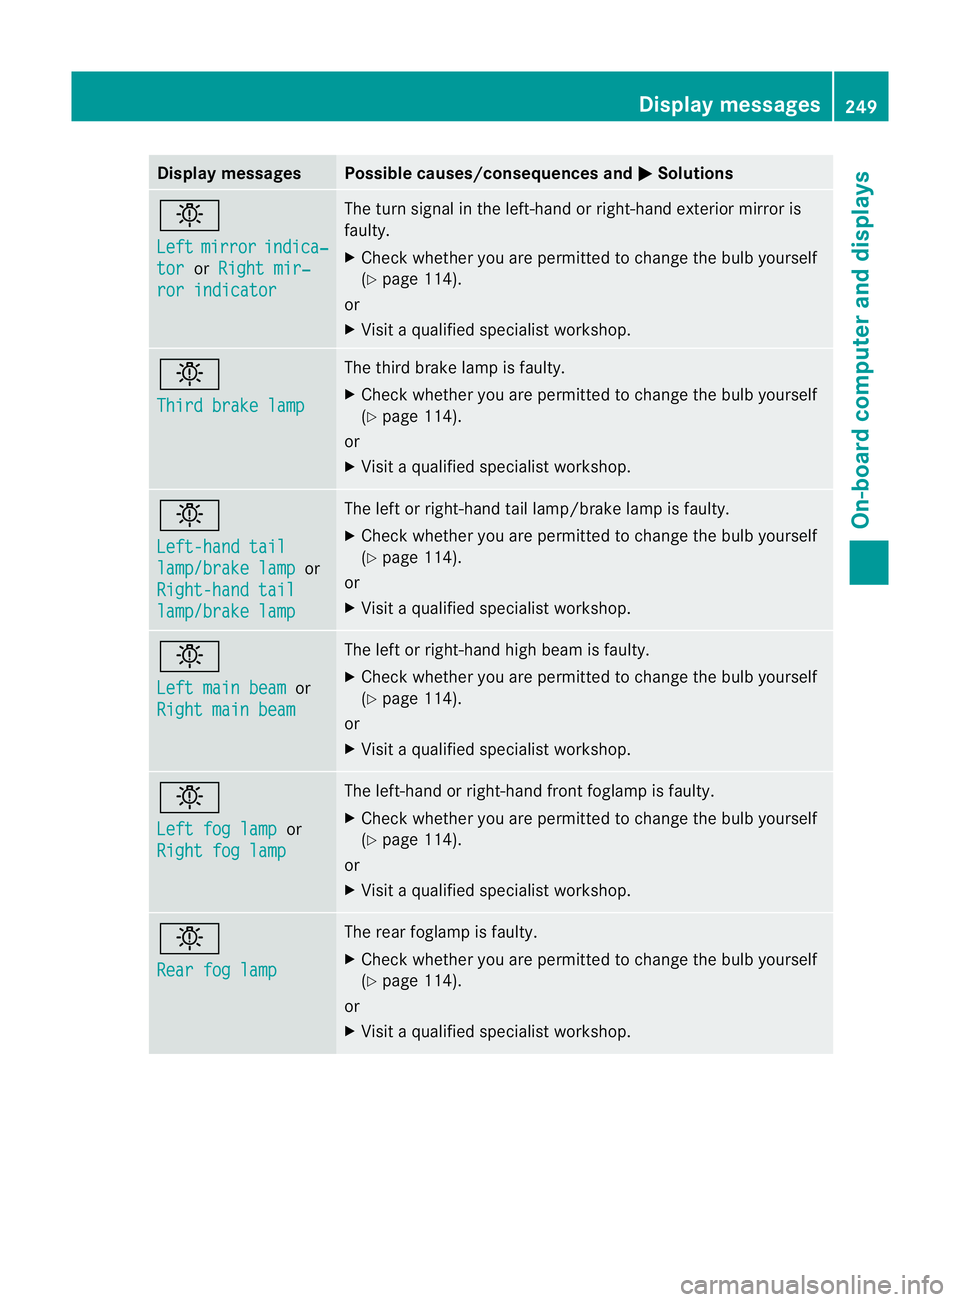
Display messages Possible causes/consequences and
M Solutions
b
Left
mirror indica‐
tor or
Right mir‐ ror indicator The turn signal in the left-hand or right-hand exterior mirror is
faulty.
X
Chec kwhether you are permitted to change the bulb yourself
(Y page 114).
or
X Visit a qualified specialist workshop. b
Third brake lamp The third brake lamp is faulty.
X
Check whether you are permitted to change the bulb yourself
(Y page 114).
or
X Visit a qualified specialist workshop. b
Left-hand tail
lamp/brake lamp or
Right-hand tail lamp/brake lamp The left or right-hand tail lamp/brake lamp is faulty.
X
Check whether you are permitted to change the bulb yourself
(Y page 114).
or
X Visit a qualified specialist workshop. b
Left main beam
or
Right main beam The left or right-hand high beam is faulty.
X
Check whether you are permitted to change the bulb yourself
(Y page 114).
or
X Visit a qualified specialist workshop. b
Left fog lamp
or
Right fog lamp The left-hand or right-hand front foglamp is faulty.
X Check whether you are permitted to change the bulb yourself
(Y page 114).
or
X Visit a qualified specialist workshop. b
Rear fog lamp The rear foglamp is faulty.
X
Check whether you are permitted to change the bulb yourself
(Y page 114).
or
X Visit a qualified specialist workshop. Display messages
249On-board computer and displays Z
Page 298 of 373
If indicator lamp
:lights up red:
X Repeat the programming procedure for the
transmitter buttons. When doing so, vary
the distance betwee nthe garage door drive
remote control and the rear-view mirror.
i If the indicator lamp flashes green after
successful programming, the garage door
system is using a rolling code. After pro-
gramming, you must synchronise the
garage door opener integrated in the rear-
view mirror with the receiver of the garage
door system.
Synchronising the rolling code
Your vehicle must be within reach of the
garage or gate opener drive. Make sure that
neither your vehicle nor any persons/objects
are present within the sweep of the door or
gate.
Observe the safety notes when performing
the rolling code synchronisation.
X Turn the key to position 2in the ignition
lock.
X Press the programming button of the door
or gate drive (see the door or gate drive
operating instructions, e.g. under "Pro-
gramming of additional remote controls").
i Usually, you now have 30 seconds to ini-
tiate the next step.
X Press the previously programmed button of
the integrated HomeLink ®
garage door
opener repeatedly until the door starts to
move.
The rolling code synchronisation is then
complete.
Problems when programming
If you have problems when programming the
integrated garage door opener, please note
the following:
R check the transmitter frequency of garage
door remote control A(this can usually be
found on the rear of the remote control).
R change the batteries in garage door remote
control A.This increases the likelihood that garage door remote control
Awill
send a strong and precise signal to the
integrated remote control in the rear-view
mirror.
R when programming, hold garage door
remote control Aat different distances
and angles from the transmitter button that
you are programming. Try various angles at
a distance of between 5 and 30 cm or the
same angle but varying distances.
R if there is another remote control for the
same garage door drive, perform the pro-
gramming steps again using this remote
control. Before performing these steps,
make sure that new batteries have been
fitted in the garage door drive remote con-
trol.
R note that some remote controls transmit
only for a limited period (the indicator lamp
on the remote control goes out). Press the
button on the remote control again before
transmission ends.
R align the aerial cable of the garage door
opener unit. This can improve signal recep-
tion/transmission.
Opening or closing the garage door Once programmed, the integrated garage
door opener will assume the function of the
garage door system's remote control. Please
also read the operating instructions for the
garage door system.
X
Turn the key to position 2in the ignition
lock.
X Press overhead control panel transmitter
button ;,=or? that you have pro-
grammed to operate the garage door.
Garage door system with a fixed code: indi-
cator lamp :lights up green.
Garage door system with a rolling code:
indicator lamp :flashes green.
i The transmitter will transmit a signal for
as long as the transmitter button is
pressed. The transmission is halted after a
maximum of 10 seconds, and indicator Features
295Stowing and features Z