2011 MERCEDES-BENZ C-CLASS COUPE spare tire
[x] Cancel search: spare tirePage 15 of 373
F
Fatigue Assist see ATTENTION ASSIST
Fault message
see Display messages
Filler cap
see Fuel fille rflap
Fire extinguisher ............................... 315
First-aid kit ......................................... 314
Flat tyre Changing a wheel/fitting the
spare wheel ................................... 321
MOExtended run-fla tsystem ......... 324
Preparing the vehicle .....................316
Raising the vehicle .........................322
TIREFIT kit ...................................... 317
Floormat ............................................ .297
Foglamps Extended range .............................. 112
Switching on/off ........................... 109
Frequencies
Garage door opene r....................... 297
Mobile phone ................................. 351
Two-way radio ................................ 351
Fron tfoglamp
Display message (12-butto nmul-
tifunction steering wheel) ..............249
Front foglamps
Display message (4-button multi-
function steering wheel) ................246
Switching on/off ........................... 109
Fron twindscreen
see Windscreen
Fuel
Displaying the range (12-button
multifunction steering wheel) ........215
Displaying the range (4-button
multifunctio nsteering wheel) ........210
Important safety notes ..................354
Notes about consumption .............354
Problem (malfunction) ...................157
Refuelling ...................................... .152
Tank content/reserve fuel .............354
Tank content display (12-button
multifunctio nsteering wheel) ..........35
Tank content display (4-button
multifunctio nsteering wheel) ..........32Fuel consumption
Current (12-button multifunction
steering wheel) .............................. 215
Fuel filler flap
Opening/closing ............................ 155
Fuel filter
Display message (12-button mul-
tifunctio nsteering wheel) ..............255
Display message (4-button multi-
function steering wheel) ................253
Fuel reserve
Display message (12-button mul-
tifunctio nsteering wheel) ..............255
Display message (4-button multi-
function steering wheel) ................253
see Fuel
Fuel tank
Capacity ........................................ 354
Problem (malfunction) ...................157
Fuse allocation chart (vehicle tool
kit) ...................................................... 315
Fuses Allocation chart ............................. 334
Before changing ............................. 334
Fuse box in the boot ......................334
Fuse box in the engine compart-
ment .............................................. 334
Important safety notes ..................333 G
Garage door opener Clearing the memory .....................296
Frequencies ................................... 297
Notes ............................................. 294
Opening/closing the garage door ..295
Programming (button in the rear-
view mirror) ................................... 294
Gear indicator (12-button multi-
function steering wheel) ..................229
Gearshift program SETUP (on-board computer) ..........229
Genuine Mercedes-Benz parts .........350
Glove compartment ..........................28512
Index
Page 318 of 373
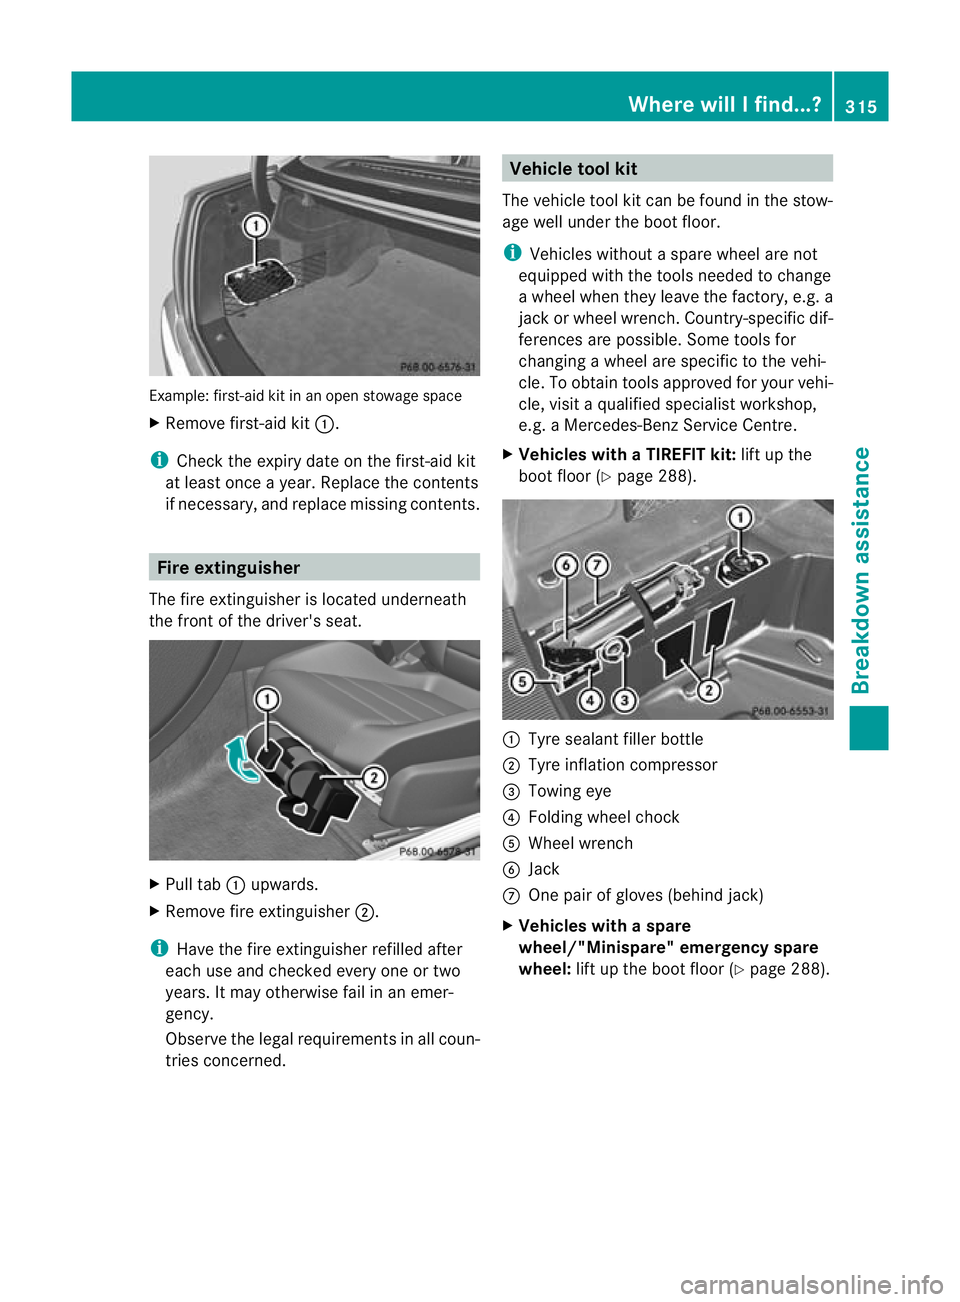
Example: first-aid kit in an open stowage space
X Remove first-aid kit :.
i Check the expiry date on the first-aid kit
at leas tonce a year .Replace the contents
if necessary, and replace missing contents. Fire extinguisher
The fire extinguisher is located underneath
the front of the driver's seat. X
Pull tab :upwards.
X Remove fire extinguisher ;.
i Have the fire extinguisher refilled after
each use and checked every one or two
years. It may otherwise fail in an emer-
gency.
Observe the legal requirement sinall coun-
tries concerned. Vehicle tool kit
The vehicle tool kit can be found in the stow-
age well under the boot floor.
i Vehicles without a spare wheel are not
equipped with the tools needed to change
a wheel when they leave the factory, e.g. a
jac korw heel wrench. Country-specific dif-
ferences are possible. Some tools for
changing a wheel are specific to the vehi-
cle. To obtain tools approved for your vehi-
cle, visit a qualified specialist workshop,
e.g. a Mercedes-Benz Service Centre.
X Vehicles with a TIREFIT kit: lift up the
boot floor (Y page 288). :
Tyre sealant filler bottle
; Tyre inflation compressor
= Towing eye
? Folding wheel chock
A Wheel wrench
B Jack
C One pair of gloves (behind jack)
X Vehicles with a spare
wheel/"Minispare" emergency spare
wheel: lift up the boot floor (Y page 288). Where will I find...?
315Breakdown assistance
Page 319 of 373

:
Vehicle tool kit tray
; Stowage well
= Spare wheel/"Minispare" emergency
spare wheel
The vehicle tool kit contains:
R Foldable wheel chock
R Fuse allocation chart
R Jack
R One pair of gloves
R Wheel wrench
R Towing eye Spare wheel/"Minispare" emergency
spare wheel
The spare wheel or "Minispare" emergency
spare wheel can be found in the stowage well
under the boot floor.
X Lift the boot floor upwards (Y page 288). X
To remove the spare wheel or
"Minispare" emergencys pare wheel:
remove vehicle tool kit tray :.
X Turn stowage well ;anti-clockwise and
remove it.
X Remove the spare wheel or "Minispare"
emergency spare wheel =.
For further information on changing a wheel
and fitting the spare wheel, see
(Y page 321). Flat tyre
Preparing the vehicle
Your vehicle may be equipped with:
R a TIREFIT kit
R an emergency spare wheel
R MOExtended tyres (tyres with run-flat char-
acteristics) (Y page 324)
i Vehicle preparation is not necessary on
vehicles with MOExtended tyres.
i Vehicles with MOExtended tyres are not
equipped with a TIREFIT kit at the factory.
It is therefore recommended that you addi-
tionally equip your vehicle with a TIREFIT kit
if you fit tyres that do not feature run-flat
properties, e.g. winter tyres. A TIREFIT kit
can be obtained from a Mercedes-Benz
Service Centre.
X Stop the vehicle as far away as possible
from traffic on solid ,non-slippery and level
ground.
X Switch on the hazard warning lamps.
X Firmly depress the parking brake.
X Bring the front wheels into the straight-
ahead position.
X Vehicles with manual transmission:
engage first or reverse gear.
X Vehicles with automatic transmission:
move the selector lever to P.
X Switch off the engine. 316
Flat tyreBreakdown assistance
Page 340 of 373

Tyre tread
G
WARNING
Bear in mind that:
R tyre grip decreases rapidly on we troads
when the tread depth is less than 3mm.
Thus, you should replace tyres that have
insufficient tread.
R winter tyres should be replaced when the
tread depth is 4mmorless as they no lon-
ger provide adequate grip.
R the tread on a tyre may not wear evenly.
Thus, you should regularly check the tread
depth and the condition of the tread across
the entire width of all tyres. If necessary,
turn the fron twheels to full lock in order to
inspect the tyre tread more easily.
Otherwise, you could lose control of the vehi-
cle and cause an accident due to the reduced
grip of the tyres on the road. Notes on selecting, fitting and replac-
ing tyres
R Only fit tyres and wheels of the same type
and make.
R Only fit tyres of the correct size onto the
wheels.
R After fittingn ew tyres, run them in at mod-
erate speeds for the first 100 km, as they
only reach their full performance after this
distance.
R Do not drive with tyres which have too little
tread depth, as this significantly reduces
the traction on wet roads (aquaplaning).
R Replace the tyres after six years at the lat-
est, regardless of wear. This also applies to
the emergency spare wheel/spare wheel. MOExtended tyres (tyres with run-flat
characteristics)
MOExtended tyres (tyres with run-flat char-
acteristics) allow you to continue driving the vehicle even when one or more tyres lose all
air pressure.
MOExtended tyres may only be used in con-
junction with the tyre pressure loss warning
system or with the tyre pressure monitor and
on wheels specifically tested by Mercedes-
Benz.
i Vehicles with MOExtended tyres are not
equipped with a TIREFIT kit at the factory.
It is therefore recommended that you addi-
tionally equip your vehicle with the TIREFIT
kit if you fit tyres that do not feature run-
flat properties, e.g. winter tyres. A TIREFIT
kit can be obtained from a Mercedes-Benz
Service Centre.
You will find notes on driving with a flat tyre
in the "Breakdown assistance" section
(Y page 324). Winter operation
Please bear the following in mind
At the onset of winter, have your vehicle win-
terproofed at a qualified specialist workshop,
e.g. at a Mercedes-Benz Service Centre.
Observe the notes in the "Changing a wheel"
section (Y page 344). Driving with summer tyres
At temperatures below +7 †, summer tyres
lose elasticity and therefore traction and
braking power; change the tyres on your vehi-
cle to M+S tyres. Using summer tyres at very
cold temperatures could cause tears to form,
thereby damaging the tyres permanently.
Mercedes-Benzc annot accept responsibility
for this type of damage. M+S tyres
At temperatures below +7 †, use winter tyres
or all-season tyres. Both types of tyre are
identified by the M+S marking. Winter operation
337Wheels and tyres Z
Page 351 of 373
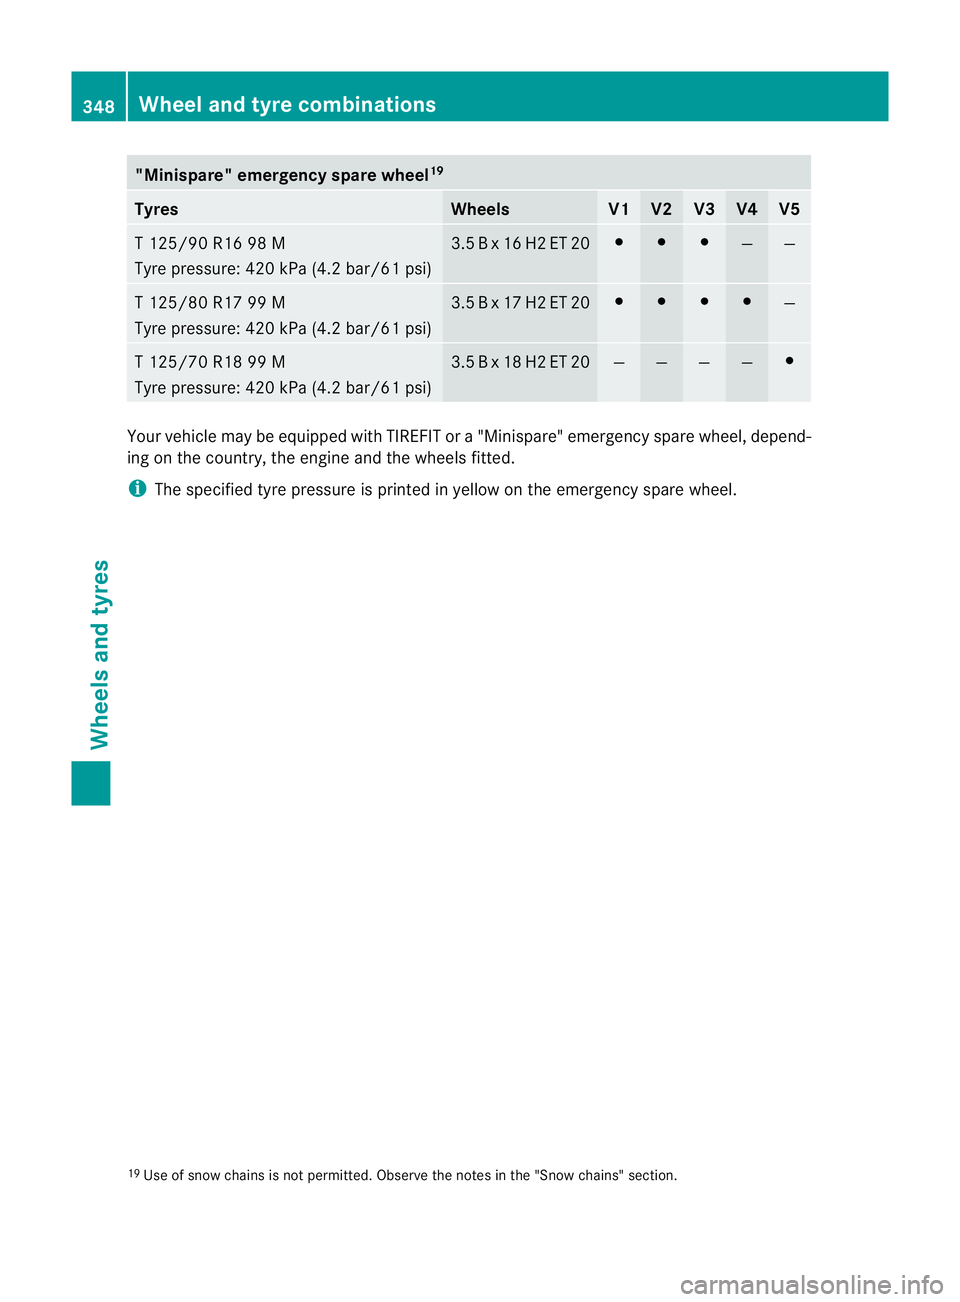
"Minispare" emergency spare wheel
19Tyres Wheels V1 V2 V3 V4 V5
T 125/90 R16 98 M
Tyre pressure: 420 kPa (4.2 bar/61 psi) 3.5 B x 16 H2 ET 20 # # #
— —
T 125/80 R17 99 M
Tyre pressure: 420 kPa (4.2 bar/61 psi) 3.5 B x 17 H2 ET 20 # # # #
—
T 125/70 R18 99 M
Tyre pressure: 420 kPa (4.2 bar/61 psi) 3.5 B x 18 H2 ET 20 — — — — #
Your vehicle may be equipped with TIREFIT or a "Minispare" emergency spare wheel, depend-
ing on the country, the engine and the wheels fitted.
i The specified tyre pressure is printed in yellow on the emergency spare wheel.
19 Use of snow chains is not permitted. Observe the notes in the "Snow chains" section. 348
Wheel and tyre combinationsWheels and tyres