2011 MERCEDES-BENZ C-CLASS COUPE clock
[x] Cancel search: clockPage 121 of 373

X
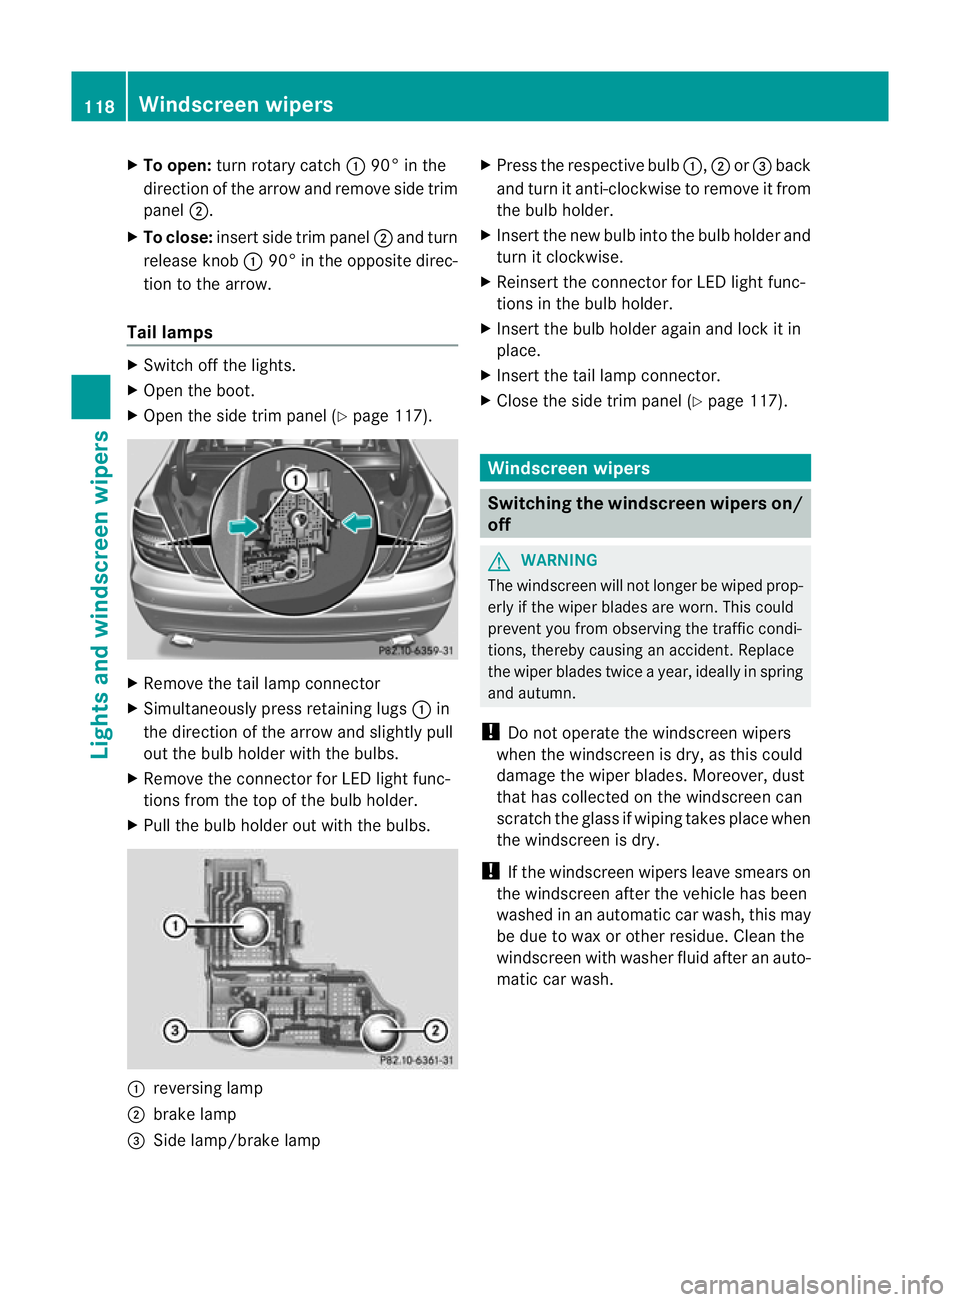
To open: turn rotary catch :90° in the
direction of the arrow and remove side trim
panel ;.
X To close: insert side trim panel ;and turn
release knob :90° in the opposite direc-
tion to the arrow.
Tail lamps X
Switch off the lights.
X Ope nthe boot.
X Open the side trim panel (Y page 117).X
Remove the tail lamp connector
X Simultaneously press retaining lugs :in
the direction of the arrow and slightly pull
out the bulb holder with the bulbs.
X Remove the connector for LED light func-
tions from the top of the bulb holder.
X Pull the bulb holder out with the bulbs. :
reversing lamp
; brake lamp
= Side lamp/brake lamp X
Press the respective bulb :,;or= back
and turn it anti-clockwise to remove it from
the bulb holder.
X Insert the new bulb into the bulb holder and
turn it clockwise.
X Reinsert the connector for LED light func-
tions in the bulb holder.
X Insert the bulb holder again and lock it in
place.
X Insert the tail lamp connector.
X Close the side trim panel (Y page 117). Windscreen wipers
Switching the windscreen wipers on/
off
G
WARNING
The windscreen will not longer be wiped prop-
erly if the wiper blades are worn. This could
prevent you from observing the traffic condi-
tions, thereby causing an accident. Replace
the wiper blades twice a year, ideally in spring
and autumn.
! Do not operate the windscreen wipers
when the windscreen is dry, as this could
damage the wiper blades. Moreover, dust
that has collected on the windscreen can
scratch the glass if wiping takes place when
the windscreen is dry.
! If the windscreen wipers leave smears on
the windscreen after the vehicle has been
washed in an automatic car wash, this may
be due to wax or other residue. Cleant he
windscreen with washer fluid after an auto-
matic car wash. 118
Windscreen wipersLights and windscreen wipers
Page 128 of 373

X
Turn the key to position 2in the ignition
lock.
X Set the desired temperature.
X To activate: press theÃbutton.
The indicator lamp in the Ãbutton lights
up. Automatic air distribution and airflow
are activated.
X To switch off: press the_button.
or
X Press the KorI button.
The indicator lamp in the Ãbutton goes
out. Automatic air distribution and airflow
are deactivated. Setting the temperature
Different temperatures can be set for the
driver's and front-passenger sides.
X Turn the key to position 2in the ignition
lock.
X To increase/reduce: turn controls:and
B clockwise or anti-clockwise
(Y page 123).
Only change the temperature setting in
small increments. Start at 22 †. Setting the air distribution
Air distribution settings P
Directs the airflow through the centre
and side air vents
O Directs the airflow through the foot-
well air vents
S Directs the airflow through the centre
and side air vents and the footwell air
vents
¯ Directs the airflow through the demis-
ter vents
b Directs the airflow through the centre
and side air vents as well as the demis-
ter vents a
Directs the airflow through the foot-
well and demister vents
_ Directs the airflow through the demis-
ter, centre and side air vents as well as
the footwell air vents
i Regardless of the air distribution setting,
airflow is always directed through the side
air vents. The side air vents can only be
closed when the controls on the side air
vents are turned downwards.
X Turn the key to position 2in the ignition
lock.
X Press the _button repeatedly until the
desired symbol appears in the display.
The indicator lamp in the Ãbutton goes
out. Automatic control is deactivated and
the air distribution is controlled according
to the selected setting. Setting the airflow
X Turn the key to position 2in the ignition
lock.
X To increase/reduce: press theKor
I button. Switching the ZONE function on/off
X To switch on: press theábutton.
The indicator lamp in the ábutton lights
up.
The temperature setting for the driver's
side is not adopted for the front-passenger
side.
When the buttons for temperature, airflow or
air distribution are activated, the temperature
setting for the driver's side is not adopted for
the other climate control zones.
X To switch off: press theábutton.
The indicator lamp in the ábutton goes
out. Operating the climate control system
125Climate control Z
Page 129 of 373

The temperature setting for the driver's
side is adopted for the front-passenger
side.
Demisting the windscreen
You can use this function to defrost the wind-
screen or to demist the inside of the wind-
screen and the side windows.
i You should only select the demisting
function until the windscreen is clear again.
X Turn the key to position 2in the ignition
lock.
X To activate: press the¬button.
The indicator lamp in the ¬button lights
up.
The climate control system switches to the
following functions:
R cooling with air dehumidification on
R high airflow 9
R high temperature 9
R air distribution to the windscreen and
fronts ide windows
R air-recirculation mode off
X To switch off: press the¬button.
The indicator lamp in the ¬button goes
out. The previously selected settings come
into effect again. The cooling with air dehu-
midification function remains on. Air-recir-
culation mode remains deactivated.
or
X Press the Ãbutton.
The indicator lamp in the ¬button goes
out. Airflow and air distribution are set to
automatic mode.
or
X Turn temperature control :orB clock-
wise or anti-clockwise (Y page 123).
or
X Press the KorI button. Demisting the windows
Windows misted up on th einside X
Activate the ¿cooling with air dehu-
midification function.
X Activate automatic mode Ã.
X If the windows continue to mist up, activate
the demisting function (Y page 126).
i You should only select this setting until
the windscreen is clear again.
Windows misted up on the outside X
Activate the windscreen wipers.
X Press the _button repeatedly until the
O orP symbol appears in the dis-
play.
i You should only select this setting until
the windscreen is clear again. Rear window heating
Activating/deactivating G
WARNING
Clear all windows of ice or snow before setting
off. Otherwise, impaired visibility could
endanger you and others.
The rear window heating has ahigh current
draw. You should therefore switch it off as
soon as the window is clear .as it only
switches off automatically after several
minutes.
If the battery voltage is too low, the rear win-
dow heating may switch off.
X Turn the key to position 2in the ignition
lock.
X Press the ¤button.
The indicator lamp in the ¤button lights
up or goes out.
9 Depending on the outside temperature. 126
Operating the climate control systemClimate control
Page 136 of 373

Setting the centre air vents
:
Centre air vent, left
; Centre air vent, right
= Centre vent thumbwheel, right
? Centre vent thumbwheel, left
X To open/close: turn thumbwheels =
and ?up or down. Setting the side air vents
X
To open/close: turn thumbwheel =to the
left or right.
i Side window demister vent :is never
completely shut, even if side air vent ;is
shut. Setting the glove compartment air
vent
When automatic climate control is activated,
the glove compartmen tcan be ventilated, for
instance to cool its contents .The level of air- flow depends on the airflow and air distribu-
tion settings.
!
Close the air vent when heating the vehi-
cle.
At high outside temperatures, open the air
vent and activate the "cooling with air dehu-
midification" function. Otherwise, temper-
ature-sensitive items stored in the glove
compartmentc ould be damaged. :
Air vent thumbwheel
; Air vent
X To open/close: turn thumbwheel :
clockwise or anti-clockwise. Setting the rear-compartment air
vents
Setting the centre vents in the rear com-
partment :
Rear-compartment air vent thumbwheel
; Rear-compartment air vent, right
= Rear-compartment air vent, left Adjusting the air vents
133Climate control Z
Page 158 of 373

Flow improver
Flow improvers can be added to improve the
cold resistance of diesel fuel .The effective-
ness of a flow improver is not guaranteed with
every fuel.
Correct dosage and thorough mixing are deci-
sive factors in ensuring improvement in low-
temperature resistance. Under certain cir-
cumstances, an excessive dosage may
actually decrease low-temperature resist-
ance and should therefore be avoided. Follow
the manufacturer's dosing instructions.
Mix the additive with the diesel in good time,
before the flow properties of the diesel
become inadequate. Malfunctions can other-
wise only be rectified by heating the entire
fuel system, e.g. by parking the vehicle in a
heated garage.
Observe the information provided by the man-
ufacturer when using a flow improver. Only
use flow improvers that have been tested and
approved by Mercedes-Benz. You can obtain
further information from any Mercedes-Benz
Service Centre. Refuelling
Fuel filler flap The fuel filler flap is unlocked or locked auto-
matically when you open or close the vehicle
with the key or using KEYLESS-GO.
The position of the fuel filler cap is displayed
in the instrument cluster 8.The arrow
next to the filling pump indicates the side of
the vehicle. :
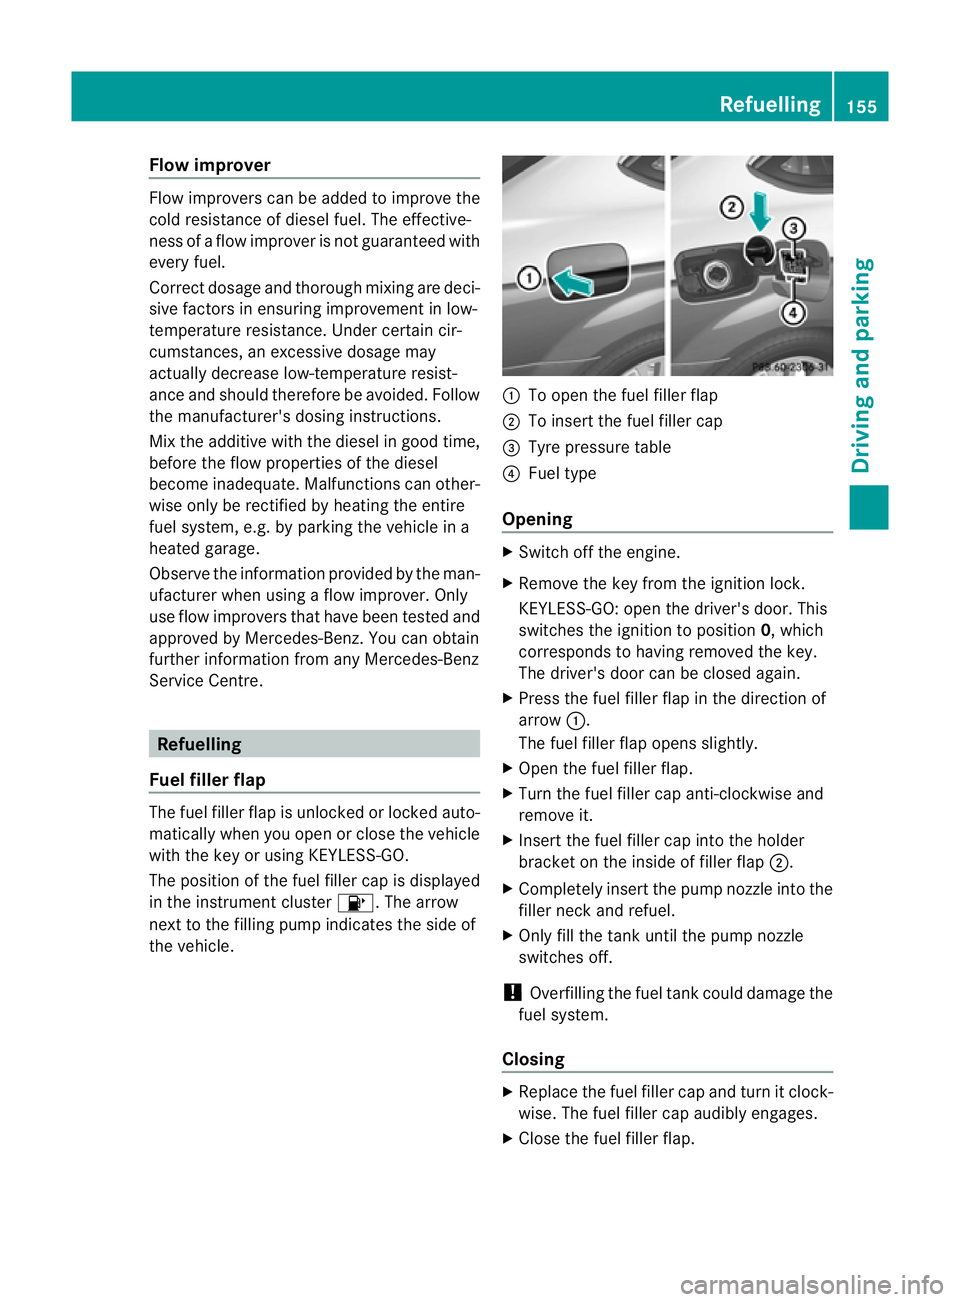
To open the fuel filler flap
; To insert the fuel filler cap
= Tyre pressure table
? Fuel type
Opening X
Switch off the engine.
X Remove the key from the ignition lock.
KEYLESS-GO: open the driver's door. This
switches the ignition to position 0, which
corresponds to having removed the key.
The driver's door can be closed again.
X Press the fuel filler flap in the direction of
arrow :.
The fuel filler flap opens slightly.
X Open the fuel filler flap.
X Turn the fuel filler cap anti-clockwise and
remove it.
X Insert the fuel filler cap into the holder
bracket on the inside of filler flap ;.
X Completely insert the pump nozzle into the
filler neck and refuel.
X Only fill the tank until the pump nozzle
switches off.
! Overfilling the fuel tank could damage the
fuel system.
Closing X
Replace the fuel filler cap and turn it clock-
wise. The fuel filler cap audibly engages.
X Close the fuel filler flap. Refuelling
155Driving and parking Z
Page 182 of 373

Conditions for activation
RACE START can be activated when:
R the doors are closed.
R the engine is running and it has reached an
operating temperature of approximately
80 †. This is the case when the engine oil
temperature in the multifunction display
stops flashing.
R SPORT handling mode is activated.
(Y page 69)
R the steering wheel is in the straight-ahead
position.
R the vehicle is stationary and the brake
pedal is depressed (lef tfoot).
R the transmission is in position D.
Activating RACE START X
Depress the brake pedal with your left foot,
and keep it depressed.
X Turn the drive program selector clockwise
(Y page 147) until the RSlamp lights up.
The multifunction display shows the RACESTART Confirm: Paddle UP Cancel:
Paddle DOWN message.
i If the conditions for activation are no lon-
ger fulfilled, RACE START is cancelled. The
multifunction display shows the RACESTART cancelled message.
X To cancel: pull the left steering wheel shift
paddle (Y page 148).
or
X To confirm: pull the right steering wheel
shift paddle (Y page 148).
The multifunction display shows the RACESTART available Depress accelera‐
tor message.
i If you do not depress the accelerator
pedal fully within two seconds, RACE
START is cancelled. The multifunction dis-
play shows the RACE START not possi‐ ble See Owner's Manual message.X
Depress the accelerator pedal fully.
The engine speed rises to approximately
4000 rpm.
The multifunction display shows the RACE START Release brake to start mes-
sage.
i If you do not release the brake pedal
within seven seconds, RACE START is can-
celled. The multifunction display shows the
RACE START cancelled message.
X Take your foot off the brake, but keep the
accelerator pedal depressed.
The vehicle pulls away at maximum accel-
eration.
The multifunction display shows the RACE START active message.
RACE START is deactivated when the vehicle
reaches a speed of approximately 50 km/h.
Drive program S+is activated. SPORT han-
dling mode remains activated.
RACE START is deactivated immediately if
you release the accelerator pedal during
RACE START or if any of the activation condi-
tions are no longer fulfilled. The multifunction
display shows the RACE START not possi‐ ble See Owner's Manual message.
i If RACE START is used repeatedly in a
short period of time, it is only available
again after having driven the vehicle a cer-
tain distance. PARKTRONIC
Important safety notes G
WARNING
PARKTRONIC is only an aid and may not
detect all obstacles. It is not a substitute for
attentive driving.
You are always responsible for safety and
must continue to pay attention to your imme-
diate surroundings when parking and
manoeuvring. You could otherwise endanger
yourself and others. Driving systems
179Driving and parking Z
Page 204 of 373

R
is affected more by strong crosswinds
R demands more sensitive steering
R consumes more fuel
On long and steep downhill gradients, you
must shift to a lower gear in good time, or on
vehicles with automatic transmission, select
the shift range 1,2or 3.
i This also applies if you have activated
cruise control, SPEEDTRONIC or DIS-
TRONIC PLUS.
This will use the braking effect of the engine,
so less braking will be required to maintain
the speed. This relieves the load on the brake
system and prevents the brakes from over-
heating and wearing too quickly. If you need
additional braking, depress the brake pedal
repeatedly rather than continuously.
Driving tips R
Maintain a greater distanc efrom the vehi-
cle in front than when driving without a
trailer.
R Avoid braking abruptly .Ifpossible, brake
gently at first to allow the trailer to run on.
Then, increase the braking force rapidly.
R The values given for gradient-climbing
capabilities from a standstill refer to sea
level. When driving in mountainous areas,
note that the power output of the engine,
and consequently the vehicle's gradient-
climbing capability, decrease with increas-
ing altitude.
If the trailer swings from side to side:
X Do not accelerate.
X Do not counter-steer.
X Brake if necessary. Folding out the ball coupling
Before you can tow a trailer with your vehicle,
you must fold out the ball coupling.
The release wheel is located behind the left-
hand side trim panel in the boot. G
WARNING
Make sure that the ball coupling is engaged,
either in its folded-out or folded-in position,
and that the indicator lamp is off.
Do not turn the release wheel when a trailer
is coupled up. Otherwise, the trailer might
detach. X
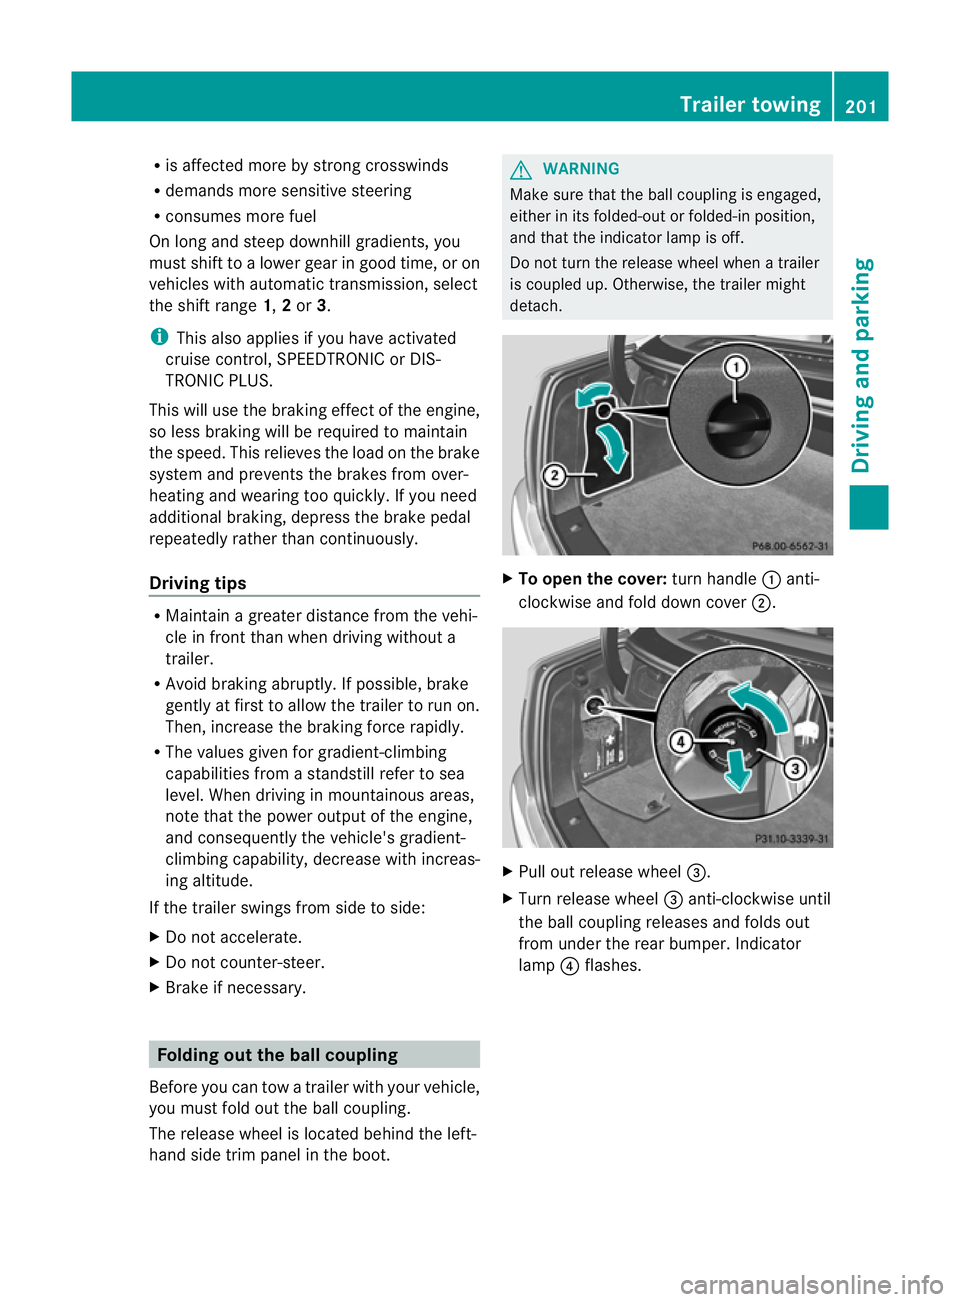
To open the cover: turn handle:anti-
clockwise and fold down cover ;. X
Pull out release wheel =.
X Turn release wheel =anti-clockwise until
the ball coupling releases and folds out
from under the rear bumper. Indicator
lamp ?flashes. Trailer towing
201Driving and parking Z
Page 206 of 373

X
Place the protective cap on the ball cou-
pling.
The release wheel is located behind the left-
hand side trim panel in the boot. Coupé
X
To open the cover: turn handle:anti-
clockwise and fold down cover ;.X
Pull out release wheel =.
X Turn release wheel =anti-clockwise.
The ball coupling unlocks and lowers. Indi-
cator lamp ?flashes. X
Press the ball coupling in the direction of
the arrow until it engages behind the
bumper.
Indicator lamp ?goes out and the mes-
sage in the multifunction display disap-
pears. Trailer power supply
When it leaves the factory, your vehicle's
trailer socket is equipped with a permanent
power supply and a power supply that is
switched on via the ignition lock.
The permanen tpower supply is supplied via
trailer socket pin 9.
The power supply that is switched on via the
ignition lock is supplied via trailer socket pin
10.
! You can connect consumers with a power
rating of up to 240 W to the permanent
power supply and up to 180 W to the power
supply that is switched on via the ignition
lock.
You must not charge a trailer battery using
the power supply.
The trailer's permanent power supply is
switched off in the event of low vehicle supply
voltage and after six hours at the latest.
You can obtain further information about
installing the trailer electrics from a qualified
specialist workshop, e.g. aMercedes-Benz
Service Centre.
X To switch the connected power supply
on or off: turn the key in the ignition lock
to position 2or 0respectively. Bulb failure indicator for LED lamps
i If LED lamps are fitted in the trailer, an
error message may appear in the multi-
function display even if there is no fault. The
reason for the error message may be that
the curren thas falle nbelow the minimum
of 50 milliamperes (mA). Trailer towing
203Driving and parking Z