2011 MERCEDES-BENZ C-CLASS COUPE spare wheel
[x] Cancel search: spare wheelPage 14 of 373

ECO start/stop function
Deactivating/activatin g................. 142
General information .......................140
Electrical fuses
see Fuses
Electronic Brake force Distribution
see EBD (Electronic Brake force
Distribution)
Electronic Stability Program
see ESP ®
(Electroni cStability Program)
Electronic Traction System
see ETS (Electronic Traction System)
Emergenc ykey
Unlocking the driver's door ..............85
Emergency key element
Function/notes ................................ 80
Locking vehicle ................................ 85
Emergency release
Driver's door .................................... 85
Emergency spare wheel
Notes/data .................................... 346
Storage location ............................ 316
Emergency unlocking
Boot ................................................. 87
Vehicle ............................................. 85
Engine
ECO start/stop function ................140
Emergency starting ........................333
Engine number ............................... 353
Running irregularl y......................... 143
Starting problems ..........................143
Starting the engine with the key ....139
Starting with KEYLESS GO .............139
Stopping ........................................ 158
Warning lamp (engine diagnos-
tics) ............................................... 280
Engine electronics
Notes ............................................. 351
Problem (fault) ............................... 143
Engine oil
Additives ........................................ 356
Checking the oil level ..................... 302
Display message (12-button mul-
tifunctio nsteering wheel) ..............255
Display message (4-button multi-
function steering wheel) ................253
Filling capacity ............................... 355Notes about oil grades ................... 355
Notes on oil level/consumption
....302
Temperature (12-button multi-
function steering wheel) ................229
Topping up ..................................... 303
Viscosity ........................................ 356
Environmental protection
Note ................................................ .25
Returning an end-of-life vehicle .......25
ESP ®
(Electronic Stability Pro-
gram) AMG menu (on-board computer) ...229
Deactivating/activating (AMG
vehicles) .......................................... 69
Deactivating/activating (except
AMG vehicles) ................................ 221
Deactivating/activating (notes;
except AMG vehicles) ......................68
Display message (12-button mul-
tifunctio nsteering wheel) ..............238
Display message (4-button multi-
function steering wheel) ................234
ETS .................................................. 68
Function/notes ................................ 67
Important safety guidelines .............67
Trailer stabilisatio n.......................... 70
Warning lamp ................................. 277
ETS (Electronic Traction System) ....... 68
Exhaus ttail pipe (cleaning instruc-
tions) .................................................. 309
Exterior lighting see Lights
Exterior mirrors
Adjusting ....................................... 103
Anti-dazzle mode (automatic) ........104
Folding in/ou t(automatically) .......104
Folding in/ou t(electrically) ...........103
Folding in (12-button multifunc-
tion steering wheel) .......................228
Out of position (troubleshooting) ...104
Parking position ............................. 104
Resetting ....................................... 104
Storing settings (memory func-
tion) ............................................... 105 Index
11
Page 15 of 373

F
Fatigue Assist see ATTENTION ASSIST
Fault message
see Display messages
Filler cap
see Fuel fille rflap
Fire extinguisher ............................... 315
First-aid kit ......................................... 314
Flat tyre Changing a wheel/fitting the
spare wheel ................................... 321
MOExtended run-fla tsystem ......... 324
Preparing the vehicle .....................316
Raising the vehicle .........................322
TIREFIT kit ...................................... 317
Floormat ............................................ .297
Foglamps Extended range .............................. 112
Switching on/off ........................... 109
Frequencies
Garage door opene r....................... 297
Mobile phone ................................. 351
Two-way radio ................................ 351
Fron tfoglamp
Display message (12-butto nmul-
tifunction steering wheel) ..............249
Front foglamps
Display message (4-button multi-
function steering wheel) ................246
Switching on/off ........................... 109
Fron twindscreen
see Windscreen
Fuel
Displaying the range (12-button
multifunction steering wheel) ........215
Displaying the range (4-button
multifunctio nsteering wheel) ........210
Important safety notes ..................354
Notes about consumption .............354
Problem (malfunction) ...................157
Refuelling ...................................... .152
Tank content/reserve fuel .............354
Tank content display (12-button
multifunctio nsteering wheel) ..........35
Tank content display (4-button
multifunctio nsteering wheel) ..........32Fuel consumption
Current (12-button multifunction
steering wheel) .............................. 215
Fuel filler flap
Opening/closing ............................ 155
Fuel filter
Display message (12-button mul-
tifunctio nsteering wheel) ..............255
Display message (4-button multi-
function steering wheel) ................253
Fuel reserve
Display message (12-button mul-
tifunctio nsteering wheel) ..............255
Display message (4-button multi-
function steering wheel) ................253
see Fuel
Fuel tank
Capacity ........................................ 354
Problem (malfunction) ...................157
Fuse allocation chart (vehicle tool
kit) ...................................................... 315
Fuses Allocation chart ............................. 334
Before changing ............................. 334
Fuse box in the boot ......................334
Fuse box in the engine compart-
ment .............................................. 334
Important safety notes ..................333 G
Garage door opener Clearing the memory .....................296
Frequencies ................................... 297
Notes ............................................. 294
Opening/closing the garage door ..295
Programming (button in the rear-
view mirror) ................................... 294
Gear indicator (12-button multi-
function steering wheel) ..................229
Gearshift program SETUP (on-board computer) ..........229
Genuine Mercedes-Benz parts .........350
Glove compartment ..........................28512
Index
Page 22 of 373

Seat
Seat backrest display message
(12-button multifunction steering
wheel) ............................................ 268
Seat backrest display message (4-
button multifunction steering
wheel) ............................................ 266
Seat belt
Activating/deactivating seat-belt
adjustment (12-button multifunc-
tion steering wheel) .......................228
Adjusting the driver's and front-
passenger sea tbelt ......................... 53
Belt force limiter .............................. 54
Belt tensioner .................................. 54
Cleaning ......................................... 311
Display message (12-button mul-
tifunctio nsteering wheel) ..............242
Display message (4-button multi-
function steering wheel) ................236
Fastening ......................................... 53
Important safety guidelines .............51
Rea rseat belt status indicator .........54
Releasing ......................................... 53
Warning lamp (function) ................... 54
Seat belts
Warning lamp ................................. 273
Seats
Adjusting (electrically). ....................98
Adjusting (manually and electri-
cally) ................................................ 98
Adjusting the 4-way lumba rsup-
por t.................................................. 99
Adjusting the head restraint ............98
Cleaning the cover .........................311
Correct driver's seat position ........... 96
Folding the backrests forward/
back ................................................ .99
Important safety notes ....................97
Seat heating problem ....................100
Seat ventilation problem ................101
Storing settings (memory func-
tion) ............................................... 105
Switching sea theating on/off .......100
Switching the sea tventilation on/
off .................................................. 100
Sensors (cleaning instructions) .......309 Service
see ASSYST PLUS service interval
display
Service menu (12-button multi-
function steering wheel) ..................222
Service products Brake fluid ..................................... 356
Coolant (engine) ............................ 356
Engine oil ....................................... 355
Fuel ................................................ 354
Important safety notes ..................353
Settings
Factory (12-button multifunction
steering wheel) .............................. 228
On-board computer (12-button
multifunctio nsteering wheel) ........223
Setting the air distribution ...............125
Setting the airflow ............................125
SETUP (on-board computer) .............229
Shifting to neutral (manual trans-
mission) ............................................. 145
Sidebag ................................................ 48
Side marker lamp Display message (12-button mul-
tifunctio nsteering wheel) ..............250
Display message (4-button multi-
function steering wheel) ................246
Side windows
Convenience closing ........................89
Convenience opening ......................88
Important safety notes ....................88
Opening/closing .............................. 88
Problem (malfunction) .....................90
resetting .......................................... 90
Sliding sunroof
see Panorama sliding sunroof
Snow chains ...................................... 338
Socket Centre console .............................. 292
Points to observe before use .........291
Rea rcompartmen t......................... 292
Spare wheel
Storage location ............................ 316
see Emergency spare wheel
Specialist workshop ............................ 26
Speed, controlling see Cruise control Index
19
Page 187 of 373

might therefore issue steering instructions
too soon. This may lead to a collision. For this
reason, you should avoid using Parking Guid-
ance in such situations. G
WARNING
Make sure that no persons or animals are in
the manoeuvring range. Otherwise, they
could be injured.
When PARKTRONIC is deactivated, Parking
Guidance is also unavailable.
Use Parking Guidance for parking spaces:
R that are parallel to the directio noftravel
R that are on straight roads, not bends
R that are on the same level as the road, i.e.
not on the pavement, for example. Parking
Guidance may not detect flat kerbs
Parking tips:
R on narrow roads, drive pastt he parking
space as close as possible.
R parking spaces that are littered, overgrown
or partially occupied by trailer drawbars
might be identified incorrectly or not at all.
R snowfall or heavy rain may lead to a parking
space being measured inaccurately.
R pay attention to the PARKTRONIC
(Y page 181) warning messages during the
parking procedure.
R when transporting a load which protrudes
from your vehicle, you must not use Parking
Guidance.
R never use Parking Guidance with snow
chains or an emergency spare wheel fitted.
R make sure that the tyre pressures are
always correct.T his hasadirec teffect on
the steering instructions.
R the way you rvehicle is positioned in the
parking space after parkin gis dependent
on various factors. These include the posi-
tion and shape of the vehicles parked in
front and behind it and the conditions of the
location. In some cases, Parking Guidance
may guide you too far or not far enough into
a parking space. In some cases, it may also lead you across or onto the kerb. If neces-
sary, cancel the parking procedure with
Parking Guidance.
! If unavoidable, you should drive over
obstacles such as kerbs slowly and not at
a sharp angle. Otherwise, you may damage
the wheels or tyres.
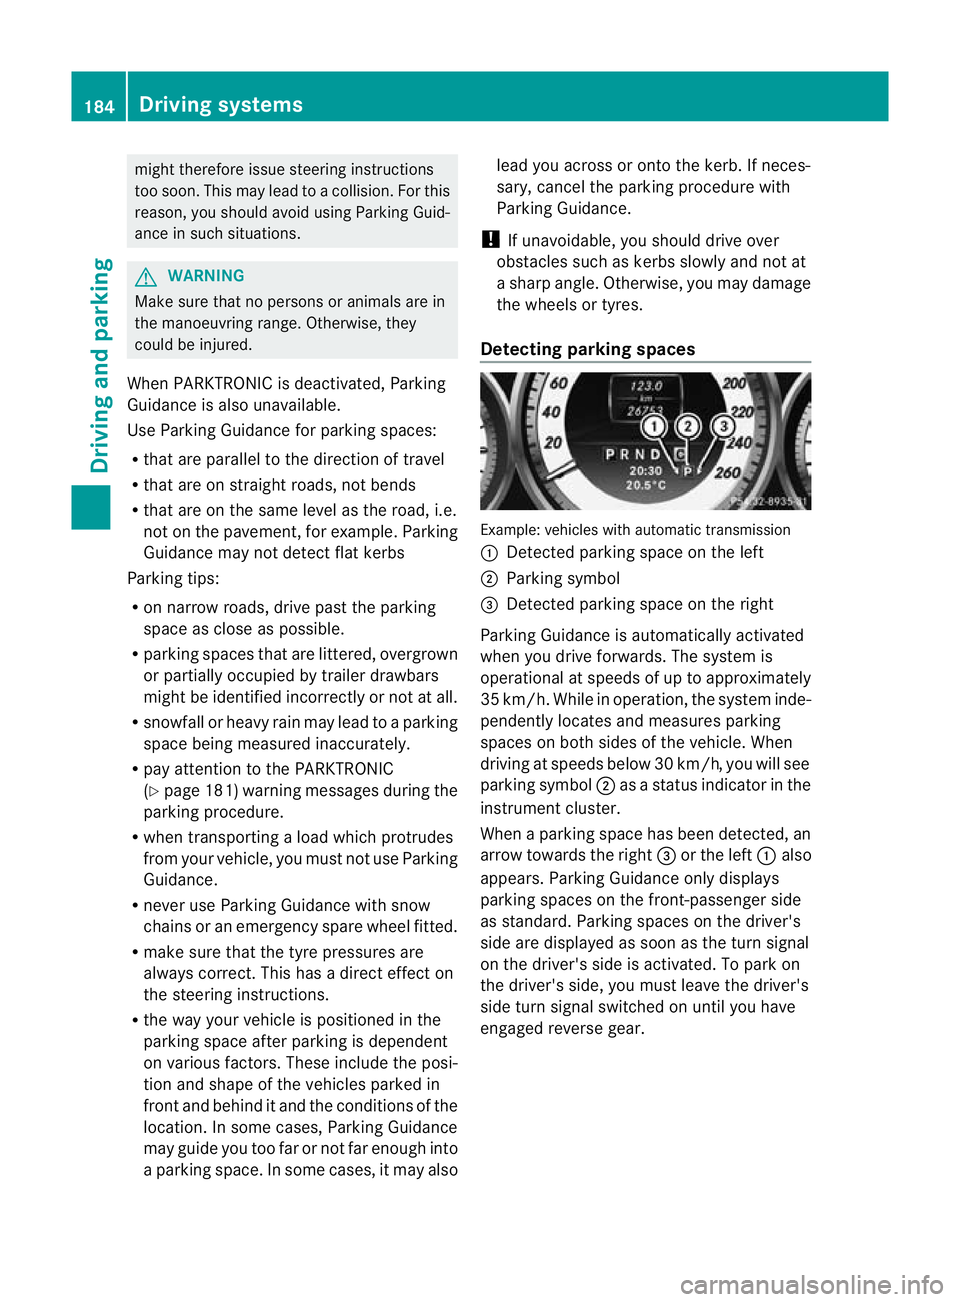
Detecting parking spaces Example: vehicles with automatic transmission
:
Detected parking space on the left
; Parking symbol
= Detected parking space on the right
Parking Guidance is automatically activated
when you drive forwards. The system is
operational at speeds of up to approximately
35 km/h. While in operation, the system inde-
pendently locates and measures parking
spaces on both sides of the vehicle. When
driving at speeds below 30 km/h, you will see
parking symbol ;as a status indicator in the
instrument cluster.
When a parking space has been detected, an
arrow towards the right =or the left :also
appears. Parking Guidance only displays
parking spaces on the front-passenger side
as standard. Parking spaces on the driver's
side are displayed as soon as the turn signal
on the driver's side is activated. To park on
the driver's side, you must leave the driver's
side turn signal switched on until you have
engaged reverse gear. 184
Driving systemsDriving and parking
Page 318 of 373

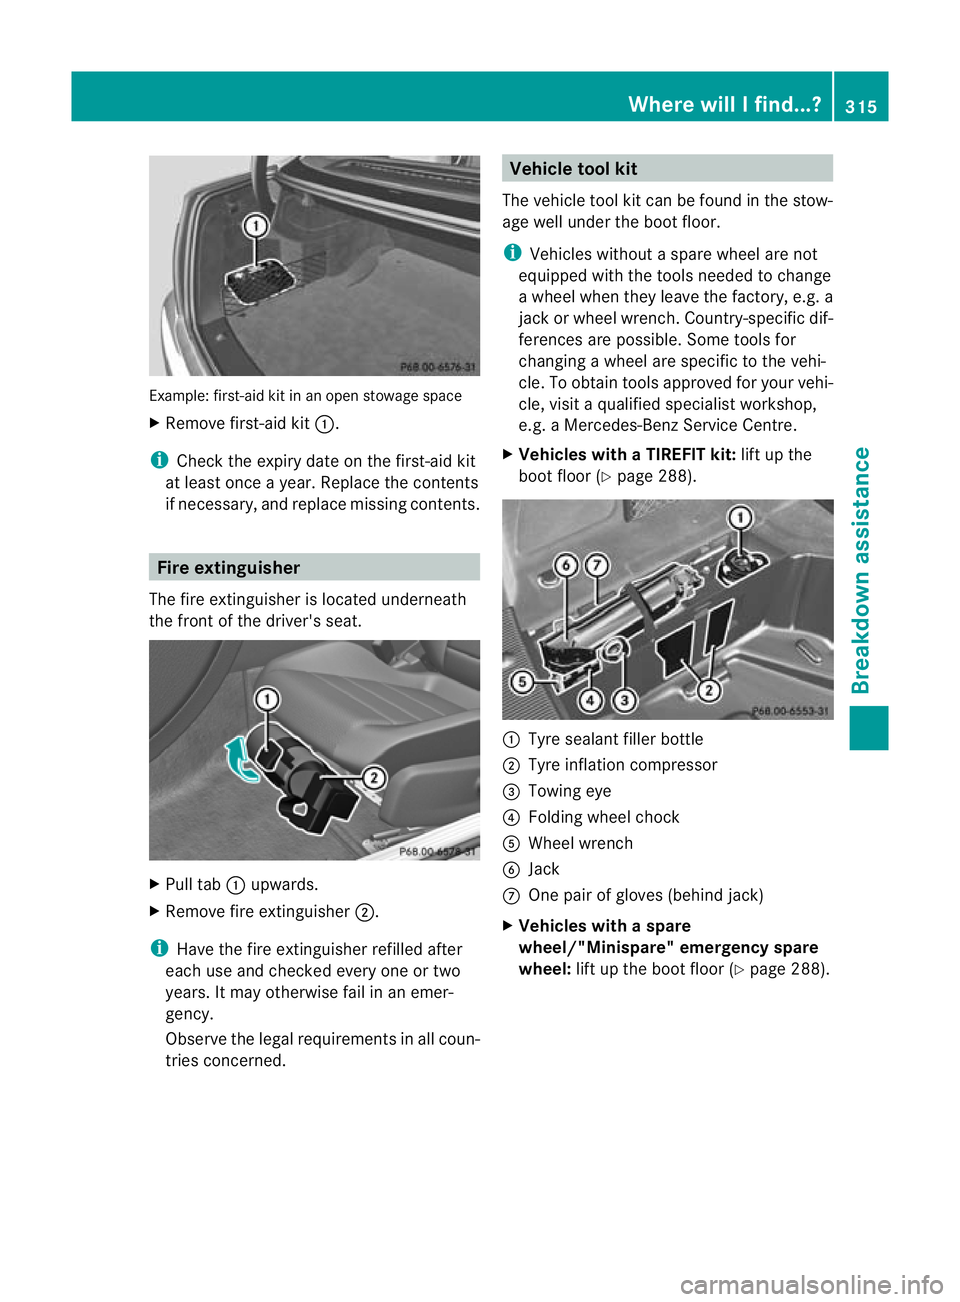
Example: first-aid kit in an open stowage space
X Remove first-aid kit :.
i Check the expiry date on the first-aid kit
at leas tonce a year .Replace the contents
if necessary, and replace missing contents. Fire extinguisher
The fire extinguisher is located underneath
the front of the driver's seat. X
Pull tab :upwards.
X Remove fire extinguisher ;.
i Have the fire extinguisher refilled after
each use and checked every one or two
years. It may otherwise fail in an emer-
gency.
Observe the legal requirement sinall coun-
tries concerned. Vehicle tool kit
The vehicle tool kit can be found in the stow-
age well under the boot floor.
i Vehicles without a spare wheel are not
equipped with the tools needed to change
a wheel when they leave the factory, e.g. a
jac korw heel wrench. Country-specific dif-
ferences are possible. Some tools for
changing a wheel are specific to the vehi-
cle. To obtain tools approved for your vehi-
cle, visit a qualified specialist workshop,
e.g. a Mercedes-Benz Service Centre.
X Vehicles with a TIREFIT kit: lift up the
boot floor (Y page 288). :
Tyre sealant filler bottle
; Tyre inflation compressor
= Towing eye
? Folding wheel chock
A Wheel wrench
B Jack
C One pair of gloves (behind jack)
X Vehicles with a spare
wheel/"Minispare" emergency spare
wheel: lift up the boot floor (Y page 288). Where will I find...?
315Breakdown assistance
Page 319 of 373

:
Vehicle tool kit tray
; Stowage well
= Spare wheel/"Minispare" emergency
spare wheel
The vehicle tool kit contains:
R Foldable wheel chock
R Fuse allocation chart
R Jack
R One pair of gloves
R Wheel wrench
R Towing eye Spare wheel/"Minispare" emergency
spare wheel
The spare wheel or "Minispare" emergency
spare wheel can be found in the stowage well
under the boot floor.
X Lift the boot floor upwards (Y page 288). X
To remove the spare wheel or
"Minispare" emergencys pare wheel:
remove vehicle tool kit tray :.
X Turn stowage well ;anti-clockwise and
remove it.
X Remove the spare wheel or "Minispare"
emergency spare wheel =.
For further information on changing a wheel
and fitting the spare wheel, see
(Y page 321). Flat tyre
Preparing the vehicle
Your vehicle may be equipped with:
R a TIREFIT kit
R an emergency spare wheel
R MOExtended tyres (tyres with run-flat char-
acteristics) (Y page 324)
i Vehicle preparation is not necessary on
vehicles with MOExtended tyres.
i Vehicles with MOExtended tyres are not
equipped with a TIREFIT kit at the factory.
It is therefore recommended that you addi-
tionally equip your vehicle with a TIREFIT kit
if you fit tyres that do not feature run-flat
properties, e.g. winter tyres. A TIREFIT kit
can be obtained from a Mercedes-Benz
Service Centre.
X Stop the vehicle as far away as possible
from traffic on solid ,non-slippery and level
ground.
X Switch on the hazard warning lamps.
X Firmly depress the parking brake.
X Bring the front wheels into the straight-
ahead position.
X Vehicles with manual transmission:
engage first or reverse gear.
X Vehicles with automatic transmission:
move the selector lever to P.
X Switch off the engine. 316
Flat tyreBreakdown assistance
Page 324 of 373

The filler hose remains attached to the tyre
sealant bottle.
X Stow the tyre sealant bottle, the tyre infla-
tion compressor and the warning triangle.
X Drive to the nearest workshop and have the
tyre changed there.
X Have the tyre sealant bottle and the filler
hose replaced as soon as possible at a
qualified specialist workshop, e.g. at a
Mercedes-Benz Service Centre. H
Environmental note
Have the used tyre sealant bottle disposed of
professionally, e.g. at aMercedes-Benz
Service Centre.
X Have the tyre sealant bottle replaced every
four years at a qualified specialist work-
shop, e.g. a Mercedes-Benz Service
Centre. Changing
awheel and fitting the spare
wheel
Preparing the vehicle G
WARNING
The wheel and tyre size of the emergency
spare wheel/spare wheel may diffe rto that of
the damaged wheel. When using an emer-
gency spare wheel/spare wheel the handling
characteristics of the vehicle may change.
Adapt your style of driving accordingly.
Never operate the vehicle with more than one
emergency spare wheel/spare wheel that dif-
fers in size.
Only use an emergency spare wheel/spare
wheel of a differing size briefly and do not
switch off ESP ®
.
When using an emergency spare wheel you
must not exceed the maximum speed of
80 km/h. G
WARNING
Have the emergency spare wheel/spare
wheel replaced with a new wheel as soon as
possible at a qualified specialist workshop
which has the necessary specialist knowledge
and tools to carry out the work required.
Mercedes-Benz recommends that you use a
Mercedes-Benz Service Centre for this pur-
pose. In particular, work relevant to safety or
on safety-related systems must be carried out
at a qualified specialist workshop.
i Vehicles without an emergency spare
wheel/spare wheel are not equipped with
wheel-changing tools at the factory. For
more information on which tools are
required to perform a wheel change on your
vehicle, e.g. wheel chock, wheel wrench or
centring pin, consult a Mercedes-Benz
Service Centre.
X Prepare the vehicle as described
(Y page 316).
X If a trailer is coupled to the vehicle, uncou-
ple it.
X Remove the following items (depending on
the vehicle's equipment) from the stowage
well under the boot floor:
R
the emergency spare wheel or spare
wheel
R the folding wheel chock
R the wheel wrench
R the jack
X Secure the vehicle to prevent it from rolling
away.
Securing the vehicle to prevent it from
rolling away If your vehicle is equipped with a wheel chock,
it can be found in the vehicle tool kit
(Y
page 315).
The folding wheel chock is an additional
securing measure to prevent the vehicle from
rolling away, for example when changing a
wheel. Flat tyre
321Breakdown assistance Z
Page 327 of 373

Do not tighte
nthe wheel bolts completely
while the vehicle is still jacked up. The vehicle
could topple off the jack.
X Cleant he wheel and wheel hub contact
surfaces. X
Slide the emergency spare wheel/spare
wheel onto the wheel hub and push it on.
X Tighten the wheel bolts until they are fin-
ger-tight.
Lowering the vehicle X
Turn the crank of the jack anti-clockwise
until the vehicle is once again standing
firmly on the ground.
X Place the jack to one side. X
Tighten the wheel bolts evenly in a cross-
wise pattern in the sequence indicated
(: toA ). The tightening torque must be
130 Nm. G
WARNING
Have the tightening torque checked immedi-
ately after a wheel is changed. The wheels
could work loose if they are not tightened to
a torque of 130 Nm.
X Turn the jack back to its initial position and
store it together with the rest of the vehicle
tool kit in the stowage well under the boot
floor.
X Transport the faulty wheel in the boot.
or
X Depending on the size of the wheel, you
may also be able to secure the faulty wheel
in the spare wheel well. In this case, you
will have to remove the stowage tray from
the spare wheel well and stow it securely
in the boot.
i When you are driving with the emergency
spare wheel fitted, the tyre pressure loss
warning system cannot function reliably.
Only restart the tyre pressure loss warning
system when the defective wheel has been
replaced with a new wheel. MOExtended tyres (tyres with run-flat
characteristics)
MOExtended tyres (tyres with run-flat char-
acteristics) allow you to continue driving the
vehicle even when one or more tyres lose all
air pressure.
MOExtended tyres may only be used in con-
junction with the activated tyre pressure loss
warning system or with the tyre pressure
monitor.
The maximum permissible distance which
can be driven in run-flat mode depends on the
load in the vehicle. It is 80 km if the vehicle
is partially laden and 30 km if fully laden.
The maximum permissible distance which
can be driven in run-flat mode is counted from
the moment the tyre pressure loss warning
appears in the multifunction display. 324
Flat tyreBreakdown assistance