Page 188 of 306

If you exceed the load limit, the rear air suspension may not operate.
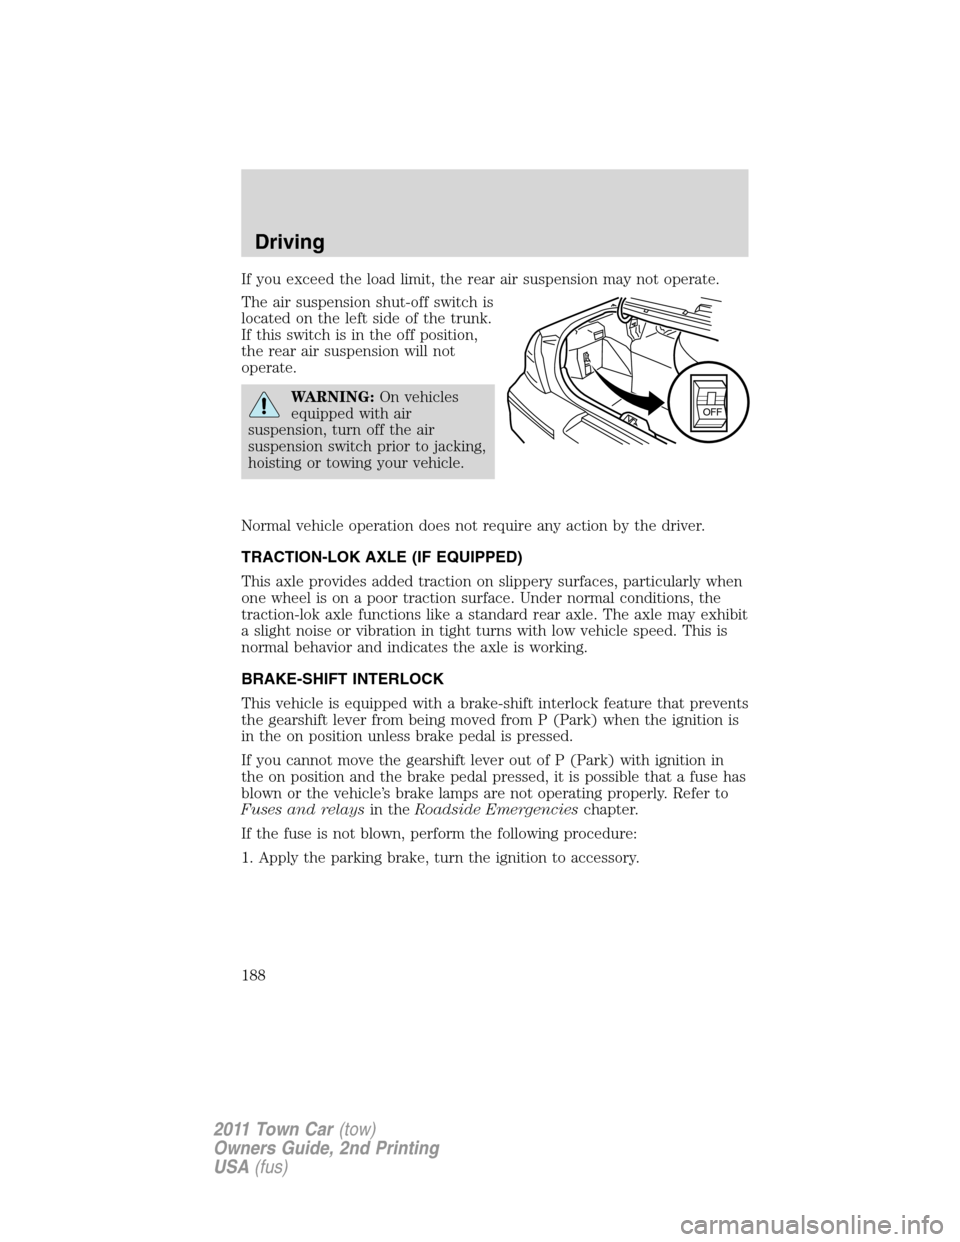
The air suspension shut-off switch is
located on the left side of the trunk.
If this switch is in the off position,
the rear air suspension will not
operate.
WARNING:On vehicles
equipped with air
suspension, turn off the air
suspension switch prior to jacking,
hoisting or towing your vehicle.
Normal vehicle operation does not require any action by the driver.
TRACTION-LOK AXLE (IF EQUIPPED)
This axle provides added traction on slippery surfaces, particularly when
one wheel is on a poor traction surface. Under normal conditions, the
traction-lok axle functions like a standard rear axle. The axle may exhibit
a slight noise or vibration in tight turns with low vehicle speed. This is
normal behavior and indicates the axle is working.
BRAKE-SHIFT INTERLOCK
This vehicle is equipped with a brake-shift interlock feature that prevents
the gearshift lever from being moved from P (Park) when the ignition is
in the on position unless brake pedal is pressed.
If you cannot move the gearshift lever out of P (Park) with ignition in
the on position and the brake pedal pressed, it is possible that a fuse has
blown or the vehicle’s brake lamps are not operating properly. Refer to
Fuses and relaysin theRoadside Emergencieschapter.
If the fuse is not blown, perform the following procedure:
1. Apply the parking brake, turn the ignition to accessory.OFF
Driving
188
2011 Town Car(tow)
Owners Guide, 2nd Printing
USA(fus)
Page 200 of 306
The high-current fuses are coded as follows.
Fuse/Relay
LocationFuse Amp
RatingProtected Circuits
1 30A* Ignition switch
2 20A* Rear heated seats
3 10A* Powertrain control module (PCM)
keep alive power and canister
vent
4 20A* Fuel relay feed
5 20A* Instrument panel power point
6 15A* Alternator regulator
7 30A* PCM relay feed
8 20A* Driver’s door module (DDM)
9 15A* Ignition coil relay feed
10 20A* Horn relay feed
11 15A* A/C clutch relay feed
12 20A* Audio
13 10A* Rear air suspension module
(RASM)
503
502
501
24
23
20
19 22
21302303304
301 207201 202203 204
209
206
208
205602118
114
110
106
102
117
113
109
105
101
116
112
108
104
115
111
107
103
18
16
14
1210
8
6
4
2
17
15
13
119
7
5
3
1 601
Roadside Emergencies
200
2011 Town Car(tow)
Owners Guide, 2nd Printing
USA(fus)
Page 206 of 306
WARNING:On vehicles
equipped with air
suspension, turn off the air
suspension switch prior to jacking,
hoisting or towing your vehicle.
Refer toAir suspension systemin
theDrivingchapter for more
information.
3. Remove the lug wrench (A) from
the jack. Rotate the lug wrench
socket out from the handle.
Full size spare (if equipped)
1. Remove the carpeted wheel
cover.
2. Remove the wing nut/bolt
assembly that secures the spare tire
by turning it counterclockwise.
OFF
A
Roadside Emergencies
206
2011 Town Car(tow)
Owners Guide, 2nd Printing
USA(fus)
Page 207 of 306
3. Remove the jack. The jack is
located in the trunk, (in a holder
bracket), on the right-hand side,
next to the wheel well.
WARNING:On vehicles
equipped with air
suspension, turn off the air
suspension switch prior to jacking,
hoisting or towing your vehicle.
Refer toAir suspension systemin
theDrivingchapter for more
information.
4. Remove the lug wrench (A) from
the jack. Rotate the lug wrench
socket out from the handle.
Tire change procedure
WARNING:When one of the front wheels is off the ground, the
transmission alone will not prevent the vehicle from moving or
slipping off the jack, even if the vehicle is in P (Park).
OFF
A
Roadside Emergencies
207
2011 Town Car(tow)
Owners Guide, 2nd Printing
USA(fus)
Page 210 of 306

WARNING:To lessen risk
of personal injury, do not
put any part of your body under
the vehicle while changing a tire.
Do not start the engine when your
vehicle is on the jack. The jack is
ONLY meant for changing the tire.
•Never use the rear differential
as a jacking point.
4. Remove the lug nuts with the lug wrench.
5. Replace the flat tire with the spare tire, making sure the valve stem is
facing outward. Reinstall lug nuts until the wheel is snug against the hub.
Do not fully tighten the lug nuts until the wheel has been lowered.
6. Lower the vehicle by turning the jack handle counterclockwise.
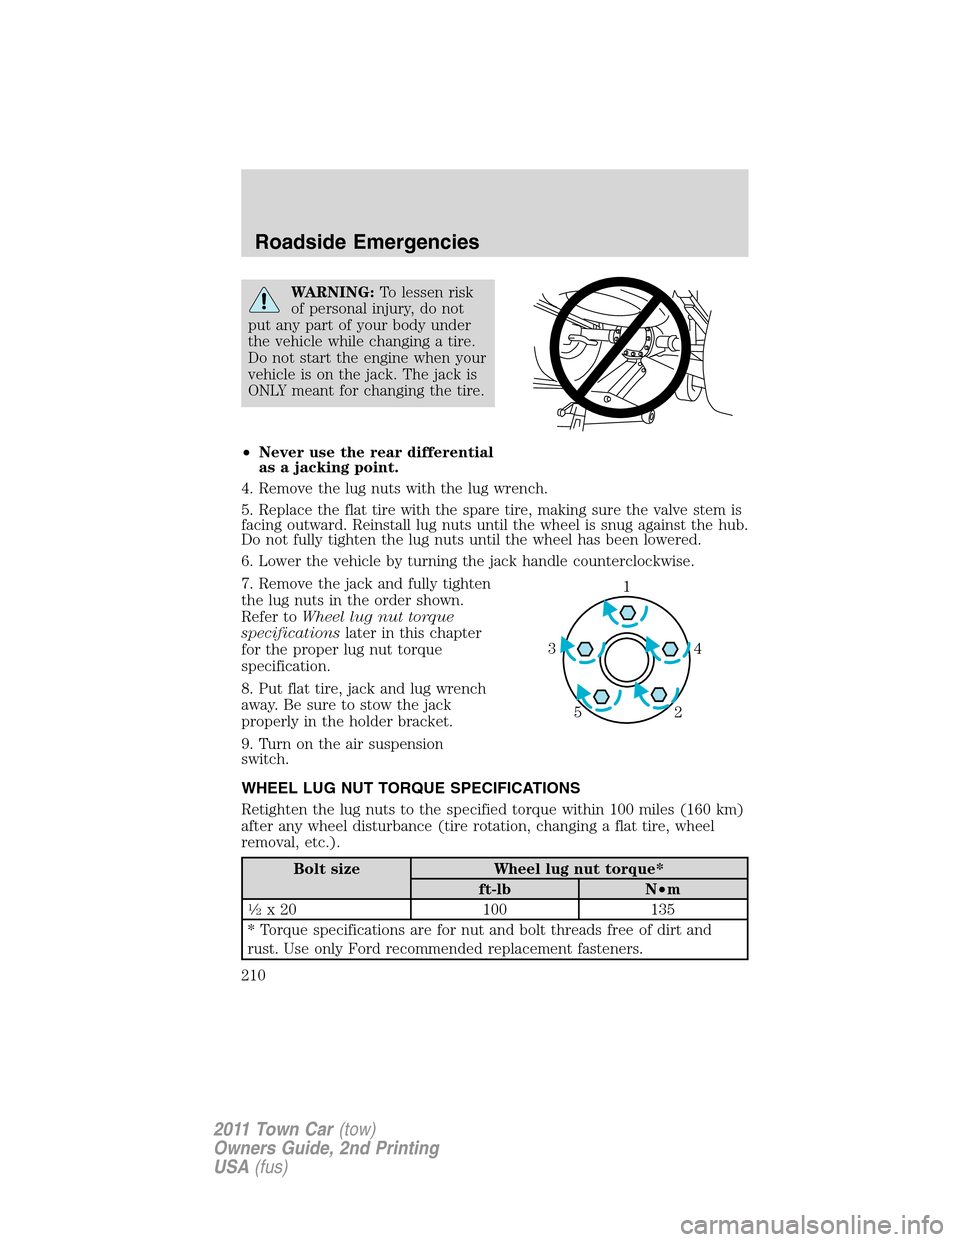
7. Remove the jack and fully tighten
the lug nuts in the order shown.
Refer toWheel lug nut torque
specificationslater in this chapter
for the proper lug nut torque
specification.
8. Put flat tire, jack and lug wrench
away. Be sure to stow the jack
properly in the holder bracket.
9. Turn on the air suspension
switch.
WHEEL LUG NUT TORQUE SPECIFICATIONS
Retighten the lug nuts to the specified torque within 100 miles (160 km)
after any wheel disturbance (tire rotation, changing a flat tire, wheel
removal, etc.).
Bolt size Wheel lug nut torque*
ft-lb N•m
1�2x 20 100 135
* Torque specifications are for nut and bolt threads free of dirt and
rust. Use only Ford recommended replacement fasteners.
1
4 3
2 5
Roadside Emergencies
210
2011 Town Car(tow)
Owners Guide, 2nd Printing
USA(fus)
Page 215 of 306
WRECKER TOWING
If you need to have your vehicle towed, contact a professional towing
service or, if you are a member of a roadside assistance program, your
roadside assistance service provider.
It is recommended that your vehicle be towed with a wheel lift or flatbed
equipment. Do not tow with a slingbelt. Ford Motor Company has not
approved a slingbelt towing procedure.
If equipped with an air suspension system, the air suspension control in
the luggage compartment must be turned to the off position before your
vehicle can be towed.
If the vehicle is towed by other means or incorrectly, vehicle
damage may occur.
Ford Motor Company produces a towing manual for all authorized tow
truck operators. Have your tow truck operator refer to this manual for
proper hook-up and towing procedures for your vehicle.
Roadside Emergencies
215
2011 Town Car(tow)
Owners Guide, 2nd Printing
USA(fus)
Page 283 of 306

Multi-point inspection
In order to keep your vehicle running right, it is important to have the
systems on your vehicle checked regularly. This can help identify
potential issues and prevent major problems. Ford Motor Company
recommends the following multi-point inspection be performed at every
scheduled maintenance interval to help ensure your vehicle keeps
running great.
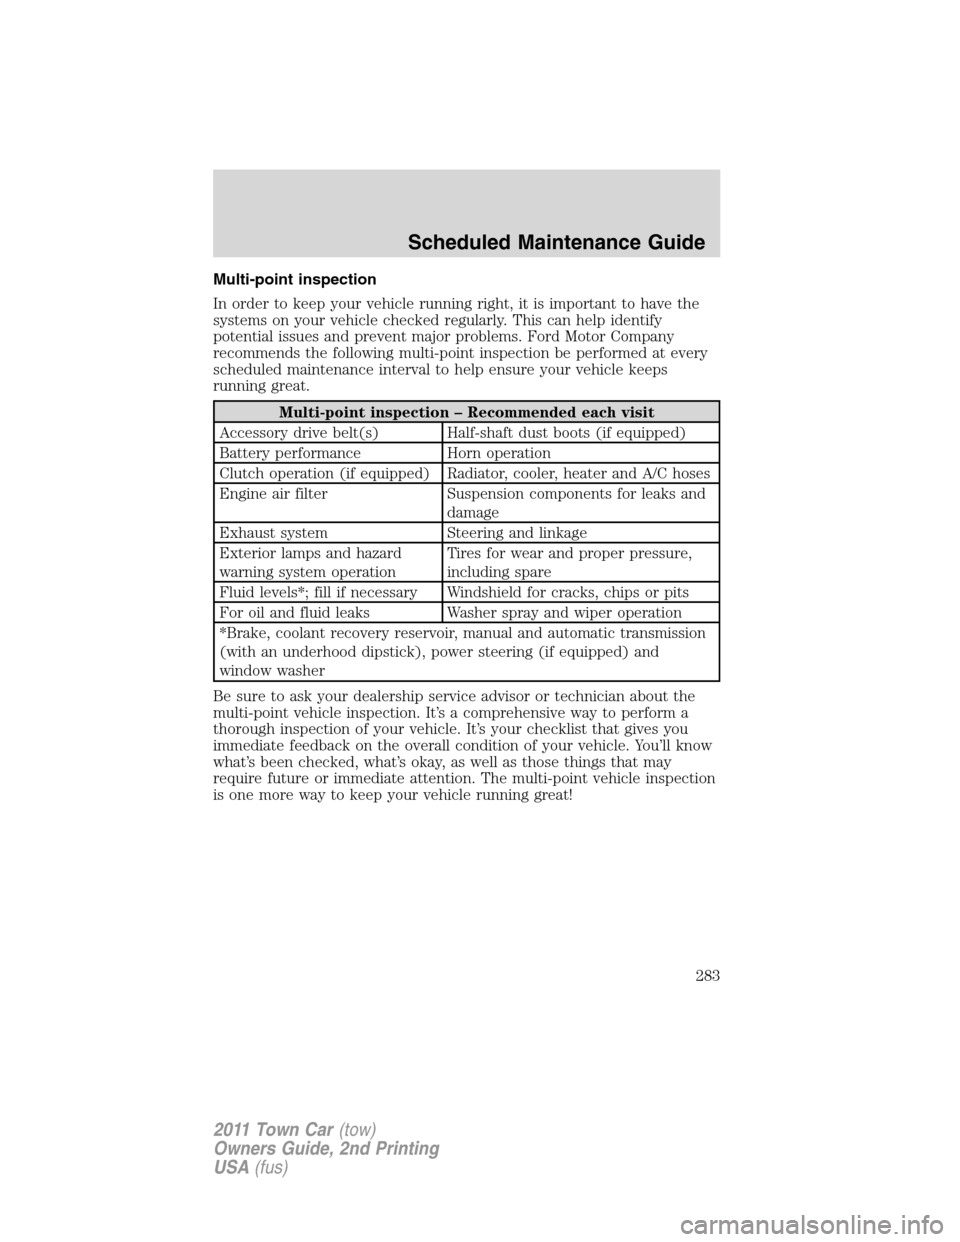
Multi-point inspection – Recommended each visit
Accessory drive belt(s) Half-shaft dust boots (if equipped)
Battery performance Horn operation
Clutch operation (if equipped) Radiator, cooler, heater and A/C hoses
Engine air filter Suspension components for leaks and
damage
Exhaust system Steering and linkage
Exterior lamps and hazard
warning system operationTires for wear and proper pressure,
including spare
Fluid levels*; fill if necessary Windshield for cracks, chips or pits
For oil and fluid leaks Washer spray and wiper operation
*Brake, coolant recovery reservoir, manual and automatic transmission
(with an underhood dipstick), power steering (if equipped) and
window washer
Be sure to ask your dealership service advisor or technician about the
multi-point vehicle inspection. It’s a comprehensive way to perform a
thorough inspection of your vehicle. It’s your checklist that gives you
immediate feedback on the overall condition of your vehicle. You’ll know
what’s been checked, what’s okay, as well as those things that may
require future or immediate attention. The multi-point vehicle inspection
is one more way to keep your vehicle running great!
Scheduled Maintenance Guide
283
2011 Town Car(tow)
Owners Guide, 2nd Printing
USA(fus)
Page 286 of 306

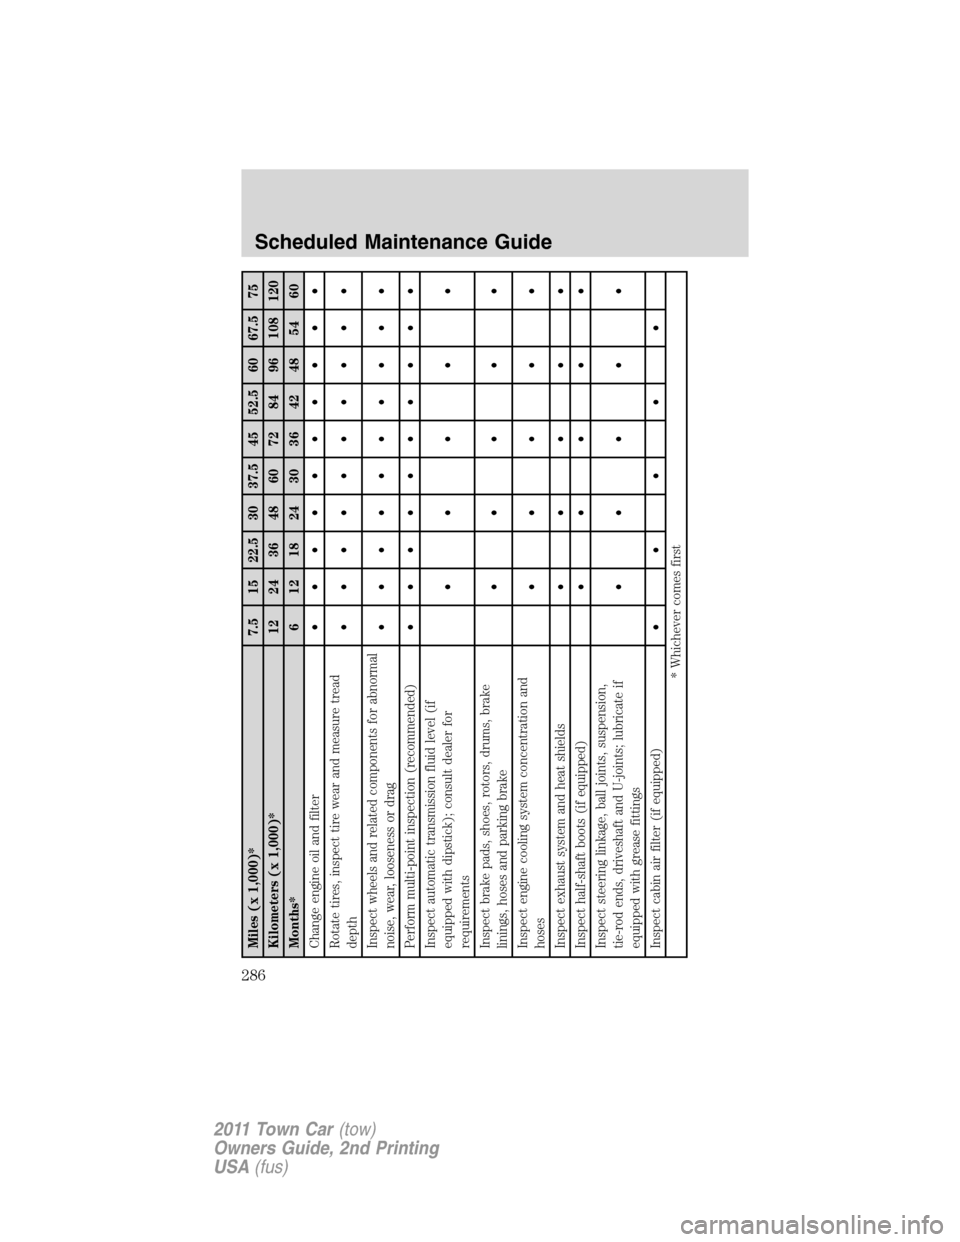
Miles (x 1,000)* 7.5 15 22.5 30 37.5 45 52.5 60 67.5 75
Kilometers (x 1,000)* 12 24 36 48 60 72 84 96 108 120
Months* 6 12 18 24 30 36 42 48 54 60
Change engine oil and filter• •••••••••
Rotate tires, inspect tire wear and measure tread
depth• •••••••••
Inspect wheels and related components for abnormal
noise, wear, looseness or drag• •••••••••
Perform multi-point inspection (recommended)• •••••••••
Inspect automatic transmission fluid level (if
equipped with dipstick); consult dealer for
requirements•••••
Inspect brake pads, shoes, rotors, drums, brake
linings, hoses and parking brake•••••
Inspect engine cooling system concentration and
hoses•••••
Inspect exhaust system and heat shields•••••
Inspect half-shaft boots (if equipped)•••••
Inspect steering linkage, ball joints, suspension,
tie-rod ends, driveshaft and U-joints; lubricate if
equipped with grease fittings•••••
Inspect cabin air filter (if equipped)• ••••
* Whichever comes first
Scheduled Maintenance Guide
286
2011 Town Car(tow)
Owners Guide, 2nd Printing
USA(fus)