2011 LINCOLN TOWN CAR horn
[x] Cancel search: hornPage 75 of 306
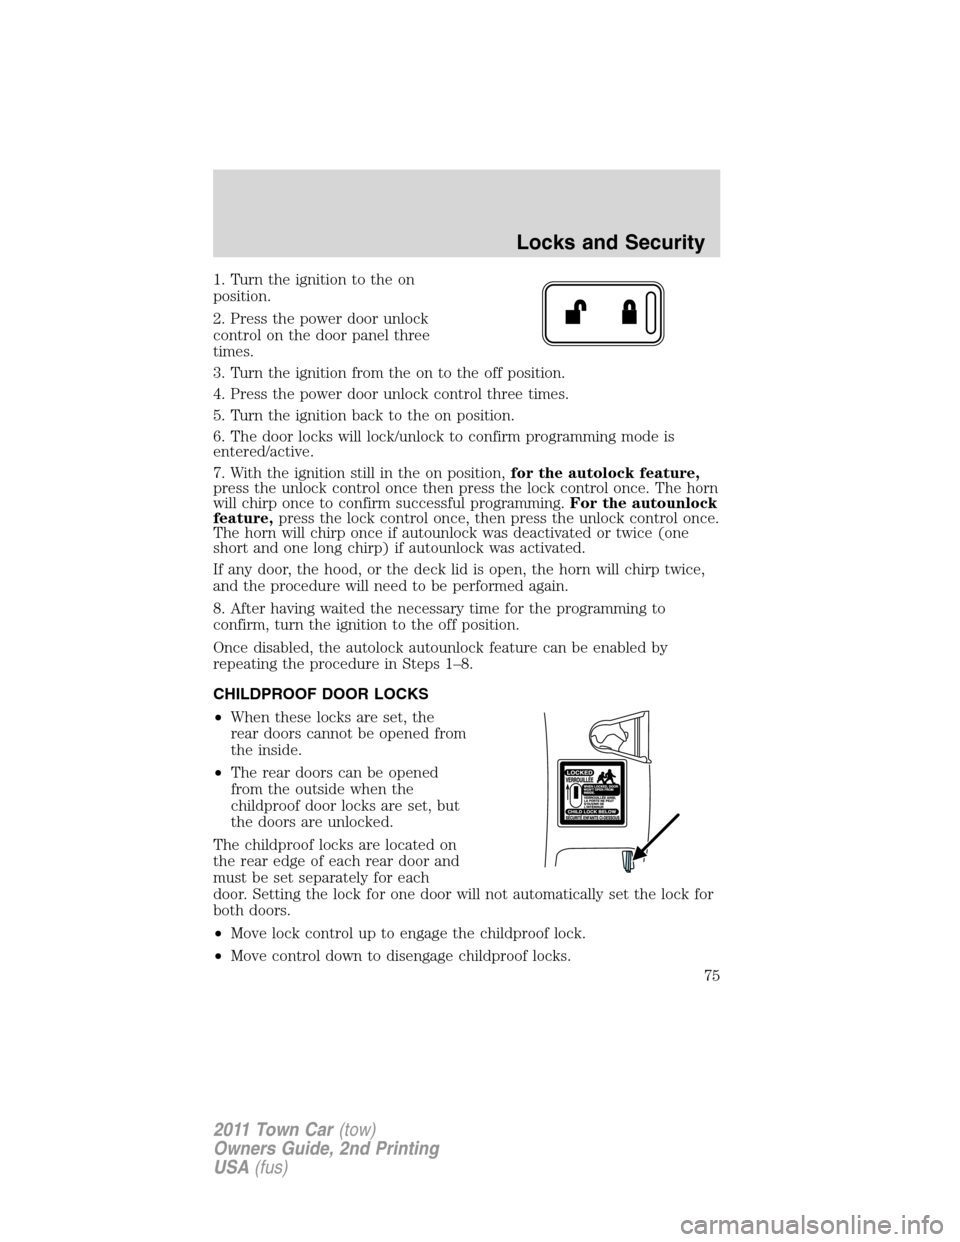
1. Turn the ignition to the on
position.
2. Press the power door unlock
control on the door panel three
times.
3. Turn the ignition from the on to the off position.
4. Press the power door unlock control three times.
5. Turn the ignition back to the on position.
6. The door locks will lock/unlock to confirm programming mode is
entered/active.
7. With the ignition still in the on position,for the autolock feature,
press the unlock control once then press the lock control once. The horn
will chirp once to confirm successful programming.For the autounlock
feature,press the lock control once, then press the unlock control once.
The horn will chirp once if autounlock was deactivated or twice (one
short and one long chirp) if autounlock was activated.
If any door, the hood, or the deck lid is open, the horn will chirp twice,
and the procedure will need to be performed again.
8. After having waited the necessary time for the programming to
confirm, turn the ignition to the off position.
Once disabled, the autolock autounlock feature can be enabled by
repeating the procedure in Steps 1–8.
CHILDPROOF DOOR LOCKS
•When these locks are set, the
rear doors cannot be opened from
the inside.
•The rear doors can be opened
from the outside when the
childproof door locks are set, but
the doors are unlocked.
The childproof locks are located on
the rear edge of each rear door and
must be set separately for each
door. Setting the lock for one door will not automatically set the lock for
both doors.
•Move lock control up to engage the childproof lock.
•Move control down to disengage childproof locks.
Locks and Security
75
2011 Town Car(tow)
Owners Guide, 2nd Printing
USA(fus)
Page 79 of 306
Pressand release again within five seconds to confirm that all the
doors are closed.Note:The doors will lock again, the horn will chirp
once and the park lamps will flash, if all the closures are closed. If any
closure is not closed, the horn will chirp twice and the park lamps will
notflash.
Car finder
Press
twice within three seconds. The horn will chirp and the park
lamps/tail lamps will flash. It is recommended that this method be used
to locate your vehicle, rather than using the panic alarm.
Opening the trunk
Pressonce to open the trunk.
If your vehicle is fitted with the optional power decklid, press
twice
to open the trunk and twice to close it.
WARNING:Before operating the power decklid, be sure that no
one, particularly a child, is in a position where he or she can be
injured by the trunk lid. NEVER leave the remote entry transmitter
where it can be inadvertently activated, as someone could be seriously
injured by a moving decklid.
•Ensure that the trunk is closed and latched before driving your
vehicle. Failure to properly latch the trunk may cause objects to fall
out or block the driver’s rear view.
The remote entry system allows you to open the trunk while the ignition
is in any position. However, if the ignition is in the on position and the
gearshift is in D (Drive), the trunk will only open if the vehicle is moving
3 mph (5 km/h) or slower.
Sounding a panic alarm
Press
on the remote transmitter to activate the alarm.Note:The
panic alarm only works with the ignition in the off position.
Press
a second time to deactivate the alarm. You may also deactivate
the alarm in the following ways:
•Turn the ignition to the on or start positions.
•Wait two minutes and 45 seconds for the alarm to time-out.
Locks and Security
79
2011 Town Car(tow)
Owners Guide, 2nd Printing
USA(fus)
Page 89 of 306
9. Your new unprogrammed key is now programmed.
If the key has been successfully programmed it will start the vehicle’s
engine and the theft indicator light will illuminate for three seconds and
then go out. If the key was not successfully programmed, it will not start
your vehicle’s engine and the theft indicator light will flash on and off
rapidly. If failure repeats, bring your vehicle to your authorized dealer to
have the new key(s) programmed.
To program additional new unprogrammed key(s), repeat this procedure
from Step 1 for each additional key.
PERIMETER ALARM SYSTEM (IF EQUIPPED)
The perimeter anti-theft system will warn you in the event of an
unauthorized entry to your vehicle.
If there is any potential perimeter anti-theft problem with your vehicle,
ensureALL remote entry transmittersare taken to the authorized
dealer to aid in troubleshooting.
Arming the system
When armed, the perimeter alarm will notify you of an unauthorized
entry. When unauthorized entry occurs, the system will flash the park
lamps and will sound the horn.
The system is ready to arm whenever the key is out of the ignition. Any
of the following actions will arm the alarm system:
•Press the remote transmitter lock control one time to arm the system.
•Lock all doors using the keypad.
•Lock all doors using the interior power lock switch while the driver or
passenger door is open and then closed.
•Lock all doors with the key in the key lock cylinder.
If all the closures (doors, trunk, hood) are closed, the park lamps will
flash once and the horn will chirp once when the
on the remote
entry transmitter is pressed a second time within five seconds.
If any closure is not properly closed, the park lamps will not flash and
the horn will chirp twice.
The system will wait 20 seconds after one of the above actions is
performed before allowing the alarm to be armed. After the 20–second
pre-arm phase, the interior trim remote trunk release control and the
interior trim power door unlock control are disabled, in order to further
protect your vehicle.
Locks and Security
89
2011 Town Car(tow)
Owners Guide, 2nd Printing
USA(fus)
Page 200 of 306
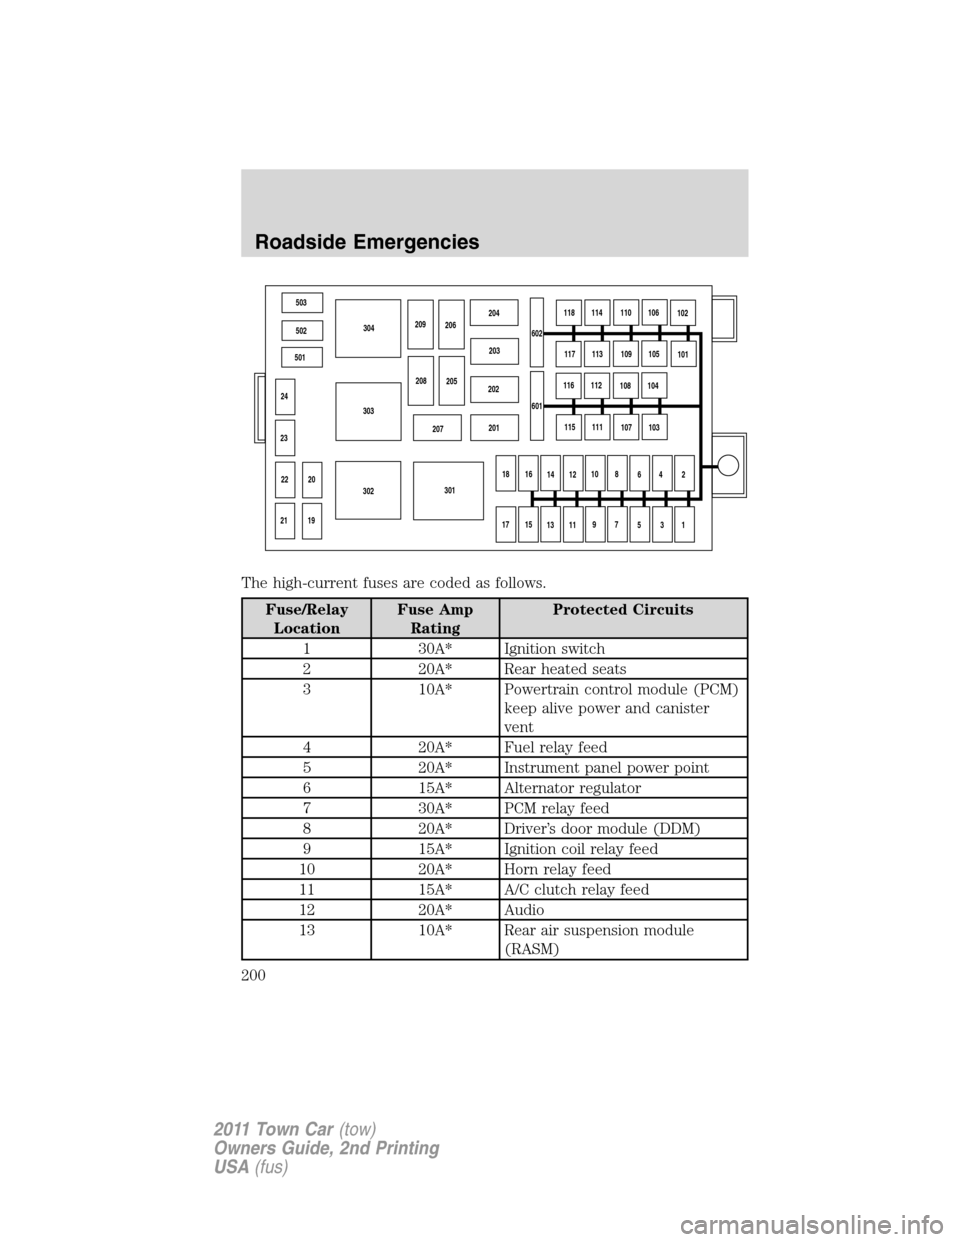
The high-current fuses are coded as follows.
Fuse/Relay
LocationFuse Amp
RatingProtected Circuits
1 30A* Ignition switch
2 20A* Rear heated seats
3 10A* Powertrain control module (PCM)
keep alive power and canister
vent
4 20A* Fuel relay feed
5 20A* Instrument panel power point
6 15A* Alternator regulator
7 30A* PCM relay feed
8 20A* Driver’s door module (DDM)
9 15A* Ignition coil relay feed
10 20A* Horn relay feed
11 15A* A/C clutch relay feed
12 20A* Audio
13 10A* Rear air suspension module
(RASM)
503
502
501
24
23
20
19 22
21302303304
301 207201 202203 204
209
206
208
205602118
114
110
106
102
117
113
109
105
101
116
112
108
104
115
111
107
103
18
16
14
1210
8
6
4
2
17
15
13
119
7
5
3
1 601
Roadside Emergencies
200
2011 Town Car(tow)
Owners Guide, 2nd Printing
USA(fus)
Page 202 of 306
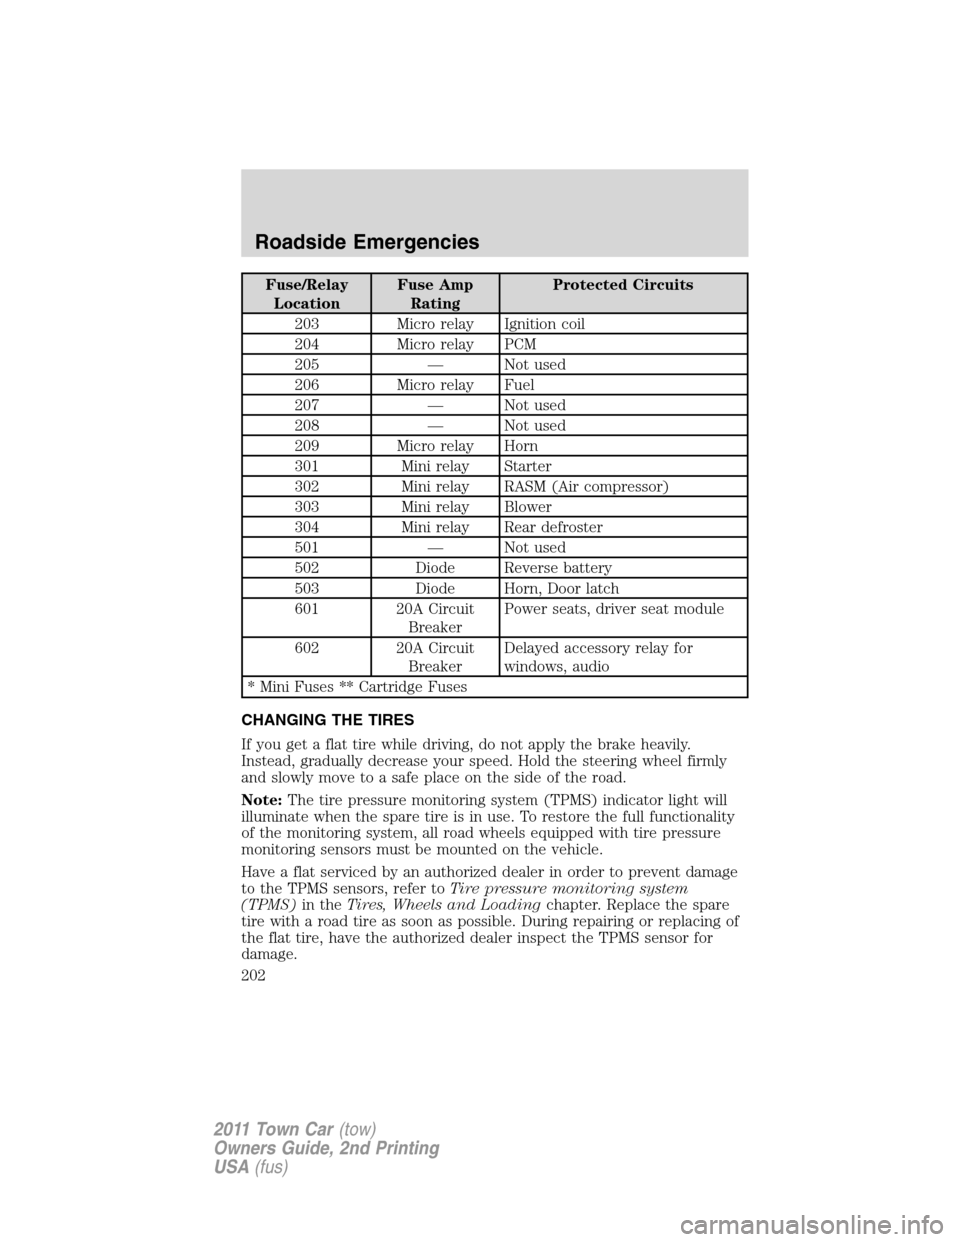
Fuse/Relay
LocationFuse Amp
RatingProtected Circuits
203 Micro relay Ignition coil
204 Micro relay PCM
205 — Not used
206 Micro relay Fuel
207 — Not used
208 — Not used
209 Micro relay Horn
301 Mini relay Starter
302 Mini relay RASM (Air compressor)
303 Mini relay Blower
304 Mini relay Rear defroster
501 — Not used
502 Diode Reverse battery
503 Diode Horn, Door latch
601 20A Circuit
BreakerPower seats, driver seat module
602 20A Circuit
BreakerDelayed accessory relay for
windows, audio
* Mini Fuses ** Cartridge Fuses
CHANGING THE TIRES
If you get a flat tire while driving, do not apply the brake heavily.
Instead, gradually decrease your speed. Hold the steering wheel firmly
and slowly move to a safe place on the side of the road.
Note:The tire pressure monitoring system (TPMS) indicator light will
illuminate when the spare tire is in use. To restore the full functionality
of the monitoring system, all road wheels equipped with tire pressure
monitoring sensors must be mounted on the vehicle.
Have a flat serviced by an authorized dealer in order to prevent damage
to the TPMS sensors, refer toTire pressure monitoring system
(TPMS)in theTires, Wheels and Loadingchapter. Replace the spare
tire with a road tire as soon as possible. During repairing or replacing of
the flat tire, have the authorized dealer inspect the TPMS sensor for
damage.
Roadside Emergencies
202
2011 Town Car(tow)
Owners Guide, 2nd Printing
USA(fus)
Page 283 of 306
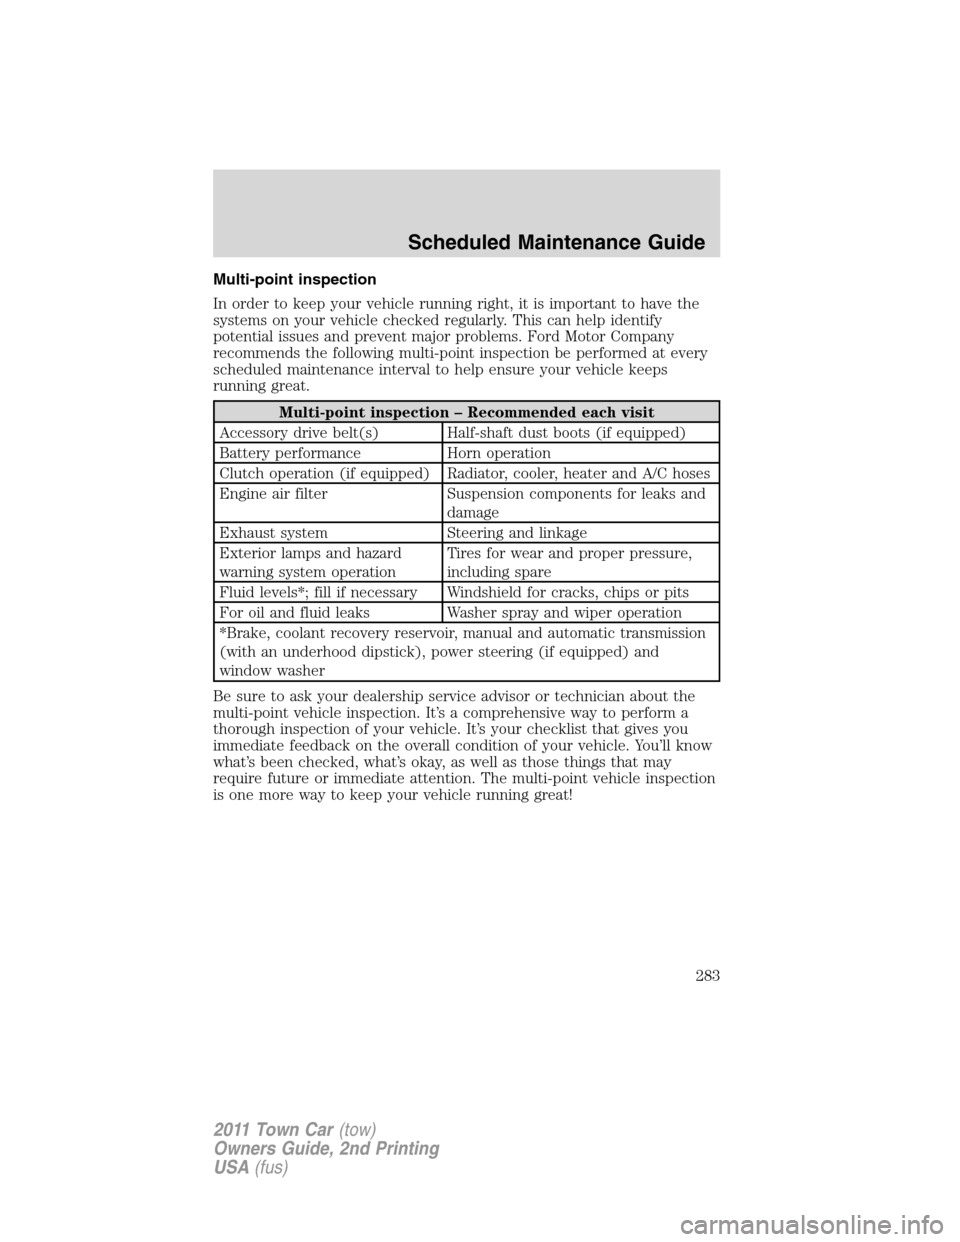
Multi-point inspection
In order to keep your vehicle running right, it is important to have the
systems on your vehicle checked regularly. This can help identify
potential issues and prevent major problems. Ford Motor Company
recommends the following multi-point inspection be performed at every
scheduled maintenance interval to help ensure your vehicle keeps
running great.
Multi-point inspection – Recommended each visit
Accessory drive belt(s) Half-shaft dust boots (if equipped)
Battery performance Horn operation
Clutch operation (if equipped) Radiator, cooler, heater and A/C hoses
Engine air filter Suspension components for leaks and
damage
Exhaust system Steering and linkage
Exterior lamps and hazard
warning system operationTires for wear and proper pressure,
including spare
Fluid levels*; fill if necessary Windshield for cracks, chips or pits
For oil and fluid leaks Washer spray and wiper operation
*Brake, coolant recovery reservoir, manual and automatic transmission
(with an underhood dipstick), power steering (if equipped) and
window washer
Be sure to ask your dealership service advisor or technician about the
multi-point vehicle inspection. It’s a comprehensive way to perform a
thorough inspection of your vehicle. It’s your checklist that gives you
immediate feedback on the overall condition of your vehicle. You’ll know
what’s been checked, what’s okay, as well as those things that may
require future or immediate attention. The multi-point vehicle inspection
is one more way to keep your vehicle running great!
Scheduled Maintenance Guide
283
2011 Town Car(tow)
Owners Guide, 2nd Printing
USA(fus)