2011 LINCOLN TOWN CAR high beam
[x] Cancel search: high beamPage 15 of 306
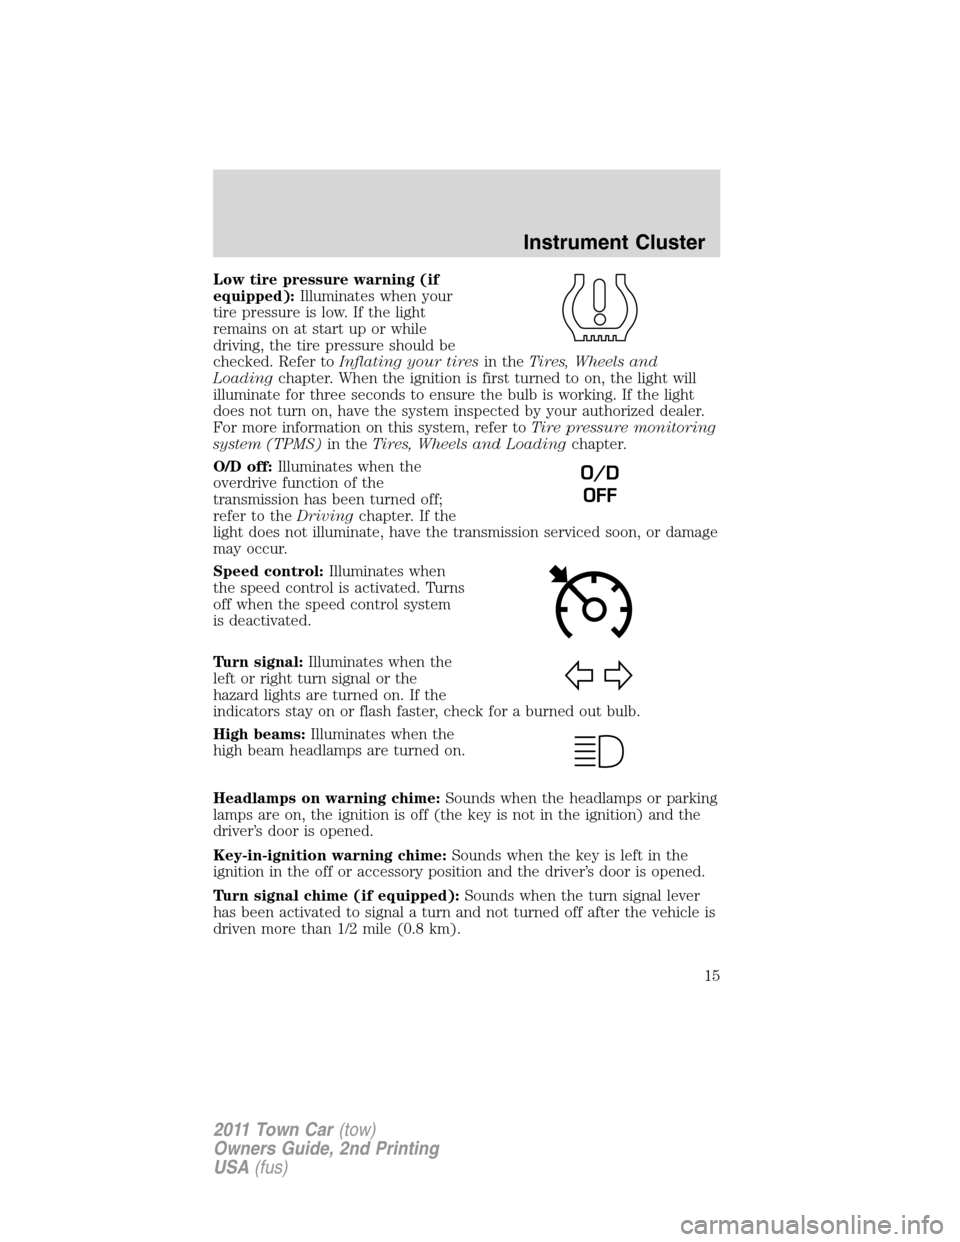
Low tire pressure warning (if
equipped):Illuminates when your
tire pressure is low. If the light
remains on at start up or while
driving, the tire pressure should be
checked. Refer toInflating your tiresin theTires, Wheels and
Loadingchapter. When the ignition is first turned to on, the light will
illuminate for three seconds to ensure the bulb is working. If the light
does not turn on, have the system inspected by your authorized dealer.
For more information on this system, refer toTire pressure monitoring
system (TPMS)in theTires, Wheels and Loadingchapter.
O/D off:Illuminates when the
overdrive function of the
transmission has been turned off;
refer to theDrivingchapter. If the
light does not illuminate, have the transmission serviced soon, or damage
may occur.
Speed control:Illuminates when
the speed control is activated. Turns
off when the speed control system
is deactivated.
Turn signal:Illuminates when the
left or right turn signal or the
hazard lights are turned on. If the
indicators stay on or flash faster, check for a burned out bulb.
High beams:Illuminates when the
high beam headlamps are turned on.
Headlamps on warning chime:Sounds when the headlamps or parking
lamps are on, the ignition is off (the key is not in the ignition) and the
driver’s door is opened.
Key-in-ignition warning chime:Sounds when the key is left in the
ignition in the off or accessory position and the driver’s door is opened.
Turn signal chime (if equipped):Sounds when the turn signal lever
has been activated to signal a turn and not turned off after the vehicle is
driven more than 1/2 mile (0.8 km).
O/D
OFF
Instrument Cluster
15
2011 Town Car(tow)
Owners Guide, 2nd Printing
USA(fus)
Page 43 of 306
6. Wait the desired amount of time for delay, then turn the headlamp
switch to off.
•At this point, the exterior lamps turn off and the time delay is set.
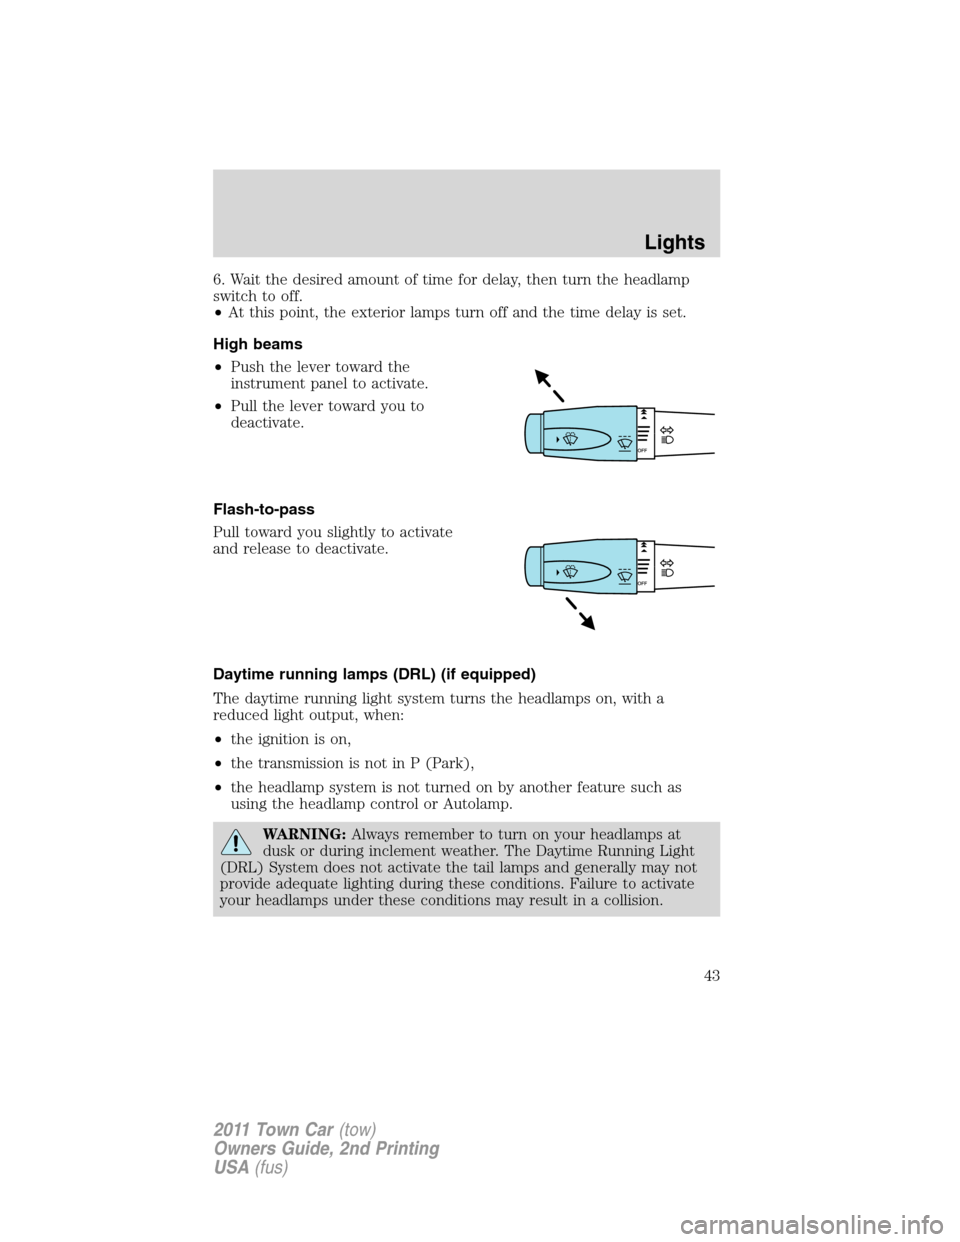
High beams
•Push the lever toward the
instrument panel to activate.
•Pull the lever toward you to
deactivate.
Flash-to-pass
Pull toward you slightly to activate
and release to deactivate.
Daytime running lamps (DRL) (if equipped)
The daytime running light system turns the headlamps on, with a
reduced light output, when:
•the ignition is on,
•the transmission is not in P (Park),
•the headlamp system is not turned on by another feature such as
using the headlamp control or Autolamp.
WARNING:Always remember to turn on your headlamps at
dusk or during inclement weather. The Daytime Running Light
(DRL) System does not activate the tail lamps and generally may not
provide adequate lighting during these conditions. Failure to activate
your headlamps under these conditions may result in a collision.
Lights
43
2011 Town Car(tow)
Owners Guide, 2nd Printing
USA(fus)
Page 45 of 306
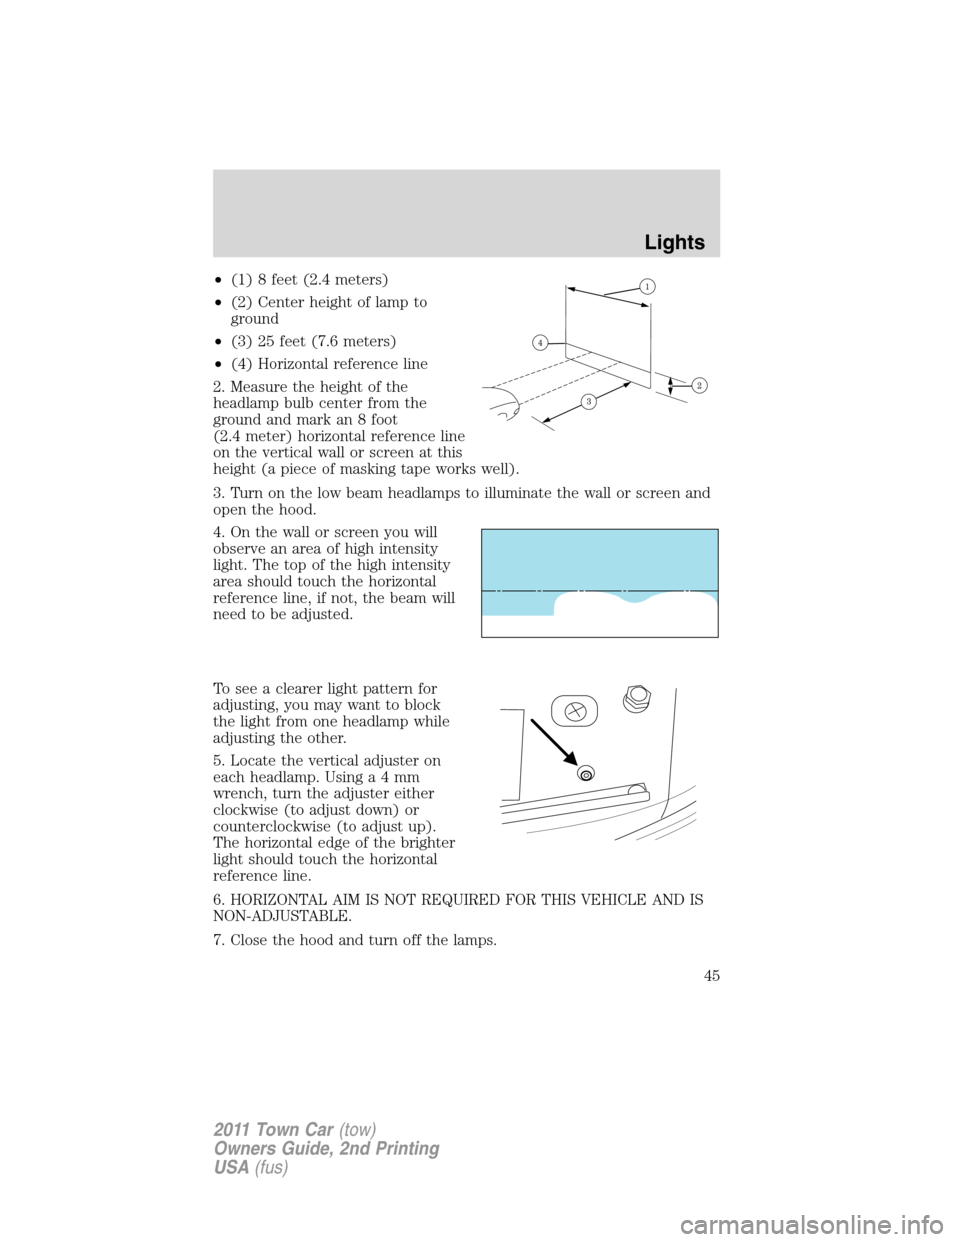
•(1) 8 feet (2.4 meters)
•(2) Center height of lamp to
ground
•(3) 25 feet (7.6 meters)
•(4) Horizontal reference line
2. Measure the height of the
headlamp bulb center from the
ground and mark an 8 foot
(2.4 meter) horizontal reference line
on the vertical wall or screen at this
height (a piece of masking tape works well).
3. Turn on the low beam headlamps to illuminate the wall or screen and
open the hood.
4. On the wall or screen you will
observe an area of high intensity
light. The top of the high intensity
area should touch the horizontal
reference line, if not, the beam will
need to be adjusted.
To see a clearer light pattern for
adjusting, you may want to block
the light from one headlamp while
adjusting the other.
5. Locate the vertical adjuster on
each headlamp. Usinga4mm
wrench, turn the adjuster either
clockwise (to adjust down) or
counterclockwise (to adjust up).
The horizontal edge of the brighter
light should touch the horizontal
reference line.
6. HORIZONTAL AIM IS NOT REQUIRED FOR THIS VEHICLE AND IS
NON-ADJUSTABLE.
7. Close the hood and turn off the lamps.
Lights
45
2011 Town Car(tow)
Owners Guide, 2nd Printing
USA(fus)
Page 50 of 306
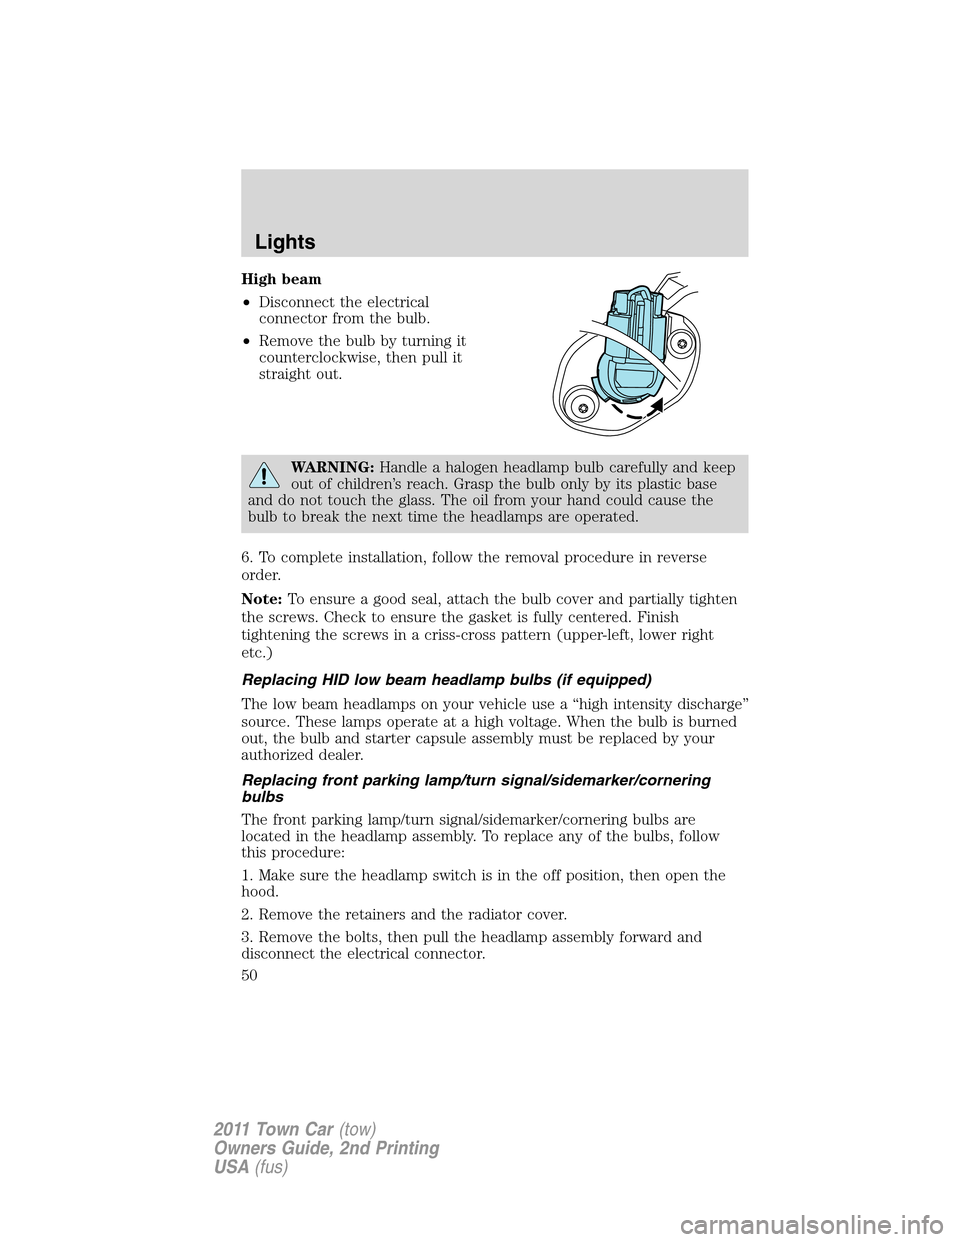
High beam
•Disconnect the electrical
connector from the bulb.
•Remove the bulb by turning it
counterclockwise, then pull it
straight out.
WARNING:Handle a halogen headlamp bulb carefully and keep
out of children’s reach. Grasp the bulb only by its plastic base
and do not touch the glass. The oil from your hand could cause the
bulb to break the next time the headlamps are operated.
6. To complete installation, follow the removal procedure in reverse
order.
Note:To ensure a good seal, attach the bulb cover and partially tighten
the screws. Check to ensure the gasket is fully centered. Finish
tightening the screws in a criss-cross pattern (upper-left, lower right
etc.)
Replacing HID low beam headlamp bulbs (if equipped)
The low beam headlamps on your vehicle use a “high intensity discharge”
source. These lamps operate at a high voltage. When the bulb is burned
out, the bulb and starter capsule assembly must be replaced by your
authorized dealer.
Replacing front parking lamp/turn signal/sidemarker/cornering
bulbs
The front parking lamp/turn signal/sidemarker/cornering bulbs are
located in the headlamp assembly. To replace any of the bulbs, follow
this procedure:
1. Make sure the headlamp switch is in the off position, then open the
hood.
2. Remove the retainers and the radiator cover.
3. Remove the bolts, then pull the headlamp assembly forward and
disconnect the electrical connector.
Lights
50
2011 Town Car(tow)
Owners Guide, 2nd Printing
USA(fus)
Page 198 of 306
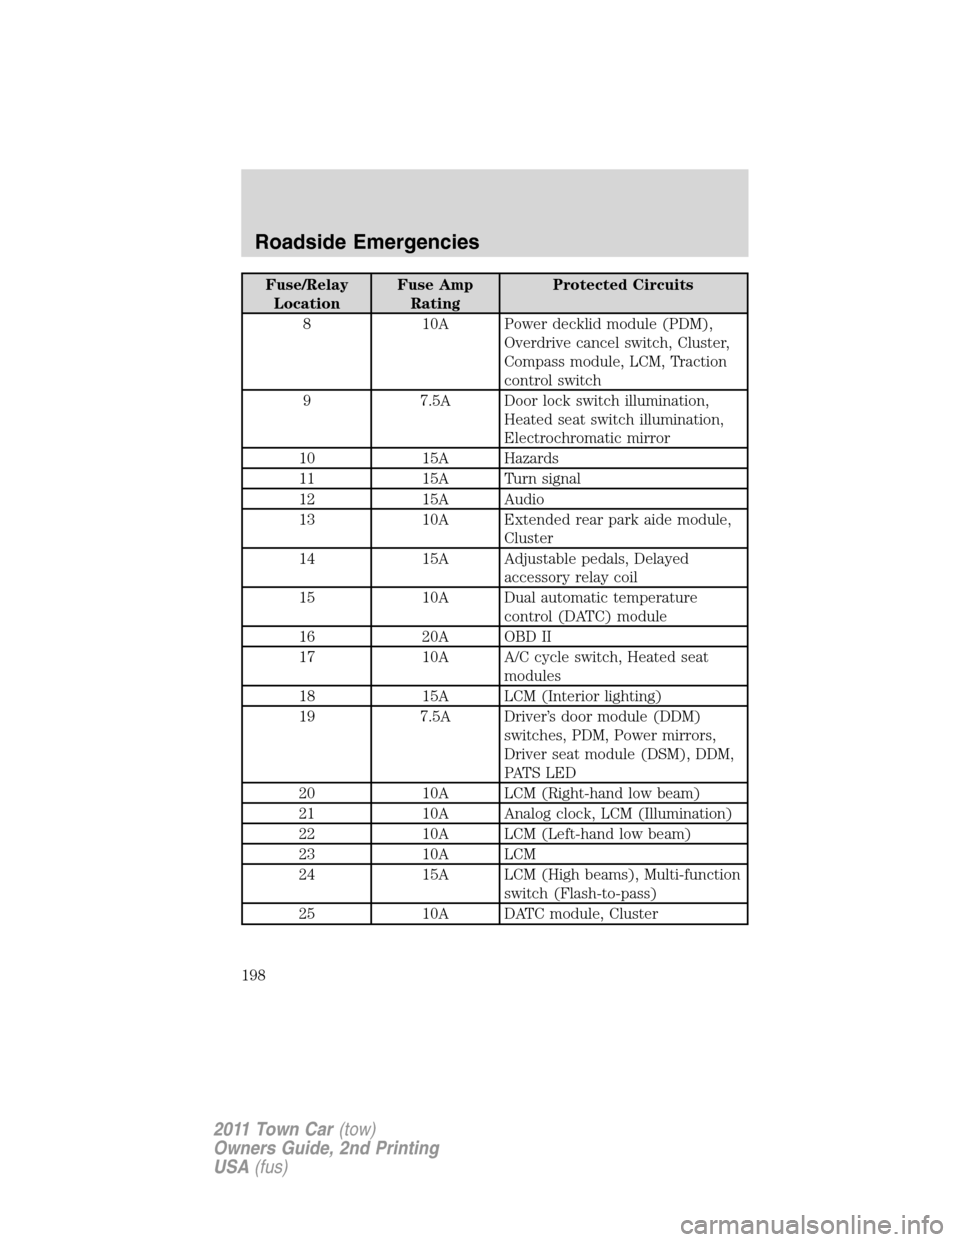
Fuse/Relay
LocationFuse Amp
RatingProtected Circuits
8 10A Power decklid module (PDM),
Overdrive cancel switch, Cluster,
Compass module, LCM, Traction
control switch
9 7.5A Door lock switch illumination,
Heated seat switch illumination,
Electrochromatic mirror
10 15A Hazards
11 15A Turn signal
12 15A Audio
13 10A Extended rear park aide module,
Cluster
14 15A Adjustable pedals, Delayed
accessory relay coil
15 10A Dual automatic temperature
control (DATC) module
16 20A OBD II
17 10A A/C cycle switch, Heated seat
modules
18 15A LCM (Interior lighting)
19 7.5A Driver’s door module (DDM)
switches, PDM, Power mirrors,
Driver seat module (DSM), DDM,
PAT S L E D
20 10A LCM (Right-hand low beam)
21 10A Analog clock, LCM (Illumination)
22 10A LCM (Left-hand low beam)
23 10A LCM
24 15A LCM (High beams), Multi-function
switch (Flash-to-pass)
25 10A DATC module, Cluster
Roadside Emergencies
198
2011 Town Car(tow)
Owners Guide, 2nd Printing
USA(fus)
Page 303 of 306
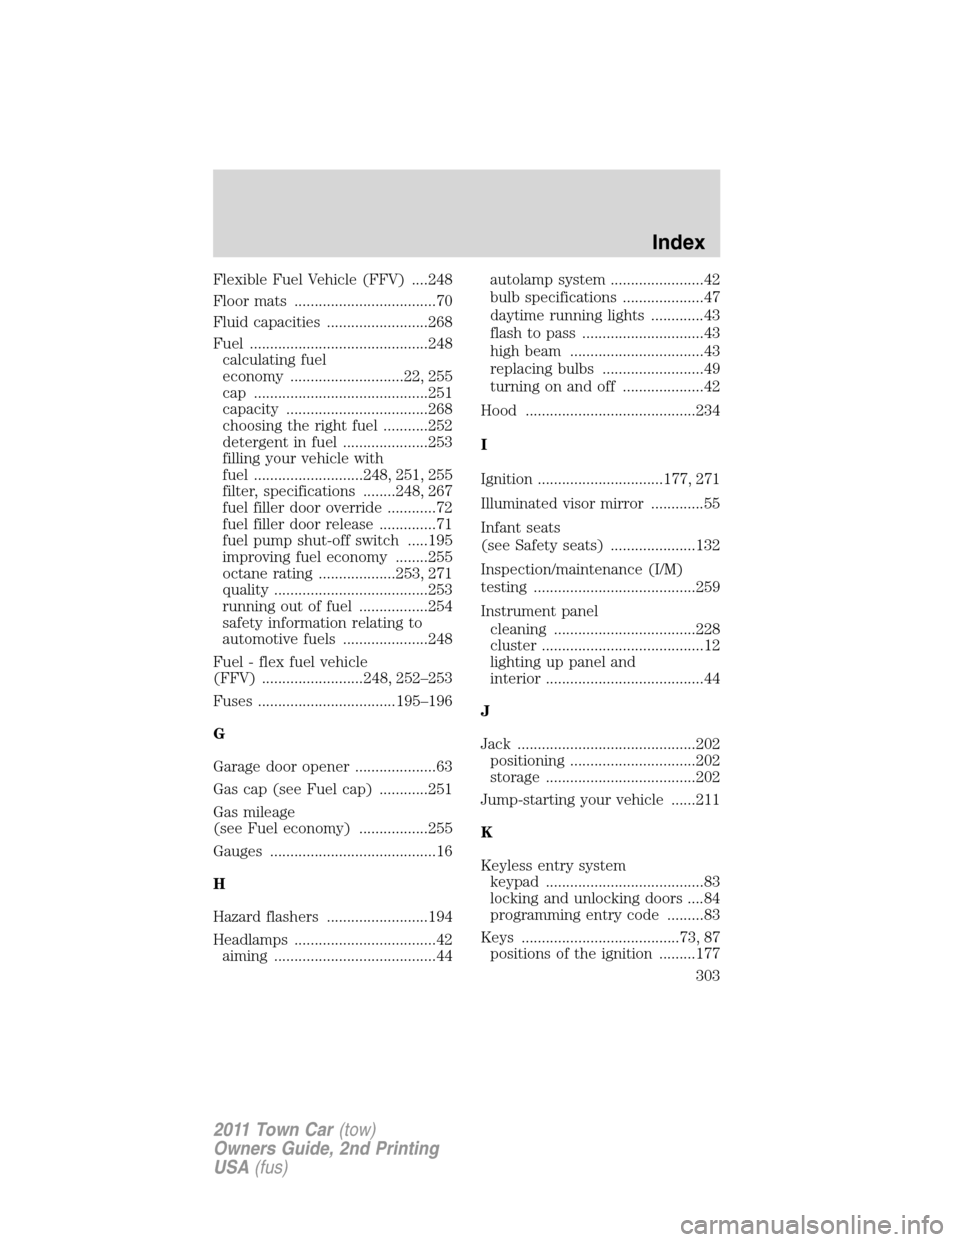
Flexible Fuel Vehicle (FFV) ....248
Floor mats ...................................70
Fluid capacities .........................268
Fuel ............................................248
calculating fuel
economy ............................22, 255
cap ...........................................251
capacity ...................................268
choosing the right fuel ...........252
detergent in fuel .....................253
filling your vehicle with
fuel ...........................248, 251, 255
filter, specifications ........248, 267
fuel filler door override ............72
fuel filler door release ..............71
fuel pump shut-off switch .....195
improving fuel economy ........255
octane rating ...................253, 271
quality ......................................253
running out of fuel .................254
safety information relating to
automotive fuels .....................248
Fuel - flex fuel vehicle
(FFV) .........................248, 252–253
Fuses ..................................195–196
G
Garage door opener ....................63
Gas cap (see Fuel cap) ............251
Gas mileage
(see Fuel economy) .................255
Gauges .........................................16
H
Hazard flashers .........................194
Headlamps ...................................42
aiming ........................................44autolamp system .......................42
bulb specifications ....................47
daytime running lights .............43
flash to pass ..............................43
high beam .................................43
replacing bulbs .........................49
turning on and off ....................42
Hood ..........................................234
I
Ignition ...............................177, 271
Illuminated visor mirror .............55
Infant seats
(see Safety seats) .....................132
Inspection/maintenance (I/M)
testing ........................................259
Instrument panel
cleaning ...................................228
cluster ........................................12
lighting up panel and
interior .......................................44
J
Jack ............................................202
positioning ...............................202
storage .....................................202
Jump-starting your vehicle ......211
K
Keyless entry system
keypad .......................................83
locking and unlocking doors ....84
programming entry code .........83
Keys .......................................73, 87
positions of the ignition .........177
Index
303
2011 Town Car(tow)
Owners Guide, 2nd Printing
USA(fus)