Page 185 of 290
184IN AN EMERGENCY
ENGINE STARTING
Go to a Lancia Dealership immediately if instrument
panel warning light
Yremains on constantly.
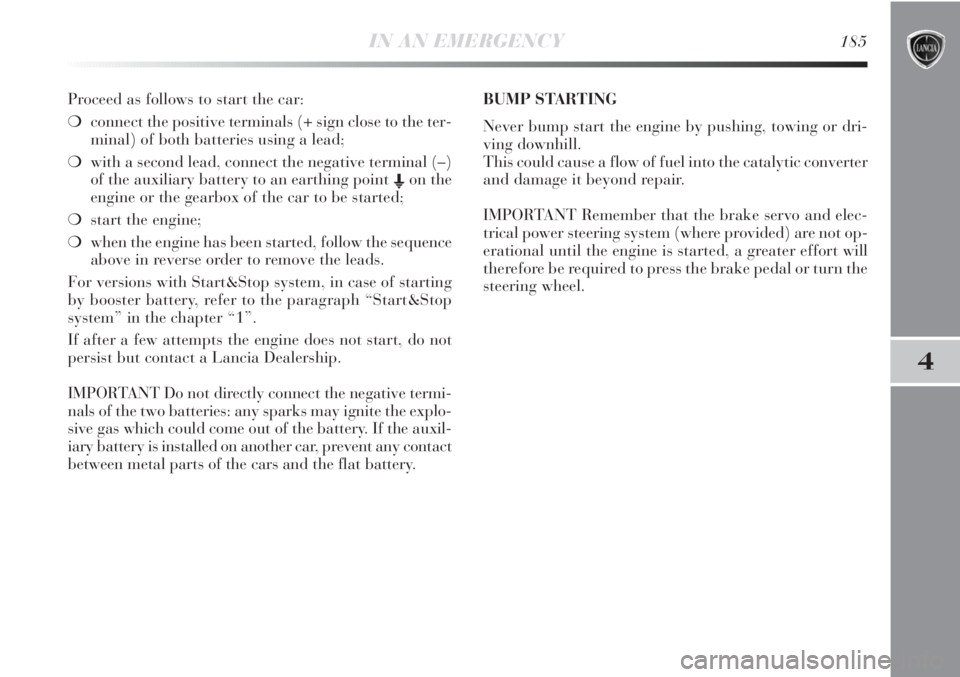
JUMP STARTING fig. 1
If the battery is flat, the engine may be started using an
auxiliary battery with the same capacity or a little higher
than the flat one.
fig. 1L0E0074m
Strictly avoid using a rapid battery charger
for jump starting: this could damage the
electronic systems and the engine fuel sup-
ply and ignition control units.
This starting procedure must be carried out
by expert personnel as incorrect manoeu-
vres can cause electrical discharges of con-
siderable intensity. Furthermore, battery fluid is
poisonous and corrosive: avoid contact with your
skin and eyes. Keep naked flames away from the
battery. No smoking. Do not cause sparks.
Page 186 of 290

IN AN EMERGENCY185
4
Proceed as follows to start the car:
❍connect the positive terminals (+ sign close to the ter-
minal) of both batteries using a lead;
❍with a second lead, connect the negative terminal (–)
of the auxiliary battery to an earthing point E
on the
engine or the gearbox of the car to be started;
❍start the engine;
❍when the engine has been started, follow the sequence
above in reverse order to remove the leads.
For versions with Start&Stop system, in case of starting
by booster battery, refer to the paragraph “Start&Stop
system” in the chapter “1”.
If after a few attempts the engine does not start, do not
persist but contact a Lancia Dealership.
IMPORTANT Do not directly connect the negative termi-
nals of the two batteries: any sparks may ignite the explo-
sive gas which could come out of the battery. If the auxil-
iary battery is installed on another car, prevent any contact
between metal parts of the cars and the flat battery.BUMP STARTING
Never bump start the engine by pushing, towing or dri-
ving downhill.
This could cause a flow of fuel into the catalytic converter
and damage it beyond repair.
IMPORTANT Remember that the brake servo and elec-
trical power steering system (where provided) are not op-
erational until the engine is started, a greater effort will
therefore be required to press the brake pedal or turn the
steering wheel.
Page 218 of 290

IN AN EMERGENCY217
4
FUSE SUMMARY TABLE
F12
F12
F13
F13
F31
F33
F34
F35
F36
F37
F38
F39
F40
F417.5
15
7.5
15
5
20
20
5
20
7.5
10
10
30
7.538
38
38
38
38
38
38
38
38
38
38
38
38
38
USERS FUSE AMPS FIGURE
Right dipped beam headlight
Right dipped beam headlight (Xenon gas discharge bulb)
Left dipped beam headlight, headlight alignment corrector
Left dipped beam headlight (Xenon gas discharge bulb)
Climate control system fan relay coil, body computer
Left rear window winder
Right rear window winder
Reversing lights, engine compartment junction unit relay coils,
brake light pedal control (normally closed contact),
water in diesel sensor, air flow meter/control on clutch pedal
and brake servo pressure sensor (1.4 Turbo Multi Air versions)
Central locking system control unit, fuel flap,
dead lock, tailgate release
Third brake light, instrument panel, Adaptive Headlights Node
(1.4 Turbo Multi Air versions excluded), control unit on left hand
gas discharge headlight (1.4 Turbo Multi Air versions excluded)
Front rear and central roof light (for versions/markets where provided,
with electric sun roof), courtesy light on driver’s side and passenger’s side,
luggage compartment light and glove compartment light
Car radio and Radio navigator (1.4 Turbo Multi Air versions excluded),
Blue&Me™ Node, alarm siren, alarm system on roof light,
climate control unit, tyre pressure monitoring system control unit,
diagnosis socket connector, rear roof lights, voltage
stabiliser (1.4 Turbo Multi Air versions without HI-FI option)
Heated rear window
Electric door mirror demisters, demisters on windscreen jets
Page 220 of 290

IN AN EMERGENCY219
4
38a
38a
38a
38a
40
40
40
40
40
40
40
40
40
40
2
42
42
42
42
42
42(P038)
(P036)
(P037)
(P039)
F08
F09
F09
F10
F14
F15
F19
F30
F85
F87
F1
F2
F3
F6
F4
F4
F510
5
5
5
40
30
20
10
15
30
7.5
15
15
5
30
30
10
10
15
20
10
USERS FUSE AMPS FIGURE
Car Radio / Radio Navigator
DRLs/Left side light
DRLs/Right side light
Adaptive Headlamps Node/Control units on right
and left hand gas discharge headlights
Climate control fan
Headlight washer pump
(1.4 Turbo Jet 120 HP, 1.4 Turbo Multi Air versions)
Headlight washer pump (1.4 Turbo Jet 150 HP,
1.6 Multijet, 2.0 Multijet, 1.9 Twin Turbo Multijet versions)
Horn
Main beam headlights
PTC1 additional heater
Air conditioning compressor
Fog/cornering lights
Fuel pump
Battery charge status sensor (1.4 Turbo Multi Air version)
Right front seat adjustment node
Left front seat adjustment node
Left front seat heating
Right front seat heating
Audio Hi-Fi control unit (1.4 Turbo Multi Air version excluded)
Voltage stabiliser (1.4 Turbo Multi Air version with HI-FI option)
BASSBOX speaker
(HI-FI system, 1.4 Turbo Multi Air version excluded)
Page 226 of 290

30 60 90 120 150 180
●●● ●●●
●●● ●●●
●●● ●●●
●●● ●●●
●●● ●●●
●●● ●●●
●●● ●●●
●●● ●●●
●●● ●●●
●●● ●●●
●●
●●
SERVICING AND MAINTENANCE225
5
SCHEDULED SERVICING PLAN
Petrol versions
Thousands of km
Check tyre condition/wear and adjust pressure if required
Check operation of lighting system (headlights, direction indicators,
hazard warning lights, luggage compartment, passenger compartment,
instrument panel warning lights, etc.)
Check windscreen wiper/washer operation
Check the position/wear of the windscreen/rear window wiper blades
Check condition and wear of front disc brake pads and operation
of pad wear indicator
Check rear disc brake pad condition and wear
Condition visual check: bodywork exterior, underbody protection,
pipes and hoses (exhaust – fuel supply system – braking system),
rubber elements (boots – sleeves – bushes – etc...)
Check cleanliness of bonnet and boot locks,
as well as cleanliness and lubrication of linkages
Check and top up, if required, fluid levels (engine coolant, brake/hydraulic
clutch fluid, windscreen washer fluid, battery fluid, etc)
Check handbrake lever travel and adjust if necessary
Visually inspect conditions of the accessory drive belts
Visually inspect the conditions of toothed timing belt
Page 228 of 290

SERVICING AND MAINTENANCE227
5
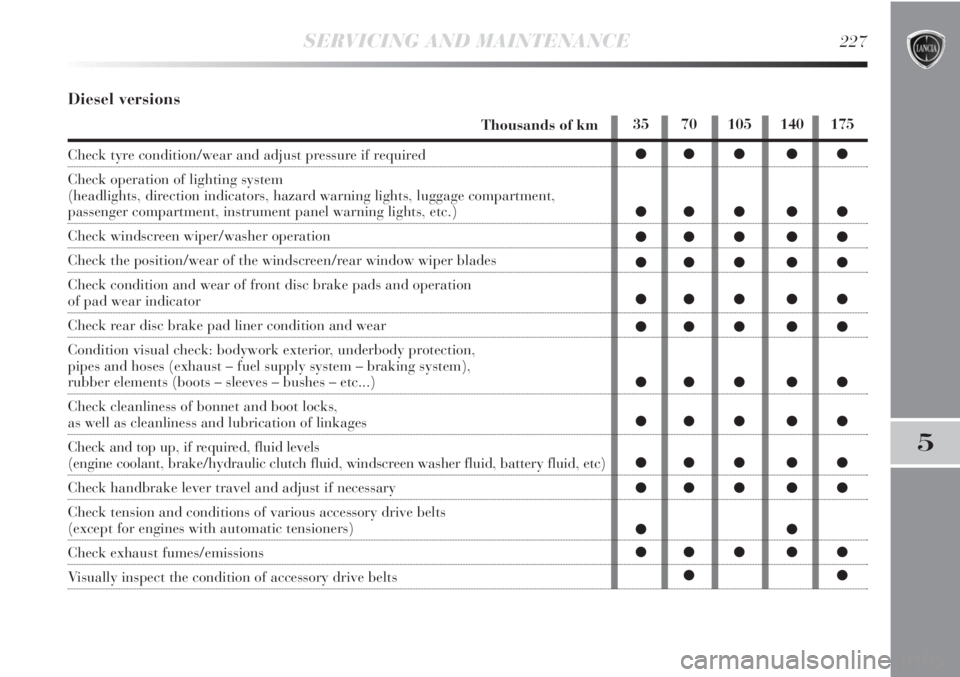
35 70 105 140 175
●● ● ● ●
●● ● ● ●
●● ● ● ●
●● ● ● ●
●● ● ● ●
●● ● ● ●
●● ● ● ●
●● ● ● ●
●● ● ● ●
●● ● ● ●
●●
●● ● ● ●
●●
Diesel versions
Thousands of km
Check tyre condition/wear and adjust pressure if required
Check operation of lighting system
(headlights, direction indicators, hazard warning lights, luggage compartment,
passenger compartment, instrument panel warning lights, etc.)
Check windscreen wiper/washer operation
Check the position/wear of the windscreen/rear window wiper blades
Check condition and wear of front disc brake pads and operation
of pad wear indicator
Check rear disc brake pad liner condition and wear
Condition visual check: bodywork exterior, underbody protection,
pipes and hoses (exhaust – fuel supply system – braking system),
rubber elements (boots – sleeves – bushes – etc...)
Check cleanliness of bonnet and boot locks,
as well as cleanliness and lubrication of linkages
Check and top up, if required, fluid levels
(engine coolant, brake/hydraulic clutch fluid, windscreen washer fluid, battery fluid, etc)
Check handbrake lever travel and adjust if necessary
Check tension and conditions of various accessory drive belts
(except for engines with automatic tensioners)
Check exhaust fumes/emissions
Visually inspect the condition of accessory drive belts
Page 229 of 290
228SERVICING AND MAINTENANCE
Thousands of km
Check engine control system operation (using diagnosis socket)
Check battery charge status and possibly recharge
Replace accessory drive belts
Replace toothed timing drive belt (*)
Replace fuel filter
Replace air filter cartridge
Change engine oil and oil filter (versions without DPF) (or every 24 months)
Change engine oil and oil filter (versions with DPF) (**)
Change brake fluid (or every 24 months)
Change pollen filter (or every 15 months)
(*) Regardless of the distance covered, the timing belt must be changed every 4 years for particularly demanding use (cold cli-
mates, city driving, long periods of idling) or at least every 5 years.
(**) The engine oil and oil filter should be changed when the warning light on the dashboard comes on, or every 24 months.
If the car is mainly used in towns and cities, change the engine oil and filter every 12 months.
35 70 105 140 175
●● ● ● ●
●● ● ● ●
●
●
●●
●●
●● ● ● ●
●●
●● ● ● ●
Page 231 of 290
230SERVICING AND MAINTENANCE
Perform the following inspections more frequently than
indicated in the Scheduled Servicing Plan:
❍check front disc brake pad condition and wear;
❍check cleanliness of bonnet and boot locks, as well as
cleanliness and lubrication of linkages;
❍visually inspect the condition of engine, gearbox,
transmission, pipes and hoses (exhaust – fuel supply
– brakes) rubber elements (boots – sleeves – bushes
etc.);❍check battery charge and fluid level (electrolyte); (see
“Battery” in this chapter);
❍visually inspect the condition of auxiliary drive belts;
❍check and, if necessary, replace the pollen filter; in
particular it should be replaced if a decrease in the air
flow into the passenger compartment is detected;
❍check air filter and replace, if required.