Page 5559 of 5598
WW-40
< DTC/CIRCUIT DIAGNOSIS >
LIGHT & RAIN SENSOR
LIGHT & RAIN SENSOR
Component Function CheckINFOID:0000000006300475
1.CHECK FRONT WIPER AUTO OPERATION
1. Clean light & rain sensor detection area of windshield fully.
2. When the front wiper switch is turned to AUTO pos ition, front wiper operates once regardless of a rainy
condition.
Is front wiper (AUTO) operation normally?
YES >> Light & rain sensor circuit is normal.
NO >> Refer to WW-40, "
Diagnosis Procedure".
Diagnosis ProcedureINFOID:0000000006300476
1.CHECK LIGHT & RAIN SENSOR FUSE
1. Turn the ignition switch OFF.
2. Check that the light & rain sensor 10A fuse (#6) is not fusing.
Is the fuse fusing?
YES >> Replace the fuse after repairing the applicable circuit.
NO >> GO TO 2.
2.CHECK LIGHT & RAIN SENSOR POWER SUPPLY
1. Disconnect light & rain sensor connector.
2. Check voltage between light & rain sensor harness connector and ground.
Is the measurement value normal?
YES >> GO TO 3.
NO >> Repair or replace harness.
3.CHECK LIGHT & RAIN SENSOR GROUND CIRCUIT
Check continuity between light & ra in sensor harness connector and ground.
Does continuity exist?
YES >> GO TO 4.
NO >> Repair or replace harness.
4.CHECK LIGHT & RAIN SENSOR SIGNAL
1. Connect light & rain sensor connector.
2. Turn ignition switch ON.
3. Check signal between BCM harness connector and ground with oscilloscope.
(+)
(− ) Voltage (Approx.)
Light & rain sensor
Connector Terminal R9 1 Ground Battery voltage
Light & rain sensor GroundContinuity
Connector Terminal
R9 3 Existed
Revision: 2010 May2011 QX56
Page 5587 of 5598
WW-68
< REMOVAL AND INSTALLATION >
FRONT WIPER BLADE
FRONT WIPER BLADE
Exploded ViewINFOID:0000000006220411
Removal and InstallationINFOID:0000000006220412
REMOVAL
1. Push up the lever (A) of wiper blade (1), while sliding wiperblade toward the direction of the arrow, to remove it from wiper
arm (2).
CAUTION:
Be careful not to drop the wi per blade onto the windshield
glass.
INSTALLATION
1. Install wiper blade into wiper arm.
2. Install wiper arm.
ReplacementINFOID:0000000006220413
1. Hold the rip of old wiper refill (1) at the rear end of the wiper blade with long-nose pliers, and pull out the wiper refill to the
direction (A).
1. Wiper refill 2. Wiper blade 3. Wiper arm
A. Wiper blade end B. Wiper blade tip
JMLIA1127ZZ
JMLIA1044ZZ
JPLIA1583ZZ
Revision: 2010 May2011 QX56
Page 5591 of 5598
WW-72
< REMOVAL AND INSTALLATION >
LIGHT & RAIN SENSOR
LIGHT & RAIN SENSOR
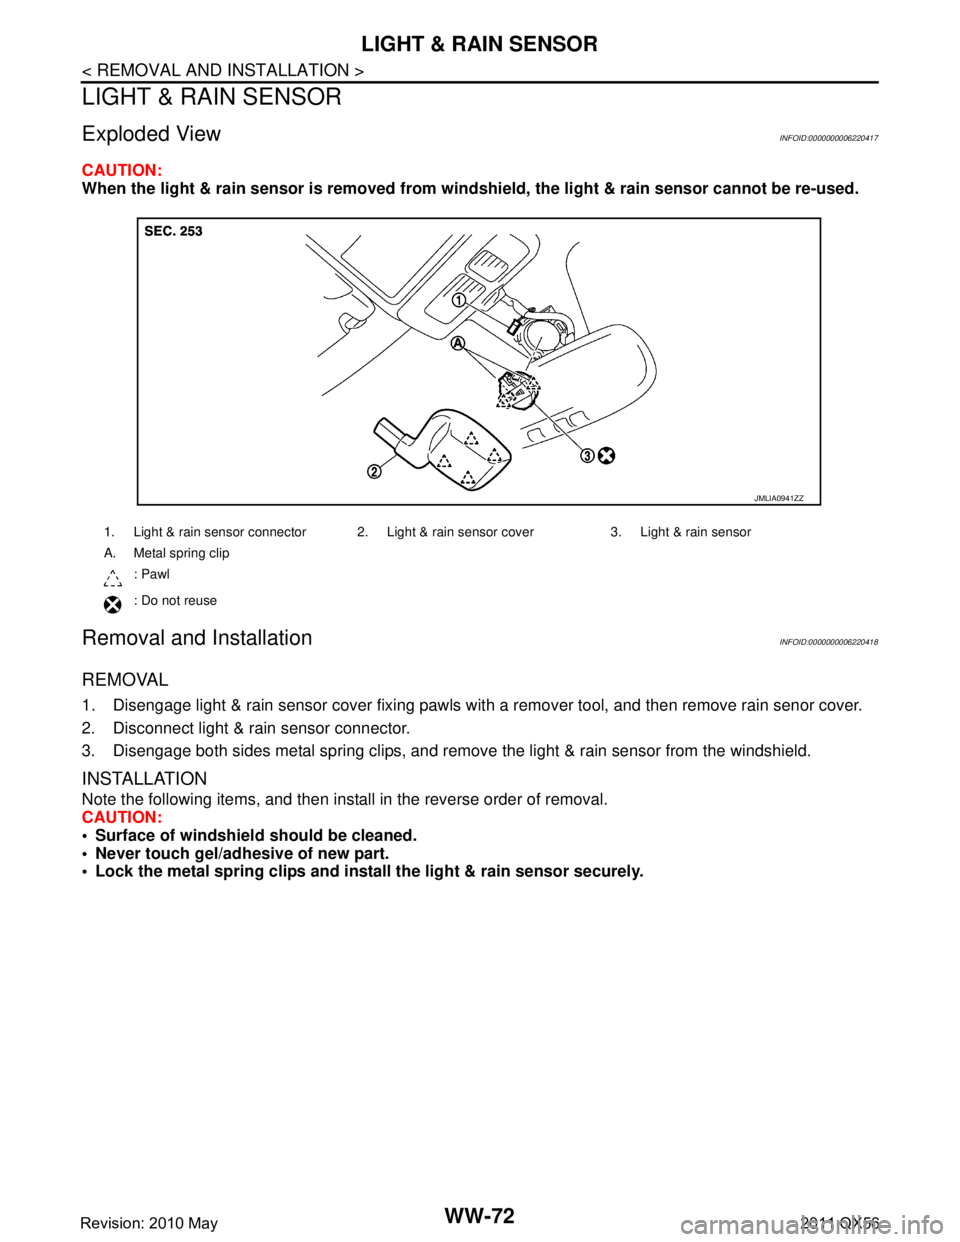
Exploded ViewINFOID:0000000006220417
CAUTION:
When the light & rain sensor is removed from windshield, the light & rain sensor cannot be re-used.
Removal and InstallationINFOID:0000000006220418
REMOVAL
1. Disengage light & rain sensor cover fixing pawls with a remover tool, and then remove rain senor cover.
2. Disconnect light & rain sensor connector.
3. Disengage both sides metal spring clips, and remove the light & rain sensor from the windshield.
INSTALLATION
Note the following items, and then install in the reverse order of removal.
CAUTION:
Surface of windshield should be cleaned.
Never touch gel/adhesive of new part.
Lock the metal spring clips and inst all the light & rain sensor securely.
1. Light & rain sensor connector 2. Light & rain sensor cover 3. Light & rain sensor
A. Metal spring clip
: Pawl
: Do not reuse
JMLIA0941ZZ
Revision: 2010 May2011 QX56