2011 INFINITI QX56 charging
[x] Cancel search: chargingPage 3256 of 5598
![INFINITI QX56 2011 Factory Service Manual
HAC-150
< REMOVAL AND INSTALLATION >[AUTOMATIC AIR CONDITIONING]
INTAKE SENSOR
INTAKE SENSOR
Exploded ViewINFOID:0000000006276004
Refer to
HA-41, "Exploded View".
Removal and InstallationINFOID:0000 INFINITI QX56 2011 Factory Service Manual
HAC-150
< REMOVAL AND INSTALLATION >[AUTOMATIC AIR CONDITIONING]
INTAKE SENSOR
INTAKE SENSOR
Exploded ViewINFOID:0000000006276004
Refer to
HA-41, "Exploded View".
Removal and InstallationINFOID:0000](/manual-img/42/57033/w960_57033-3255.png)
HAC-150
< REMOVAL AND INSTALLATION >[AUTOMATIC AIR CONDITIONING]
INTAKE SENSOR
INTAKE SENSOR
Exploded ViewINFOID:0000000006276004
Refer to
HA-41, "Exploded View".
Removal and InstallationINFOID:0000000006276005
REMOVAL
1. Remove the front evaporator assembly. Refer to HA-43, "EVAPORATOR : Removal and Installation".
2. Remove the intake sensor from front evaporator.
INSTALLATION
Note the following items, and install in the reverse order of removal.
CAUTION:
Replace O-rings with new ones. Then apply the compressor oil to them when installing.
Mark the mounting position of intake sensor bracket prior to removal so that the reinstalled sensor
can be located in the same position.
Never rotate the bracket insertion part when removing and installing the intake sensor.
Check for leakages when recharging refrigerant. Refer to HA-18, "
Leak Test".
Revision: 2010 May2011 QX56
Page 3276 of 5598
SYSTEMINL-9
< SYSTEM DESCRIPTION >
C
DE
F
G H
I
J
K
M A
B
INL
N
O P
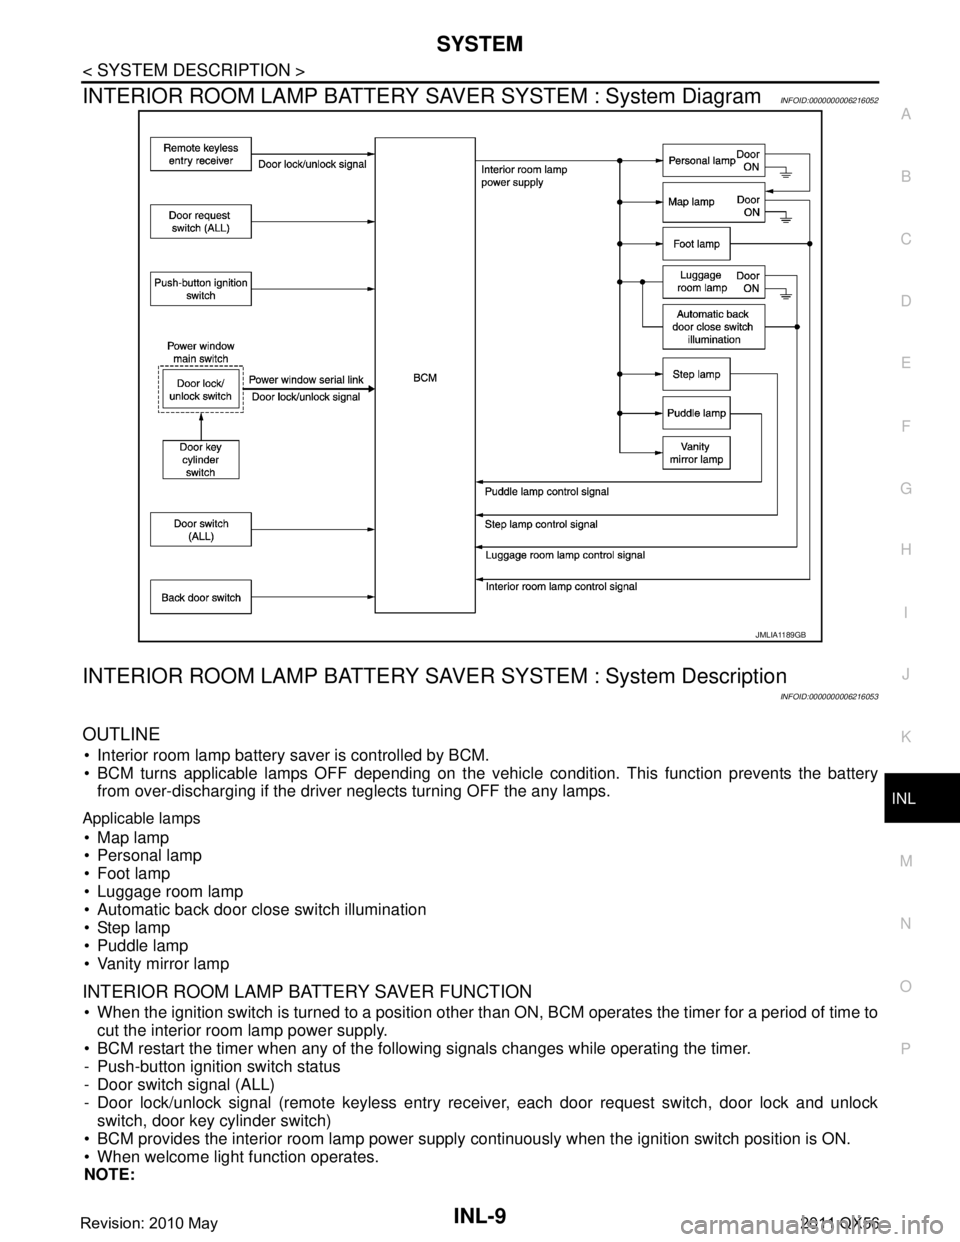
INTERIOR ROOM LAMP BATTERY SAVER SYSTEM : System DiagramINFOID:0000000006216052
INTERIOR ROOM LAMP BATTERY SA VER SYSTEM : System Description
INFOID:0000000006216053
OUTLINE
Interior room lamp battery saver is controlled by BCM.
BCM turns applicable lamps OFF depending on the vehicle condition. This function prevents the battery
from over-discharging if the driver neglects turning OFF the any lamps.
Applicable lamps
Map lamp
Personal lamp
Foot lamp
Luggage room lamp
Automatic back door close switch illumination
Step lamp
Puddle lamp
Vanity mirror lamp
INTERIOR ROOM LAMP BATTERY SAVER FUNCTION
When the ignition switch is turned to a position other than ON, BCM operates the timer for a period of time to
cut the interior room lamp power supply.
BCM restart the timer when any of the following signals changes while operating the timer.
- Push-button ignition switch status
- Door switch signal (ALL)
- Door lock/unlock signal (remote keyless entry re ceiver, each door request switch, door lock and unlock
switch, door key cylinder switch)
BCM provides the interior room lamp power supply continuously when the ignition switch position is ON.
When welcome light function operates.
NOTE:
JMLIA1189GB
Revision: 2010 May2011 QX56
Page 3878 of 5598
![INFINITI QX56 2011 Factory Service Manual
PCS
SYSTEMPCS-37
< SYSTEM DESCRIPTION > [POWER DISTRIBUTION SYSTEM]
C
D
E
F
G H
I
J
K L
B A
O P
N
SYSTEM
POWER DISTRIBUTION SYSTEM
POWER DISTRIBUTION SYSTEM : System DiagramINFOID:0000000006220196
PO INFINITI QX56 2011 Factory Service Manual
PCS
SYSTEMPCS-37
< SYSTEM DESCRIPTION > [POWER DISTRIBUTION SYSTEM]
C
D
E
F
G H
I
J
K L
B A
O P
N
SYSTEM
POWER DISTRIBUTION SYSTEM
POWER DISTRIBUTION SYSTEM : System DiagramINFOID:0000000006220196
PO](/manual-img/42/57033/w960_57033-3877.png)
PCS
SYSTEMPCS-37
< SYSTEM DESCRIPTION > [POWER DISTRIBUTION SYSTEM]
C
D
E
F
G H
I
J
K L
B A
O P
N
SYSTEM
POWER DISTRIBUTION SYSTEM
POWER DISTRIBUTION SYSTEM : System DiagramINFOID:0000000006220196
POWER DISTRIBUTION SYST
EM : System DescriptionINFOID:0000000006220197
SYSTEM DESCRIPTION
PDS (POWER DISTRIBUTION SYSTEM) is the system that BCM controls with the operation of the push-
button ignition switch and performs the power distributi on to each power circuit. This system is used instead
of the mechanical power supply changing mechanism wit h the operation of the conventional key cylinder.
The push-button ignition switch can be operated when Intelligent Key is in the following condition. Refer to Engine Start Function for details.
- Intelligent Key is in the detection area of the inside key antenna.
- Intelligent Key backside is contact ed to push-button ignition switch.
The push-button ignition switch operation is input to BCM as a signal. BCM changes the power supply posi-
tion according to the status and operates the follo wing relays to supply power to each power circuit.
- Ignition relay (inside IPDM E/R)
- Ignition relay-1
- ACC relay
- Blower relay
NOTE:
The engine switch operation changes due to the conditions of brake pedal, selector lever and vehicle speed.
The power supply position can be confirmed with the light ing of the indicators near the push-button ignition
switch.
BATTERY SAVER SYSTEM
When all the following conditions are met for 60 minutes, the battery saver system will cut off the power supply
to prevent battery discharge.
The ignition switch is in the ACC position
All doors are closed
Selector lever is in the P position
Reset Condition of Battery Saver System
In order to prevent the battery from discharging, the battery saver system will cut off the power supply when all
doors are closed, the selector lever is on P position and t he ignition switch is left on ACC position for 1 hour. If
any of the following conditions are met the battery saver system is released and the steering will change auto-
matically to lock position from OFF position.
Opening any door
Operating with door request switch on door lock
Operating with Intelligent Key on door lock
Press push-button ignition switch and ignition swit ch will change to ACC position from OFF position.
JMMIA0444GB
Revision: 2010 May2011 QX56
Page 4078 of 5598
PG
BATTERY INSPECTIONPG-159
< BASIC INSPECTION >
C
DE
F
G H
I
J
K L
B A
O P
N
BASIC INSPECTION
BATTERY INSPECTION
How to Handle BatteryINFOID:0000000006288754
CAUTION:
If it becomes necessary to start the engine with
a booster battery and jumper cables, use a 12-volt
booster battery.
After connecting battery cables, ensure that they are tightly clamped to battery terminals for good
contact.
Never add distilled water through the hole used to check specific gravity.
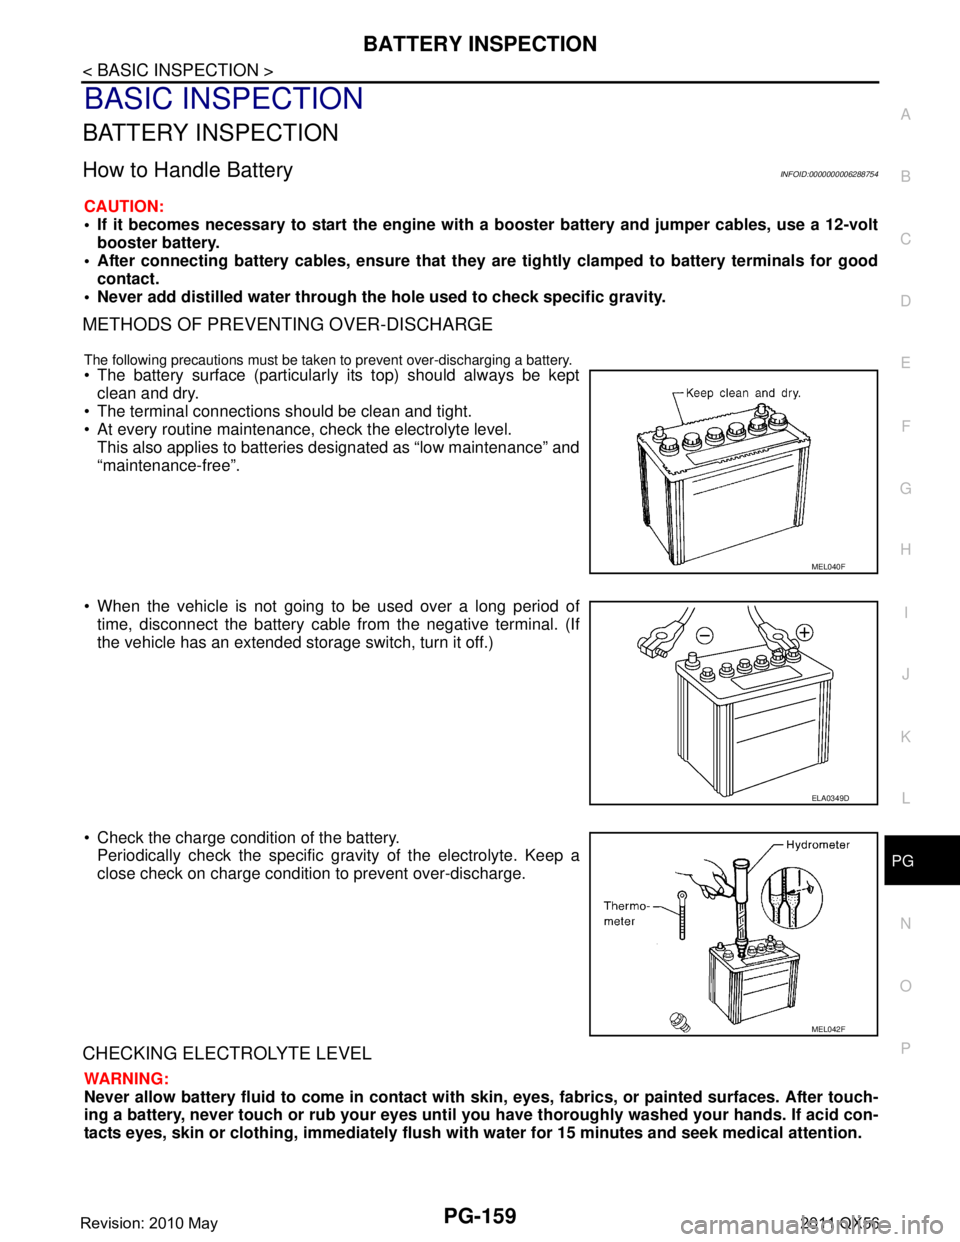
METHODS OF PREVENTING OVER-DISCHARGE
The following precautions must be taken to prevent over-discharging a battery.
The battery surface (particularly its top) should always be kept
clean and dry.
The terminal connections should be clean and tight.
At every routine maintenance, check the electrolyte level. This also applies to batteries designated as “low maintenance” and
“maintenance-free”.
When the vehicle is not going to be used over a long period of time, disconnect the battery cable from the negative terminal. (If
the vehicle has an extended storage switch, turn it off.)
Check the charge condition of the battery. Periodically check the specific gr avity of the electrolyte. Keep a
close check on charge condition to prevent over-discharge.
CHECKING ELECTROLYTE LEVEL
WARNING:
Never allow battery fluid to come in contact with skin, eyes, fabrics, or painted surfaces. After touch-
ing a battery, never touch or rub your eyes until you have thoroughly washed your hands. If acid con-
tacts eyes, skin or clothing, imme diately flush with water for 15 minutes and seek medical attention.
MEL040F
ELA0349D
MEL042F
Revision: 2010 May2011 QX56
Page 4079 of 5598
PG-160
< BASIC INSPECTION >
BATTERY INSPECTION
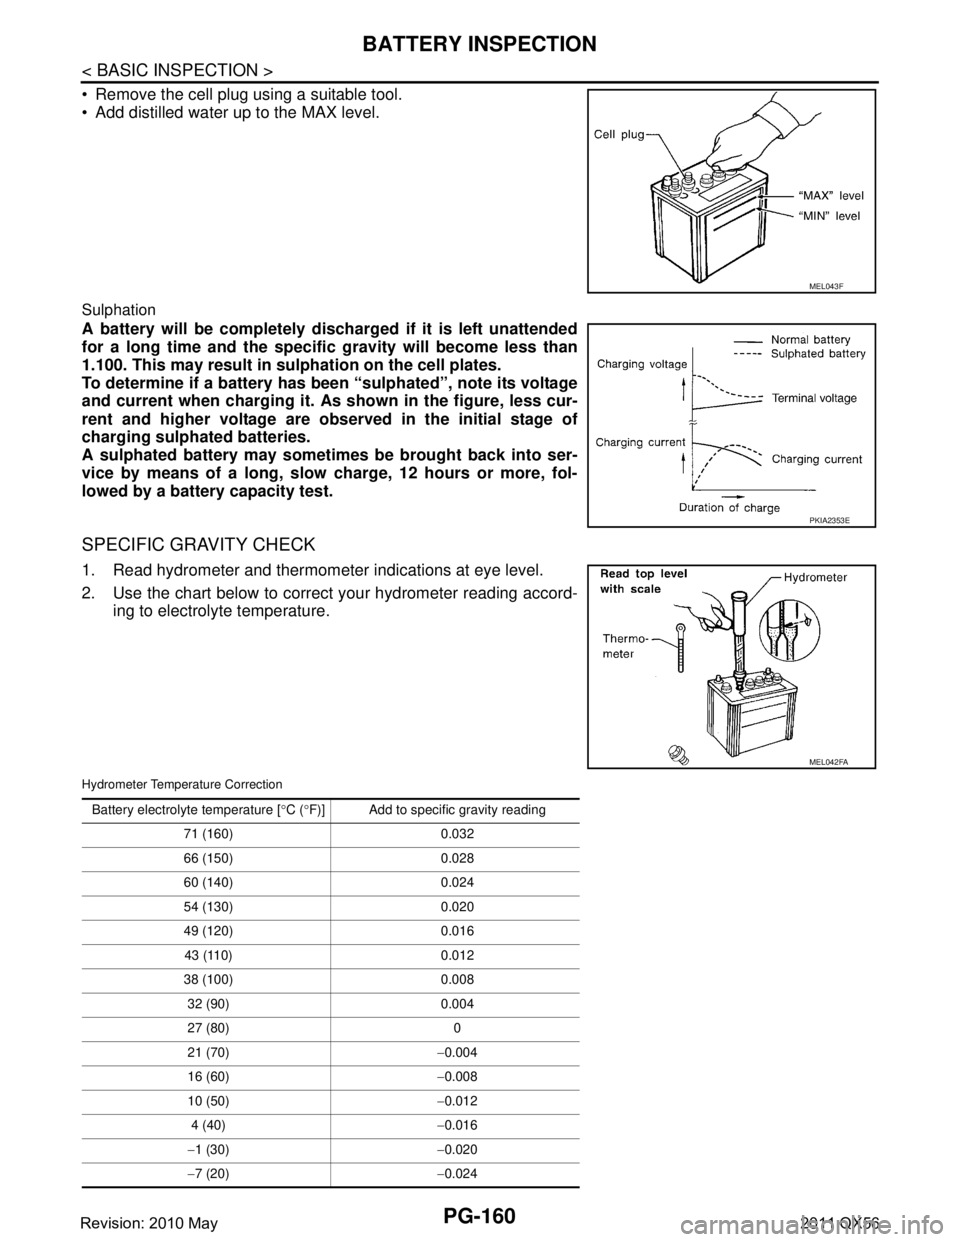
Remove the cell plug using a suitable tool.
Add distilled water up to the MAX level.
Sulphation
A battery will be completely discharged if it is left unattended
for a long time and the specific gravity will become less than
1.100. This may result in sulphation on the cell plates.
To determine if a battery has been “sulphated”, note its voltage
and current when charging it. As shown in the figure, less cur-
rent and higher voltage are observed in the initial stage of
charging sulphated batteries.
A sulphated battery may sometimes be brought back into ser-
vice by means of a long, slow charge, 12 hours or more, fol-
lowed by a battery capacity test.
SPECIFIC GRAVITY CHECK
1. Read hydrometer and thermometer indications at eye level.
2. Use the chart below to correct your hydrometer reading accord- ing to electrolyte temperature.
Hydrometer Temperature Correction
MEL043F
PKIA2353E
MEL042FA
Battery electrolyte temperature [ °C ( °F)] Add to specific gravity reading
71 (160) 0.032
66 (150) 0.028
60 (140) 0.024
54 (130) 0.020
49 (120) 0.016 43 (110) 0.012
38 (100) 0.008 32 (90) 0.004
27 (80) 0
21 (70) −0.004
16 (60) −0.008
10 (50) −0.012
4 (40) −0.016
− 1 (30) −0.020
− 7 (20) −0.024
Revision: 2010 May2011 QX56
Page 4080 of 5598
PG
BATTERY INSPECTIONPG-161
< BASIC INSPECTION >
C
DE
F
G H
I
J
K L
B A
O P
N
CHARGING THE BATTERY
CAUTION:
Never “quick charge” a fully discharged battery.
Keep the battery away from open
flame while it is being charged.
When connecting the charger, connect the leads first, then turn on the charger. Never turn on the
charger first, as this may cause a spark.
If battery electrolyte temperature rises above 55 °C (131 °F), stop charging. Always charge battery at
a temperature below 55 °C (131 °F).
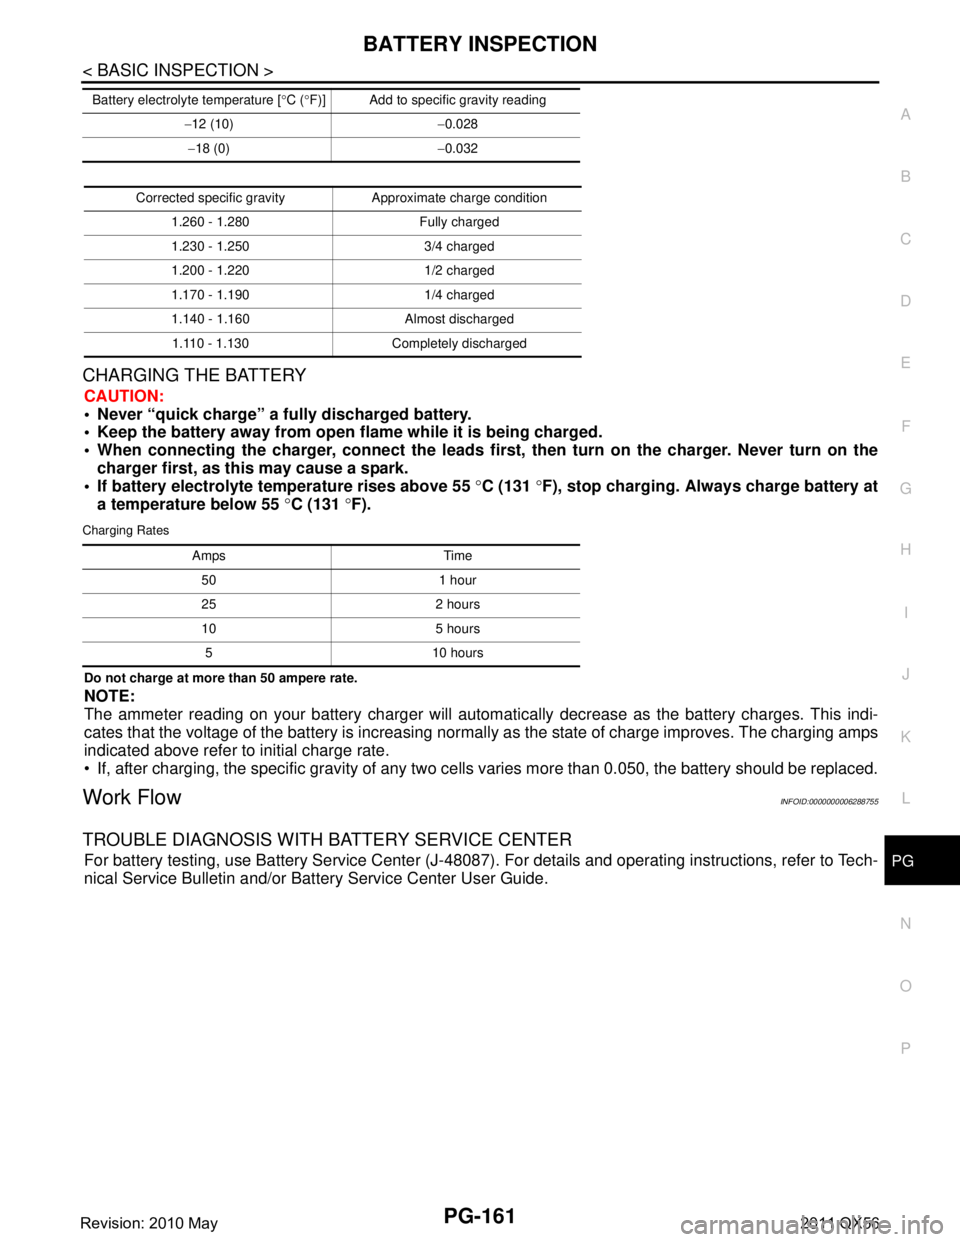
Charging Rates
Do not charge at more than 50 ampere rate.
NOTE:
The ammeter reading on your battery charger will automat ically decrease as the battery charges. This indi-
cates that the voltage of the battery is increasing norma lly as the state of charge improves. The charging amps
indicated above refer to initial charge rate.
If, after charging, the specific gravity of any two ce lls varies more than 0.050, the battery should be replaced.
Work FlowINFOID:0000000006288755
TROUBLE DIAGNOSIS WITH BATTERY SERVICE CENTER
For battery testing, use Battery Service Center (J-48087) . For details and operating instructions, refer to Tech-
nical Service Bulletin and/or Battery Service Center User Guide.
− 12 (10) −0.028
− 18 (0) −0.032
Battery electrolyte temperature [
°C ( °F)] Add to specific gravity reading
Corrected specific gravity Approximate charge condition
1.260 - 1.280 Fully charged
1.230 - 1.250 3/4 charged
1.200 - 1.220 1/2 charged
1.170 - 1.190 1/4 charged
1.140 - 1.160 Almost discharged1.110 - 1.130 Completely discharged
Amps Time 50 1 hour
25 2 hours
10 5 hours5 10 hours
Revision: 2010 May2011 QX56
Page 4210 of 5598
RAX-14
< REMOVAL AND INSTALLATION >
REAR DRIVE SHAFT
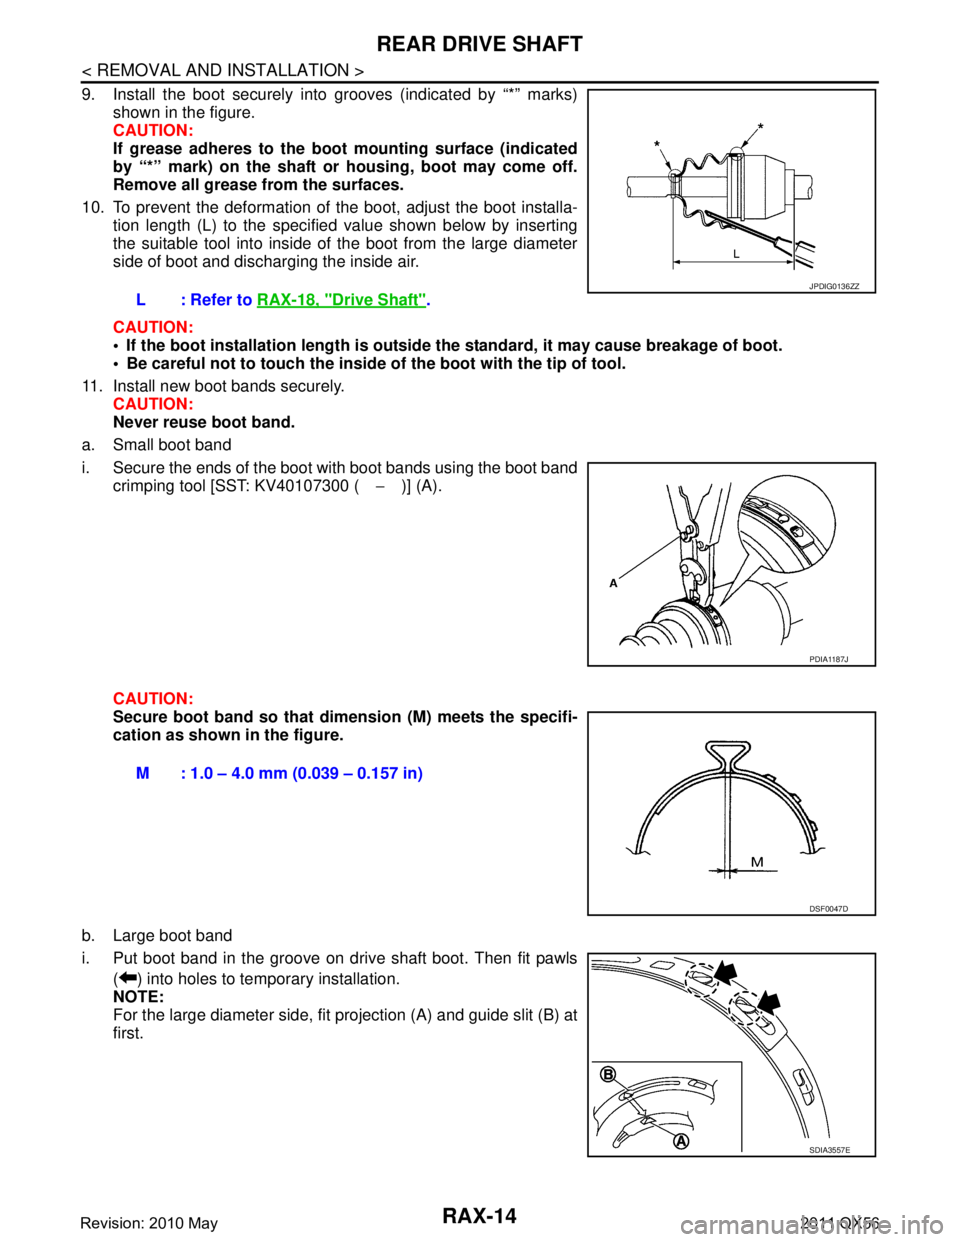
9. Install the boot securely into grooves (indicated by “*” marks)shown in the figure.
CAUTION:
If grease adheres to the boot mounting surface (indicated
by “*” mark) on the shaft or housing, boot may come off.
Remove all grease from the surfaces.
10. To prevent the deformation of the boot, adjust the boot installa- tion length (L) to the specified value shown below by inserting
the suitable tool into inside of the boot from the large diameter
side of boot and discharging the inside air.
CAUTION:
If the boot installation length is outsid e the standard, it may cause breakage of boot.
Be careful not to touch the inside of the boot with the tip of tool.
11. Install new boot bands securely. CAUTION:
Never reuse boot band.
a. Small boot band
i. Secure the ends of the boot with boot bands using the boot band crimping tool [SST: KV40107300 ( −)] (A).
CAUTION:
Secure boot band so that dimension (M) meets the specifi-
cation as shown in the figure.
b. Large boot band
i. Put boot band in the groove on drive shaft boot. Then fit pawls ( ) into holes to temporary installation.
NOTE:
For the large diameter side, fit projection (A) and guide slit (B) at
first.L: Refer to
RAX-18, "
Drive Shaft".
JPDIG0136ZZ
PDIA1187J
M : 1.0 – 4.0 mm (0.039 – 0.157 in)
DSF0047D
SDIA3557E
Revision: 2010 May2011 QX56
Page 4212 of 5598
RAX-16
< REMOVAL AND INSTALLATION >
REAR DRIVE SHAFT
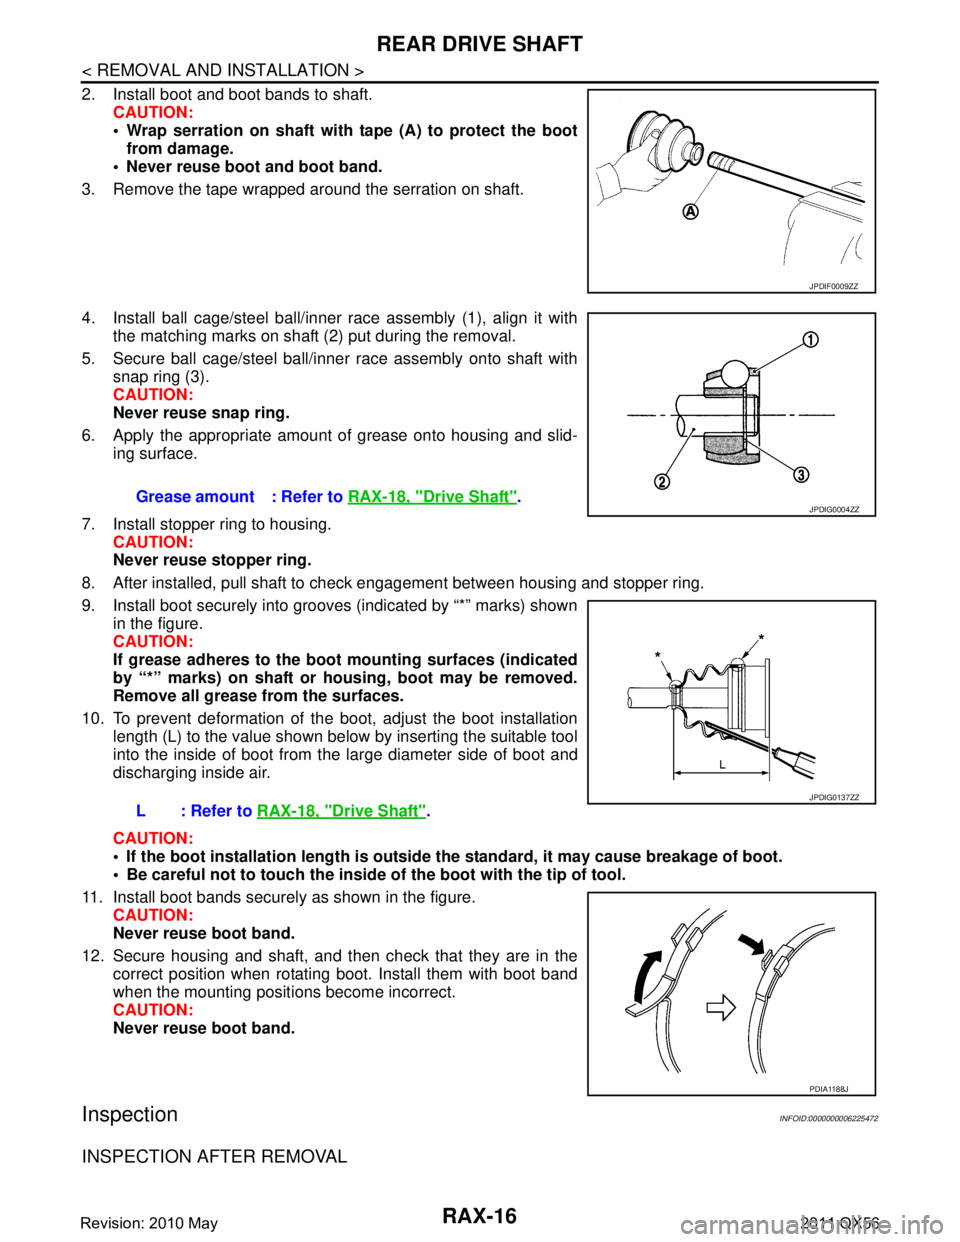
2. Install boot and boot bands to shaft.CAUTION:
Wrap serration on shaft with tape (A) to protect the bootfrom damage.
Never reuse boot and boot band.
3. Remove the tape wrapped around the serration on shaft.
4. Install ball cage/steel ball/inner race assembly (1), align it with the matching marks on shaft (2) put during the removal.
5. Secure ball cage/steel ball/inner race assembly onto shaft with snap ring (3).
CAUTION:
Never reuse snap ring.
6. Apply the appropriate amount of grease onto housing and slid- ing surface.
7. Install stopper ring to housing. CAUTION:
Never reuse stopper ring.
8. After installed, pull shaft to check engagement between housing and stopper ring.
9. Install boot securely into grooves (indicated by “*” marks) shown in the figure.
CAUTION:
If grease adheres to the boot mounting surfaces (indicated
by “*” marks) on shaft or housing, boot may be removed.
Remove all grease from the surfaces.
10. To prevent deformation of the boot, adjust the boot installation
length (L) to the value shown below by inserting the suitable tool
into the inside of boot from the large diameter side of boot and
discharging inside air.
CAUTION:
If the boot installation length is outsid e the standard, it may cause breakage of boot.
Be careful not to touch the inside of the boot with the tip of tool.
11. Install boot bands securely as shown in the figure. CAUTION:
Never reuse boot band.
12. Secure housing and shaft, and then check that they are in the correct position when rotating boot. Install them with boot band
when the mounting positi ons become incorrect.
CAUTION:
Never reuse boot band.
InspectionINFOID:0000000006225472
INSPECTION AFTER REMOVAL
JPDIF0009ZZ
Grease amount : Refer to RAX-18, "Drive Shaft".
L: Refer to RAX-18, "
Drive Shaft".
JPDIG0004ZZ
JPDIG0137ZZ
PDIA1188J
Revision: 2010 May2011 QX56