Page 2893 of 5598

EXT-38
< REMOVAL AND INSTALLATION >
DOOR SASH COVER
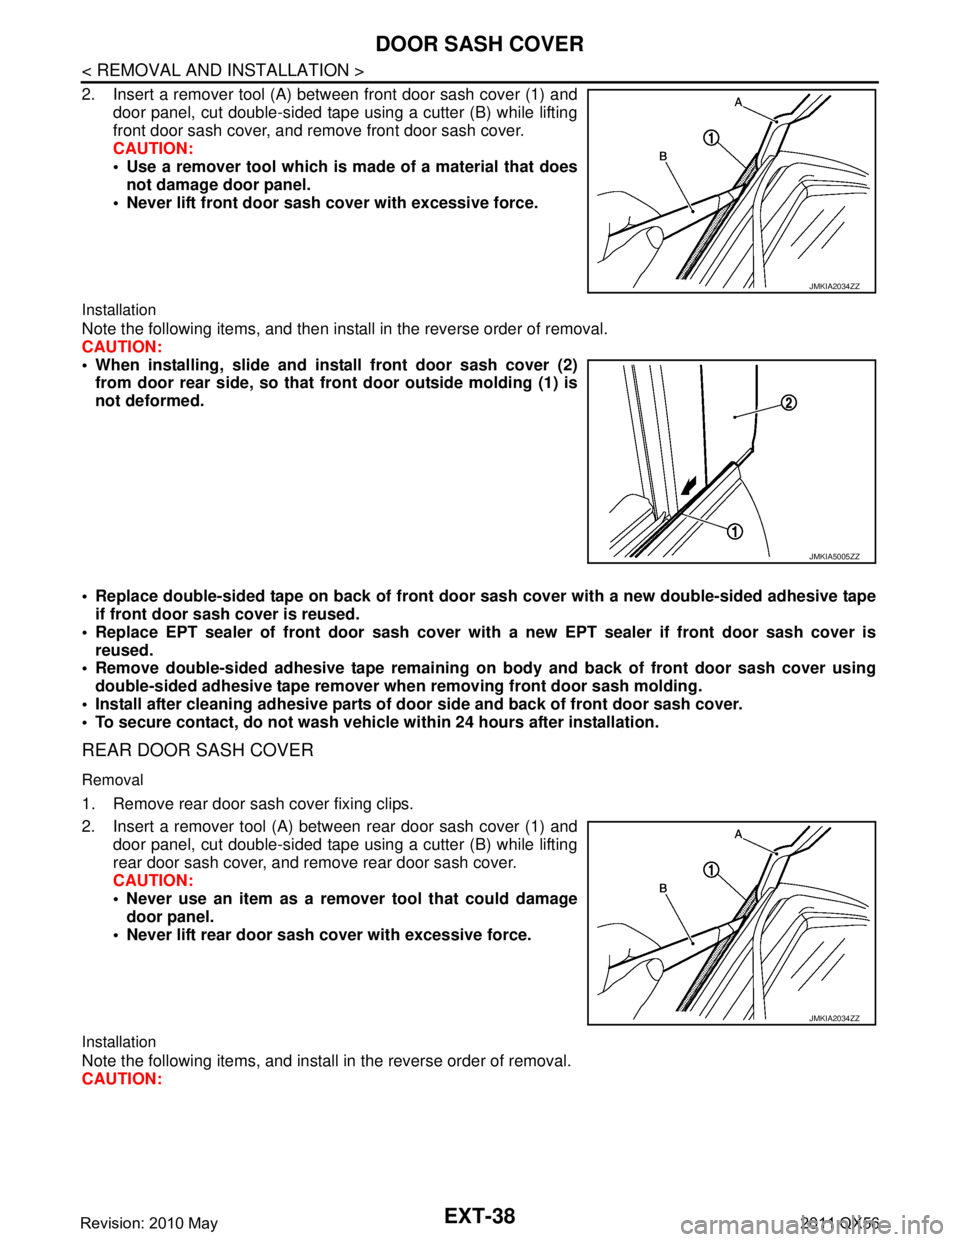
2. Insert a remover tool (A) between front door sash cover (1) anddoor panel, cut double-sided tape using a cutter (B) while lifting
front door sash cover, and remove front door sash cover.
CAUTION:
Use a remover tool which is made of a material that doesnot damage door panel.
Never lift front door sash cover with excessive force.
Installation
Note the following items, and then install in the reverse order of removal.
CAUTION:
When installing, slid e and install front door sash cover (2)
from door rear side, so that front door outside molding (1) is
not deformed.
Replace double-sided tape on back of front door sash cover with a new double-sided adhesive tape
if front door sash cover is reused.
Replace EPT sealer of front door sash cover with a new EPT sealer if front door sash cover is
reused.
Remove double-sided adhesive ta pe remaining on body and back of front door sash cover using
double-sided adhesive tape remover wh en removing front door sash molding.
Install after cleaning adhesive parts of doo r side and back of front door sash cover.
To secure contact, do not wash vehicle within 24 hours after installation.
REAR DOOR SASH COVER
Removal
1. Remove rear door sash cover fixing clips.
2. Insert a remover tool (A) between rear door sash cover (1) and
door panel, cut double-sided tape using a cutter (B) while lifting
rear door sash cover, and remove rear door sash cover.
CAUTION:
Never use an item as a remover tool that could damagedoor panel.
Never lift rear door sash cover with excessive force.
Installation
Note the following items, and install in the reverse order of removal.
CAUTION:
JMKIA2034ZZ
JMKIA5005ZZ
JMKIA2034ZZ
Revision: 2010 May2011 QX56
Page 2896 of 5598
REAR SPOILEREXT-41
< REMOVAL AND INSTALLATION >
C
DE
F
G H
I
J
L
M A
B
EXT
N
O P
REAR SPOILER
Exploded ViewINFOID:0000000006367627
Removal and InstallationINFOID:0000000006367628
REMOVAL
1. Remove back door trim. Refer to INT-39, "Removal and Installation".
2. Remove rear spoiler mounting nuts.
3. Cut rear spoiler fixing double-sided tape with cutter knife.
4. Disengage rear spoiler fixing clips with remover tool (A), and then remove rear spoiler.
CAUTION:
Apply a protective tape (B) on body panel and rear spoiler
to protect the painted surface from damage.
1. Rear spoiler assembly 2. Grommet 3. High-mounted stop lamp
4. High-mounted stop lamp cover 5. Washer nozzle 6. EPT sealer [t: 5.0 mm (0.197 in)]
7. Double-sided tape
[t: 1.6 mm (0.063 in)] 8. EPT sealer [t: 4.0 mm (0.157 in)]
: Clip
: Vehicle front
Refer to GI-4, "
Components" for symbols in the figure.
JMKIA5322ZZ
: Clip
JMKIA5383ZZ
Revision: 2010 May2011 QX56
Page 2897 of 5598
EXT-42
< REMOVAL AND INSTALLATION >
REAR SPOILER
5. Remove following parts after removing rear spoiler. High-mounted stop lamp
Grommets
Washer nozzle
INSTALLATION
Note the following items, and then install in the reverse order of removal.
CAUTION:
Be careful no to damage the back door.
Always replace double-sided tape with a new one, if rear spoiler is reused.
Remove double-sided tape remain ing on back door panel and back of rear spoiler with a double-
sided tape remover, after removing rear spoiler.
When installing, visually check the rear spoiler and the clips, then replace them with new parts if
they are damaged.
When installing rear spoiler, check that clips an d bolts are securely fitted in back door panel holes,
and then press them in.
Never wash the vehicle within 24 hours af ter installing so as to keep adhesive.
Revision: 2010 May2011 QX56
Page 2898 of 5598
DRIP MOLDINGEXT-43
< REMOVAL AND INSTALLATION >
C
DE
F
G H
I
J
L
M A
B
EXT
N
O P
DRIP MOLDING
Exploded ViewINFOID:0000000006367629
Removal and InstallationINFOID:0000000006367630
REMOVAL
Remove drip molding fixing clips from rear end to front end using
remover tool (A).
CAUTION:
Apply protective tape (B) on body panel to protect the painted
damage from damage.
INSTALLATION
Note the following items, and then install in the reverse order of removal.
CAUTION:
When installing, check visually the drip molding and clips, then replace them with new parts if they are
damaged.
1. Drip molding clip 2. Drip molding
JMKIA5314ZZ
: Clip
JMKIA5474ZZ
Revision: 2010 May2011 QX56
Page 3043 of 5598
GW-14
< REMOVAL AND INSTALLATION >
SIDE WINDOW GLASS
SIDE WINDOW GLASS
Exploded ViewINFOID:0000000006220816
1. Side window glass 2. Body side outer panel 3. Luggage side upper finisher
4. Adhesive 5. Primer 6. Back pillar garnish
7. Rear pillar finisher 8. Luggage side lower finisher
JMKIA5206GB
Revision: 2010 May2011 QX56
Page 3045 of 5598
GW-16
< REMOVAL AND INSTALLATION >
BACK DOOR WINDOW GLASS
BACK DOOR WINDOW GLASS
Exploded ViewINFOID:0000000006220819
Removal and InstallationINFOID:0000000006220820
REMOVAL
1. Remove rear spoiler. Refer to EXT-41, "Removal and Installation".
2. Remove the connectors and grounds for the back door window defogger.
1. Dam-sealant rubber upper 2. Back door window glass 3. Back door window glass holder (up- per)
4. Back door window glass molding 5. Back door window glass holder (low- er)6. Back door panel outer
7. Back door panel inner 8. Adhesive 9. Primer : Do not reuse
Unit : mm (in)
JMKIA5457GB
Revision: 2010 May2011 QX56
Page 3046 of 5598

BACK DOOR WINDOW GLASSGW-17
< REMOVAL AND INSTALLATION >
C
DE
F
G H
I
J
L
M A
B
GW
N
O P
3. Remove rear wiper arm. Refer to WW-74, "Removal and Installation".
4. Remove rear wiper motor. Refer to WW-76, "
Removal and Installation".
5. Remove back door window glass molding using a pliers. Refer to GW-16, "
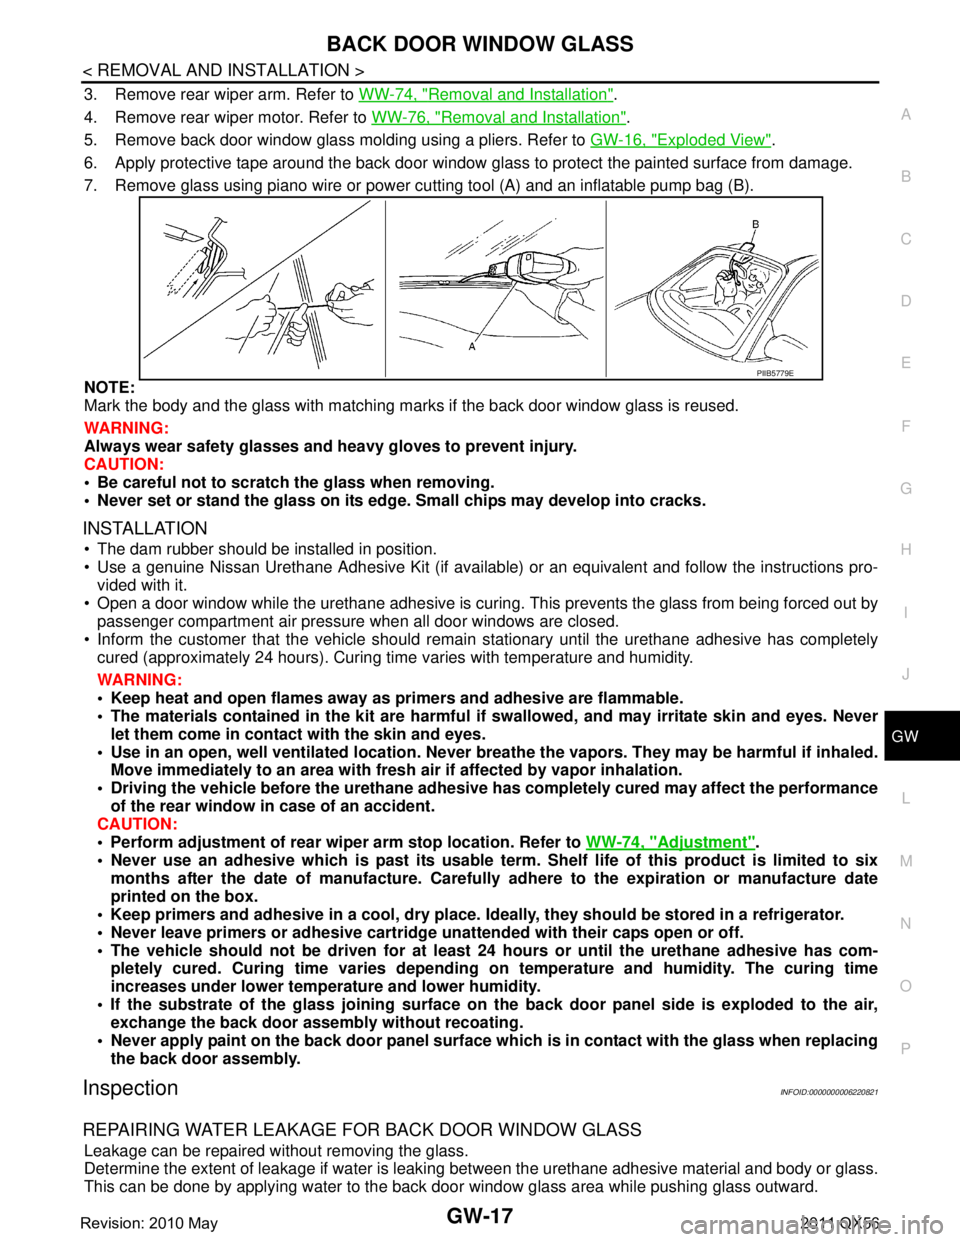
Exploded View".
6. Apply protective tape around the back door window gl ass to protect the painted surface from damage.
7. Remove glass using piano wire or power cutting tool (A) and an inflatable pump bag (B).
NOTE:
Mark the body and the glass with matching ma rks if the back door window glass is reused.
WARNING:
Always wear safety glasses and heavy gloves to prevent injury.
CAUTION:
Be careful not to scratch the glass when removing.
Never set or stand the glass on its edge . Small chips may develop into cracks.
INSTALLATION
The dam rubber should be installed in position.
Use a genuine Nissan Urethane Adhesive Kit (if available) or an equivalent and follow the instructions pro-
vided with it.
Open a door window while the urethane adhesive is curing. This prevents the glass from being forced out by
passenger compartment air pressure when all door windows are closed.
Inform the customer that the v ehicle should remain stationary until the urethane adhesive has completely
cured (approximately 24 hours). Curing time varies with temperature and humidity.
WARNING:
Keep heat and open flames away as primers and adhesive are flammable.
The materials contained in the kit are harmful if swallowed, and may irritate skin and eyes. Never
let them come in contact with the skin and eyes.
Use in an open, well ventilated location. Never br eathe the vapors. They may be harmful if inhaled.
Move immediately to an area with fresh air if affected by vapor inhalation.
Driving the vehicle before the urethane adhesive has completely cured may affect the performance
of the rear window in case of an accident.
CAUTION:
Perform adjustment of rear wipe r arm stop location. Refer to WW-74, "
Adjustment".
Never use an adhesive which is past its usable term. Shelf life of this product is limited to six
months after the date of manufacture. Carefull y adhere to the expiration or manufacture date
printed on the box.
Keep primers and adhesive in a cool, dry place. Id eally, they should be stored in a refrigerator.
Never leave primers or adhesive cartridge unattended with their caps open or off.
The vehicle should not be driven for at least 24 hours or until the urethane adhesive has com-
pletely cured. Curing time varies depending on temperature and humidity. The curing time
increases under lower temperature and lower humidity.
If the substrate of the glass joining surface on th e back door panel side is exploded to the air,
exchange the back door assembly without recoating.
Never apply paint on the back door panel surface wh ich is in contact with the glass when replacing
the back door assembly.
InspectionINFOID:0000000006220821
REPAIRING WATER LEAKAGE FOR BACK DOOR WINDOW GLASS
Leakage can be repaired without removing the glass.
Determine the extent of leakage if water is leaki ng between the urethane adhesive material and body or glass.
This can be done by applying water to the back door window glass area while pushing glass outward.
PIIB5779E
Revision: 2010 May2011 QX56
Page 3052 of 5598

REAR DOOR GLASSGW-23
< REMOVAL AND INSTALLATION >
C
DE
F
G H
I
J
L
M A
B
GW
N
O P
REAR DOOR GLASS
Exploded ViewINFOID:0000000006220829
Removal and InstallationINFOID:0000000006220830
REMOVAL
1. Remove rear door finisher. Refer to INT-16, "Removal and Installation".
2. Remove rear door inside seal.
3. Remove rear door outside molding. Refer to EXT-32, "
Removal and Installation".
4. Remove rear door pull handle bracket mounting bolts and remove it.
5. Disconnect rear door speaker harness connector.
6. Remove the rear door sealing screen with a cutter tool. NOTE:
Cut the butyl-tape so that some parts of the butyl-tape do not remain on the rear door sealing screen, if the
sealing screen is reused.
7. Reconnect the rear door power window switch.
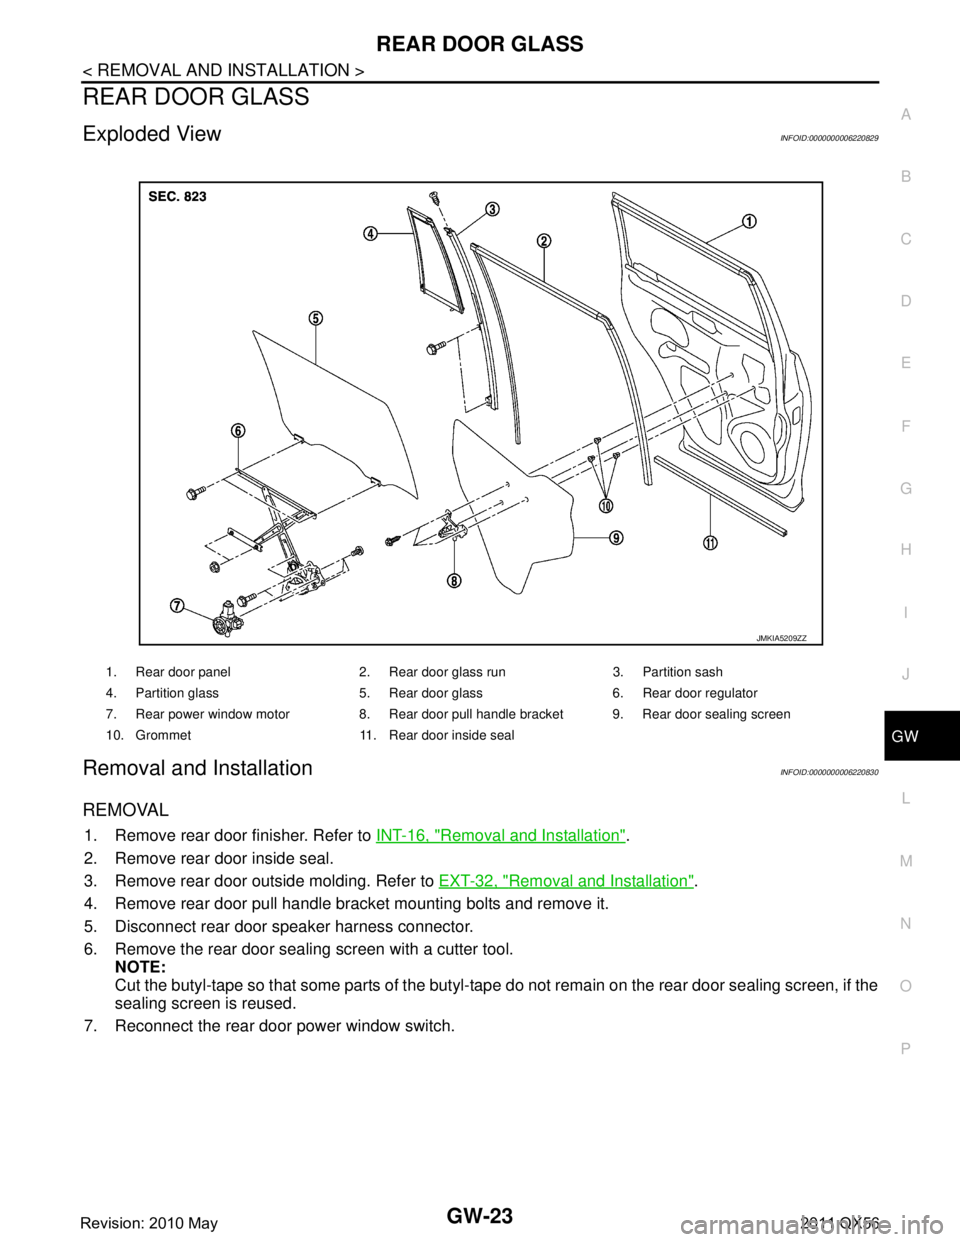
1. Rear door panel 2. Rear door glass run 3. Partition sash
4. Partition glass 5. Rear door glass 6. Rear door regulator
7. Rear power window motor 8. Rear door pull handle bracket 9. Rear door sealing screen
10. Grommet 11. Rear door inside seal
JMKIA5209ZZ
Revision: 2010 May2011 QX56