Page 3695 of 5598

CHASSIS MAINTENANCEMA-25
< PERIODIC MAINTENANCE >
C
DE
F
G H
I
J
K L
M B
MA
N
O A
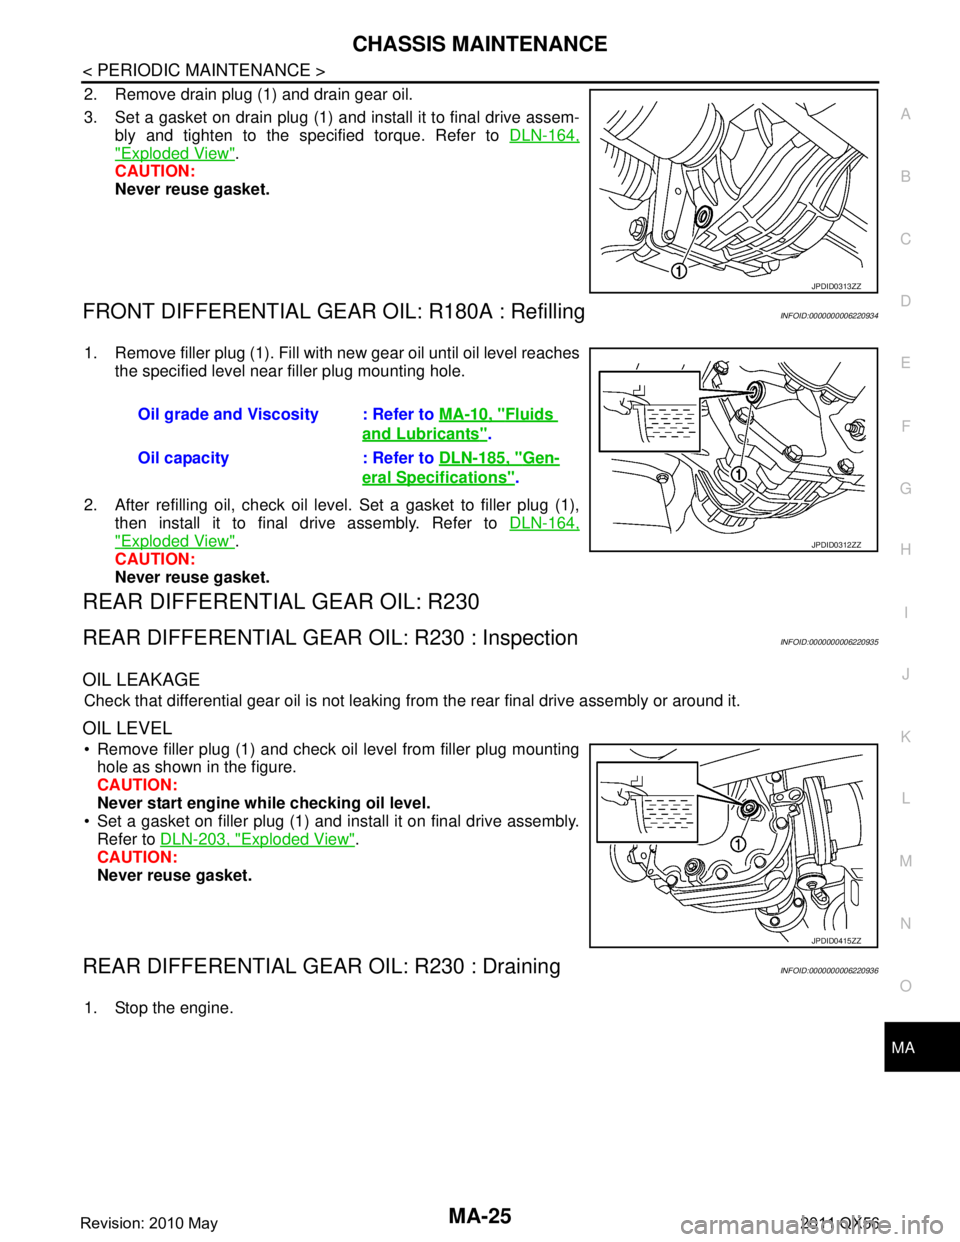
2. Remove drain plug (1) and drain gear oil.
3. Set a gasket on drain plug (1) and install it to final drive assem-
bly and tighten to the specified torque. Refer to DLN-164,
"Exploded View".
CAUTION:
Never reuse gasket.
FRONT DIFFERENTIAL GEAR OIL: R180A : RefillingINFOID:0000000006220934
1. Remove filler plug (1). Fill with new gear oil until oil level reaches
the specified level near filler plug mounting hole.
2. After refilling oil, check oil level. Set a gasket to filler plug (1), then install it to final drive assembly. Refer to DLN-164,
"Exploded View".
CAUTION:
Never reuse gasket.
REAR DIFFERENTIAL GEAR OIL: R230
REAR DIFFERENTIAL GEAR OIL: R230 : InspectionINFOID:0000000006220935
OIL LEAKAGE
Check that differential gear oil is not leaking fr om the rear final drive assembly or around it.
OIL LEVEL
Remove filler plug (1) and check oil level from filler plug mounting
hole as shown in the figure.
CAUTION:
Never start engine while checking oil level.
Set a gasket on filler plug (1) and install it on final drive assembly. Refer to DLN-203, "
Exploded View".
CAUTION:
Never reuse gasket.
REAR DIFFERENTIAL GEAR OIL: R230 : DrainingINFOID:0000000006220936
1. Stop the engine.
JPDID0313ZZ
Oil grade and Viscosity : Refer to MA-10, "Fluids
and Lubricants".
Oil capacity : Refer to DLN-185, "
Gen-
eral Specifications".
JPDID0312ZZ
JPDID0415ZZ
Revision: 2010 May2011 QX56
Page 5058 of 5598

DIAGNOSIS AND REPAIR WORK FLOWSTC-13
< BASIC INSPECTION >
C
DE
F
H I
J
K L
M A
B
STC
N
O P
BASIC INSPECTION
DIAGNOSIS AND REPAIR WORK FLOW
Work FlowINFOID:0000000006256124
DETAILED FLOW
1.COLLECT THE INFORMATION FROM THE CUSTOMER
It is also important to clarify customer complaints before inspection. First of all, reproduce symptoms and
understand them fully. Ask customer about his/her complaints carefully. In some cases, it is necessary to
check symptoms by driving vehicle with customer.
CAUTION:
Customers are not professional. It is danger ous to make an easy guess like “maybe the customer
means that...,” or “maybe the cu stomer mentions this symptom”.
>> GO TO 2.
2.CHECK THE STATUS
1. Power steering fluid leakage and check the power steering fluid level. Refer to ST-30, "
Inspection".
2. Check the drive belt tension. Refer to EM-20, "
Checking".
3. Check the power steering gear for damages, cracks and fluid leakage. Refer to ST-46, "
Inspection".
4. Check the relief oil pressure. Refer to ST-52, "
Inspection".
>> GO TO 3.
3.DIAGNOSIS CHART BY SYMPTOM
Perform the diagnosis by symptom. Refer to STC-22, "
Diagnosis Procedure".
>> GO TO 4.
4.FINAL CHECK
Check the input/output standard values for the power steering control unit.
Are the power steering control unit input/output values within standard ranges respectively?
YES >> INSPECTION END
NO >> GO TO 2.
Revision: 2010 May2011 QX56
Page 5183 of 5598
![INFINITI QX56 2011 Factory Service Manual
A/T FLUIDTM-95
< BASIC INSPECTION > [7AT: RE7R01B]
C
EF
G H
I
J
K L
M A
B
TM
N
O P
d. When the ATF starts to drip, tighten the drain plug to the oil pan to the specified torque. Refer to TM-182,
"Ex INFINITI QX56 2011 Factory Service Manual
A/T FLUIDTM-95
< BASIC INSPECTION > [7AT: RE7R01B]
C
EF
G H
I
J
K L
M A
B
TM
N
O P
d. When the ATF starts to drip, tighten the drain plug to the oil pan to the specified torque. Refer to TM-182,
"Ex](/manual-img/42/57033/w960_57033-5182.png)
A/T FLUIDTM-95
< BASIC INSPECTION > [7AT: RE7R01B]
C
EF
G H
I
J
K L
M A
B
TM
N
O P
d. When the ATF starts to drip, tighten the drain plug to the oil pan to the specified torque. Refer to TM-182,
"Exploded View".
CAUTION:
Never reuse drain plug and drain plug gasket.
e. Remove overflow plug from oil pan.
f. Install the charging pipe (A) to the overflow plug hole. CAUTION:
Tighten the charging pipe by hand.
g. Install the bucket pump hose (B) to the charging pipe. CAUTION:
Insert the bucket pump hose all the way to the end of the
charging pipe.
h. Fill approximately 3 liters (3-1/8 US qt, 2-5/8 lmp qt) of the ATF.
i. Remove the bucket pump hose to remove the charging pipe, and then temporarily tighten the overflow plug to the oil pan.
CAUTION:
Quickly perform the procedure to avoid ATF leakage from
the oil pan.
j. Lift down the vehicle.
k. Start the engine.
l. Make the ATF temperature approximately 40 °C (104 °F).
NOTE:
The ATF level is greatly affected by the temperat ure. Always check the ATF temperature on “ATF TEMP
1” of “Data Monitor” using CONSULT-III.
m. Park vehicle on level surface and set parking brake.
n. Shift the selector lever through each gear pos ition. Leave selector lever in “P” position.
o. Lift up the vehicle when the ATF temperature reaches 40 °C (104 °F), and remove the overflow plug from
the oil pan.
CAUTION:
Perform “Step 4-o” with the engine at idle.
p. When the ATF starts to drip, tighten the overflow plug to the oil pan to the specified torque. Refer to TM-
182, "Exploded View".
CAUTION:
Never reuse overflow plug.
AdjustmentINFOID:0000000006226792
CAUTION:
Use only Genuine NISSAN Matic S ATF. Never mix with other ATF.
Using ATF other than Genuine NI SSAN Matic S ATF will cause deteri oration in driveability and A/T
durability, and may damage the A/T, which is not covered by the INFINITI new vehicle limited war-
ranty.
When filling ATF, be careful not to sca tter heat generating parts such as exhaust.
Always maintain the ATF temperature within between 35 °C (95 °F) and 45 °C (113 °F) while checking
with CONSULT-III when the ATF level adjustment is performed.
JSDIA1335ZZ
Recommended fluid and fluid capacity : Refer to TM-296, "General Specification".
Revision: 2010 May2011 QX56