2011 INFINITI QX56 belt
[x] Cancel search: beltPage 4592 of 5598
SECOND SEATSE-133
< REMOVAL AND INSTALLATION >
C
DE
F
G H
I
K L
M A
B
SE
N
O P
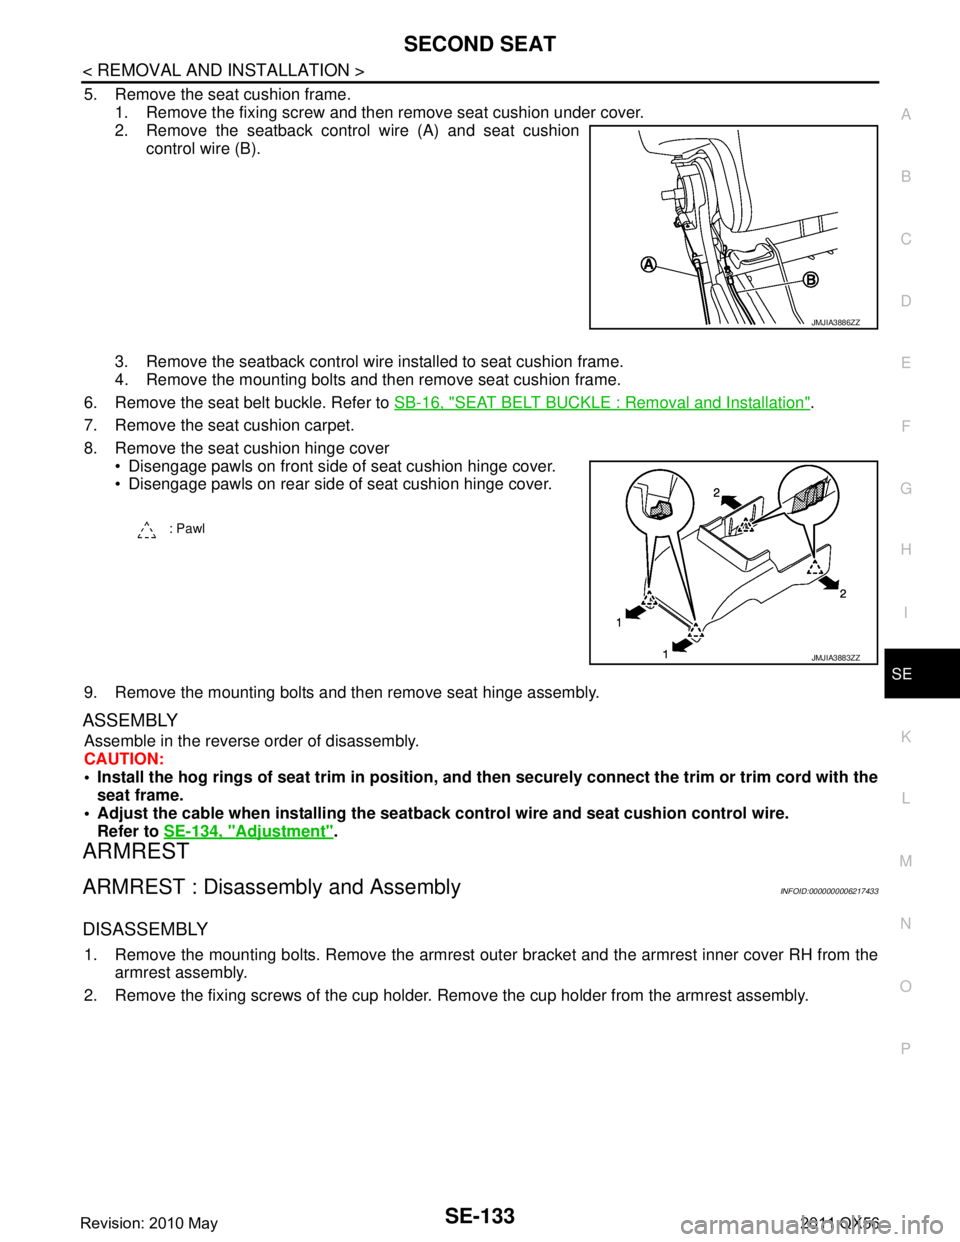
5. Remove the seat cushion frame. 1. Remove the fixing screw and then remove seat cushion under cover.
2. Remove the seatback control wire (A) and seat cushion control wire (B).
3. Remove the seatback control wire installed to seat cushion frame.
4. Remove the mounting bolts and then remove seat cushion frame.
6. Remove the seat belt buckle. Refer to SB-16, "
SEAT BELT BUCKLE : Removal and Installation".
7. Remove the seat cushion carpet.
8. Remove the seat cushion hinge cover Disengage pawls on front side of seat cushion hinge cover.
Disengage pawls on rear side of seat cushion hinge cover.
9. Remove the mounting bolts and then remove seat hinge assembly.
ASSEMBLY
Assemble in the reverse order of disassembly.
CAUTION:
Install the hog rings of seat trim in position, and then securely connect the trim or trim cord with the
seat frame.
Adjust the cable when installing the seatb ack control wire and seat cushion control wire.
Refer to SE-134, "
Adjustment".
ARMREST
ARMREST : Disassembly and AssemblyINFOID:0000000006217433
DISASSEMBLY
1. Remove the mounting bolts. Remove the armrest out er bracket and the armrest inner cover RH from the
armrest assembly.
2. Remove the fixing screws of the cup holder. Remove the cup holder from the armrest assembly.
JMJIA3886ZZ
: Pawl
JMJIA3883ZZ
Revision: 2010 May2011 QX56
Page 4597 of 5598
SE-138
< REMOVAL AND INSTALLATION >
THIRD SEAT
Removal and Installation
INFOID:0000000006217436
REMOVAL
CAUTION:
When removing and installi ng, use shop cloths to protect parts from damage.
1. Remove the headrest.
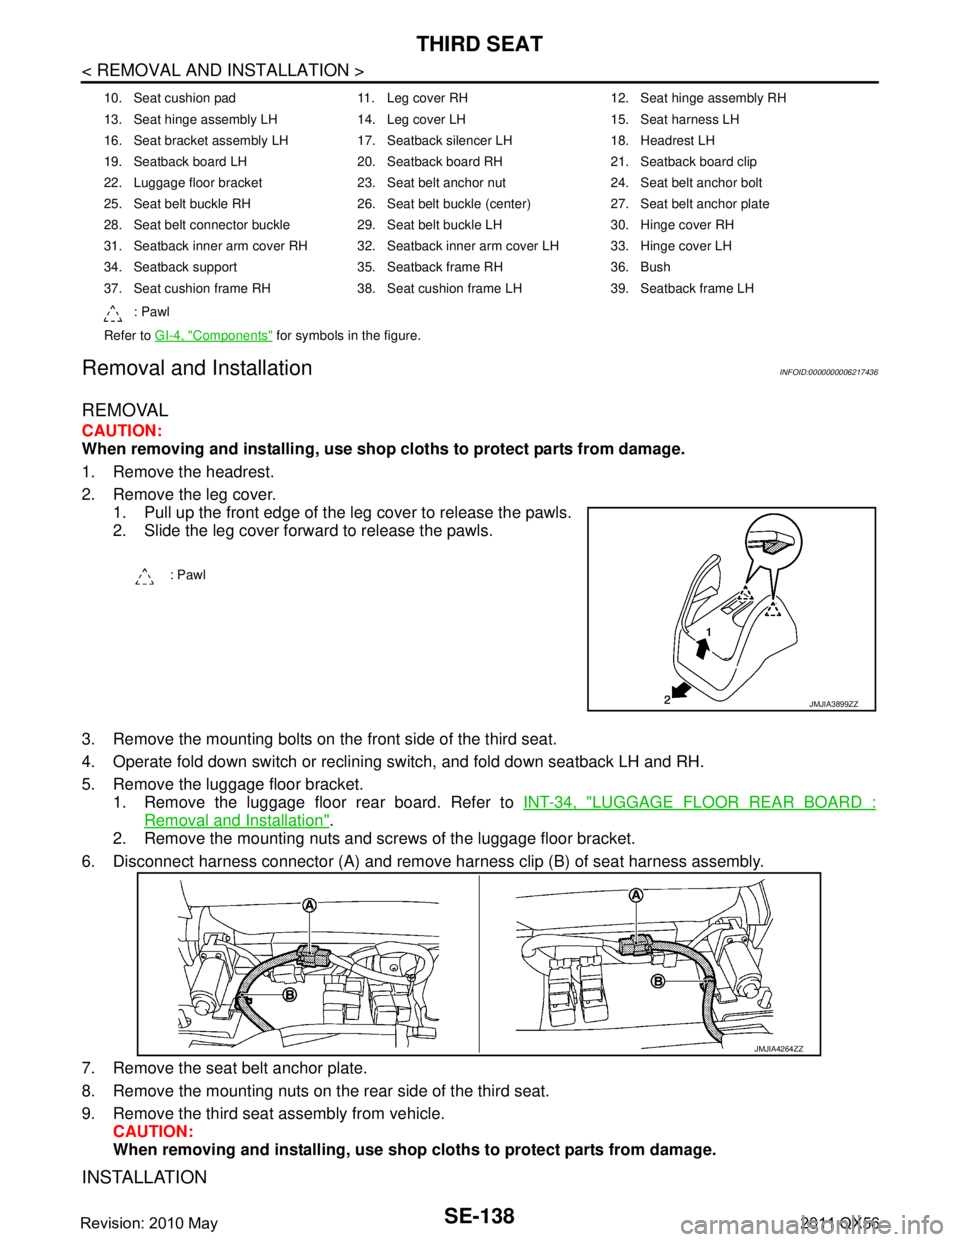
2. Remove the leg cover. 1. Pull up the front edge of the leg cover to release the pawls.
2. Slide the leg cover forward to release the pawls.
3. Remove the mounting bolts on the front side of the third seat.
4. Operate fold down switch or reclining switch, and fold down seatback LH and RH.
5. Remove the luggage floor bracket. 1. Remove the luggage floor rear board. Refer to INT-34, "
LUGGAGE FLOOR REAR BOARD :
Removal and Installation".
2. Remove the mounting nuts and screws of the luggage floor bracket.
6. Disconnect harness connector (A) and remove har ness clip (B) of seat harness assembly.
7. Remove the seat belt anchor plate.
8. Remove the mounting nuts on the rear side of the third seat.
9. Remove the third seat assembly from vehicle. CAUTION:
When removing and installi ng, use shop cloths to protect parts from damage.
INSTALLATION
10. Seat cushion pad 11. Leg cover RH 12. Seat hinge assembly RH
13. Seat hinge assembly LH 14. Leg cover LH 15. Seat harness LH
16. Seat bracket assembly LH 17. Seatback silencer LH 18. Headrest LH
19. Seatback board LH 20. Seatback board RH 21. Seatback board clip
22. Luggage floor bracket 23. Seat belt anchor nut 24. Seat belt anchor bolt
25. Seat belt buckle RH 26. Seat belt buckle (center) 27. Seat belt anchor plate
28. Seat belt connector buckle 29. Seat belt buckle LH 30. Hinge cover RH
31. Seatback inner arm cover RH 32. Seatback inner arm cover LH 33. Hinge cover LH
34. Seatback support 35. Seatback frame RH 36. Bush
37. Seat cushion frame RH 38. Seat cushion frame LH 39. Seatback frame LH
: Pawl
Refer to GI-4, "
Components" for symbols in the figure.
: Pawl
JMJIA3899ZZ
JMJIA4264ZZ
Revision: 2010 May2011 QX56
Page 4608 of 5598

SEC-1
BODY EXTERIOR, DOORS, ROOF & VEHICLE SECURITY
C
D
E
F
G H
I
J
L
M
SECTION SEC
A
B
SEC
N
O P
CONTENTS
SECURITY CONTROL SYSTEM
WITH INTELLIGE NT KEY SYSTEM
PRECAUTION ................ ...............................
5
PRECAUTIONS .............................................. .....5
Precaution for Supplemental Restraint System
(SRS) "AIR BAG" and "SEAT BELT PRE-TEN-
SIONER" ............................................................. ......
5
Precaution Necessary for Steering Wheel Rota-
tion after Battery Disconnect .....................................
5
Precaution for Procedure without Cowl Top Cover ......6
SYSTEM DESCRIPTION ..............................7
COMPONENT PARTS ................................... .....7
Component Parts Location .................................. ......7
Component Description .............................................8
A/T Shift Selector (Detention Switch) ........................8
BCM ..........................................................................8
ECM ..........................................................................9
IPDM E/R ..................................................................9
NATS Antenna Amp. .................................................9
TCM ..........................................................................9
Combination Meter ....................................................9
Door Switch ...............................................................9
Hood Switch ..............................................................9
Inside Key Antenna ...................................................9
Intelligent Key ............................................................9
Push-button Ignition Switch .....................................10
Remote Keyless Entry Receiver .............................10
Security Indicator Lamp ..........................................10
Starter Control Relay ...............................................10
Starter Relay ...........................................................10
Steering Lock Relay ................................................10
Steering Lock Unit ...................................................10
Stop Lamp Switch ...................................................10
Transmission Range Switch ....................................10
Vehicle Information Display .....................................11
SYSTEM .............................................................12
INTELLIGENT KEY SYSTEM/ENGINE START
FUNCTION ............................................................. ....
12
INTELLIGENT KEY SYSTEM/ENGINE START
FUNCTION : System Diagram ................................
12
INTELLIGENT KEY SYSTEM/ENGINE START
FUNCTION : System Description ............................
12
INFINITI VEHICLE IMMOBILIZER SYSTEM-NATS ....14
INFINITI VEHICLE IMMOBILIZER SYSTEM-
NATS : System Diagram .........................................
15
INFINITI VEHICLE IMMOBILIZER SYSTEM-
NATS : System Description .....................................
15
VEHICLE SECURITY SYSTEM .................................17
VEHICLE SECURITY SYSTEM : System Dia-
gram .................................................................... ....
17
VEHICLE SECURITY SYSTEM : System Descrip-
tion ...........................................................................
18
DIAGNOSIS SYSTEM (BCM) ...........................21
COMMON ITEM ..................................................... ....21
COMMON ITEM : CONSULT-III Function (BCM -
COMMON ITEM) .....................................................
21
INTELLIGENT KEY ................................................ ....22
INTELLIGENT KEY : CONSULT-III Function
(BCM - INTELLIGENT KEY) ....................................
22
THEFT ALM ........................................................... ....26
THEFT ALM : CONSULT-III Function (BCM -
THEFT) ................................................................ ....
26
IMMU ...................................................................... ....27
IMMU : CONSULT-III Function (BCM - IMMU) ........27
DIAGNOSIS SYSTEM (IPDM E/R) ...................28
CONSULT-III Function (IPDM E/R) .........................28
ECU DIAGNOSIS INFORMATION ..............30
ECM, IPDM E/R, BCM .......................................30
List of ECU Reference ......................................... ....30
Revision: 2010 May2011 QX56
Page 4612 of 5598
![INFINITI QX56 2011 Factory Service Manual
PRECAUTIONSSEC-5
< PRECAUTION > [WITH INTELLIGENT KEY SYSTEM]
C
D
E
F
G H
I
J
L
M A
B
SEC
N
O P
PRECAUTION
PRECAUTIONS
Precaution for Supplemental Restraint System (SRS) "AIR BAG" and "SEAT BELT
PR INFINITI QX56 2011 Factory Service Manual
PRECAUTIONSSEC-5
< PRECAUTION > [WITH INTELLIGENT KEY SYSTEM]
C
D
E
F
G H
I
J
L
M A
B
SEC
N
O P
PRECAUTION
PRECAUTIONS
Precaution for Supplemental Restraint System (SRS) "AIR BAG" and "SEAT BELT
PR](/manual-img/42/57033/w960_57033-4611.png)
PRECAUTIONSSEC-5
< PRECAUTION > [WITH INTELLIGENT KEY SYSTEM]
C
D
E
F
G H
I
J
L
M A
B
SEC
N
O P
PRECAUTION
PRECAUTIONS
Precaution for Supplemental Restraint System (SRS) "AIR BAG" and "SEAT BELT
PRE-TENSIONER"
INFOID:0000000006226148
The Supplemental Restraint System such as “A IR BAG” and “SEAT BELT PRE-TENSIONER”, used along
with a front seat belt, helps to reduce the risk or severi ty of injury to the driver and front passenger for certain
types of collision. This system includes seat belt switch inputs and dual stage front air bag modules. The SRS
system uses the seat belt switches to determine the front air bag deployment, and may only deploy one front
air bag, depending on the severity of a collision and whether the front occupants are belted or unbelted.
Information necessary to service the system safely is included in the “SRS AIR BAG” and “SEAT BELT” of this
Service Manual.
WARNING:
• To avoid rendering the SRS inoper ative, which could increase the risk of personal injury or death in
the event of a collision that would result in air ba g inflation, all maintenance must be performed by
an authorized NISSAN/INFINITI dealer.
Improper maintenance, including in correct removal and installation of the SRS, can lead to personal
injury caused by unintentional act ivation of the system. For removal of Spiral Cable and Air Bag
Module, see the “SRS AIR BAG”.
Do not use electrical test equipm ent on any circuit related to the SRS unless instructed to in this
Service Manual. SRS wiring harnesses can be identi fied by yellow and/or orange harnesses or har-
ness connectors.
PRECAUTIONS WHEN USING POWER TOOLS (AIR OR ELECTRIC) AND HAMMERS
WARNING:
When working near the Air Bag Diagnosis Sensor Unit or other Air Bag System sensors with the
ignition ON or engine running, DO NOT use air or electric power tools or strike near the sensor(s)
with a hammer. Heavy vibration could activate the sensor(s) and deploy the air bag(s), possibly
causing serious injury.
When using air or electric power tools or hammers , always switch the ignition OFF, disconnect the
battery, and wait at least 3 minutes before performing any service.
Precaution Necessary for Steering Wh eel Rotation after Battery Disconnect
INFOID:0000000006226149
NOTE:
Before removing and installing any control units, first tu rn the push-button ignition switch to the LOCK posi-
tion, then disconnect both battery cables.
After finishing work, confirm that all control unit connectors are connected properly, then re-connect both
battery cables.
Always use CONSULT-III to perform self-diagnosis as a part of each function inspection after finishing work.
If a DTC is detected, perform trouble diagnos is according to self-diagnosis results.
For vehicle with steering lock unit, if the battery is disconnected or discharged, the steering wheel will lock and
cannot be turned.
If turning the steering wheel is required with the batte ry disconnected or discharged, follow the operation pro-
cedure below before starting the repair operation.
OPERATION PROCEDURE
1. Connect both battery cables. NOTE:
Supply power using jumper cables if battery is discharged.
2. Turn the push-button ignition switch to ACC position. (At this time, the steering lock will be released.)
3. Disconnect both battery cables. The steering lock wil l remain released with both battery cables discon-
nected and the steering wheel can be turned.
4. Perform the necessary repair operation.
Revision: 2010 May2011 QX56
Page 4764 of 5598

SR-1
RESTRAINTS
C
DE
F
G
I
J
K L
M
SECTION SR
A
B
SR
N
O P
CONTENTS
SRS AIRBAG
PRECAUTION ................ ...............................2
PRECAUTIONS .............................................. .....2
Precaution for Supplemental Restraint System
(SRS) "AIR BAG" and "SEAT BELT PRE-TEN-
SIONER" ............................................................. ......
2
Precaution Necessary for Steering Wheel Rota-
tion after Battery Disconnect .....................................
2
Precaution for Battery Service ..................................3
Occupant Classification System ..............................3
Service ......................................................................3
PREPARATION ............................................4
PREPARATION .............................................. .....4
Commercial Service Tools .................................. ......4
BASIC INSPECTION ....................................5
COLLISION DIAGNOSIS ............................... .....5
FOR FRONTAL COLLISION ................................. ......5
FOR FRONTAL COLLISION : When SRS is acti-
vated in a collision .....................................................
5
FOR FRONTAL COLLISION : When SRS is not
activated in a collision ...............................................
6
FOR SIDE AND ROLLOVER COLLISION ............ ......7
FOR SIDE AND ROLLOVER COLLISION : When
SRS is activated in a collision ............................. ......
7
FOR SIDE AND ROLLOVER COLLISION : When
SRS is not activated in a collision ....................... ......
8
REMOVAL AND INSTALLATION ...............11
DRIVER AIR BAG MODULE .......................... ....11
Exploded View .................................................... ....11
Removal and Installation .........................................11
SPIRAL CABLE ................................................14
Exploded View ..................................................... ....14
Removal and Installation .........................................14
FRONT PASSENGER AIR BAG MODULE ......17
Exploded View .........................................................17
Removal and Installation .........................................17
SIDE CURTAIN AIR BAG MODULE ................19
Exploded View .........................................................19
Removal and Installation .........................................19
CRASH ZONE SENSOR ...................................22
Exploded View ..................................................... ....22
Removal and Installation .........................................22
SIDE AIR BAG (SATELLITE) SENSOR ...........24
Exploded View .........................................................24
Removal and Installation .........................................24
DIAGNOSIS SENSOR UNIT .............................26
Exploded View .........................................................26
Removal and Installation .........................................26
SEAT BELT PRE-TENSIONER ........................28
Exploded View .........................................................28
Removal and Installation .........................................28
LAP PRE-TENSIONER .....................................29
Exploded View .........................................................29
Removal and Installation .........................................29
OCCUPANT DETECTION SYSTEM CON-
TROL UNIT ........................................................
30
Exploded View .........................................................30
Removal and Installation .........................................30
Revision: 2010 May2011 QX56
Page 4765 of 5598
SR-2
< PRECAUTION >
PRECAUTIONS
PRECAUTION
PRECAUTIONS
Precaution for Supplemental Restraint System (SRS) "AIR BAG" and "SEAT BELT
PRE-TENSIONER"
INFOID:0000000006113043
The Supplemental Restraint System such as “A IR BAG” and “SEAT BELT PRE-TENSIONER”, used along
with a front seat belt, helps to reduce the risk or severi ty of injury to the driver and front passenger for certain
types of collision. This system includes seat belt switch inputs and dual stage front air bag modules. The SRS
system uses the seat belt switches to determine the front air bag deployment, and may only deploy one front
air bag, depending on the severity of a collision and w hether the front occupants are belted or unbelted.
Information necessary to service the system safely is included in the “SRS AIR BAG” and “SEAT BELT” of this
Service Manual.
WARNING:
• To avoid rendering the SRS inopera tive, which could increase the risk of personal injury or death in
the event of a collision that would result in air bag inflation, all maintenance must be performed by
an authorized NISS AN/INFINITI dealer.
Improper maintenance, including in correct removal and installation of the SRS, can lead to personal
injury caused by unintent ional activation of the system. For re moval of Spiral Cable and Air Bag
Module, see the “SRS AIR BAG”.
Do not use electrical test equipmen t on any circuit related to the SRS unless instructed to in this
Service Manual. SRS wiring harnesses can be identi fied by yellow and/or orange harnesses or har-
ness connectors.
PRECAUTIONS WHEN USING POWER TOOLS (AIR OR ELECTRIC) AND HAMMERS
WARNING:
When working near the Air Bag Diagnosis Sensor Unit or other Air Bag System sensors with the ignition ON or engine running, DO NOT use air or electric power tools or strike near the sensor(s)
with a hammer. Heavy vibration could activate the sensor(s) and deploy the air bag(s), possibly
causing serious injury.
When using air or electric power tools or hammers , always switch the ignition OFF, disconnect the
battery, and wait at least 3 minu tes before performing any service.
Precaution Necessary for Steering W heel Rotation after Battery Disconnect
INFOID:0000000006113044
NOTE:
Before removing and installing any control units, first tu rn the push-button ignition switch to the LOCK posi-
tion, then disconnect bot h battery cables.
After finishing work, confirm that all control unit connectors are connected properly, then re-connect both
battery cables.
Always use CONSULT-III to perform self-diagnosis as a part of each function inspection after finishing work.
If a DTC is detected, perform trouble diagnos is according to self-diagnosis results.
For vehicle with steering lock unit, if the battery is disconnected or discharged, the steering wheel will lock and
cannot be turned.
If turning the steering wheel is required with the bat tery disconnected or discharged, follow the operation pro-
cedure below before starting the repair operation.
OPERATION PROCEDURE
1. Connect both battery cables. NOTE:
Supply power using jumper cables if battery is discharged.
2. Turn the push-button ignition switch to ACC position. (At this time, the steering lock will be released.)
3. Disconnect both battery cables. The steering lock wi ll remain released with both battery cables discon-
nected and the steering wheel can be turned.
4. Perform the necessary repair operation.
Revision: 2010 May2011 QX56
Page 4766 of 5598
PRECAUTIONSSR-3
< PRECAUTION >
C
DE
F
G
I
J
K L
M A
B
SR
N
O P
5. When the repair work is completed, re-connect both battery cables. With the brake pedal released, turn
the push-button ignition switch from ACC position to ON position, then to LOCK position. (The steering
wheel will lock when the push-button ignition switch is turned to LOCK position.)
6. Perform self-diagnosis check of a ll control units using CONSULT-III.
Precaution for Battery ServiceINFOID:0000000006113045
Before disconnecting the battery, lower both the driver and passenger windows. This will prevent any interfer-
ence between the window edge and the vehicle when the door is opened/closed. During normal operation, the
window slightly raises and lowers automatically to prev ent any window to vehicle interference. The automatic
window function will not work with the battery disconnected.
Occupant Classification SystemINFOID:0000000006113047
Replace occupant classification system control uni t and passenger front seat cushion as an assembly.
Refer to SE-105, "
Exploded View".
ServiceINFOID:0000000006113046
Never use electrical test equipment to check SRS circuits unless instructed to in this Service Manual.
Before servicing the SRS, turn ignition switch OFF, disconnect battery negative terminal and wait at least 3
minutes.
For approximately 3 minutes after the battery negative termi nal is removed, it is still possible for the air bag
and seat belt pre-tensioner to deploy. Therefore, never work on any SRS connectors or wires until at least 3
minutes have elapsed.
Diagnosis sensor unit must always be installed with their arrow marks “ ⇐” pointing towards the front of the
vehicle for proper operation. Also check diagnosis sensor unit for cracks, deformities, or rust before installa-
tion and replace as required.
The spiral cable must be aligned in the neutral position since its rotations are limited. Never turn steering
wheel and column after removal of steering gear.
Handle air bag module carefully. Always place driver and front passenger air bag modules with the pad side facing upward and seat mounted front side air bag m odule standing with the stud bolt side facing downward.
Perform self-diagnosis to check entire SRS fo r proper function after replacing any components.
After air bag deploys, the front instrument panel assembly should be replaced if damaged.
Always replace instrument panel pad following front passenger air bag deployment.
Revision: 2010 May2011 QX56
Page 4768 of 5598
COLLISION DIAGNOSISSR-5
< BASIC INSPECTION >
C
DE
F
G
I
J
K L
M A
B
SR
N
O P
BASIC INSPECTION
COLLISION DIAGNOSIS
FOR FRONTAL COLLISION
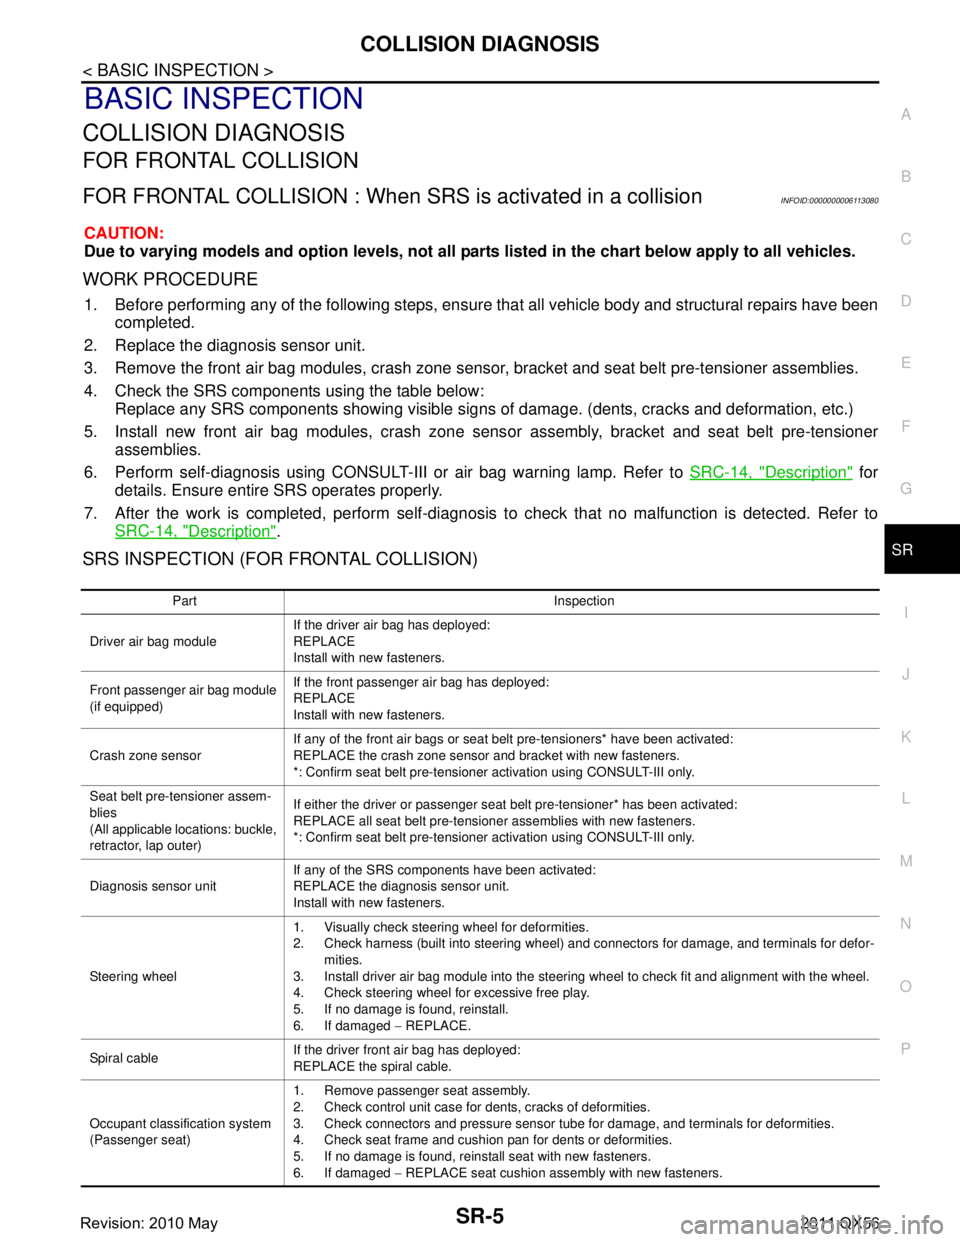
FOR FRONTAL COLLISION : When SR S is activated in a collisionINFOID:0000000006113080
CAUTION:
Due to varying models and option levels, not all parts listed in the chart below apply to all vehicles.
WORK PROCEDURE
1. Before performing any of the following steps, ensur e that all vehicle body and structural repairs have been
completed.
2. Replace the diagnosis sensor unit.
3. Remove the front air bag modules, crash zone sensor , bracket and seat belt pre-tensioner assemblies.
4. Check the SRS components using the table below: Replace any SRS components showing visible signs of damage. (dents, cracks and deformation, etc.)
5. Install new front air bag modules, crash zone sens or assembly, bracket and seat belt pre-tensioner
assemblies.
6. Perform self-diagnosis using CONSULT-III or air bag warning lamp. Refer to SRC-14, "
Description" for
details. Ensure entire SRS operates properly.
7. After the work is completed, perform self-diagnosis to check that no malfunction is detected. Refer to
SRC-14, "
Description".
SRS INSPECTION (FOR FRONTAL COLLISION)
Part Inspection
Driver air bag module If the driver air bag has deployed:
REPLACE
Install with new fasteners.
Front passenger air bag module
(if equipped) If the front passenger air bag has deployed:
REPLACE
Install with new fasteners.
Crash zone sensor If any of the front air bags or seat belt pre-tensioners* have been activated:
REPLACE the crash zone sensor and bracket with new fasteners.
*: Confirm seat belt pre-tensioner activation using CONSULT-III only.
Seat belt pre-tensioner assem-
blies
(All applicable locations: buckle,
retractor, lap outer) If either the driver or passenger seat belt pre-tensioner* has been activated:
REPLACE all seat belt pre-tensioner assemblies with new fasteners.
*: Confirm seat belt pre-tensioner activation using CONSULT-III only.
Diagnosis sensor unit If any of the SRS components have been activated:
REPLACE the diagnosis sensor unit.
Install with new fasteners.
Steering wheel 1. Visually check steering wheel for deformities.
2. Check harness (built into steering wheel) and connectors for damage, and terminals for defor-
mities.
3. Install driver air bag module into the steering wheel to check fit and alignment with the wheel.
4. Check steering wheel for excessive free play.
5. If no damage is found, reinstall.
6. If damaged − REPLACE.
Spiral cable If the driver front air bag has deployed:
REPLACE the spiral cable.
Occupant classification system
(Passenger seat) 1. Remove passenger seat assembly.
2. Check control unit case for dents, cracks of deformities.
3. Check connectors and pressure sensor tube for damage, and terminals for deformities.
4. Check seat frame and cushion pan for dents or deformities.
5. If no damage is found, reinstall seat with new fasteners.
6. If damaged
− REPLACE seat cushion assembly with new fasteners.
Revision: 2010 May2011 QX56