2011 INFINITI QX56 height adjustment
[x] Cancel search: height adjustmentPage 1200 of 5598
![INFINITI QX56 2011 Factory Service Manual
DAS
DIAGNOSIS SYSTEM (ICC SENSOR)DAS-235
< SYSTEM DESCRIPTION > [FCW]
C
D
E
F
G H
I
J
K L
M B
N P A
DIAGNOSIS SYSTEM (ICC SENSOR)
CONSULT-III Function (LASER)INFOID:0000000006228179
APPLICATION ITEMS INFINITI QX56 2011 Factory Service Manual
DAS
DIAGNOSIS SYSTEM (ICC SENSOR)DAS-235
< SYSTEM DESCRIPTION > [FCW]
C
D
E
F
G H
I
J
K L
M B
N P A
DIAGNOSIS SYSTEM (ICC SENSOR)
CONSULT-III Function (LASER)INFOID:0000000006228179
APPLICATION ITEMS](/manual-img/42/57033/w960_57033-1199.png)
DAS
DIAGNOSIS SYSTEM (ICC SENSOR)DAS-235
< SYSTEM DESCRIPTION > [FCW]
C
D
E
F
G H
I
J
K L
M B
N P A
DIAGNOSIS SYSTEM (ICC SENSOR)
CONSULT-III Function (LASER)INFOID:0000000006228179
APPLICATION ITEMS
CONSULT-III performs the following functions via CAN communication with ADAS control unit and the com-
munication with ICC sensor.
WORK SUPPORT
Laser Beam Adjust
Refer to CCS-72, "Description".
SELF DIAGNOSTIC RESULT
Refer to CCS-55, "DTC Index".
DATA MONITOR
Diagnosis mode Description
Work Support It can monitor the adjustment direction indication in order to perform the laser beam aiming operation
smoothly
Self Diagnostic Result Displays malfunctioning system memorized in ICC sensor
Data Monitor Displays real-time input/output data of ICC sensor
Ecu Identification Displays ICC sensor part number
CAN Diag Support Monitor The results of transmit/receive diagnosis of ITS communication can be read
Work support items Description
LASER BEAM ADJUST Outputs laser beam, calculates dislocation of the beam, and indicates adjustment direction
Monitored item
[Unit] Description
VHCL SPEED SE
[km/h] or [mph] Vehicle speed judged from a vehicle speed signal read by the ICC sensor via ITS communica-
tion is displayed [ADAS control unit receives a vehicle speed signal from ABS actuator and
electric unit (control unit) via CAN communication and transmits the calculated vehicle speed
to ICC sensor via ITS communication]
YAW R AT E
[deg/s] Indicates yaw rate read from ADAS control unit through ITS communication (ADAS control unit
receives yaw rate signal from ABS actuator and electric unit (control unit) via CAN communi-
cation and transmits yaw rate calculated by the ADAS control unit)
Yaw rate judged from a yaw rate signal read by ICC sensor via ITS communication is displayed
[ADAS control unit receives a yaw
rate signal from ABS actuator and electric unit (control unit)
via CAN communication and transmits the calculated yaw rate to ICC sensor via ITS commu-
nication]
PWR SUP MONI
[V] Indicates IGN voltage input by ICC sensor
DISTANCE
[m] Indicates the distance from the vehicle ahead
RELATIVE SPD
[m/s] Indicates the relative speed of the vehicle ahead
LASER OFFSET
[m] NOTE:
The item is indicated, but not used
LASER HEIGHT
[m] NOTE:
The item is indicated, but not used
STEERING ANGLE
[deg] The steering angle is displayed
STRG ANGLE SPEED
[deg/s] The steering angle speed is displayed
Revision: 2010 May2011 QX56
Page 1213 of 5598
![INFINITI QX56 2011 Factory Service Manual
DAS-248
< ECU DIAGNOSIS INFORMATION >[FCW]
ICC SENSOR
ICC SENSOR
Reference ValueINFOID:0000000006228180
VALUES ON THE DIAGNOSIS TOOL
TERMINAL LAYOUT
PHYSICAL VALUES
Monitor item Condition Value/Statu INFINITI QX56 2011 Factory Service Manual
DAS-248
< ECU DIAGNOSIS INFORMATION >[FCW]
ICC SENSOR
ICC SENSOR
Reference ValueINFOID:0000000006228180
VALUES ON THE DIAGNOSIS TOOL
TERMINAL LAYOUT
PHYSICAL VALUES
Monitor item Condition Value/Statu](/manual-img/42/57033/w960_57033-1212.png)
DAS-248
< ECU DIAGNOSIS INFORMATION >[FCW]
ICC SENSOR
ICC SENSOR
Reference ValueINFOID:0000000006228180
VALUES ON THE DIAGNOSIS TOOL
TERMINAL LAYOUT
PHYSICAL VALUES
Monitor item Condition Value/Status
VHCL SPEED SE While driving Value of vehicle
speed signal
(wheel speed)
YAW RATE While driving Vehicle stopped 0.0
Vehicle turning right Positive value
Vehicle turning left Negative value
PWR SUP MONI Ignition switch ON Power supply
voltage value of ICC sensor
DISTANCE Drive the vehicle and activate
the vehicle-to-vehicle distance
control mode When a vehicle ahead is detected
Displays the dis-
tance from the
preceding vehi- cle
When a vehicle ahead is not detected 0.0
RELATIVE SPD Drive the vehicle and activate
the vehicle-to-vehicle distance
control mode When a vehicle ahead is detected
Displays the rel-
ative speed
When a vehicle ahead is not detected 0.0
LASER OFFSET NOTE:
The item is indicated, but not used
—
LASER HEIGHT NOTE:
The item is indicated, but not used —
STEERING ANGLE Ignition switch ON When setting the steering wheel in straight-ahead posi-
tion
0.0
When turning the steering wheel 90 ° rightward +90
When turning the steering wheel 90 ° leftward -90
STRG ANGLE
SPEED Ignition switch ON At the time of turning the steering wheel Steering wheel
turning speed is
displayed
L/R ADJUST Ignition switch ON At the completion of laser beam adjustment Horizontal cor-
rection value is
displayed
U/D ADJUST Ignition switch ON At the completion of laser beam adjustment Vertical correc-
tion value is dis-
played
JPOIA0105ZZ
Revision: 2010 May2011 QX56
Page 1306 of 5598
![INFINITI QX56 2011 Factory Service Manual
DAS
CAMERA AIMING ADJUSTMENTDAS-341
< BASIC INSPECTION > [LDW & LDP]
C
D
E
F
G H
I
J
K L
M B
N P A
>> Go to DAS-341, "Work Procedure (Target Setting)".
Work Procedure (Target Setting)INFOID:00000000 INFINITI QX56 2011 Factory Service Manual
DAS
CAMERA AIMING ADJUSTMENTDAS-341
< BASIC INSPECTION > [LDW & LDP]
C
D
E
F
G H
I
J
K L
M B
N P A
>> Go to DAS-341, "Work Procedure (Target Setting)".
Work Procedure (Target Setting)INFOID:00000000](/manual-img/42/57033/w960_57033-1305.png)
DAS
CAMERA AIMING ADJUSTMENTDAS-341
< BASIC INSPECTION > [LDW & LDP]
C
D
E
F
G H
I
J
K L
M B
N P A
>> Go to DAS-341, "Work Procedure (Target Setting)".
Work Procedure (Target Setting)INFOID:0000000006223736
CAUTION:
Perform this operation in a horizo ntal position where there is a clear view for 5 m (16.4 ft) forward
and 3 m (9.84 ft) wide.
Place the target in a well-lig hted location. (Poor lighting may make it hard to adjust.)
The target may not be detected when there is a ligh t source within 1.5 m (4.92 ft) from either side and
within 1 m (3.28 ft) upward/downward from the target.
Check the location of the sun. (S unlight should not shine directly on the front of the vehicle.)
The target may not be detected when there is the same pattern of black and white as the target when
the pattern is within 1 m (3.28 ft) from either si de and upward/downward position from the target. (It
is desirable that the vehicle is positioned on the opposite side of a single-color wall.)
1.TARGET SETTING
1. Mark points “A”, “B”, “C” and “D”at the center of the lateral sur- face of each wheels.
NOTE:
Hang a string with a cone from the fender so as to pass through
the center of wheel, and then mark a point at the center of the
lateral surface of the wheel.
2. Draw line “LH” passing through points “A” and “B” on the left side
of vehicle.
NOTE:
Approximately 4 m (13.12 ft) or mo re from the front end of vehi-
cle.
1.Board 2.String 3.Cone
: Target mark
Diameter of a target (D) : 200 mm (7.87 in)
Height of a target center (H) : 1450 mm (57.09 in)
Width between a right target cen-
ter from a left target center (W) : 600 mm (23.62 in)
“A” – “E” (“C” – “F”) : 3850 mm (151.57 in)
PKIB4694E
JSOIA0360GB
Revision: 2010 May2011 QX56
Page 1307 of 5598
![INFINITI QX56 2011 Factory Service Manual
DAS-342
< BASIC INSPECTION >[LDW & LDP]
CAMERA AIMING ADJUSTMENT
3. Mark point “E” on the line “LH” at the
positions 3850 mm (151.57 in) from point “A”.
4. Draw line “RH” passing thr INFINITI QX56 2011 Factory Service Manual
DAS-342
< BASIC INSPECTION >[LDW & LDP]
CAMERA AIMING ADJUSTMENT
3. Mark point “E” on the line “LH” at the
positions 3850 mm (151.57 in) from point “A”.
4. Draw line “RH” passing thr](/manual-img/42/57033/w960_57033-1306.png)
DAS-342
< BASIC INSPECTION >[LDW & LDP]
CAMERA AIMING ADJUSTMENT
3. Mark point “E” on the line “LH” at the
positions 3850 mm (151.57 in) from point “A”.
4. Draw line “RH” passing through points “C” and “D” on the right side of vehicle in the same way as step 2. NOTE:
Approximately 4 m (13.12 ft) or more from the front end of vehicle.
5. Mark point “F” on the line “RH” at the positions 3850 mm (151.57 in) from point “C”.
6. Draw line “FW” passing through the points “E” and “F” on the front side of vehicle.
7. Mark point “X” at the center of point “E” and “F” on the line “FW”.
CAUTION:
Make sure that “E” to “X” is equal to “F” to “X”.
8. Position the center of the ri ght target to point of “X”.
>> Go to DAS-342, "
Work Procedure (Camera Aiming
Adjustment)".
Work Procedure (Camera Aiming Adjustment)INFOID:0000000006223737
CAUTION:
Perform the adjustment under unloaded vehicle condition.
1.CHECK VEHICLE HEIGHT
Measure the wheelarch height. Calculate “Dh”.
NOTE:
“Dh” may be calculated as a minus value.
>> GO TO 2.
2.CAMERA AIMING ADJUSTMENT
CAUTION:
Operate CONSULT-III outside the vehic le, and close all the doors. (To retain vehicle attitude appropri-
ately)
1. Select “Work Support” on “L ANE CAMERA” with CONSULT-III.
2. Select “AUTO AIM”.
3. Confirm the following items;
- The target should be accurately placed.
- The vehicle should be stopped.
4. Select “Start” to perform camera aiming. CAUTION:
Never select “Start” when the target is not accurately placed.
Wait 5 seconds or more after selecting “Start”.
5. Input “Dh”, and then select “Start”.
CAUTION:
Never change “Ht” and “Dt”.
6. Confirm the displayed item.
- “Normally Completed”: Select “Completion”.
- “SUSPENSION”, “X AIMING NG Y”, “ABNORMALL Y COMPLETED”: Perform the following services.
JPOIA0173GB
Dh [mm] = (Hfl + Hfr) ÷ 2 − 903
where, Hfl: Front left wheelarch height [mm]
Hfr: Front right wh eelarch height [mm]
JSOIA0361ZZ
Revision: 2010 May2011 QX56
Page 1753 of 5598

HOOD
DLK-217
< REMOVAL AND INSTALLATION >
C
D E
F
G H
I
J
L
M A
B
DLK
N
O P
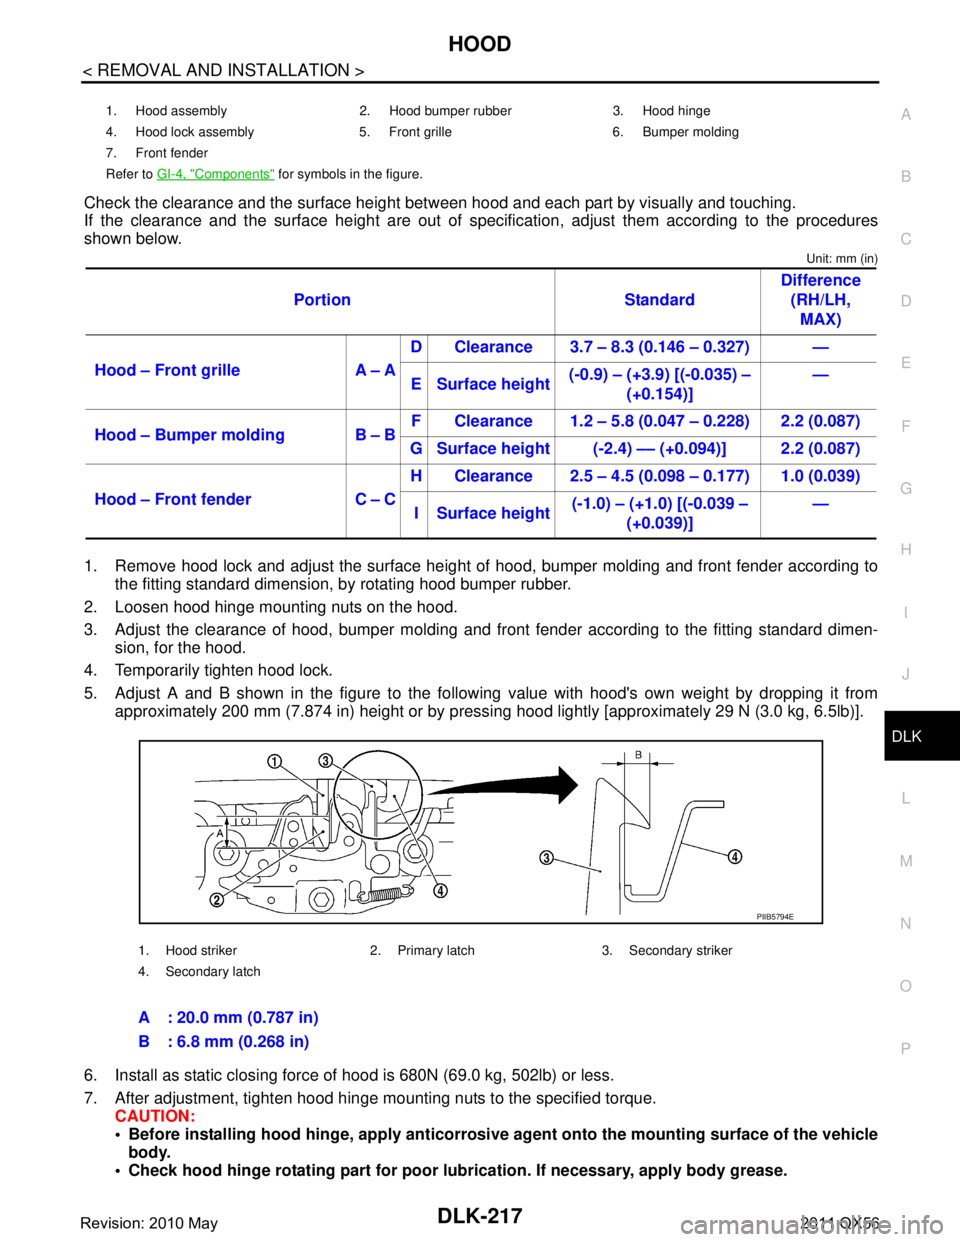
Check the clearance and the surface height betw een hood and each part by visually and touching.
If the clearance and the surface height are out of spec ification, adjust them according to the procedures
shown below.
Unit: mm (in)
1. Remove hood lock and adjust the surface height of hood, bumper molding and front fender according to
the fitting standard dimension, by rotating hood bumper rubber.
2. Loosen hood hinge mounting nuts on the hood.
3. Adjust the clearance of hood, bumper molding and fr ont fender according to the fitting standard dimen-
sion, for the hood.
4. Temporarily tighten hood lock.
5. Adjust A and B shown in the figure to the following value with hood's own weight by dropping it from approximately 200 mm (7.874 in) height or by pressi ng hood lightly [approximately 29 N (3.0 kg, 6.5lb)].
6. Install as static closing force of hood is 680N (69.0 kg, 502lb) or less.
7. After adjustment, tighten hood hinge mounting nuts to the specified torque. CAUTION:
Before installing hood hinge, apply anticorrosive agent onto th e mounting surface of the vehicle
body.
Check hood hinge rotating pa rt for poor lubrication. If necessary, apply body grease.
1. Hood assembly 2. Hood bumper rubber 3. Hood hinge
4. Hood lock assembly 5. Front grille 6. Bumper molding
7. Front fender
Refer to GI-4, "
Components" for symbols in the figure.
Portion Standard Difference
(RH/LH, MAX)
Hood – Front grille A – A D Clearance 3.7 – 8.3 (0.146 – 0.327) —
E Surface height (-0.9) – (+3.9) [(-0.035) –
(+0.154)] —
Hood – Bumper molding B – B F Clearance 1.2 – 5.8 (0.047 – 0.228) 2.2 (0.087)
G Surface height (-2.4) –– (+0.094)] 2.2 (0.087)
Hood – Front fender C – C H Clearance 2.5 – 4.5 (0.098 – 0.177) 1.0 (0.039)
I Surface height (-1.0) – (+1.0) [(-0.039 –
(+0.039)] —
1. Hood striker 2. Primary latch 3. Secondary striker
4. Secondary latch
A : 20.0 mm (0.787 in)
B : 6.8 mm (0.268 in)
PIIB5794E
Revision: 2010 May2011 QX56
Page 1761 of 5598

FRONT DOORDLK-225
< REMOVAL AND INSTALLATION >
C
DE
F
G H
I
J
L
M A
B
DLK
N
O P
DOOR ASSEMBLY : AdjustmentINFOID:0000000006226076
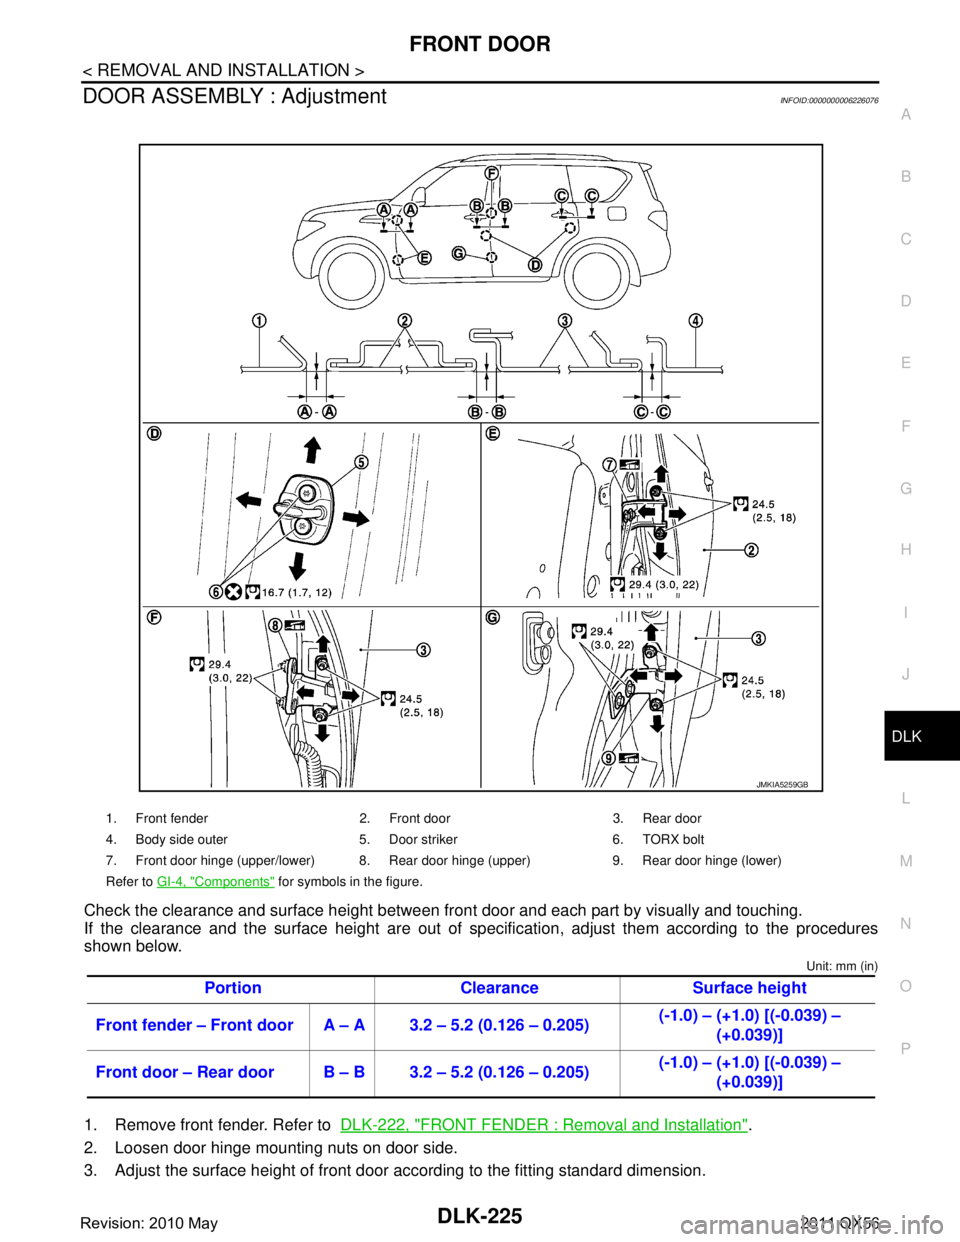
Check the clearance and surface height between front door and each part by visually and touching.
If the clearance and the surface height are out of spec ification, adjust them according to the procedures
shown below.
Unit: mm (in)
1. Remove front fender. Refer to DLK-222, "FRONT FENDER : Removal and Installation".
2. Loosen door hinge mounting nuts on door side.
3. Adjust the surface height of front door according to the fitting standard dimension.
1. Front fender 2. Front door 3. Rear door
4. Body side outer 5. Door striker 6. TORX bolt
7. Front door hinge (upper/lower) 8. Rear door hinge (upper) 9. Rear door hinge (lower)
Refer to GI-4, "
Components" for symbols in the figure.
Portion Clearance Surface height
Front fender – Front door A – A 3.2 – 5.2 (0.126 – 0.205) (-1.0) – (+1.0) [(-0.039) –
(+0.039)]
Front door – Rear door B – B 3.2 – 5.2 (0.126 – 0.205) (-1.0) – (+1.0) [(-0.039) –
(+0.039)]
JMKIA5259GB
Revision: 2010 May2011 QX56
Page 1765 of 5598

REAR DOORDLK-229
< REMOVAL AND INSTALLATION >
C
DE
F
G H
I
J
L
M A
B
DLK
N
O P
After installation, perform th e fitting adjustment. Refer to DLK-229, "DOOR ASSEMBLY : Adjust-
ment".
After installation, apply touch-up paint (the body color) onto the head of door hinge mounting nuts.
DOOR ASSEMBLY : AdjustmentINFOID:0000000006226082
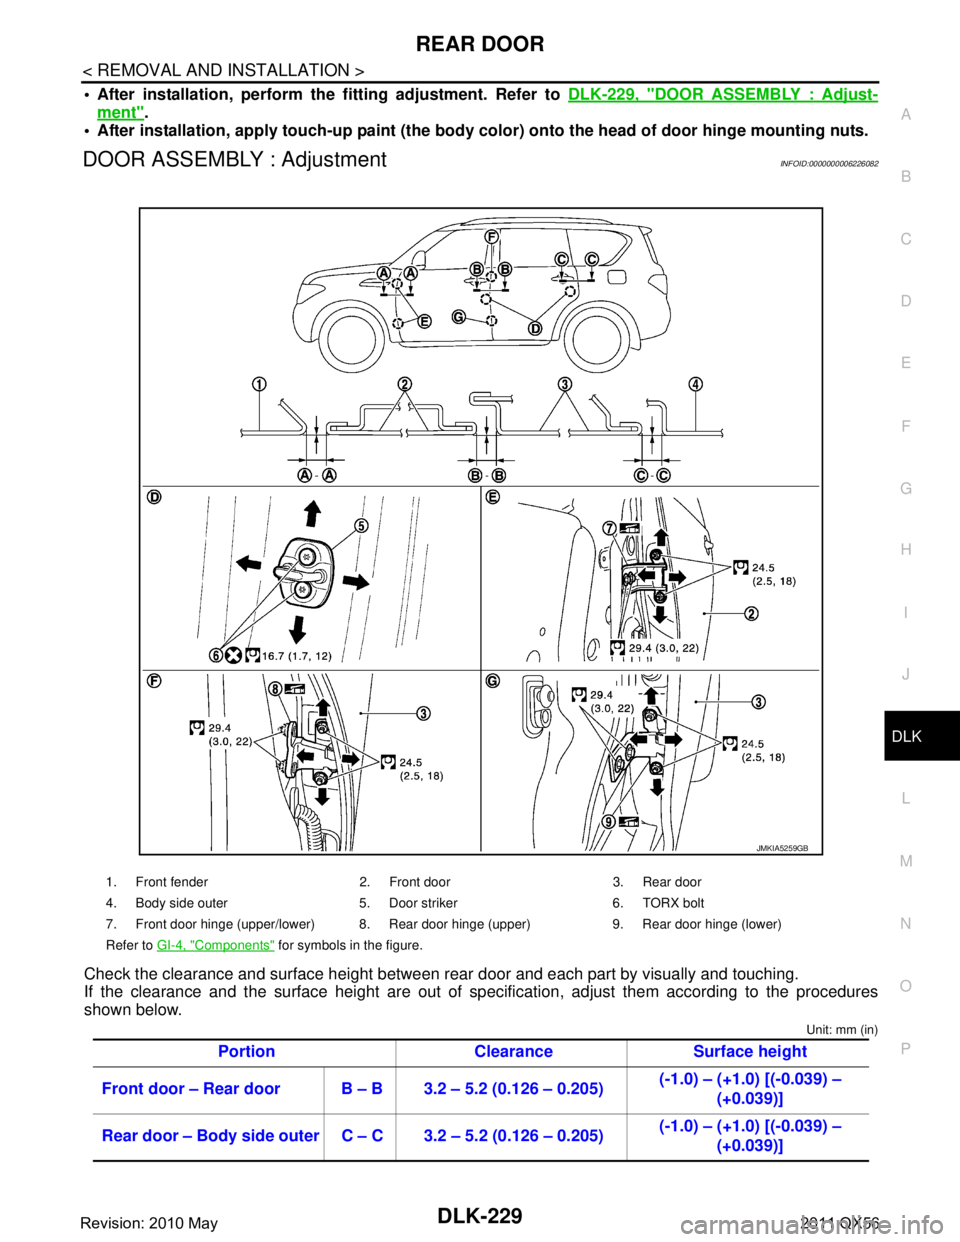
Check the clearance and surface height between rear door and each part by visually and touching.
If the clearance and the surface height are out of spec ification, adjust them according to the procedures
shown below.
Unit: mm (in)
1. Front fender 2. Front door 3. Rear door
4. Body side outer 5. Door striker 6. TORX bolt
7. Front door hinge (upper/lower) 8. Rear door hinge (upper) 9. Rear door hinge (lower)
Refer to GI-4, "
Components" for symbols in the figure.
Portion Clearance Surface height
Front door – Rear door B – B 3.2 – 5.2 (0.126 – 0.205) (-1.0) – (+1.0) [(-0.039) –
(+0.039)]
Rear door – Body side outer C – C 3.2 – 5.2 (0.126 – 0.205) (-1.0) – (+1.0) [(-0.039) –
(+0.039)]
JMKIA5259GB
Revision: 2010 May2011 QX56
Page 1766 of 5598

DLK-230
< REMOVAL AND INSTALLATION >
REAR DOOR
1. Remove center pillar lower garnish. Refer to INT-22, "CENTER PILLAR LOWER GARNISH : Removal
and Installation".
2. Loosen door hinge mounting nuts on door side.
3. Adjust the surface height of rear door according to the fitting standard dimension.
4. Temporarily tighten door hinge mounting nuts on door side.
5. Loosen door hinge mounting nuts and bolts on body side.
6. Raise rear door at rear end to adjust clearance of rear door according to the fitting standard dimension.
7. After adjustment tighten bolts and nuts to the specified torque. CAUTION:
After installation, apply touch-up paint (the bo dy color) onto the head of hinge mounting bolts
and nuts.
Check door hinge rotating part for poor lubrication. If necessary, apply body grease.
8. Install center pillar lower garnish. Refer to INT-22, "
CENTER PILLAR LOWER GARNISH : Removal and
Installation".
DOOR STRIKER ADJUSTMENT
Adjust door striker so that it becomes parallel with door lock insertion direction.
DOOR STRIKER
DOOR STRIKER : Removal and InstallationINFOID:0000000006226083
REMOVAL
Remove TORX bolts, and then remove door striker.
INSTALLATION
Note the following items, and then install in the reverse order of removal.
CAUTION:
Check rear door open/c lose, after installation.
After installation, be sure to perf orm the fitting adjustment. Refer to DLK-229, "
DOOR ASSEMBLY :
Adjustment".
DOOR HINGE
DOOR HINGE : Removal and InstallationINFOID:0000000006226084
CAUTION:
Perform work with 2 workers, because of it’s heavy weight.
When removing and installing r ear door assembly, support door with a jack and shop cloth to pro-
tect door and body.
REMOVAL
1. Remove rear door assembly. Refer to DLK-228, "DOOR ASSEMBLY : Removal and Installation".
2. Remove center pillar lower garnish. Refer to INT-22, "
CENTER PILLAR LOWER GARNISH : Removal
and Installation".
3. Remove rear door hinge mounting bolts and nuts (body side), and then remove door hinge.
INSTALLATION
Note the following items, and then install in the reverse order of removal.
CAUTION:
Apply anticorrosive agent onto the mounting surface.
Check rear door open/close op eration after installation.
Check door hinge rotating pa rt for poor lubrication. If necessary, apply body grease.
When removing and inst alling rear door assembly, perform the fitting adjustment. Refer to DLK-229,
"DOOR ASSEMBLY : Adjustment".
After installing, apply the touch-up paint (the body color) onto the head of door hinge mounting nuts.
DOOR CHECK LINK
DOOR CHECK LINK : Removal and InstallationINFOID:0000000006226085
REMOVAL
Revision: 2010 May2011 QX56