2011 INFINITI QX56 check oil
[x] Cancel search: check oilPage 3093 of 5598
COOLER PIPE AND HOSEHA-37
< REMOVAL AND INSTALLATION >
C
DE
F
G H
J
K L
M A
B
HA
N
O P
Cap on wrap the joint of the A/C piping and expan sion valve with suitable material such as vinyl
tape to avoid the entry of air.
10. Remove low-pressure pipe from the vhiecle.
INSTALLATION
Note the following items, and install in the reverse order of removal.
CAUTION:
Replace O-rings with new ones. Then apply compressor oil to them when installing.
Check for leakages when recharging refrigerant. Refer to HA-18, "
Leak Test".
REAR COOLER PIPE
REAR COOLER PIPE : Removal and InstallationINFOID:0000000006276177
CAUTION:
Perform lubricant return operati on before each refrigeration system disassembly. However, if a large
amount of refrigerant or lubricant is detected, n ever perform lubricant return operation. Refer to HA-
22, "Perform Lubricant Return Operation".
REMOVAL
1. Use a refrigerant collecting equipment (for HF C-134a) to discharge the refrigerant. Refer to HA-22, "Per-
form Lubricant Return Operation".
2. Separate frame and body. Refer to DLK-251, "
Removal and Installation".
3. Remove mounting bolts, and then disconnect high-pressure pipe and low-pressure pipe from rear cooler & heater pipe assembly.
CAUTION:
Cap or wrap the joint of the A/C piping with suitab le material such as vinyl tape to avoid the entry
air.
4. Remove clamps, and then disconnect rear heater bypas hoses from rear cooler & heater pipe assembly.
5. Remove mounting bolt, and then disconnect rear cooler &. heater pipe assembly from rear expansion
valve.
CAUTION:
Cap or wrap the joint of the A/C piping and rear expansion valve with suitable material such as
vinyl tape to avoid the entry air.
6. Remove clamps, and then disconnect rear cooler & heater pipe assembly from rear heater pipes.
7. Remove mounting nuts, and then remove rear cooler pipe cover.
8. Remove mounting bolts and nuts, and then remove rear cooler & heater pipe assembly from the vehicle.
INSTALLATION
Note the following items, and install in the reverse order of removal.
CAUTION:
Replace O-rings with new ones. Then apply compressor oil to them when installing.
Check for leakages when recharging refrigerant. Refer to HA-18, "
Leak Test".
Revision: 2010 May2011 QX56
Page 3095 of 5598
CONDENSERHA-39
< REMOVAL AND INSTALLATION >
C
DE
F
G H
J
K L
M A
B
HA
N
O P
CAUTION:
Replace O-rings with new ones. Then apply compressor oil to them when installing.
Perform lubricant adjusting procedure befo re installing new condenser. Refer to HA-22, "
Lubricant
Adjusting Procedure for Components Replacement Except Compressor".
Check for leakages when recharging refrigerant. Refer to HA-18, "
Leak Test".
LIQUID TANK
LIQUID TANK : Removal and InstallationINFOID:0000000006276180
CAUTION:
Perform lubricant return operation before each refrigeration system disassembly. However, if a large
amount of refrigerant or lubricant is detected, n ever perform lubricant return operation. Refer to HA-
22, "Perform Lubricant Return Operation".
REMOVAL
1. Use a refrigerant collecting equipment (for HF C-134a) to discharge the refrigerant. Refer to HA-20, "Recy-
cle Refrigerant".
2. Remove front bumper fascia. Refer to EXT-13, "
Removal and Installation".
3. Clean liquid tank and its surrounding area, and then remove dust and rust from liquid tank. CAUTION:
Be sure to clean carefully.
4. Remove mounting bolts, and then remove liquid tank from the condenser. CAUTION:
Cap or wrap the joint of the A/C piping and liquid tank with suitable material such as vinyl tape to
avoid the entry of air.
INSTALLATION
Install liquid tank, and then install liquid tank bracket on condenser.
CAUTION:
Check that liquid tank bracket is securely installe d at protrusion of condenser. (Check that liquid
tank bracket never move to a positio n below center of liquid tank.)
Replace O-rings of the A/ C piping with new ones. Then apply comp ressor oil to them when installing.
Perform lubricant adjusting procedure befo re installing new liquid tank. Refer to HA-22, "
Lubricant
Adjusting Procedure for Components Replacement Except Compressor".
Check for leakages when recharging refrigerant. Refer to HA-18, "
Leak Test".
REFRIGERANT PRESSURE SENSOR
REFRIGERANT PRESSURE SENSOR : Removal and InstallationINFOID:0000000006276181
CAUTION:
Perform lubricant return operation before each refrigeration system disassembly. However, if a large
amount of refrigerant or lubricant is detected, n ever perform lubricant return operation. Refer to HA-
22, "Perform Lubricant Return Operation".
REMOVAL
1. Use a refrigerant collecting equipment (for HF C-134a) to discharge the refrigerant. Refer to HA-20, "Recy-
cle Refrigerant".
2. Remove front grille. Refer to EXT-19, "
Removal and Installation".
3. Clean refrigerant pressure sensor and its surrounding area, and then remove dust and rust from refriger- ant pressure sensor.
CAUTION:
Be sure to clean carefully.
4. Disconnect refrigerant pressure sensor connector.
5. Use a adjustable wrench or other tool to hold the refrigerant pressure sensor mounting block, and then
remove the refrigerant pressure sensor from the condenser.
CAUTION:
Be careful not to damage liquid tank.
Be careful not to damage core surface of condenser.
Cap or wrap the joint of the condenser and liquid tank with suitable material such as vinyl tape to
avoid the entry of air.
Revision: 2010 May2011 QX56
Page 3096 of 5598

HA-40
< REMOVAL AND INSTALLATION >
CONDENSER
INSTALLATION
Note the following items, and install in the reverse order of removal.
CAUTION:
Replace O-ring with new one. Then apply compressor oil to them when installing.
Check for leakages when recharging refrigerant. Refer to HA-18, "
Leak Test".
Revision: 2010 May2011 QX56
Page 3099 of 5598
A/C UNIT ASSEMBLYHA-43
< REMOVAL AND INSTALLATION >
C
DE
F
G H
J
K L
M A
B
HA
N
O P
Perform lubricant return operati on before each refrigeration system disassembly. However, if a large
amount of refrigerant or lubricant is detected, n ever perform lubricant return operation. Refer to HA-
22, "Perform Lubricant Return Operation".
REMOVAL
1. Use a refrigerant collecting equipment (for HF C-134a) to discharge the refrigerant. Refer to HA-20, "Recy-
cle Refrigerant". (If equipped)
2. Drain engine coolant from cooling system. Refer to CO-8, "
Draining".
3. Remove clamps, and then disconnect front heater outlet hose from heater pipe.
CAUTION:
Some coolant may spill when heater hoses are disconnected.
Close off the coolant inlet and outlet on the heater core (2 locations) with shop cloths.
4. Remove mounting bolt, and then disconnect low-pressure pipe and high-pressure pipe from expansion valve.
CAUTION:
Cap or wrap the joint of the A/C piping and expan sion valve with suitable material such as vinyl
tape to avoid the entry of air.
5. Remove instrument panel assembly. Refer to IP-14, "
Removal and Installation".
6. Remove steering column mounting bolt and nuts. Refer to ST-34, "
Removal and Installation".
7. Move steering column assembly to a position where it does not inhibit work.
8. Disconnect harness clips, harness connectors, ground bol ts and blackets from steering member, and then
move the vehicle harness to the position without hindrance for work.
9. Remove mounting nuts, and then remove instrument stay (RH and LH).
10. Remove A/C unit assembly mounting bolts.
11. Remove mounting bolts, and then remove steering member from the vehicle.
12. Disconnect drain hose from A/C unit assembly, and then remove A/C unit assembly from the vehicle.
13. Remove mounting bolts, and then disconnect heater & cooling unit and blower unitassembly.
INSTALLATION
Note the following items, and install in the reverse order of removal.
CAUTION:
Replace O-rings with new ones. Then apply compressor oil to them when installing.
Check for leakages when recharging refrigerant. Refer to HA-18, "
Leak Test".
NOTE:
Refer to CO-9, "
Refilling" when filling radiator with engine coolant.
EVAPORATOR
EVAPORATOR : Removal and InstallationINFOID:0000000006276184
REMOVAL
1. Remove heater & cooling unit assembly. Refer to HA-41, "Exploded View".
2. Remove heater core. Refer to HA-44, "
HEATER CORE : Removal and Installation".
3. Remove mounting screws, and then remove evaporator pipe cover.
4. Remove air mix door motor (RH). Refer to HAC-153, "
AIR MIX DOOR MOTOR : Removal and Installa-
tion".
5. Remove mounting screws, and then remove A/C cover.
6. Remove foot duct LH. Refer to VTL-11, "
FLOOR DUCT 1 : Removal and Installation".
7. Remove mounting screws, and then remove A/C lower case.
8. Remove intake sensor. Refer to HAC-150, "
Removal and Installation".
9. Remove evaporator assembly from heater & cooling unit assembly.
10. Remove mounting bolts, and then remove evaporator from evaporator assembly.
CAUTION:
Cap or wrap the joint of the evaporator and evaporat or pipe assembly with suitable material such as
vinyl tape to avoid the entry of air.
Revision: 2010 May2011 QX56
Page 3100 of 5598
HA-44
< REMOVAL AND INSTALLATION >
A/C UNIT ASSEMBLY
INSTALLATION
Note the following items, and install in the reverse order of removal.
CAUTION:
Replace O-rings with new ones. Then apply compressor oil to them when installing.
When install the intake sensor, set the same position before replacement.
Never rotate the bracket insertion part when removing and installing the intake sensor.
Perform lubricant adjusting procedure af ter installing new evaporator. Refer to HA-22, "
Lubricant
Adjusting Procedure for Components Replacement Except Compressor".
HEATER CORE
HEATER CORE : Removal and InstallationINFOID:0000000006276185
REMOVAL
1. Remove heater & cooling unit assembly. Refer to HA-42, "HEATER & COOLING UNIT ASSEMBLY :
Removal and Installation".
2. Remove mounting screws, and then remove heater core pipe cover.
3. Remove mode door motor. Refer to HAC-153, "
MODE DOOR MOTOR : Removal and Installation".
4. Remove main link, foot door link and foot door lever. Refer to HAC-152, "
Exploded View".
5. Remove mounting screws, and then remove foot duct (assist side). Refer to VTL-11, "
FLOOR DUCT 1 :
Removal and Installation".
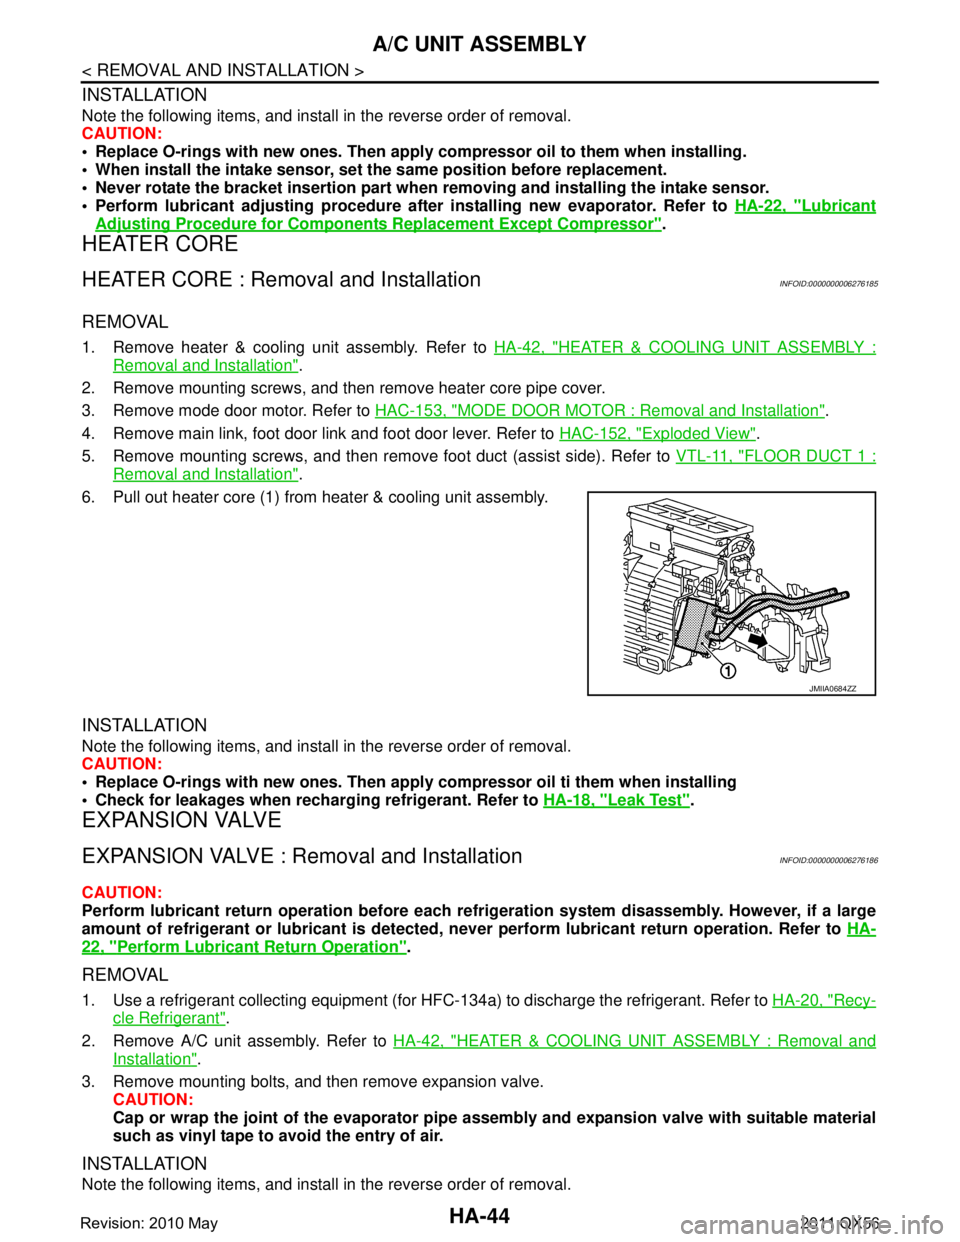
6. Pull out heater core (1) from heater & cooling unit assembly.
INSTALLATION
Note the following items, and install in the reverse order of removal.
CAUTION:
Replace O-rings with new ones. Then apply compressor oil ti them when installing
Check for leakages when recharging refrigerant. Refer to HA-18, "
Leak Test".
EXPANSION VALVE
EXPANSION VALVE : Removal and InstallationINFOID:0000000006276186
CAUTION:
Perform lubricant return operation before each refrigeration system disassembly. However, if a large
amount of refrigerant or lubrican t is detected, never perform lubricant return operation. Refer to HA-
22, "Perform Lubricant Return Operation".
REMOVAL
1. Use a refrigerant collecting equipment (for HF C-134a) to discharge the refrigerant. Refer to HA-20, "Recy-
cle Refrigerant".
2. Remove A/C unit assembly. Refer to HA-42, "
HEATER & COOLING UNIT ASSEMBLY : Removal and
Installation".
3. Remove mounting bolts, and then remove expansion valve. CAUTION:
Cap or wrap the joint of the evaporator pipe assembly and expansion valve with suitable material
such as vinyl tape to avoid the entry of air.
INSTALLATION
Note the following items, and install in the reverse order of removal.
JMIIA0684ZZ
Revision: 2010 May2011 QX56
Page 3101 of 5598
A/C UNIT ASSEMBLYHA-45
< REMOVAL AND INSTALLATION >
C
DE
F
G H
J
K L
M A
B
HA
N
O P
CAUTION:
Replace O-rings with new ones. Then apply compressor oil to them when installing.
Check for leakages when recharging refrigerant. Refer to HA-18, "
Leak Test".
Revision: 2010 May2011 QX56
Page 3104 of 5598
HA-48
< REMOVAL AND INSTALLATION >
REAR A/C UNIT
CAUTION:
Cap or wrap the joint of the A/C piping with suitable material such as vinyl tape to avoid the entry
of air.
6. Remove clamps, and then disconnect rear heater pipe from rear cooler pipe assembly.
7. Remove jack from the vehicle.
8. Remove mounting bolts and nuts, and then remove rear A/C unit assembly.
INSTALLATION
Note the following items, and install in the reverse order of removal.
CAUTION:
Replace O-rings with new ones. Then apply compressor oil to them when installing.
Check for leakages when recharging refrigerant. Refer to HA-18, "
Leak Test".
EVAPORATOR
EVAPORATOR : Removal and InstallationINFOID:0000000006276189
REMOVAL
1. Remove rear A/C unit assembly. Refer to HA-47, "REAR A/C UNIT ASSEMBLY : Removal and Installa-
tion".
2. Disassemble rear A/C unit, and then remove rear evaporator assembly.
3. Remove mounting bolt, and then remove rear evaporator from rear evaporator assembly.
INSTALLATION
Note the following items, and install in the reverse order of removal.
CAUTION:
Replace O-rings with new ones. Then apply compressor oil to them when installing.
Check for leakages when recharging refrigerant. Refer to HA-18, "
Leak Test".
EVAPORATOR PIPE ASSEMBLY
EVAPORATOR PIPE ASSEMBLY : Removal and InstallationINFOID:0000000006276190
REMOVAL
1. Remove rear evaporator assembly. Refer to HA-48, "EVAPORATOR : Removal and Installation".
2. Remove mounting bolts, and then rear expansion valve from rear evaporator assembly. CAUTION:
Cap or wrap the joint of the A/C piping and rear expansion valve with suitable material such as
vinyl tape to avoid the entry of air.
3. Remove mounting bolts, and then remove evaporat or pipe assembly from evaporator assembly.
INSTALLATION
Note the following items, and install in the reverse order of removal.
CAUTION:
Replace O-rings with new ones. Then apply compressor oil to them when installing.
Check for leakages when recharging refrigerant. Refer to HA-18, "
Leak Test".
HEATER CORE
HEATER CORE : Removal and InstallationINFOID:0000000006276191
REMOVAL
1. Remove rear A/C unit assembly. Refer to HA-47, "REAR A/C UNIT ASSEMBLY : Removal and Installa-
tion"
2. Remove grommet from pipe bracket.
3. Remove mounting screws and then remove pipe bracket.
4. Remove mounting screw, and then heater pipe clamp.
Revision: 2010 May2011 QX56
Page 3105 of 5598
REAR A/C UNITHA-49
< REMOVAL AND INSTALLATION >
C
DE
F
G H
J
K L
M A
B
HA
N
O P
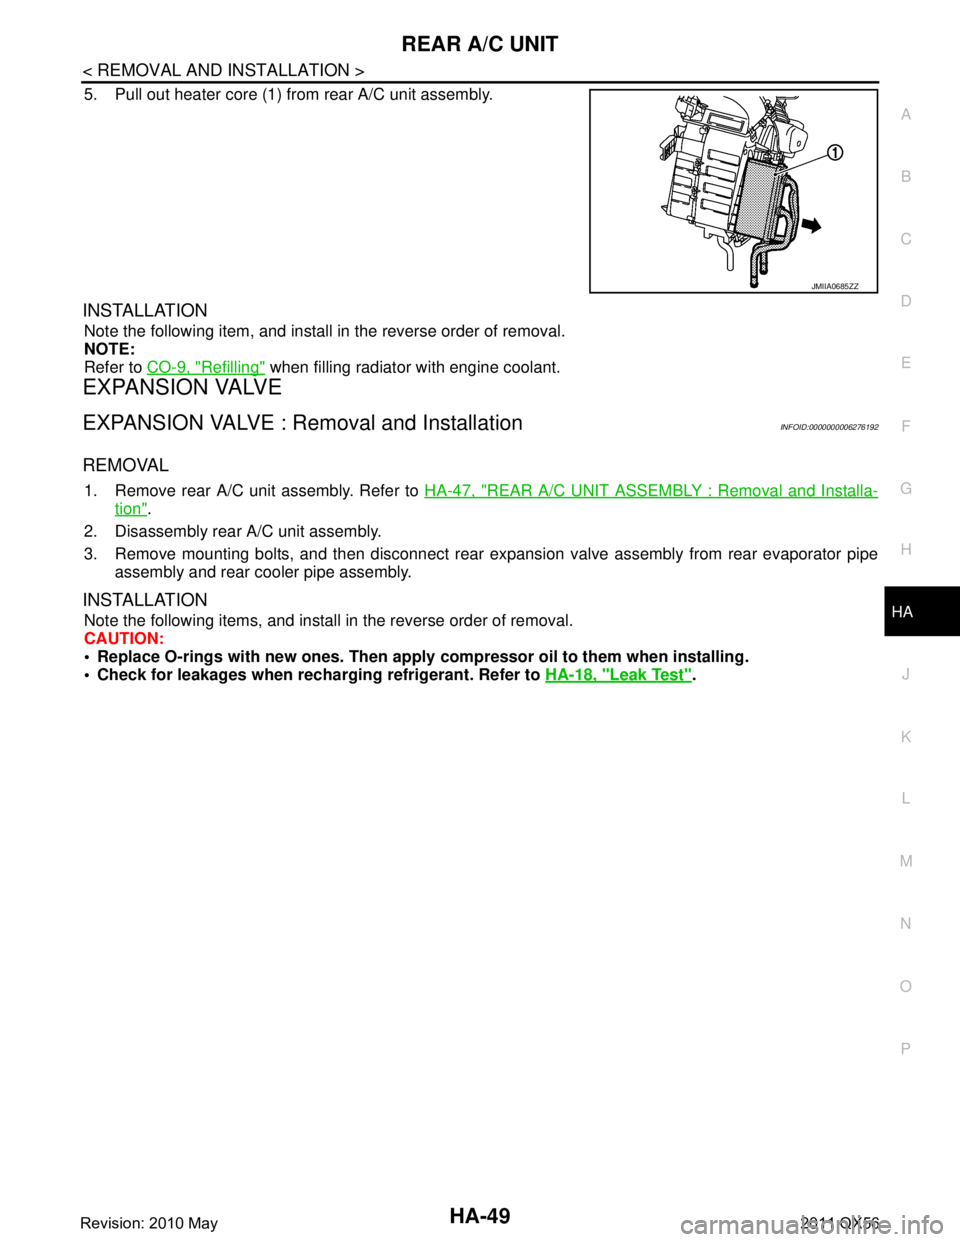
5. Pull out heater core (1) from rear A/C unit assembly.
INSTALLATION
Note the following item, and install in the reverse order of removal.
NOTE:
Refer to CO-9, "
Refilling" when filling radiator with engine coolant.
EXPANSION VALVE
EXPANSION VALVE : Removal and InstallationINFOID:0000000006276192
REMOVAL
1. Remove rear A/C unit assembly. Refer to HA-47, "REAR A/C UNIT ASSEMBLY : Removal and Installa-
tion".
2. Disassembly rear A/C unit assembly.
3. Remove mounting bolts, and then disconnect rear exp ansion valve assembly from rear evaporator pipe
assembly and rear cooler pipe assembly.
INSTALLATION
Note the following items, and install in the reverse order of removal.
CAUTION:
Replace O-rings with new ones. Then apply compressor oil to them when installing.
Check for leakages when recharging refrigerant. Refer to HA-18, "
Leak Test".
JMIIA0685ZZ
Revision: 2010 May2011 QX56