2011 INFINITI QX56 engine
[x] Cancel search: enginePage 2676 of 5598
EM-114
< UNIT DISASSEMBLY AND ASSEMBLY >
CYLINDER BLOCK
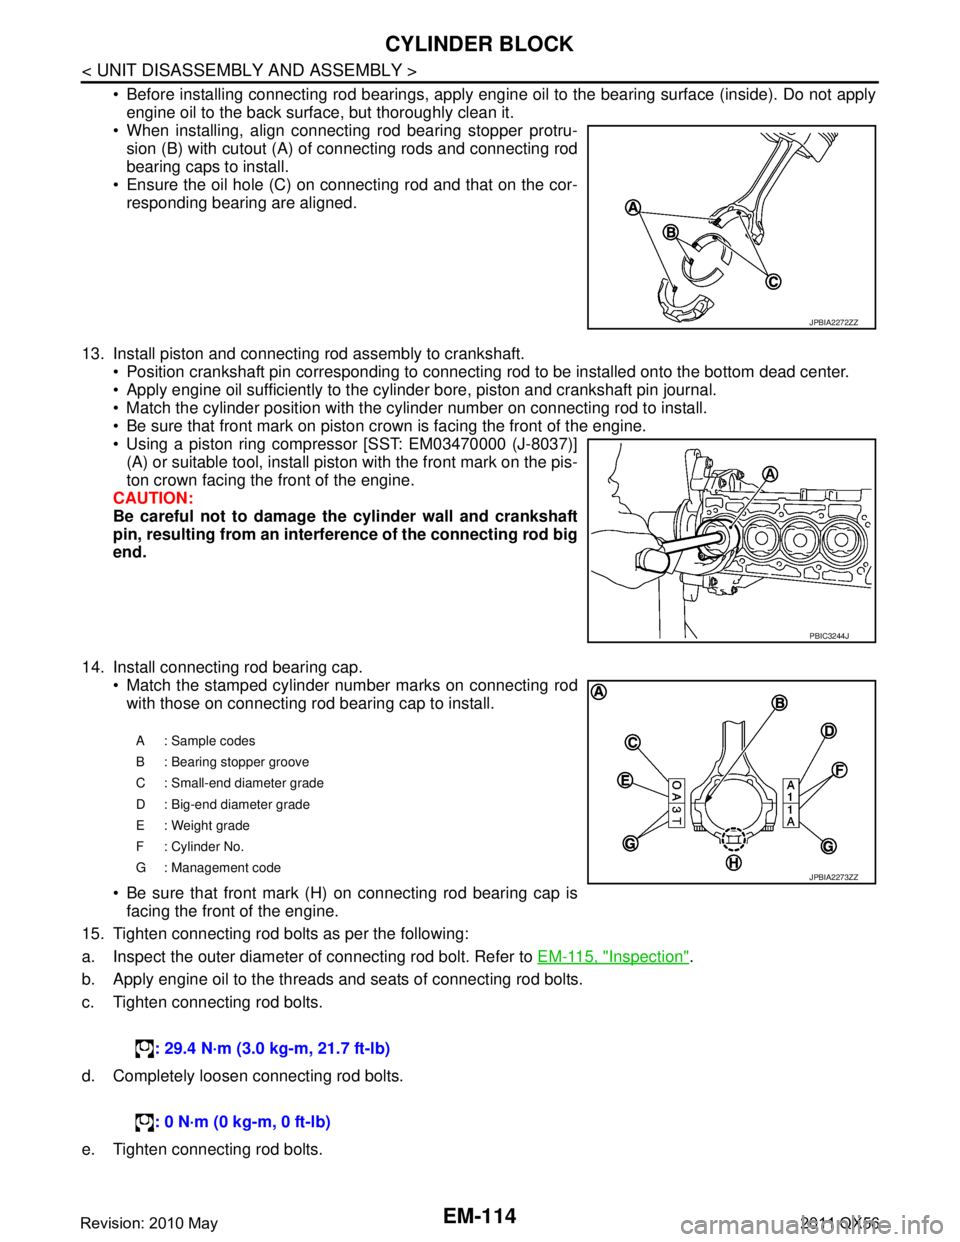
Before installing connecting rod bearings, apply engine oil to the bearing surface (inside). Do not applyengine oil to the back surface, but thoroughly clean it.
When installing, align connecting rod bearing stopper protru-
sion (B) with cutout (A) of connecting rods and connecting rod
bearing caps to install.
Ensure the oil hole (C) on connecting rod and that on the cor-
responding bearing are aligned.
13. Install piston and connecting rod assembly to crankshaft. Position crankshaft pin corresponding to connecting rod to be installed onto the bottom dead center.
Apply engine oil sufficiently to the cylinder bore, piston and crankshaft pin journal.
Match the cylinder position with the cyli nder number on connecting rod to install.
Be sure that front mark on piston cr own is facing the front of the engine.
Using a piston ring compressor [SST: EM03470000 (J-8037)]
(A) or suitable tool, install piston with the front mark on the pis-
ton crown facing the front of the engine.
CAUTION:
Be careful not to damage the cylinder wall and crankshaft
pin, resulting from an interf erence of the connecting rod big
end.
14. Install connecting rod bearing cap. Match the stamped cylinder number marks on connecting rodwith those on connecting rod bearing cap to install.
Be sure that front mark (H) on connecting rod bearing cap is facing the front of the engine.
15. Tighten connecting rod bolts as per the following:
a. Inspect the outer diameter of connecting rod bolt. Refer to EM-115, "
Inspection".
b. Apply engine oil to the threads and seats of connecting rod bolts.
c. Tighten connecting rod bolts.
d. Completely loosen connecting rod bolts.
e. Tighten connecting rod bolts.
JPBIA2272ZZ
PBIC3244J
A: Sample codes
B : Bearing stopper groove
C : Small-end diameter grade
D : Big-end diameter grade
E : Weight grade
F : Cylinder No.
G : Management code
: 29.4 N·m (3.0 kg-m, 21.7 ft-lb)
: 0 N·m (0 kg-m, 0 ft-lb)
JPBIA2273ZZ
Revision: 2010 May2011 QX56
Page 2677 of 5598
![INFINITI QX56 2011 Factory Service Manual
CYLINDER BLOCKEM-115
< UNIT DISASSEMBLY AND ASSEMBLY >
C
DE
F
G H
I
J
K L
M A
EM
NP
O
f. Tighten connecting rod bolts. (clockwise)
CAUTION:
Always use the angle wrench [SST: KV10112100 (B T8653-A)]. INFINITI QX56 2011 Factory Service Manual
CYLINDER BLOCKEM-115
< UNIT DISASSEMBLY AND ASSEMBLY >
C
DE
F
G H
I
J
K L
M A
EM
NP
O
f. Tighten connecting rod bolts. (clockwise)
CAUTION:
Always use the angle wrench [SST: KV10112100 (B T8653-A)].](/manual-img/42/57033/w960_57033-2676.png)
CYLINDER BLOCKEM-115
< UNIT DISASSEMBLY AND ASSEMBLY >
C
DE
F
G H
I
J
K L
M A
EM
NP
O
f. Tighten connecting rod bolts. (clockwise)
CAUTION:
Always use the angle wrench [SST: KV10112100 (B T8653-A)]. Never make judgment by visual
inspection.
After tightening connecting rod bolts, c heck that crankshaft rotates smoothly.
Check the connecting rod side clearance. Refer to EM-115, "
Inspection".
16. Install knock sensors (1). Install knock sensors in the direction shown in the figure.
After installing knock sens or, connect harness connector, and
lay it out to front of the engine.
CAUTION:
Never tighten mounting bolts while holding connector.
If any impact by dropping is applied to knock sensor,
replace it with new one.
NOTE:
Check that there is no foreign material on the cylinder block
mating surface and the back surface of knock sensor.
Check that knock sensor does not interfere with other parts.
17. Install oil filter (for VVEL ladder assembly).
18. Install drive plate. Install drive plate (4) and reinforcement plate (3) as shown inthe figure.
When installing drive plate to crankshaft (1), be sure to cor- rectly align crankshaft side dowel pin and drive plate side
dowel pin hole.
CAUTION:
If these are not aligned correct ly, engine runs roughly and
“MIL” illuminates.
Holding ring gear with the ring gear stopper [SST: KV10119200 (J-49277)].
Tighten the mounting bolts crosswise over several times.
19. Assemble in the reverse order of disassembly.
InspectionINFOID:0000000006289584
CRANKSHAFT END PLAY
Measure the clearance between thrust bearings and crankshaft arm when crankshaft is moved fully forward or backward with a dial
indicator (A).
If the measured value exceeds t he limit, replace thrust bearings,
and measure again. If it still exceeds the limit, replace crankshaft
also. : 19.6 N·m (2.0 kg-m, 14.5 ft-lb)
Angle tightening: 90 degrees
: Engine front
2 : Pilot converter
A : Rounded : Engine front
JPBIA4515ZZ
JPBIA2275ZZ
Standard and limit : Refer to EM-137, "CylinderBlock".
JPBIA2477ZZ
Revision: 2010 May2011 QX56
Page 2679 of 5598
CYLINDER BLOCKEM-117
< UNIT DISASSEMBLY AND ASSEMBLY >
C
DE
F
G H
I
J
K L
M A
EM
NP
O
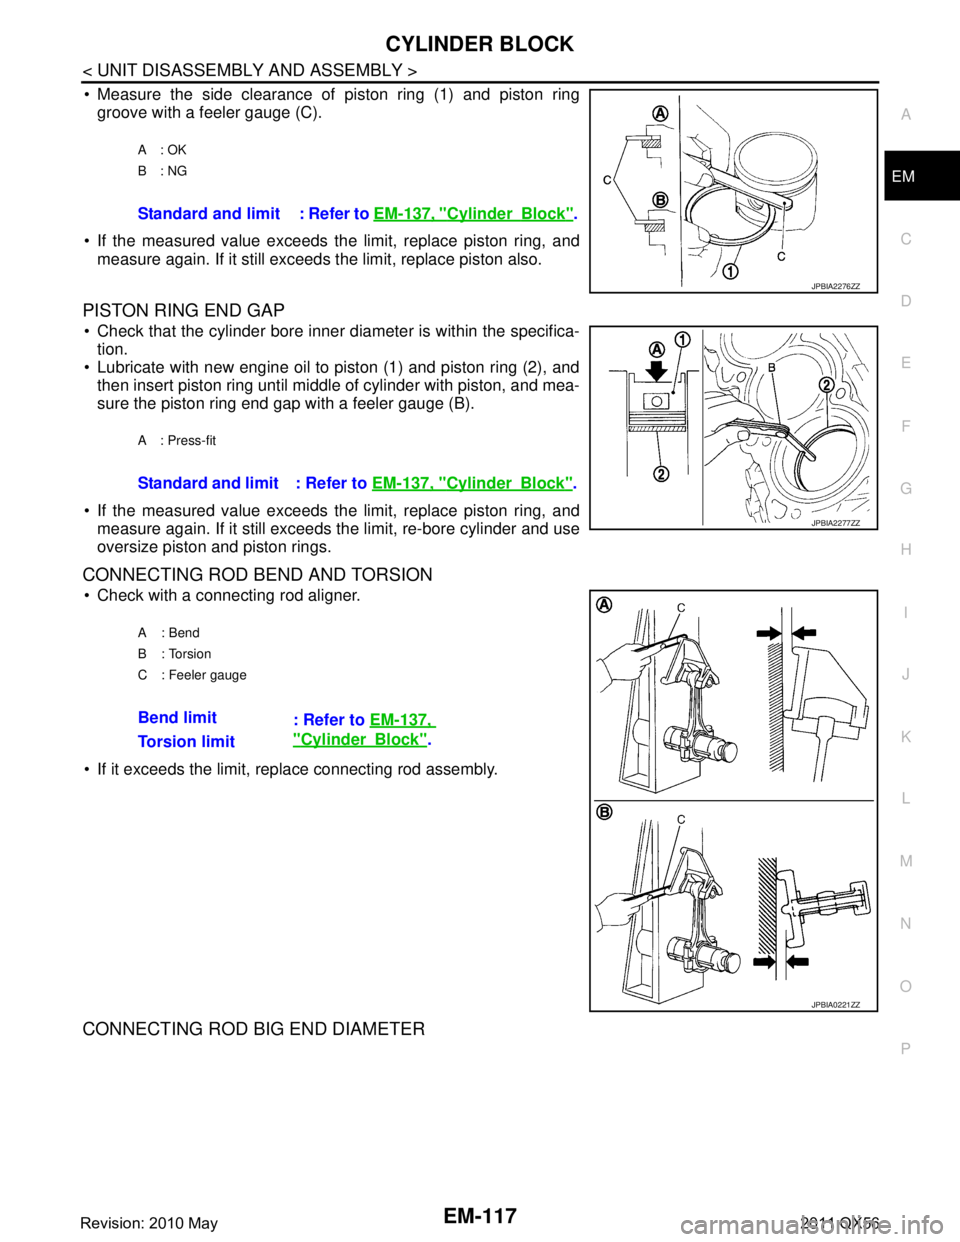
Measure the side clearance of piston ring (1) and piston ring
groove with a feeler gauge (C).
If the measured value exceeds t he limit, replace piston ring, and
measure again. If it still exceeds the limit, replace piston also.
PISTON RING END GAP
Check that the cylinder bore inner diameter is within the specifica- tion.
Lubricate with new engine oil to piston (1) and piston ring (2), and
then insert piston ring until middle of cylinder with piston, and mea-
sure the piston ring end gap with a feeler gauge (B).
If the measured value exceeds t he limit, replace piston ring, and
measure again. If it still exceeds the limit, re-bore cylinder and use
oversize piston and piston rings.
CONNECTING ROD BEND AND TORSION
Check with a connecting rod aligner.
If it exceeds the limit, replace connecting rod assembly.
CONNECTING ROD BIG END DIAMETER
A: OK
B: NG
Standard and limit : Refer to EM-137, "CylinderBlock".
JPBIA2276ZZ
A : Press-fit
Standard and limit : Refer to EM-137, "CylinderBlock".
JPBIA2277ZZ
A: Bend
B: Torsion
C : Feeler gauge
Bend limit
: Refer to EM-137,
"CylinderBlock".
Torsion limit
JPBIA0221ZZ
Revision: 2010 May2011 QX56
Page 2680 of 5598
EM-118
< UNIT DISASSEMBLY AND ASSEMBLY >
CYLINDER BLOCK
Install connecting rod bearing cap without installing connecting rodbearing, and tighten connecting rod bolts to the specified torque.
Refer to EM-107, "
Disassembly and Assembly" for the tightening
procedure.
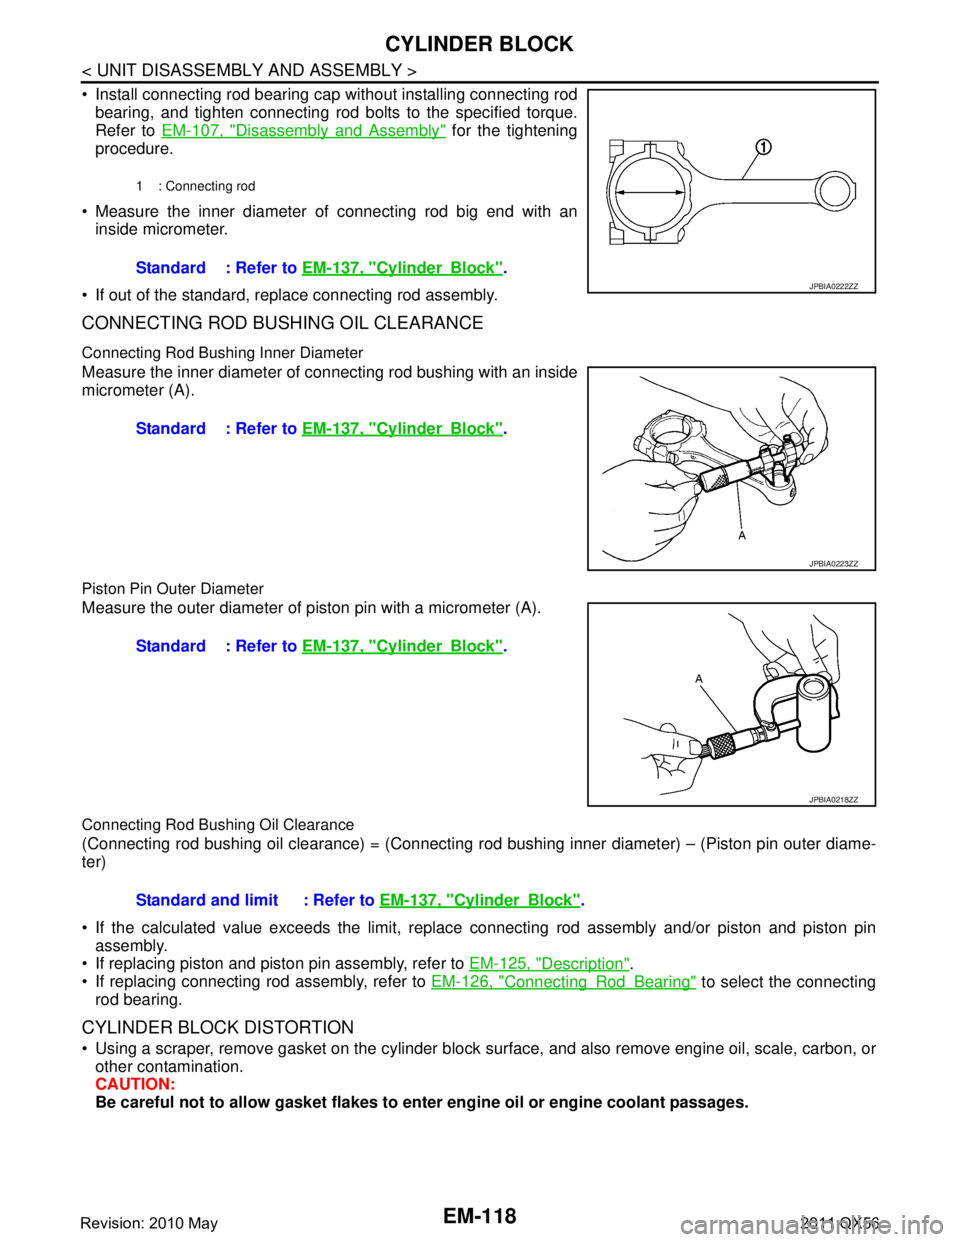
Measure the inner diameter of connecting rod big end with an inside micrometer.
If out of the standard, replace connecting rod assembly.
CONNECTING ROD BUSHING OIL CLEARANCE
Connecting Rod Bushing Inner Diameter
Measure the inner diameter of connecting rod bushing with an inside
micrometer (A).
Piston Pin Outer Diameter
Measure the outer diameter of piston pin with a micrometer (A).
Connecting Rod Bushing Oil Clearance
(Connecting rod bushing oil clearance) = (Connecting rod bus hing inner diameter) – (Piston pin outer diame-
ter)
If the calculated value exceeds the limit, replac e connecting rod assembly and/or piston and piston pin
assembly.
If replacing piston and piston pin assembly, refer to EM-125, "
Description".
If replacing connecting rod assembly, refer to EM-126, "
ConnectingRodBearing" to select the connecting
rod bearing.
CYLINDER BLOCK DISTORTION
Using a scraper, remove gasket on the cylinder block su rface, and also remove engine oil, scale, carbon, or
other contamination.
CAUTION:
Be careful not to allow gasket flakes to en ter engine oil or engine coolant passages.
1 : Connecting rod
Standard : Refer to EM-137, "CylinderBlock".
JPBIA0222ZZ
Standard : Refer to EM-137, "CylinderBlock".
JPBIA0223ZZ
Standard : Refer to EM-137, "CylinderBlock".
JPBIA0218ZZ
Standard and limit : Refer to EM-137, "CylinderBlock".
Revision: 2010 May2011 QX56
Page 2681 of 5598
CYLINDER BLOCKEM-119
< UNIT DISASSEMBLY AND ASSEMBLY >
C
DE
F
G H
I
J
K L
M A
EM
NP
O
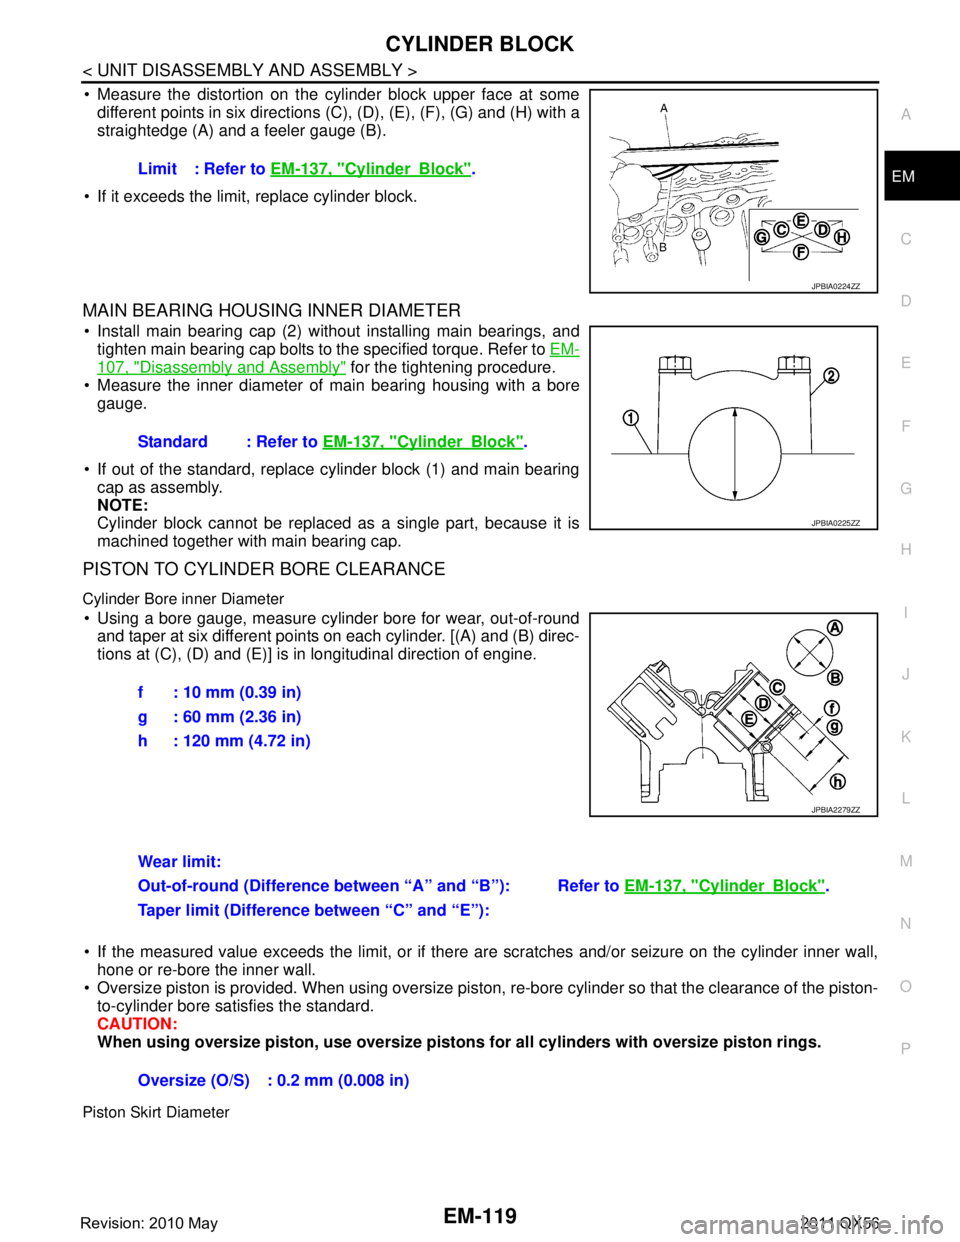
Measure the distortion on the cylinder block upper face at some
different points in six directions (C ), (D), (E), (F), (G) and (H) with a
straightedge (A) and a feeler gauge (B).
If it exceeds the limit, replace cylinder block.
MAIN BEARING HOUSING INNER DIAMETER
Install main bearing cap (2) without installing main bearings, and tighten main bearing cap bolts to the specified torque. Refer to EM-
107, "Disassembly and Assembly" for the tightening procedure.
Measure the inner diameter of main bearing housing with a bore
gauge.
If out of the standard, replace cylinder block (1) and main bearing cap as assembly.
NOTE:
Cylinder block cannot be replaced as a single part, because it is
machined together with main bearing cap.
PISTON TO CYLINDER BORE CLEARANCE
Cylinder Bore inner Diameter
Using a bore gauge, measure cylinder bore for wear, out-of-round
and taper at six different points on each cylinder. [(A) and (B) direc-
tions at (C), (D) and (E)] is in longitudinal direction of engine.
If the measured value exceeds the limit, or if there are scratches and/or seizure on the cylinder inner wall,
hone or re-bore the inner wall.
Oversize piston is provided. When using oversize piston, re-bore cylinder so that the clearance of the piston-
to-cylinder bore satisfies the standard.
CAUTION:
When using oversize pist on, use oversize pistons for all cyl inders with oversize piston rings.
Piston Skirt Diameter
Limit : Refer to EM-137, "CylinderBlock".
JPBIA0224ZZ
Standard : Refer to EM-137, "CylinderBlock".
JPBIA0225ZZ
f : 10 mm (0.39 in)
g : 60 mm (2.36 in)
h : 120 mm (4.72 in)
JPBIA2279ZZ
Wear limit:
Refer to EM-137, "
CylinderBlock".
Out-of-round (Difference between “A” and “B”):
Taper limit (Difference between “C” and “E”):
Oversize (O/S) : 0.2 mm (0.008 in)
Revision: 2010 May2011 QX56
Page 2684 of 5598
EM-122
< UNIT DISASSEMBLY AND ASSEMBLY >
CYLINDER BLOCK
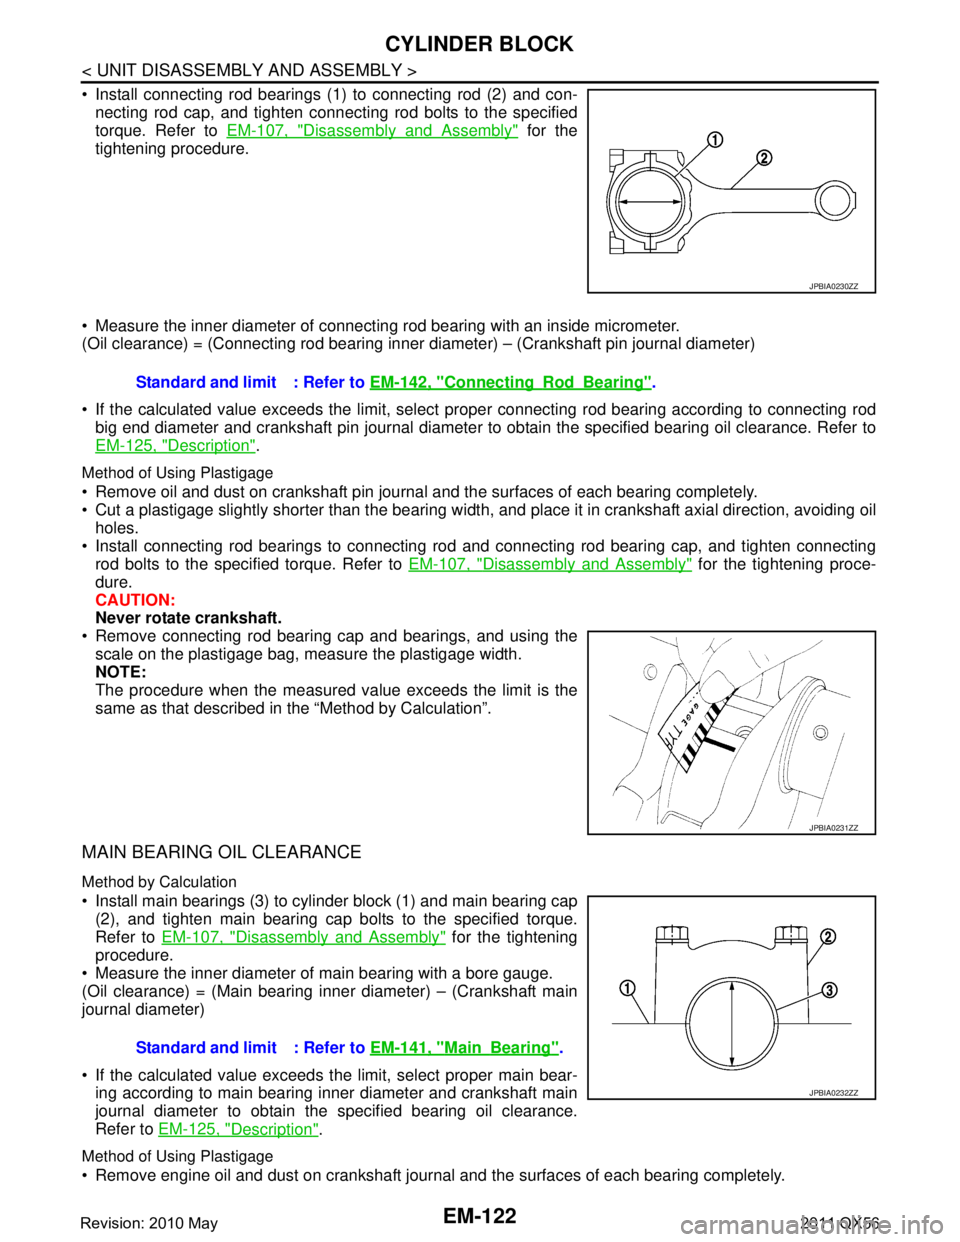
Install connecting rod bearings (1) to connecting rod (2) and con-necting rod cap, and tighten connecting rod bolts to the specified
torque. Refer to EM-107, "
Disassembly and Assembly" for the
tightening procedure.
Measure the inner diameter of connecting rod bearing with an inside micrometer.
(Oil clearance) = (Connecting rod bearing inner di ameter) – (Crankshaft pin journal diameter)
If the calculated value exceeds the limit, select proper connecting rod bearing according to connecting rod
big end diameter and crankshaft pin journal diameter to obtain the specified bearing oil clearance. Refer to
EM-125, "
Description".
Method of Using Plastigage
Remove oil and dust on crankshaft pin journal and the surfaces of each bearing completely.
Cut a plastigage slightly shorter than the bearing width, and place it in crankshaft axial direction, avoiding oil
holes.
Install connecting rod bearings to connecting rod and connecting rod bearing cap, and tighten connecting
rod bolts to the specified torque. Refer to EM-107, "
Disassembly and Assembly" for the tightening proce-
dure.
CAUTION:
Never rotate crankshaft.
Remove connecting rod bearing cap and bearings, and using the
scale on the plastigage bag, measure the plastigage width.
NOTE:
The procedure when the measured va lue exceeds the limit is the
same as that described in the “Method by Calculation”.
MAIN BEARING OIL CLEARANCE
Method by Calculation
Install main bearings (3) to cylinder block (1) and main bearing cap (2), and tighten main bearing cap bolts to the specified torque.
Refer to EM-107, "
Disassembly and Assembly" for the tightening
procedure.
Measure the inner diameter of main bearing with a bore gauge.
(Oil clearance) = (Main bearing inner diameter) – (Crankshaft main
journal diameter)
If the calculated value exceeds t he limit, select proper main bear-
ing according to main bearing inner diameter and crankshaft main
journal diameter to obtain the specified bearing oil clearance.
Refer to EM-125, "
Description".
Method of Using Plastigage
Remove engine oil and dust on crankshaft journal and the surfaces of each bearing completely.
JPBIA0230ZZ
Standard and limit : Refer to EM-142, "ConnectingRodBearing".
JPBIA0231ZZ
Standard and limit : Refer to EM-141, "MainBearing".
JPBIA0232ZZ
Revision: 2010 May2011 QX56
Page 2686 of 5598
EM-124
< UNIT DISASSEMBLY AND ASSEMBLY >
CYLINDER BLOCK
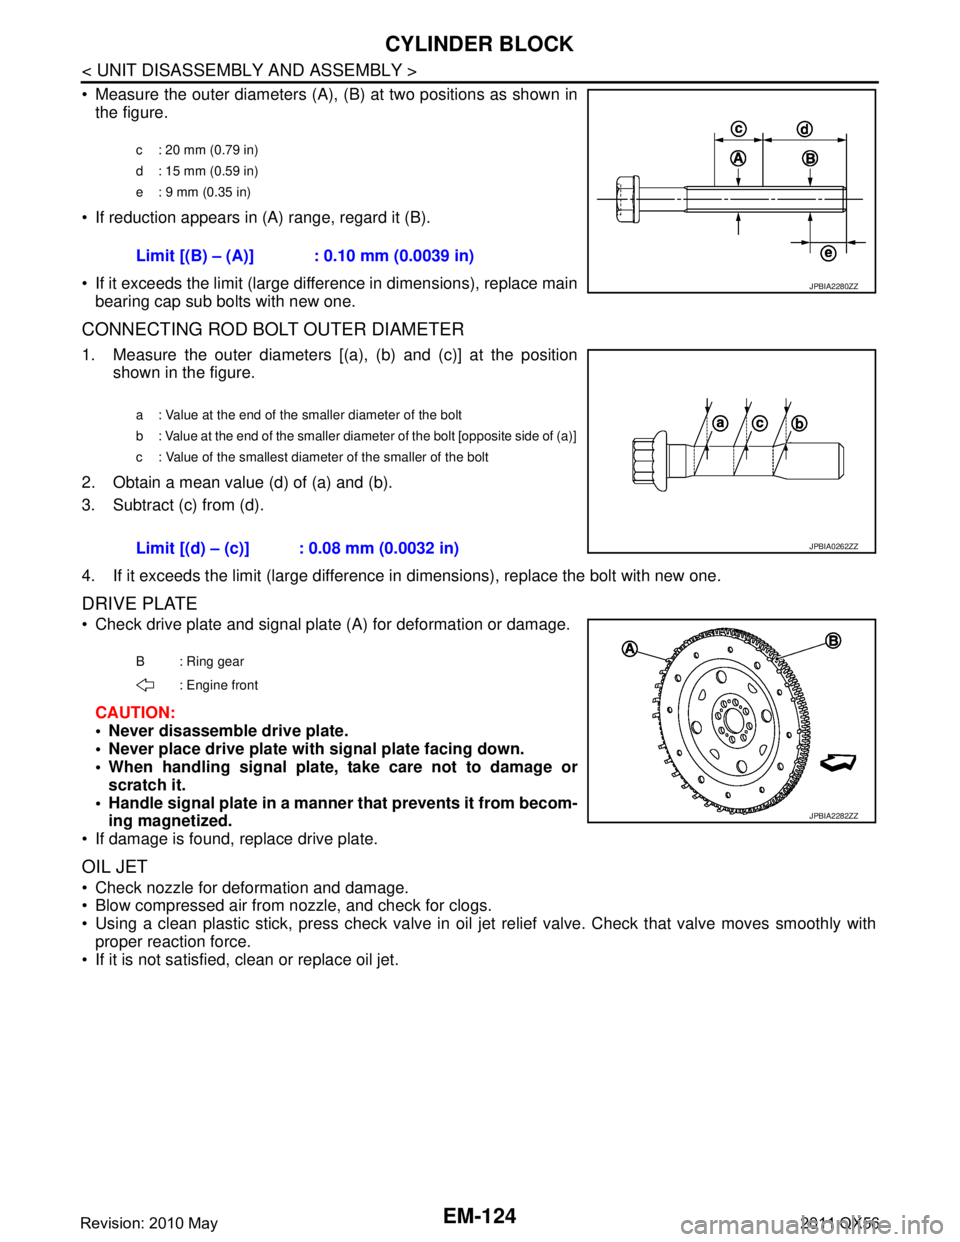
Measure the outer diameters (A), (B) at two positions as shown in
the figure.
If reduction appears in (A) range, regard it (B).
If it exceeds the limit (large difference in dimensions), replace main bearing cap sub bolts with new one.
CONNECTING ROD BOLT OUTER DIAMETER
1. Measure the outer diameters [(a), (b) and (c)] at the position shown in the figure.
2. Obtain a mean value (d) of (a) and (b).
3. Subtract (c) from (d).
4. If it exceeds the limit (large difference in dimensions), replace the bolt with new one.
DRIVE PLATE
Check drive plate and signal plate (A) for deformation or damage.
CAUTION:
Never disassemble drive plate.
Never place drive plate with signal plate facing down.
When handling signal plate, take care not to damage or scratch it.
Handle signal plate in a manner that prevents it from becom-
ing magnetized.
If damage is found, replace drive plate.
OIL JET
Check nozzle for deformation and damage.
Blow compressed air from nozzle, and check for clogs.
Using a clean plastic stick, press check valve in oil je t relief valve. Check that valve moves smoothly with
proper reaction force.
If it is not satisfied, clean or replace oil jet.
c : 20 mm (0.79 in)
d : 15 mm (0.59 in)
e : 9 mm (0.35 in)
Limit [(B) – (A)] : 0.10 mm (0.0039 in)
JPBIA2280ZZ
a : Value at the end of the smaller diameter of the bolt
b : Value at the end of the smaller diameter of the bolt [opposite side of (a)]
c : Value of the smallest diameter of the smaller of the bolt
Limit [(d) – (c)] : 0.08 mm (0.0032 in)JPBIA0262ZZ
B : Ring gear
: Engine front
JPBIA2282ZZ
Revision: 2010 May2011 QX56
Page 2705 of 5598
EX-1
ENGINE
C
DE
F
G H
I
J
K L
M
SECTION EX
A
EX
N
O P
CONTENTS
EXHAUST SYSTEM
PRECAUTION ................ ...............................2
PRECAUTIONS .............................................. .....2
Removal and Installation ..................................... ......2
PREPARATION ............................................3
PREPARATION .............................................. .....3
Special Service Tool ........................................... ......3
Commercial Service Tool ..........................................3
PERIODIC MAINTENANCE .........................4
EXHAUST SYSTEM ...........................................4
Inspection ............................................................ .....4
REMOVAL AND INSTALLATION ................5
EXHAUST SYSTEM ...........................................5
Exploded View ..................................................... .....5
Removal and Installation ..........................................5
Inspection .................................................................6
Revision: 2010 May2011 QX56