2011 HYUNDAI VERACRUZ service
[x] Cancel search: servicePage 361 of 419
Maintenance
44
7
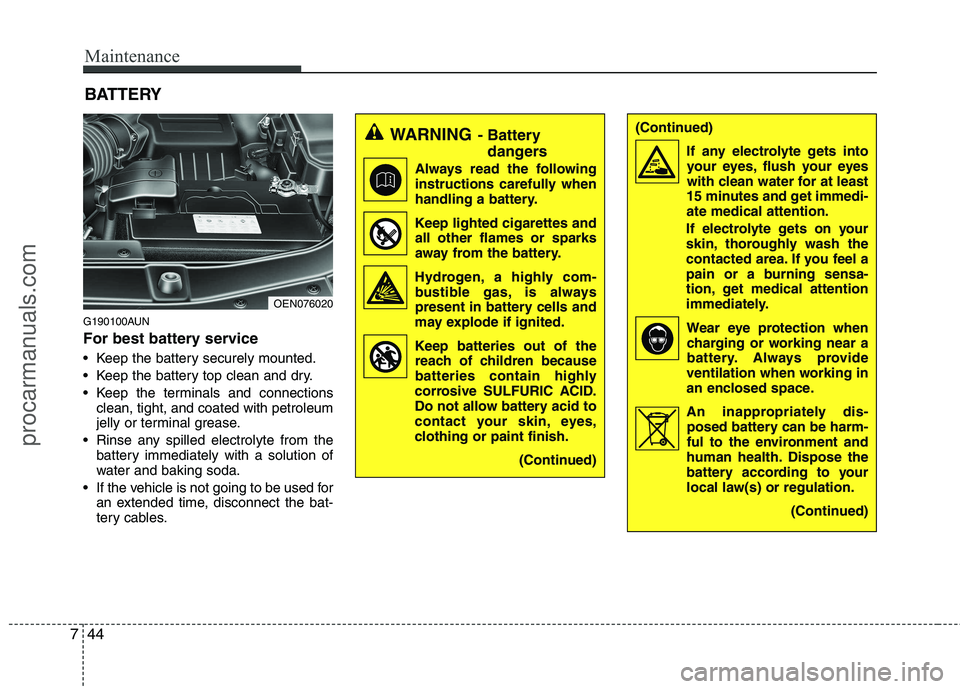
G190100AUN
For best battery service
Keep the battery securely mounted.
Keep the battery top clean and dry.
Keep the terminals and connections
clean, tight, and coated with petroleum
jelly or terminal grease.
Rinse any spilled electrolyte from the battery immediately with a solution of
water and baking soda.
If the vehicle is not going to be used for an extended time, disconnect the bat-
tery cables.
BATTERY
OEN076020
WARNING
- Battery
dangers
Always read the following
instructions carefully when
handling a battery.
Keep lighted cigarettes and all other flames or sparks
away from the battery.
Hydrogen, a highly com- bustible gas, is always
present in battery cells and
may explode if ignited.
Keep batteries out of the reach of children because
batteries contain highly
corrosive SULFURIC ACID.
Do not allow battery acid to
contact your skin, eyes,
clothing or paint finish.
(Continued)(Continued)If any electrolyte gets intoyour eyes, flush your eyes
with clean water for at least
15 minutes and get immedi-ate medical attention.
If electrolyte gets on your
skin, thoroughly wash the
contacted area. If you feel a
pain or a burning sensa-
tion, get medical attention
immediately.
Wear eye protection whencharging or working near a
battery. Always provide
ventilation when working in
an enclosed space.
An inappropriately dis- posed battery can be harm-
ful to the environment and
human health. Dispose the
battery according to your
local law(s) or regulation.
(Continued)
procarmanuals.com
Page 371 of 419
Maintenance
54
7
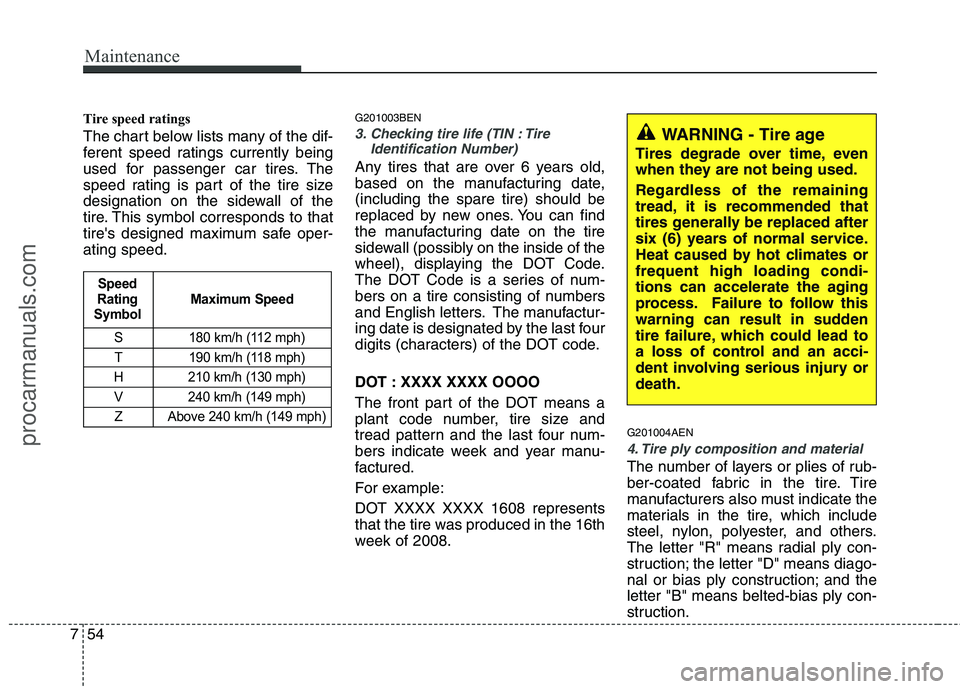
Tire speed ratings
The chart below lists many of the dif-
ferent speed ratings currently being
used for passenger car tires. The
speed rating is part of the tire size
designation on the sidewall of the
tire. This symbol corresponds to that
tire's designed maximum safe oper-ating speed. G201003BEN
3. Checking tire life (TIN : Tire
Identification Number)
Any tires that are over 6 years old,
based on the manufacturing date,(including the spare tire) should be
replaced by new ones. You can find
the manufacturing date on the tire
sidewall (possibly on the inside of the
wheel), displaying the DOT Code.
The DOT Code is a series of num-
bers on a tire consisting of numbers
and English letters. The manufactur-
ing date is designated by the last four
digits (characters) of the DOT code.
DOT : XXXX XXXX OOOO
The front part of the DOT means a
plant code number, tire size and
tread pattern and the last four num-
bers indicate week and year manu-
factured.
For example:
DOT XXXX XXXX 1608 represents
that the tire was produced in the 16th
week of 2008. G201004AEN
4. Tire ply composition and material
The number of layers or plies of rub-
ber-coated fabric in the tire. Tire
manufacturers also must indicate the
materials in the tire, which include
steel, nylon, polyester, and others.
The letter "R" means radial ply con-
struction; the letter "D" means diago-
nal or bias ply construction; and theletter "B" means belted-bias ply con-
struction.
S 180 km/h (112 mph)
T 190 km/h (118 mph)
H 210 km/h (130 mph) V 240 km/h (149 mph)
Z Above 240 km/h (149 mph)
Maximum Speed
Speed
Rating
Symbol
WARNING - Tire age
Tires degrade over time, even
when they are not being used.
Regardless of the remaining
tread, it is recommended that
tires generally be replaced after
six (6) years of normal service.
Heat caused by hot climates orfrequent high loading condi-
tions can accelerate the aging
process. Failure to follow this
warning can result in sudden
tire failure, which could lead to
a loss of control and an acci-
dent involving serious injury ordeath.
procarmanuals.com
Page 372 of 419
755
Maintenance
G201005AUN
5. Maximum permissible inflationpressure
This number is the greatest amount of air pressure that should be put in
the tire. Do not exceed the maximum
permissible inflation pressure. Refer
to the Tire and Loading Information
label for recommended inflation
pressure.
G201006AUN
6. Maximum load rating
This number indicates the maximum
load in kilograms and pounds that
can be carried by the tire. When
replacing the tires on the vehicle,
always use a tire that has the same
load rating as the factory installed
tire. G2010007BEN
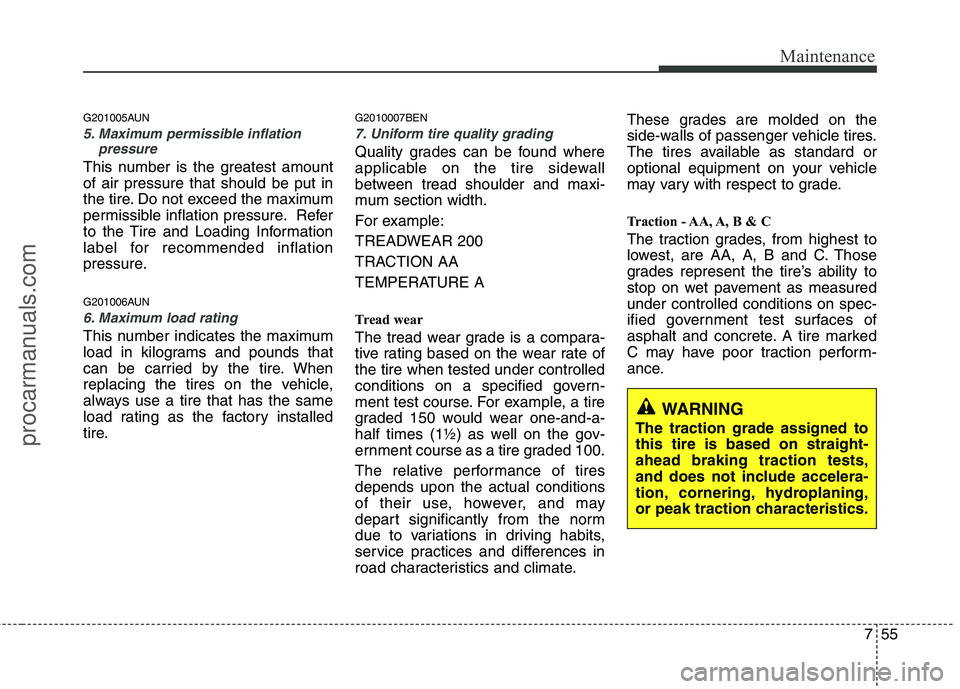
7. Uniform tire quality grading
Quality grades can be found where
applicable on the tire sidewall
between tread shoulder and maxi-
mum section width.
For example:
TREADWEAR 200
TRACTION AA
TEMPERATURE A
Tread wear
The tread wear grade is a compara-
tive rating based on the wear rate ofthe tire when tested under controlled
conditions on a specified govern-
ment test course. For example, a tire
graded 150 would wear one-and-a-
half times (1½) as well on the gov-
ernment course as a tire graded 100.
The relative performance of tires depends upon the actual conditions
of their use, however, and may
depart significantly from the norm
due to variations in driving habits,
service practices and differences in
road characteristics and climate.These grades are molded on the
side-walls of passenger vehicle tires.
The tires available as standard or
optional equipment on your vehicle
may vary with respect to grade.
Traction - AA, A, B & C
The traction grades, from highest to
lowest, are AA, A, B and C. Those
grades represent the tire’s ability to
stop on wet pavement as measuredunder controlled conditions on spec-
ified government test surfaces of
asphalt and concrete. A tire marked
C may have poor traction perform-
ance.
WARNING
The traction grade assigned to this tire is based on straight-ahead braking traction tests,
and does not include accelera-
tion, cornering, hydroplaning,
or peak traction characteristics.
procarmanuals.com
Page 389 of 419
Maintenance
72
7
6. Insert a new bulb by inserting it into
the socket and rotating it until it locks
into place.
7. Install the socket in the assembly by aligning the tabs on the socket with the
slots in the assembly. Push the socket
into the assembly and turn the socket
clockwise.
8. Reinstall the light assembly to the body of the vehicle.
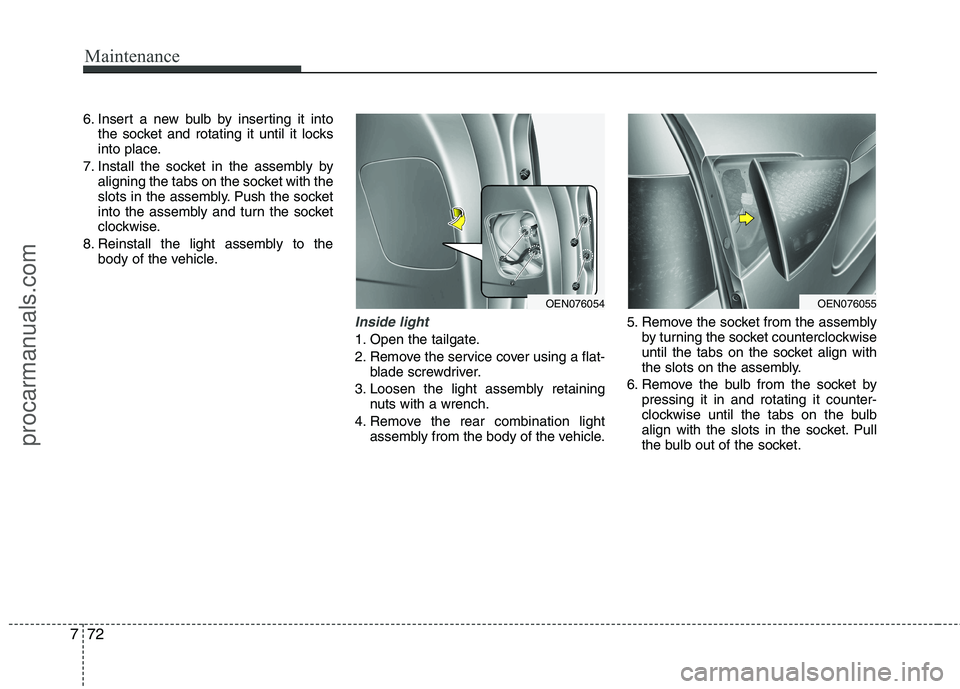
Inside light
1. Open the tailgate.
2. Remove the service cover using a flat-blade screwdriver.
3. Loosen the light assembly retaining nuts with a wrench.
4. Remove the rear combination light assembly from the body of the vehicle. 5. Remove the socket from the assembly
by turning the socket counterclockwise
until the tabs on the socket align with
the slots on the assembly.
6. Remove the bulb from the socket by pressing it in and rotating it counter-
clockwise until the tabs on the bulb
align with the slots in the socket. Pull
the bulb out of the socket.
OEN076054OEN076055
procarmanuals.com
Page 390 of 419
773
Maintenance
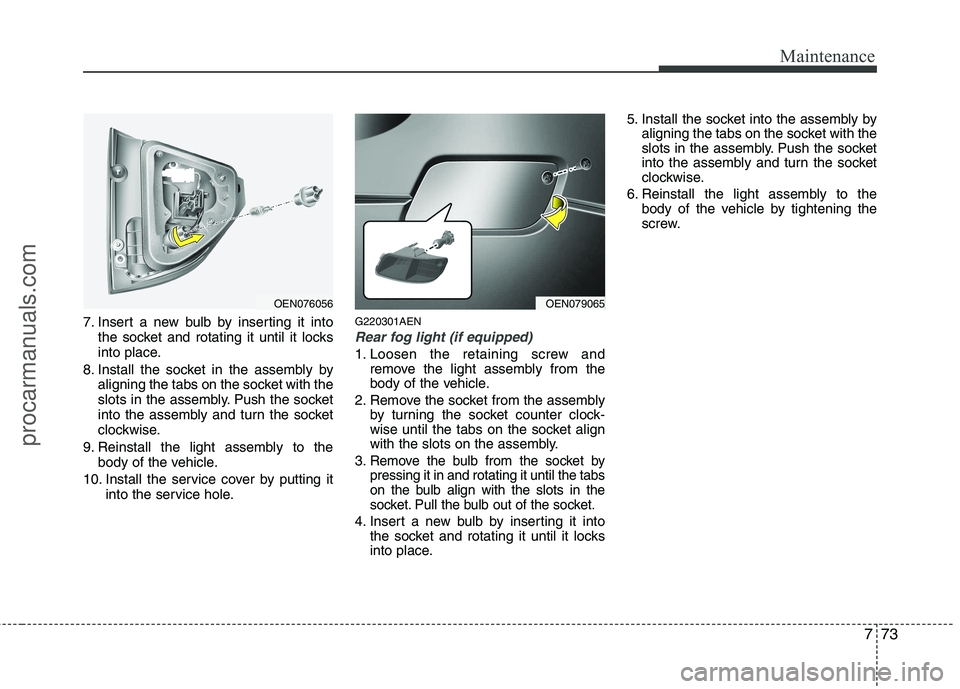
7. Insert a new bulb by inserting it intothe socket and rotating it until it locks
into place.
8. Install the socket in the assembly by aligning the tabs on the socket with the
slots in the assembly. Push the socket
into the assembly and turn the socket
clockwise.
9. Reinstall the light assembly to the body of the vehicle.
10. Install the service cover by putting it into the service hole. G220301AENRear fog light (if equipped)
1. Loosen the retaining screw and
remove the light assembly from the
body of the vehicle.
2. Remove the socket from the assembly by turning the socket counter clock-
wise until the tabs on the socket align
with the slots on the assembly.
3.
Remove the bulb from the socket bypressing it in and rotating it until the tabs
on the bulb align with the slots in the
socket. Pull the bulb out of the socket.
4. Insert a new bulb by inserting it into the socket and rotating it until it locks
into place. 5. Install the socket into the assembly by
aligning the tabs on the socket with the
slots in the assembly. Push the socket
into the assembly and turn the socket
clockwise.
6. Reinstall the light assembly to the body of the vehicle by tightening the
screw.
OEN076056OEN079065
procarmanuals.com
Page 399 of 419
Maintenance
82
7
EMISSION CONTROL SYSTEM (IF EQUIPPED)
G270000AEN
The emission control system of your
vehicle is covered by a written limited
warranty. Please see the warranty infor-
mation contained in the Service Passport
in your vehicle.
Your vehicle is equipped with an emis-
sion control system to meet all applicable
emission regulations. There are three emission control sys-
tems, as follows.
(1) Crankcase emission control system
(2) Evaporative emission control system(3) Exhaust emission control system In order to assure the proper function of
the emission control systems, it is rec-
ommended that you have your car
inspected and maintained by an author-
ized HYUNDAI dealer in accordance with
the maintenance schedule in this manu-al. Caution for the Inspection and
Maintenance Test (With Electronic
Stability Program (ESP) system)
To prevent the vehicle from misfir-
ing during dynamometer testing,
turn the Electronic Stability
Program (ESP) system off by press-
ing the ESP switch.
After dynamometer testing is com- pleted, turn the ESP system back on
by pressing the ESP switch again. G270100AUN
1. Crankcase emission control
system
The positive crankcase ventilation sys-
tem is employed to prevent air pollution
caused by blow-by gases being emitted
from the crankcase. This system supplies
fresh filtered air to the crankcase through
the air intake hose. Inside the crankcase,
the fresh air mixes with blow-by gases,
which then pass through the PCV valveinto the induction system. G270200AEN
2. Evaporative emission control system
The Evaporative Emission Control
System is designed to prevent fuel
vapors from escaping into the atmos-
phere.
procarmanuals.com
Page 406 of 419
85
Specifications & Consumer information
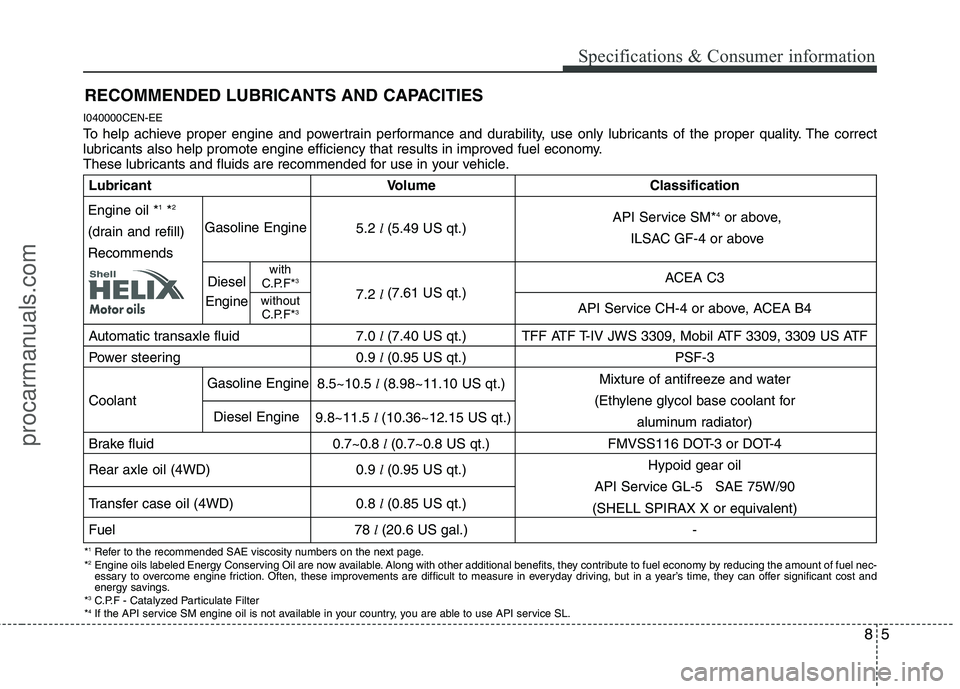
RECOMMENDED LUBRICANTS AND CAPACITIES
I040000CEN-EE
To help achieve proper engine and powertrain performance and durability, use only lubricants of the proper quality. The correct
lubricants also help promote engine efficiency that results in improved fuel economy.
These lubricants and fluids are recommended for use in your vehicle.
* 1
Refer to the recommended SAE viscosity numbers on the next page.
* 2
Engine oils labeled Energy Conserving Oil are now available. Along with other additional benefits, they contribute to fuel economy by reducing the amount of fuel nec-
essary to overcome engine friction. Often, these improvements are difficult to measure in everyday driving, but in a year’s time, they can offer significant cost and
energy savings.
* 3
C.P.F - Catalyzed Particulate Filter
* 4
If the API service SM engine oil is not available in your country, you are able to use API service SL.
Lubricant Volume Classification
5.2 l (5.49 US qt.)
ACEA C3
7.2 l (7.61 US qt.)
API Service CH-4 or above, ACEA B4
Automatic transaxle fluid 7.0 l (7.40 US qt.) TFF ATF T-IV JWS 3309, Mobil ATF 3309, 3309 US ATF
Power steering 0.9 l (0.95 US qt.) PSF-3
8.5~10.5 l (8.98~11.10 US qt.) Mixture of antifreeze and water
Coolant (Ethylene glycol base coolant for
9.8~11.5 l (10.36~12.15 US qt.)
aluminum radiator)
Brake fluid 0.7~0.8 l (0.7~0.8 US qt.) FMVSS116 DOT-3 or DOT-4
Rear axle oil (4WD) 0.9 l (0.95 US qt.) Hypoid gear oil
API Service GL-5 SAE 75W/90
Transfer case oil (4WD) 0.8 l (0.85 US qt.)
(SHELL SPIRAX X or equivalent)
Fuel 78 l (20.6 US gal.) -
Engine oil * 1
*2
(drain and refill) Recommends Gasoline Engine
Gasoline EngineDiesel
Engine with
C.P.F* 3
without C.P.F* 3
Diesel Engine API Service SM*
4
or above,
ILSAC GF-4 or above
procarmanuals.com
Page 415 of 419
Index
6
I
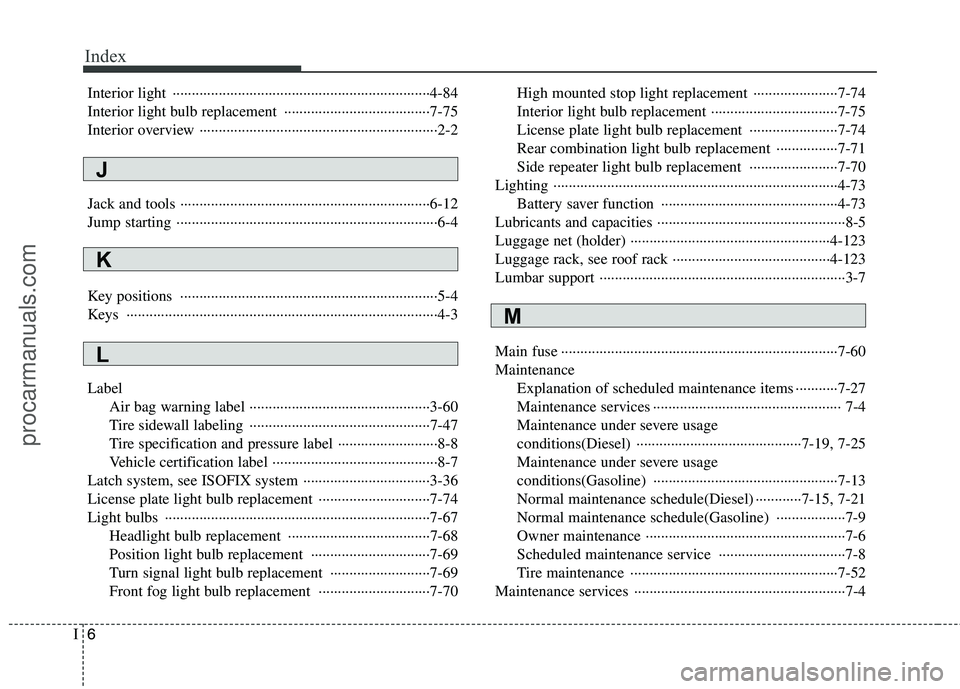
Interior light ···································································4-84
Interior light bulb replacement ······································7-75
Interior overview ······························································2-2
Jack and tools ·································································6-12
Jump starting ····································································6-4
Key positions ···································································5-4
Keys ·················································································4-3 Label
Air bag warning label ···············································3-60
Tire sidewall labeling ···············································7-47
Tire specification and pressure label ··························8-8
Vehicle certification label ···········································8-7
Latch system, see ISOFIX system ·································3-36
License plate light bulb replacement ·····························7-74
Light bulbs ·····································································7-67 Headlight bulb replacement ·····································7-68
Position light bulb replacement ·······························7-69
Turn signal light bulb replacement ··························7-69
Front fog light bulb replacement ·····························7-70 High mounted stop light replacement ······················7-74
Interior light bulb replacement ·································7-75
License plate light bulb replacement ·······················7-74
Rear combination light bulb replacement ················7-71
Side repeater light bulb replacement ·······················7-70
Lighting ··········································································4-73 Battery saver function ··············································4-73
Lubricants and capacities ·················································8-5Luggage net (holder) ····················································4-123
Luggage rack, see roof rack ·········································4-123
Lumbar support ································································3-7
Main fuse ········································································7-60 Maintenance Explanation of scheduled maintenance items ···········7-27Maintenance services ················································· 7-4
Maintenance under severe usage
conditions(Diesel) ···········································7-19, 7-25
Maintenance under severe usage conditions(Gasoline) ················································7-13 Normal maintenance schedule(Diesel) ············7-15, 7-21
Normal maintenance schedule(Gasoline) ··················7-9
Owner maintenance ····················································7-6
Scheduled maintenance service ·································7-8
Tire maintenance ······················································7-52
Maintenance services ·······················································7-4
L
M
K
J
procarmanuals.com