Page 14 of 386

Your vehicle at a glance
2 2
INTERIOR OVERVIEW
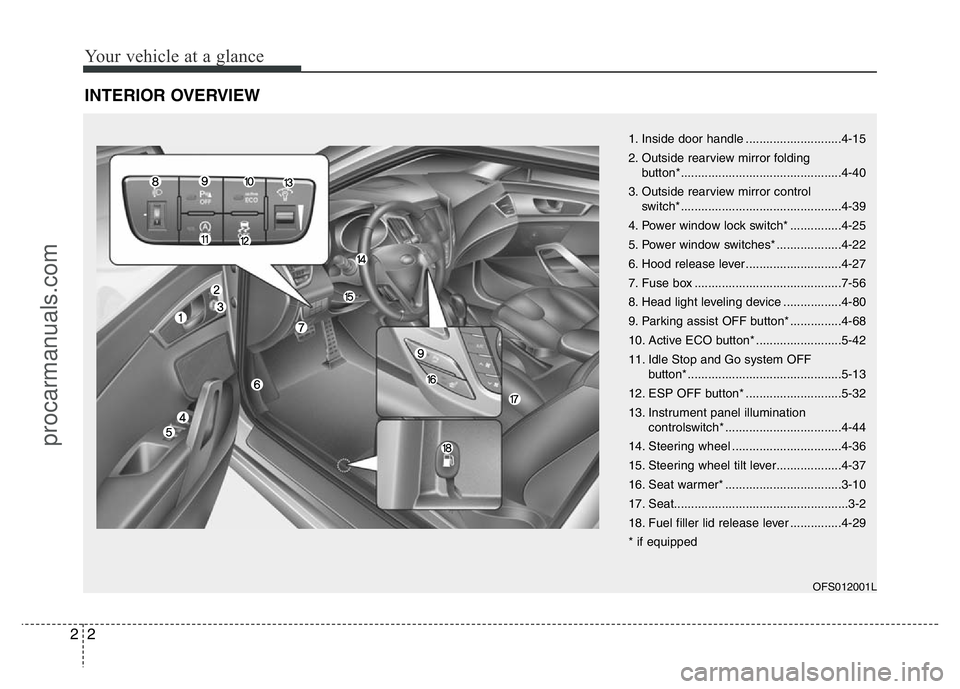
1. Inside door handle ............................4-15
2. Outside rearview mirror folding
button*...............................................4-40
3. Outside rearview mirror control
switch*...............................................4-39
4. Power window lock switch* ...............4-25
5. Power window switches* ...................4-22
6. Hood release lever ............................4-27
7. Fuse box ...........................................7-56
8. Head light leveling device .................4-80
9. Parking assist OFF button* ...............4-68
10. Active ECO button* .........................5-42
11.
Idle Stop and Go system OFF
button*.............................................5-13
12. ESP OFF button* ............................5-32
13. Instrument panel illumination
controlswitch* ..................................4-44
14. Steering wheel ................................4-36
15. Steering wheel tilt lever...................4-37
16. Seat warmer* ..................................3-10
17. Seat...................................................3-2
18. Fuel filler lid release lever ...............4-29
* if equipped
OFS012001L
procarmanuals.com
Page 75 of 386
4
Keys / 4-2
Remote keyless entry / 4-5
Smart key / 4-8
Theft-alarm system / 4-12
Door locks / 4-14
Tailgate / 4-19
Windows / 4-22
Hood / 4-27
Fuel filler lid / 4-29
Panorama sunroof / 4-32
Steering wheel / 4-36
Mirrors / 4-37
Instrument cluster / 4-42
Rear parking assist system / 4-68
Rearview camera / 4-72
Hazard warning flasher / 4-73
Lighting / 4-74
Wipers and washers / 4-81
Interior light / 4-85
Defroster / 4-88
Manual climate control system / 4-89
Automatic climate control system / 4-98
Windshield defrosting and defogging / 4-106
Storage compartment / 4-109
Interior features / 4-111
Audio system / 4-117
Features of your vehicle
procarmanuals.com
Page 112 of 386

Features of your vehicle
38 4
Inside rearview mirror
Adjust the rearview mirror so that the
center view through the rear window is
seen. Make this adjustment before you
start driving.
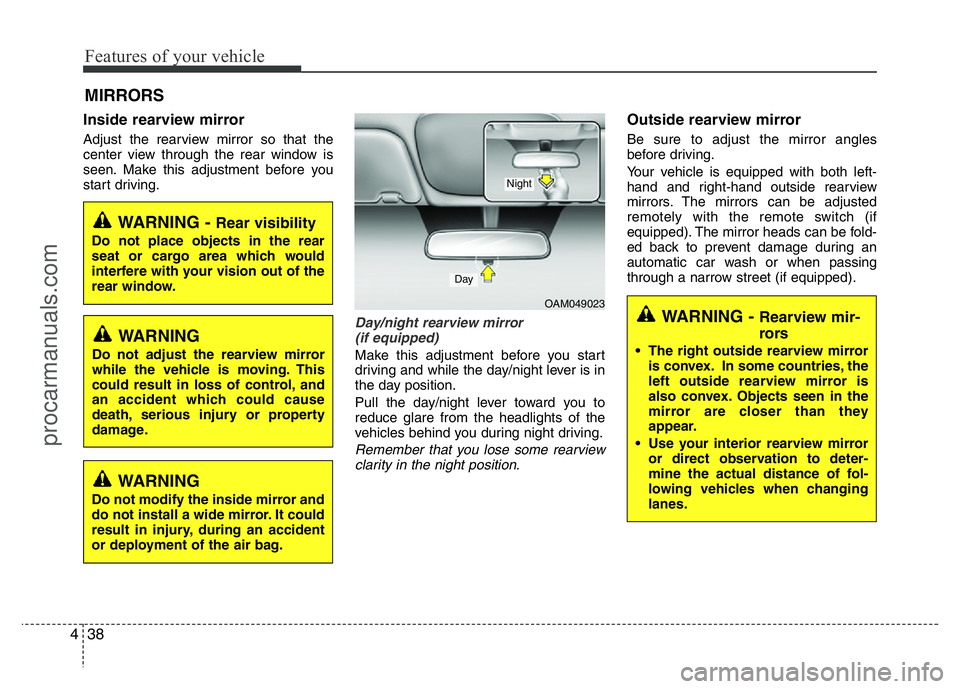
Day/night rearview mirror
(if equipped)
Make this adjustment before you start
driving and while the day/night lever is in
the day position.
Pull the day/night lever toward you to
reduce glare from the headlights of the
vehicles behind you during night driving.
Remember that you lose some rearview
clarity in the night position.
Outside rearview mirror
Be sure to adjust the mirror angles
before driving.
Your vehicle is equipped with both left-
hand and right-hand outside rearview
mirrors. The mirrors can be adjusted
remotely with the remote switch (if
equipped). The mirror heads can be fold-
ed back to prevent damage during an
automatic car wash or when passing
through a narrow street (if equipped).
MIRRORS
OAM049023
Day
Night
WARNING - Rear visibility
Do not place objects in the rear
seat or cargo area which would
interfere with your vision out of the
rear window.
WARNING
Do not adjust the rearview mirror
while the vehicle is moving. This
could result in loss of control, and
an accident which could cause
death, serious injury or property
damage.
WARNING
Do not modify the inside mirror and
do not install a wide mirror. It could
result in injury, during an accident
or deployment of the air bag.
WARNING - Rearview mir-
rors
• The right outside rearview mirror
is convex. In some countries, the
left outside rearview mirror is
also convex. Objects seen in the
mirror are closer than they
appear.
• Use your interior rearview mirror
or direct observation to deter-
mine the actual distance of fol-
lowing vehicles when changing
lanes.
procarmanuals.com
Page 113 of 386

439
Features of your vehicle
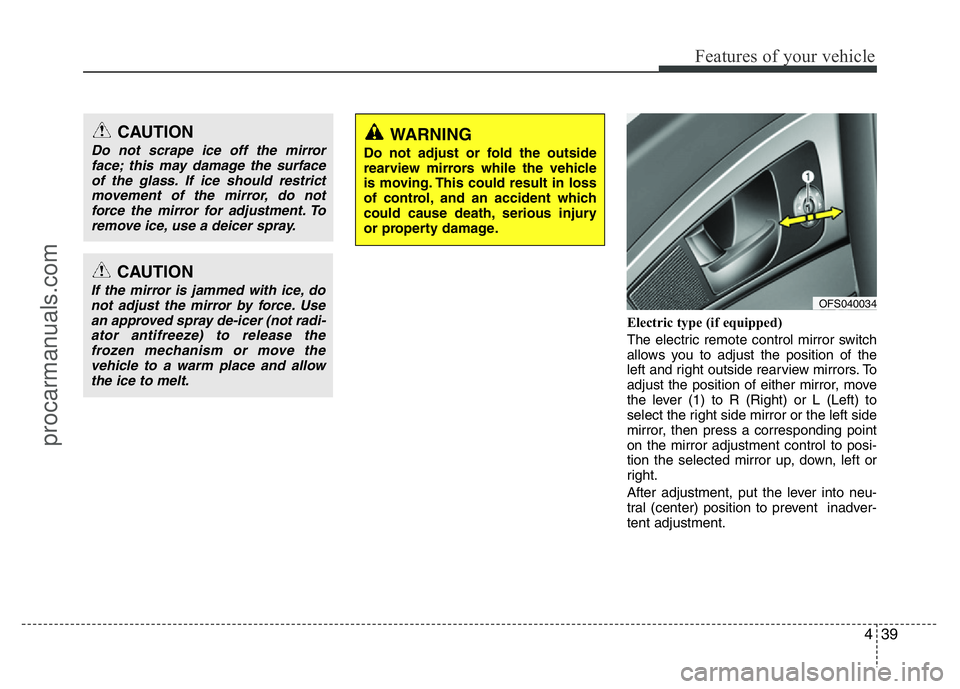
Electric type (if equipped)
The electric remote control mirror switch
allows you to adjust the position of the
left and right outside rearview mirrors. To
adjust the position of either mirror, move
the lever (1) to R (Right) or L (Left) to
select the right side mirror or the left side
mirror, then press a corresponding point
on the mirror adjustment control to posi-
tion the selected mirror up, down, left or
right.
After adjustment, put the lever into neu-
tral (center) position to prevent inadver-
tent adjustment.
CAUTION
Do not scrape ice off the mirror
face; this may damage the surface
of the glass. If ice should restrict
movement of the mirror, do not
force the mirror for adjustment. To
remove ice, use a deicer spray.
CAUTION
If the mirror is jammed with ice, do
not adjust the mirror by force. Use
an approved spray de-icer (not radi-
ator antifreeze) to release the
frozen mechanism or move the
vehicle to a warm place and allow
the ice to melt.
WARNING
Do not adjust or fold the outside
rearview mirrors while the vehicle
is moving. This could result in loss
of control, and an accident which
could cause death, serious injury
or property damage.
OFS040034
procarmanuals.com
Page 114 of 386
Features of your vehicle
40 4
Folding the outside rearview mirror
Manual type
To fold the outside rearview mirror, grasp
the housing of the mirror and then fold it
toward the rear of the vehicle.Electric Type (if equipped)
To fold the outside rearview mirror, press
the button.
To unfold it, press the button again.
CAUTION
• The mirrors stop moving when
they reach the maximum adjust-
ing angles, but the motor contin-
ues to operate while the switch is
pressed. Do not press the switch
longer than necessary, the motor
may be damaged.
• Do not attempt to adjust the out-
side rearview mirror by hand.
Doing so may damage the parts.
1LDA2083A
CAUTION
The electric type outside rearview
mirror operates even though the
ignition switch is in the LOCK posi-
tion. However, to prevent unneces-
sary battery discharge, do not
adjust the mirrors longer than nec-
essary while the engine is not run-
ning.
OFS040035
procarmanuals.com
Page 115 of 386
441
Features of your vehicle
Outside rearview mirror heater
(if equipped)
The outside rearview mirror heater is
actuated in connection with the rear win-
dow defroster. To heat the outside
rearview mirror glass, push the button
( ) for rear window defroster.
The outside rearview mirror glass will be
heated for defrosting or defogging and
will give you improved rear vision in
inclement weather conditions. Push the
button again to turn the heater off. The
outside rearview mirror heater automati-
cally turns off after 20 minutes.
CAUTION
In case it is an electric type outside
rearview mirror, don’t fold it by
hand. It could cause motor failure.
procarmanuals.com
Page 146 of 386
Features of your vehicle
72 4
REARVIEW CAMERA (IF EQUIPPED)
The rearview camera will activate when
the back-up light is ON with the ignition
switch ON and the shift lever in the R
(Reverse) position.
This system is a supplemental system
that shows behind the vehicle through
the rearview display mirror while back-
ing-up.
✽NOTICE
The warning "Warning ! Check sur-
roundings for safety " will appear on the
rearview display when the rearview
camera is activated.
WARNING
• This system is a supplementary
function only. It is the responsi-
bility of the driver to always
check the inside/outside rearview
mirror and the area behind the
vehicle before and while backing
up because there is a dead zone
that can't be seen through the
camera.
• Always keep the camera lens
clean. If lens is covered with for-
eign matter, the camera may not
operate normally.
OFS040081
OFS040082
procarmanuals.com
Page 180 of 386

Features of your vehicle
106 4
• For maximum defrosting, set the tem-
perature control to the extreme
right/hot position and the fan speed
control to the highest speed.
• If warm air to the floor is desired while
defrosting or defogging, set the mode
to the floor-defrost position.
• Before driving, clear all snow and ice
from the windshield, rear window, out-
side rear view mirrors, and all side win-
dows.
• Clear all snow and ice from the hood
and air inlet in the cowl grill to improve
heater and defroster efficiency and to
reduce the probability of fogging up
inside of the windshield.
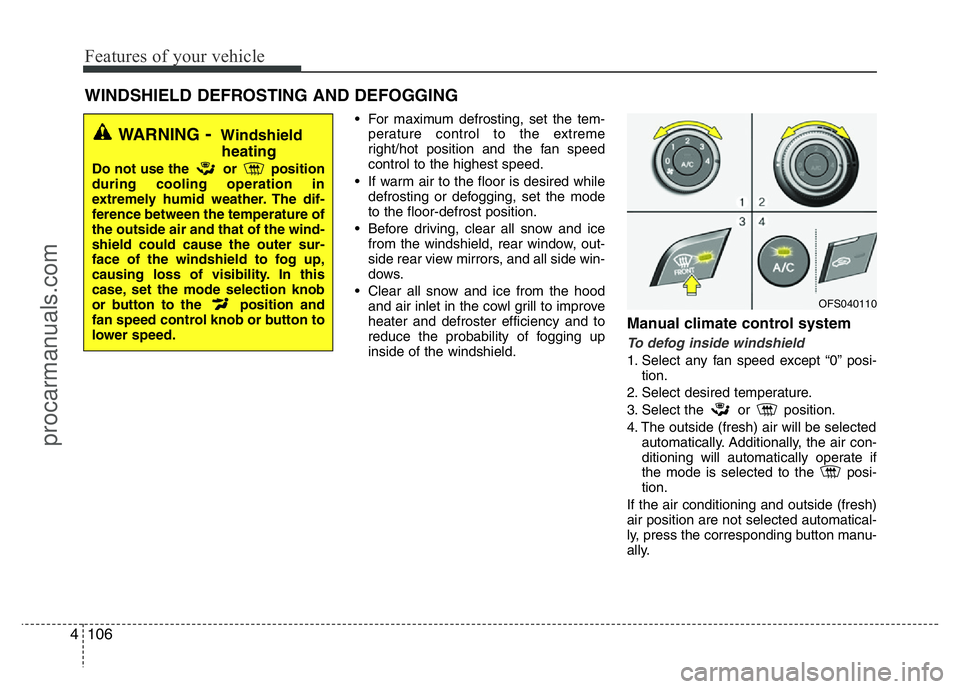
Manual climate control system
To defog inside windshield
1. Select any fan speed except “0” posi-
tion.
2. Select desired temperature.
3. Select the or position.
4. The outside (fresh) air will be selected
automatically. Additionally, the air con-
ditioning will automatically operate if
the mode is selected to the posi-
tion.
If the air conditioning and outside (fresh)
air position are not selected automatical-
ly, press the corresponding button manu-
ally.
WINDSHIELD DEFROSTING AND DEFOGGING
WARNING- Windshield
heating
Do not use the or position
during cooling operation in
extremely humid weather. The dif-
ference between the temperature of
the outside air and that of the wind-
shield could cause the outer sur-
face of the windshield to fog up,
causing loss of visibility. In this
case, set the mode selection knob
or button to the position and
fan speed control knob or button to
lower speed.
OFS040110
procarmanuals.com