2011 HYUNDAI VELOSTER inflation pressure
[x] Cancel search: inflation pressurePage 58 of 386
Safety features of your vehicle
42 3
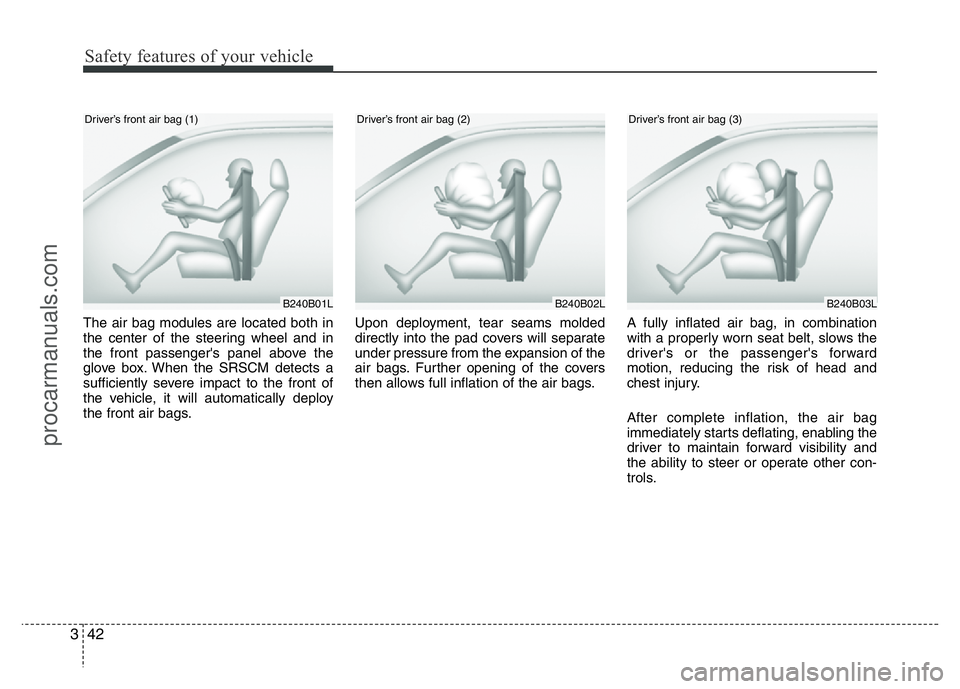
The air bag modules are located both in
the center of the steering wheel and in
the front passenger's panel above the
glove box. When the SRSCM detects a
sufficiently severe impact to the front of
the vehicle, it will automatically deploy
the front air bags.Upon deployment, tear seams molded
directly into the pad covers will separate
under pressure from the expansion of the
air bags. Further opening of the covers
then allows full inflation of the air bags.A fully inflated air bag, in combination
with a properly worn seat belt, slows the
driver's or the passenger's forward
motion, reducing the risk of head and
chest injury.
After complete inflation, the air bag
immediately starts deflating, enabling the
driver to maintain forward visibility and
the ability to steer or operate other con-
trols.
B240B02LB240B03L
Driver’s front air bag (2)Driver’s front air bag (3)
B240B01L
Driver’s front air bag (1)
procarmanuals.com
Page 250 of 386

543
Driving your vehicle
Your vehicle's fuel economy depends
mainly on your style of driving, where you
drive and when you drive.
Each of these factors affects how many
kilometers (miles) you can get from a
liter (gallon) of fuel. To operate your vehi-
cle as economically as possible, use the
following driving suggestions to help
save money in both fuel and repairs:
• Drive smoothly. Accelerate at a moder-
ate rate. Don't make "jack-rabbit" starts
or full-throttle shifts and maintain a
steady cruising speed. Don't race
between stoplights. Try to adjust your
speed to the traffic so you don't have to
change speeds unnecessarily. Avoid
heavy traffic whenever possible.
Always maintain a safe distance from
other vehicles so you can avoid unnec-
essary braking. This also reduces
brake wear.
• Drive at a moderate speed. The faster
you drive, the more fuel your vehicle
uses. Driving at a moderate speed,
especially on the highway, is one of the
most effective ways to reduce fuel con-
sumption.• Don't "ride" the brake or clutch pedal.
This can increase fuel consumption
and also increase wear on these com-
ponents. In addition, driving with your
foot resting on the brake pedal may
cause the brakes to overheat, which
reduces their effectiveness and may
lead to more serious consequences.
• Take care of your tires. Keep them
inflated to the recommended pressure.
Incorrect inflation, either too much or
too little, results in unnecessary tire
wear. Check the tire pressures at least
once a month.
• Be sure that the wheels are aligned
correctly. Improper alignment can
result from hitting curbs or driving too
fast over irregular surfaces. Poor align-
ment causes faster tire wear and may
also result in other problems as well as
greater fuel consumption.• Keep your vehicle in good condition.
For better fuel economy and reduced
maintenance costs, maintain your vehi-
cle in accordance with the mainte-
nance schedule in section 7. If you
drive your vehicle in severe conditions,
more frequent maintenance is required
(see section 7 for details).
• Keep your vehicle clean. For maximum
service, your vehicle should be kept
clean and free of corrosive materials. It
is especially important that mud, dirt,
ice, etc. not be allowed to accumulate
on the underside of the vehicle. This
extra weight can result in increased
fuel consumption and also contribute
to corrosion.
• Travel lightly. Don't carry unnecessary
weight in your vehicle. Weight reduces
fuel economy.
• Don't let the engine idle longer than
necessary. If you are waiting (and not
in traffic), turn off your engine and
restart only when you're ready to go.
ECONOMICAL OPERATION
procarmanuals.com
Page 255 of 386
Driving your vehicle
48 5
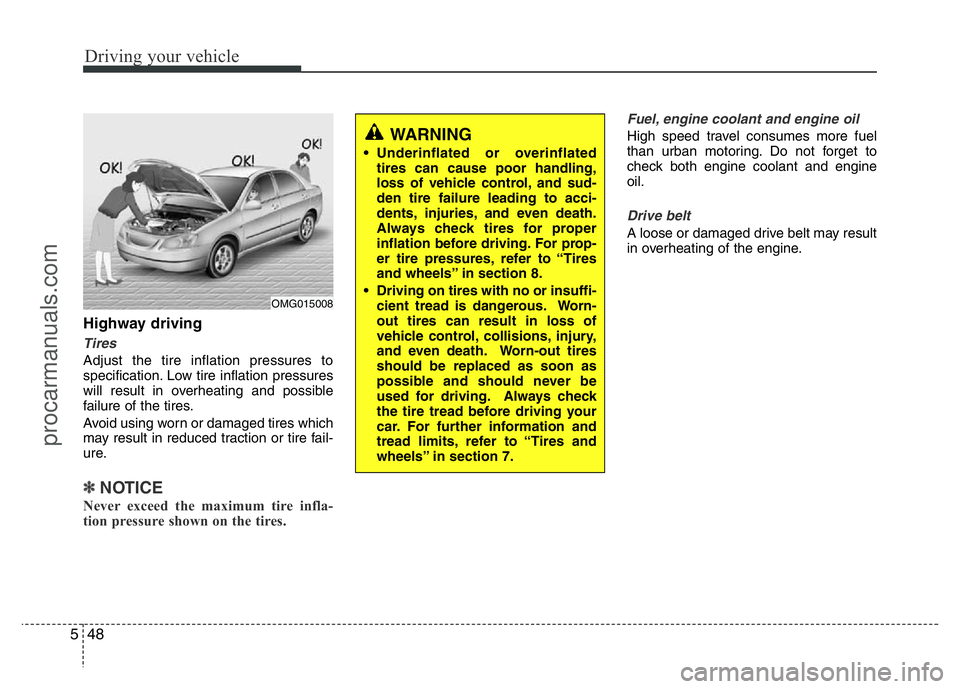
Highway driving
Tires
Adjust the tire inflation pressures to
specification. Low tire inflation pressures
will result in overheating and possible
failure of the tires.
Avoid using worn or damaged tires which
may result in reduced traction or tire fail-
ure.
✽NOTICE
Never exceed the maximum tire infla-
tion pressure shown on the tires.
Fuel, engine coolant and engine oil
High speed travel consumes more fuel
than urban motoring. Do not forget to
check both engine coolant and engine
oil.
Drive belt
A loose or damaged drive belt may result
in overheating of the engine.
WARNING
• Underinflated or overinflated
tires can cause poor handling,
loss of vehicle control, and sud-
den tire failure leading to acci-
dents, injuries, and even death.
Always check tires for proper
inflation before driving. For prop-
er tire pressures, refer to “Tires
and wheels” in section 8.
• Driving on tires with no or insuffi-
cient tread is dangerous. Worn-
out tires can result in loss of
vehicle control, collisions, injury,
and even death. Worn-out tires
should be replaced as soon as
possible and should never be
used for driving. Always check
the tire tread before driving your
car. For further information and
tread limits, refer to “Tires and
wheels” in section 7.
OMG015008
procarmanuals.com
Page 274 of 386

What to do in an emergency
14 6
Wheel nut tightening torque:
Steel wheel & aluminum alloy wheel:
9~11 kg·m (65~79 lb·ft)
If you have a tire gauge, remove the
valve cap and check the air pressure.
If the pressure is lower than recom-
mended, drive slowly to the nearest
service station and inflate to the cor-
rect pressure. If it is too high, adjust
it until it is correct. Always reinstall
the valve cap after checking or
adjusting tire pressure. If the cap is
not replaced, air may leak from the
tire. If you lose a valve cap, buy
another and install it as soon as pos-
sible.
After you have changed wheels,
always secure the flat tire in its place
and return the jack and tools to their
proper storage locations.To prevent the jack, jack handle,
wheel lug nut wrench and spare tire
from rattling while the vehicle is in
motion, store them properly.CAUTION
Your vehicle has metric threads
on the wheel studs and nuts.
Make certain during wheel
removal that the same nuts that
were removed are reinstalled -
or, if replaced, that nuts with
metric threads and the same
chamfer configuration are used.
Installation of a non-metric
thread nut on a metric stud or
vice-versa will not secure the
wheel to the hub properly and
will damage the stud so that it
must be replaced.
Note that most lug nuts do not
have metric threads. Be sure to
use extreme care in checking
for thread style before installing
aftermarket lug nuts or wheels.
If in doubt, consult an author-
ized HYUNDAI dealer.
WARNING- Wheel studs
If the studs are damaged, they
may lose their ability to retain
the wheel. This could lead to the
loss of the wheel and a collision
resulting in serious injuries.
WARNING - Inadequate
spare tire pressure
Check the inflation pressures
as soon as possible after
installing the spare tire. Adjust
it to the specified pressure, if
necessary. Refer to “Tires and
wheels” in section 8.
procarmanuals.com
Page 275 of 386
615
What to do in an emergency
Important - use of compact spare tire
(if equipped)
Your vehicle is equipped with a com-
pact spare tire. This compact spare
tire takes up less space than a regu-
lar-size tire. This tire is smaller than a
conventional tire and is designed for
temporary use only.
The compact spare should be inflat-
ed to 420 kPa (60 psi).
✽NOTICE
Check the inflation pressure after
installing the spare tire. Adjust it to
the specified pressure, as necessary.
When using a compact spare tire,
observe the following precautions:
• Under no circumstances should
you exceed 80 km/h (50 mph); a
higher speed could damage the
tire.
• Ensure that you drive slowly
enough to avoid all hazards. Any
road hazard, such as a pothole or
debris, could seriously damage the
compact spare.
• Any continuous road use of this tire
could result in tire failure, loss of
vehicle control, and possible per-
sonal injury.
• Do not exceed the vehicle’s maxi-
mum load rating or the load-carry-
ing capacity shown on the sidewall
of the compact spare tire.
• Avoid driving over obstacles. The
compact spare tire diameter is
smaller than the diameter of a con-
ventional tire and reduces the
ground clearance approximately
25 mm (1 inch), which could result
in damage to the vehicle.
CAUTION
• You should drive carefully
when the compact spare is in
use. The compact spare
should be replaced by the
proper conventional tire and
rim at the first opportunity.
• The operation of this vehicle
is not recommended with
more than one compact spare
tire in use at the same time.
WARNING
The compact spare tire is for
emergency use only. Do not
operate your vehicle on this
compact spare at the speed
over 80 km/h (50 mph). The
original tire should be repaired
or replaced as soon as possible
to avoid failure of the spare
possibly leading to personal
injury or death.
procarmanuals.com
Page 278 of 386
What to do in an emergency
18 6
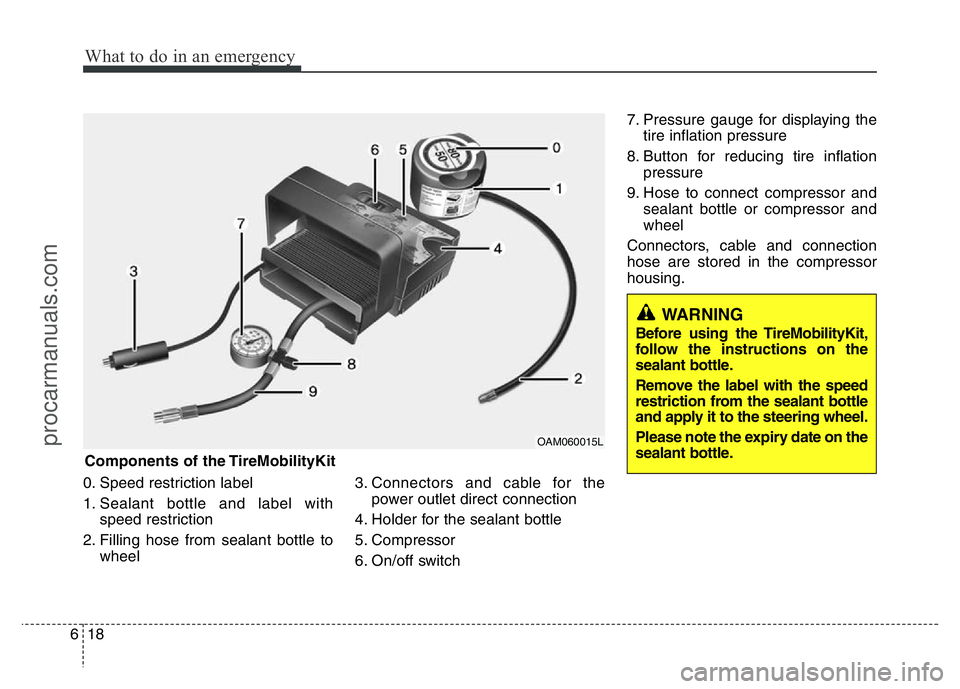
0. Speed restriction label
1. Sealant bottle and label with
speed restriction
2. Filling hose from sealant bottle to
wheel3. Connectors and cable for the
power outlet direct connection
4. Holder for the sealant bottle
5. Compressor
6. On/off switch7. Pressure gauge for displaying the
tire inflation pressure
8. Button for reducing tire inflation
pressure
9. Hose to connect compressor and
sealant bottle or compressor and
wheel
Connectors, cable and connection
hose are stored in the compressor
housing.
WARNING
Before using the TireMobilityKit,
follow the instructions on the
sealant bottle.
Remove the label with the speed
restriction from the sealant bottle
and apply it to the steering wheel.
Please note the expiry date on the
sealant bottle.
Components of the TireMobilityKit
OAM060015L
procarmanuals.com
Page 279 of 386
619
What to do in an emergency
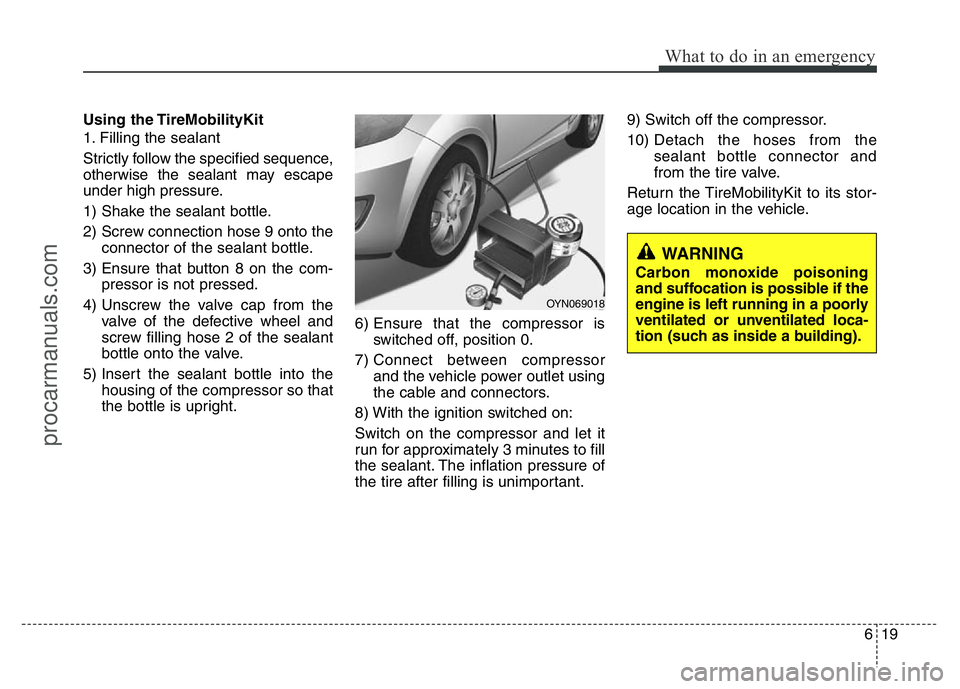
Using the TireMobilityKit
1. Filling the sealant
Strictly follow the specified sequence,
otherwise the sealant may escape
under high pressure.
1) Shake the sealant bottle.
2) Screw connection hose 9 onto the
connector of the sealant bottle.
3) Ensure that button 8 on the com-
pressor is not pressed.
4) Unscrew the valve cap from the
valve of the defective wheel and
screw filling hose 2 of the sealant
bottle onto the valve.
5) Insert the sealant bottle into the
housing of the compressor so that
the bottle is upright.6) Ensure that the compressor is
switched off, position 0.
7) Connect between compressor
and the vehicle power outlet using
the cable and connectors.
8) With the ignition switched on:
Switch on the compressor and let it
run for approximately 3 minutes to fill
the sealant. The inflation pressure of
the tire after filling is unimportant.9) Switch off the compressor.
10) Detach the hoses from the
sealant bottle connector and
from the tire valve.
Return the TireMobilityKit to its stor-
age location in the vehicle.
WARNING
Carbon monoxide poisoning
and suffocation is possible if the
engine is left running in a poorly
ventilated or unventilated loca-
tion (such as inside a building).
OYN069018
procarmanuals.com
Page 280 of 386
What to do in an emergency
20 6
Distributing the sealant
Immediately drive approximately 3 km
(2 miles) to evenly distribute the
sealant in the tire.Producing the tire inflation pres-
sure
1) After driving approximately 3 km (2
miles), stop at a suitable location.
2) Connect connection hose 9 of the
compressor directly to the tire
valve.
3) Connect between compressor
and the vehicle power outlet using
the cable and connectors.
4) Adjust the tire inflation pressure to
220 kPa (32 psi). With the ignition
switched on, proceed as follows.
- To increase the inflation pres-
sure:Switch on the compressor,
position I. To check the current
inflation pressure setting, briefly
switch off the compressor.- To reduce the inflation pres-
sure:Press the button 8 on the
compressor.
WARNING
Do not let the compressor run for
more than 10 minutes, otherwise
the device will overheat and may
be damaged.
WARNING
The tire inflation pressure must
be at least 220 kPa (32 psi). If it is
not, do not continue driving. Call
for road side service or towing.
CAUTION
Do not exceed a speed of 60
km/h (35 mph). If possible, do
not fall below a speed of 20
km/h (12 mph).
While driving, if you experience
any unusual vibration, ride dis-
turbance or noise, reduce your
speed and drive with caution
until you can safely pull off of
the side of the road.
Call for road side service or tow-
ing.
CAUTION
If the inflation pressure is not
maintained, drive the vehicle a
second time, refer to Distributing
the sealant. Then repeat steps 1
to 4.
Use of the TireMobilityKit may
be ineffectual for tire damage
larger than approximately 4 mm
(0.16 in).
Please contact the nearest
HYUNDAI A/S center, or a work-
shop that works according to
HYUNDAI repair procedures
with correspondingly trained
personnel if the tire cannot be
made roadworthy with the
TireMobilityKit.
procarmanuals.com