Page 75 of 386
4
Keys / 4-2
Remote keyless entry / 4-5
Smart key / 4-8
Theft-alarm system / 4-12
Door locks / 4-14
Tailgate / 4-19
Windows / 4-22
Hood / 4-27
Fuel filler lid / 4-29
Panorama sunroof / 4-32
Steering wheel / 4-36
Mirrors / 4-37
Instrument cluster / 4-42
Rear parking assist system / 4-68
Rearview camera / 4-72
Hazard warning flasher / 4-73
Lighting / 4-74
Wipers and washers / 4-81
Interior light / 4-85
Defroster / 4-88
Manual climate control system / 4-89
Automatic climate control system / 4-98
Windshield defrosting and defogging / 4-106
Storage compartment / 4-109
Interior features / 4-111
Audio system / 4-117
Features of your vehicle
procarmanuals.com
Page 112 of 386

Features of your vehicle
38 4
Inside rearview mirror
Adjust the rearview mirror so that the
center view through the rear window is
seen. Make this adjustment before you
start driving.
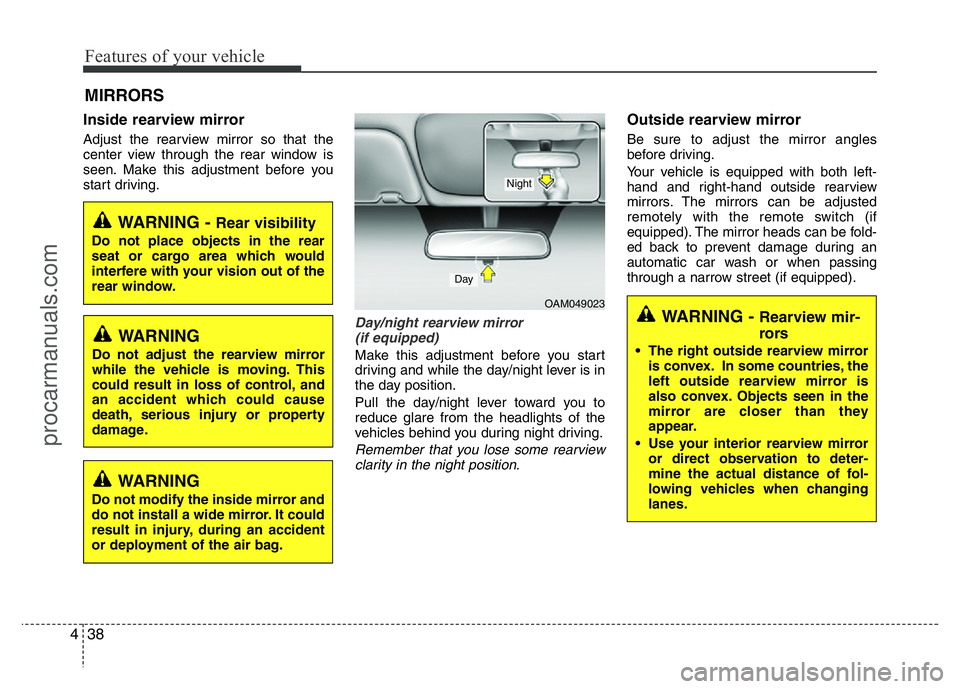
Day/night rearview mirror
(if equipped)
Make this adjustment before you start
driving and while the day/night lever is in
the day position.
Pull the day/night lever toward you to
reduce glare from the headlights of the
vehicles behind you during night driving.
Remember that you lose some rearview
clarity in the night position.
Outside rearview mirror
Be sure to adjust the mirror angles
before driving.
Your vehicle is equipped with both left-
hand and right-hand outside rearview
mirrors. The mirrors can be adjusted
remotely with the remote switch (if
equipped). The mirror heads can be fold-
ed back to prevent damage during an
automatic car wash or when passing
through a narrow street (if equipped).
MIRRORS
OAM049023
Day
Night
WARNING - Rear visibility
Do not place objects in the rear
seat or cargo area which would
interfere with your vision out of the
rear window.
WARNING
Do not adjust the rearview mirror
while the vehicle is moving. This
could result in loss of control, and
an accident which could cause
death, serious injury or property
damage.
WARNING
Do not modify the inside mirror and
do not install a wide mirror. It could
result in injury, during an accident
or deployment of the air bag.
WARNING - Rearview mir-
rors
• The right outside rearview mirror
is convex. In some countries, the
left outside rearview mirror is
also convex. Objects seen in the
mirror are closer than they
appear.
• Use your interior rearview mirror
or direct observation to deter-
mine the actual distance of fol-
lowing vehicles when changing
lanes.
procarmanuals.com
Page 113 of 386

439
Features of your vehicle
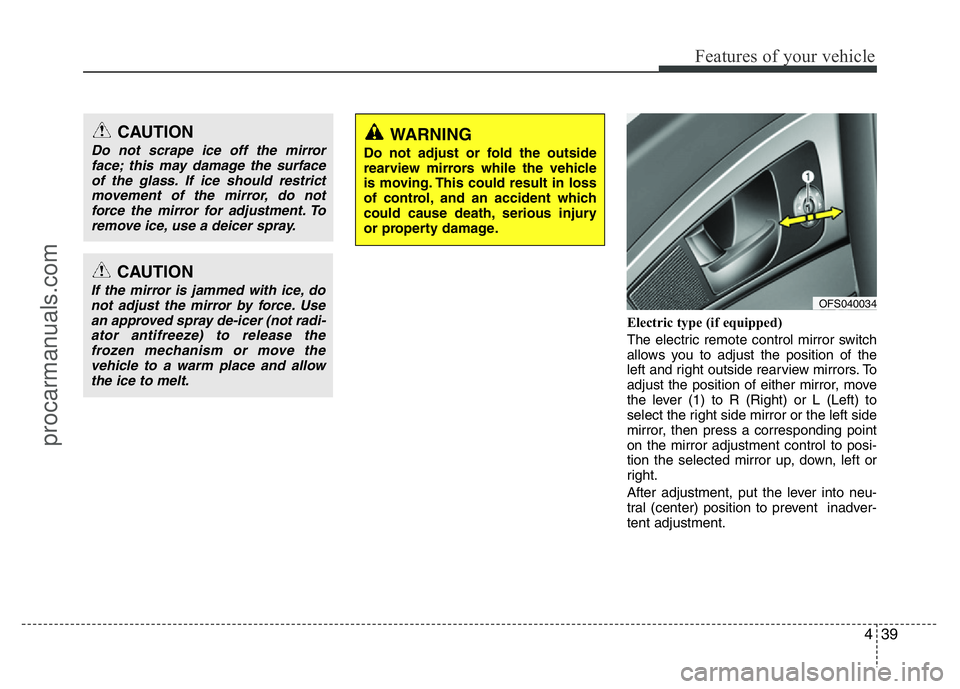
Electric type (if equipped)
The electric remote control mirror switch
allows you to adjust the position of the
left and right outside rearview mirrors. To
adjust the position of either mirror, move
the lever (1) to R (Right) or L (Left) to
select the right side mirror or the left side
mirror, then press a corresponding point
on the mirror adjustment control to posi-
tion the selected mirror up, down, left or
right.
After adjustment, put the lever into neu-
tral (center) position to prevent inadver-
tent adjustment.
CAUTION
Do not scrape ice off the mirror
face; this may damage the surface
of the glass. If ice should restrict
movement of the mirror, do not
force the mirror for adjustment. To
remove ice, use a deicer spray.
CAUTION
If the mirror is jammed with ice, do
not adjust the mirror by force. Use
an approved spray de-icer (not radi-
ator antifreeze) to release the
frozen mechanism or move the
vehicle to a warm place and allow
the ice to melt.
WARNING
Do not adjust or fold the outside
rearview mirrors while the vehicle
is moving. This could result in loss
of control, and an accident which
could cause death, serious injury
or property damage.
OFS040034
procarmanuals.com
Page 192 of 386

Features of your vehicle
118 4
Audio remote control
(if equipped)
The steering wheel audio remote control
switch is installed to promote safe driving.
VOL (VOL+/VOL-) (1)
Increases or decreases the volume level.
SEEK ( / ) (2)
• Press this button.
- Automatic tuning:
- Track up/down:
• Press and hold this button.
- Manual tuning:
- Search (FF/REW):
MODE (3)
Selects a source.
FM
➟AM ➟CD ➟USB (or iPod) ➟BT ➟AUX ➟FM...
(4)
Press this button briefly to reject a call
during a call.
(5)
• Press this button to start the voice
recognition mode.
• Press the button one more to cancel
voice commands while the voice
recognition is active.
(6)
Enables Bluetooth Hands-Free Phone.
• Press this button briefly to take a call
when there is an incoming call.
• Press this button briefly to make a call
from last calls.
• Press this button lengthy to switch the
sound path during a call.
(Hands free ↔phone)
BT
iPodCDUSB
RADIO
iPodCDUSB
RADIO
CAUTION
Do not operate the audio remote
control switches simultaneously.
OFS040128
procarmanuals.com
Page 206 of 386

Features of your vehicle
132 4
NOTE:
When a station is preset on the preset
station button number on which
another station of the same band has
already been preset, the previously
preset station is automatically erased.
Voice recognition
Voice recognition allows hands-free
operation of the AV system (RADIO, CD,
USB, iPod), navigation and other sys-
tems equipped on this vehicle, such as
the phone.
NOTE:
To get the best recognition perform-
ance out of voice recognition, observe
the following:
• Keep the interior of the vehicle as
quiet as possible. Close the win-
dows to eliminate the surrounding
noises (traffic noises, vibration
sounds, etc.), which may prevent
the system from recognizing the
voice commands correctly.
• Wait until a beep sounds before
speaking a command. Otherwise,
the command will not be recognized
properly.
• Speak in a natural voice without
pausing between words.
Giving voice commands
1. Press ( ) on the steering wheel
remote control.
2. After the beep sounds, say "Help". All
commands shall be listed which are
presented in active fields.
NOTE:
• If the command is not recognized,
the system announces, 1st time
"Pardon?", 2nd time "Please,
repeat", and 3rd time "Command is
not recognized".
• If you want to cancel the voice
recognition, press () one more time
or press the any button or touch
screen say "Cancel".
• If you want to adjust the volume of
the system feedback, press VOL+ or
VOL-on the steering wheel remote
control or use the volume knob
(VOLUME) on the control while the
voice recognition is active.
procarmanuals.com
Page 284 of 386

What to do in an emergency
24 6
TPMS (Tire Pressure
Monitoring System)
malfunction indicator
The TPMS malfunction indicator will
illuminate after it blinks for approxi-
mately one minute when there is a
problem with the Tire Pressure
Monitoring System. If the system is
able to correctly detect an under infla-
tion warning at the same time as sys-
tem failure then it will illuminate the
TPMS malfunction indicator.
Have the system checked by an
authorized HYUNDAI dealer as soon
as possible to determine the cause
of the problem.
WARNING - Low pressure
damage
Significantly low tire pressure
makes the vehicle unstable and
can contribute to loss of vehicle
control and increased braking
distances.
Continued driving on low pres-
sure tires can cause the tires to
overheat and fail.CAUTION
• The TPMS malfunction indica-
tor may be illuminated if the
vehicle is moving around elec-
tric power supply cables or
radios transmitter such as at
police stations, government
and public offices, broadcast-
ing stations, military installa-
tions, airports, or transmitting
towers, etc. This can interfere
with normal operation of the
Tire Pressure Monitoring
System (TPMS).
• The TPMS malfunction indica-
tor may illuminate if snow
chains or some separately
purchased devices such as
notebook computers, mobile
charger, remote starter, navi-
gation etc. are used in the
vehicle. This can interfere with
normal operation of the Tire
Pressure Monitoring System
(TPMS).
procarmanuals.com