Page 12 of 386
Introduction
6 1
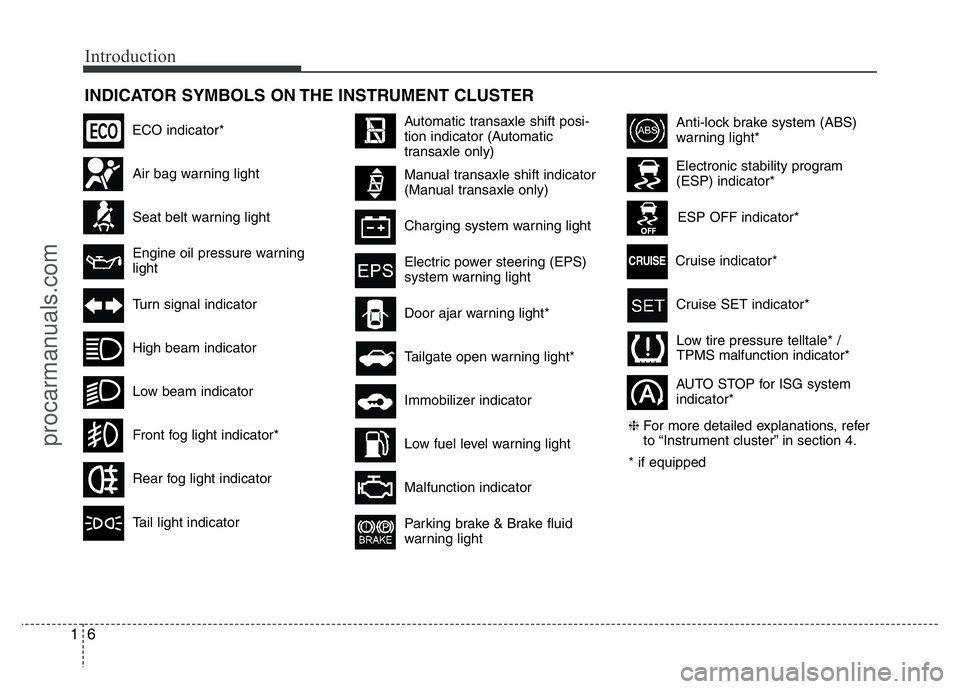
INDICATOR SYMBOLS ON THE INSTRUMENT CLUSTER
Seat belt warning light
High beam indicator
Turn signal indicator
Anti-lock brake system (ABS)
warning light*
Parking brake & Brake fluid
warning light
Malfunction indicator
Immobilizer indicator Tailgate open warning light*
Charging system warning light
Door ajar warning light*
Electronic stability program
(ESP) indicator*
ESP OFF indicator*
Front fog light indicator*
Engine oil pressure warning
lightElectric power steering (EPS)
system warning light
Air bag warning light
Low tire pressure telltale* /
TPMS malfunction indicator*
Rear fog light indicator
Cruise SET indicator*
AUTO STOP for ISG system
indicator* Cruise indicator*
Tail light indicator
Automatic transaxle shift posi-
tion indicator (Automatic
transaxle only)
Manual transaxle shift indicator
(Manual transaxle only)
Low fuel level warning light
Low beam indicator
❈For more detailed explanations, refer
to “Instrument cluster” in section 4.
* if equipped
ECO indicator*
CRUISE
procarmanuals.com
Page 75 of 386
4
Keys / 4-2
Remote keyless entry / 4-5
Smart key / 4-8
Theft-alarm system / 4-12
Door locks / 4-14
Tailgate / 4-19
Windows / 4-22
Hood / 4-27
Fuel filler lid / 4-29
Panorama sunroof / 4-32
Steering wheel / 4-36
Mirrors / 4-37
Instrument cluster / 4-42
Rear parking assist system / 4-68
Rearview camera / 4-72
Hazard warning flasher / 4-73
Lighting / 4-74
Wipers and washers / 4-81
Interior light / 4-85
Defroster / 4-88
Manual climate control system / 4-89
Automatic climate control system / 4-98
Windshield defrosting and defogging / 4-106
Storage compartment / 4-109
Interior features / 4-111
Audio system / 4-117
Features of your vehicle
procarmanuals.com
Page 129 of 386
455
Features of your vehicle
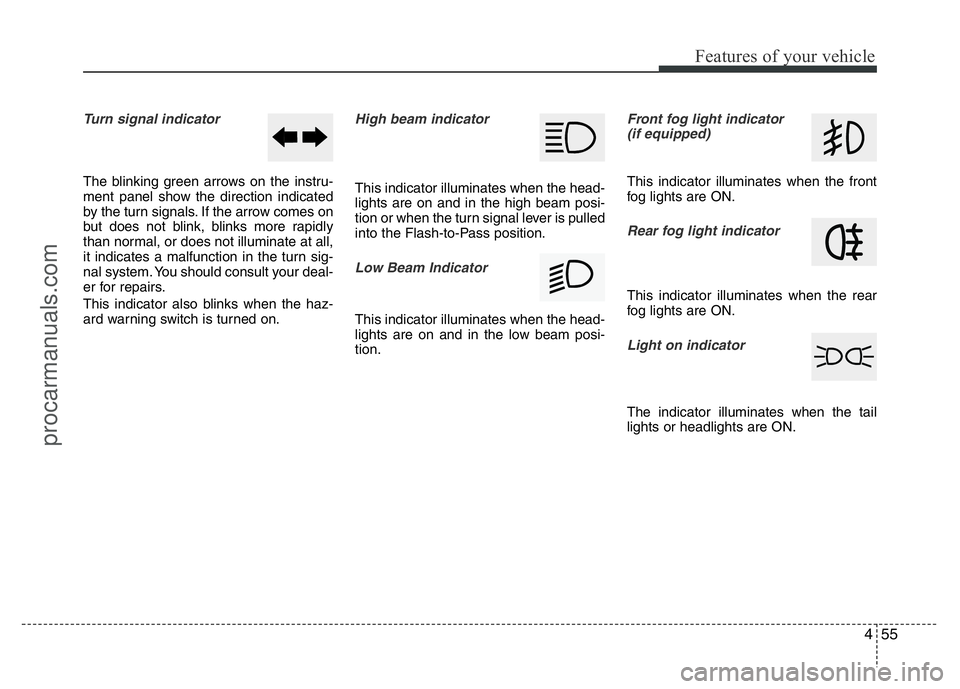
Turn signal indicator
The blinking green arrows on the instru-
ment panel show the direction indicated
by the turn signals. If the arrow comes on
but does not blink, blinks more rapidly
than normal, or does not illuminate at all,
it indicates a malfunction in the turn sig-
nal system. You should consult your deal-
er for repairs.
This indicator also blinks when the haz-
ard warning switch is turned on.
High beam indicator
This indicator illuminates when the head-
lights are on and in the high beam posi-
tion or when the turn signal lever is pulled
into the Flash-to-Pass position.
Low Beam Indicator
This indicator illuminates when the head-
lights are on and in the low beam posi-
tion.
Front fog light indicator
(if equipped)
This indicator illuminates when the front
fog lights are ON.
Rear fog light indicator
This indicator illuminates when the rear
fog lights are ON.
Light on indicator
The indicator illuminates when the tail
lights or headlights are ON.
procarmanuals.com
Page 152 of 386
Features of your vehicle
78 4
If the indicator continues to flash after a
turn, manually return the lever to the off
position.
To signal a lane change, move the turn
signal lever slightly and hold it in position
(B). The lever will return to the off position
when released.
If an indicator stays on and does not
flash or if it flashes abnormally, one of the
turn signal bulbs may be burned out and
will require replacement.One-touch lane change function
(if equipped)
To activate an one-touch lane change
function, move the turn signal lever
slightly and then release it. The lane
change signals will blink 3 times.
✽NOTICE
If an indicator flash is abnormally quick
or slow, a bulb may be burned out or
have a poor electrical connection in the
circuit.
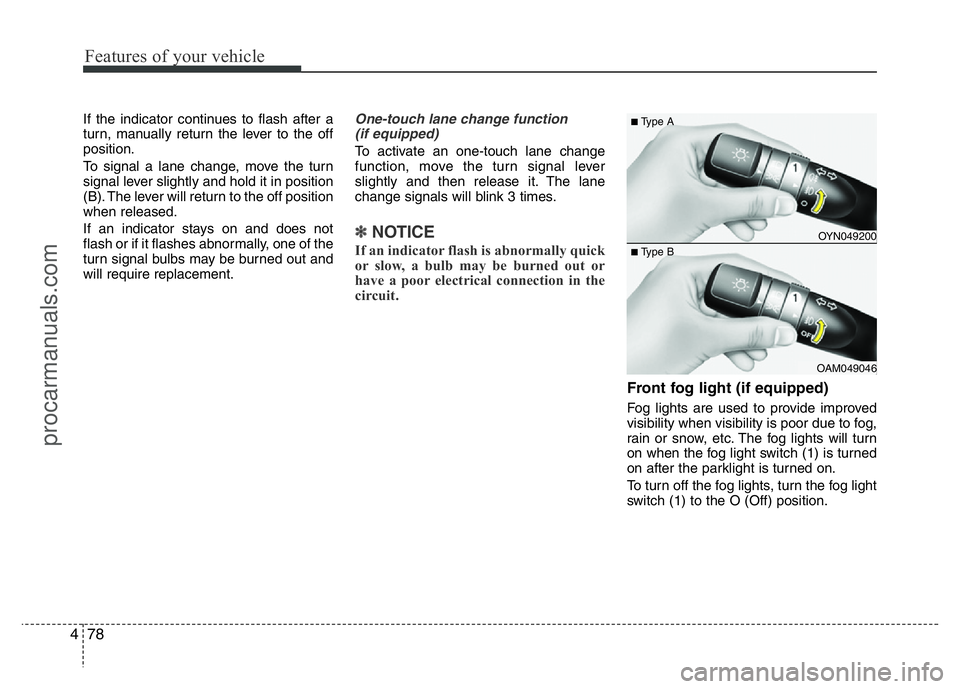
Front fog light (if equipped)
Fog lights are used to provide improved
visibility when visibility is poor due to fog,
rain or snow, etc. The fog lights will turn
on when the fog light switch (1) is turned
on after the parklight is turned on.
To turn off the fog lights, turn the fog light
switch (1) to the O (Off) position.
OYN049200
OAM049046
■Type A
■Type B
procarmanuals.com
Page 153 of 386
479
Features of your vehicle
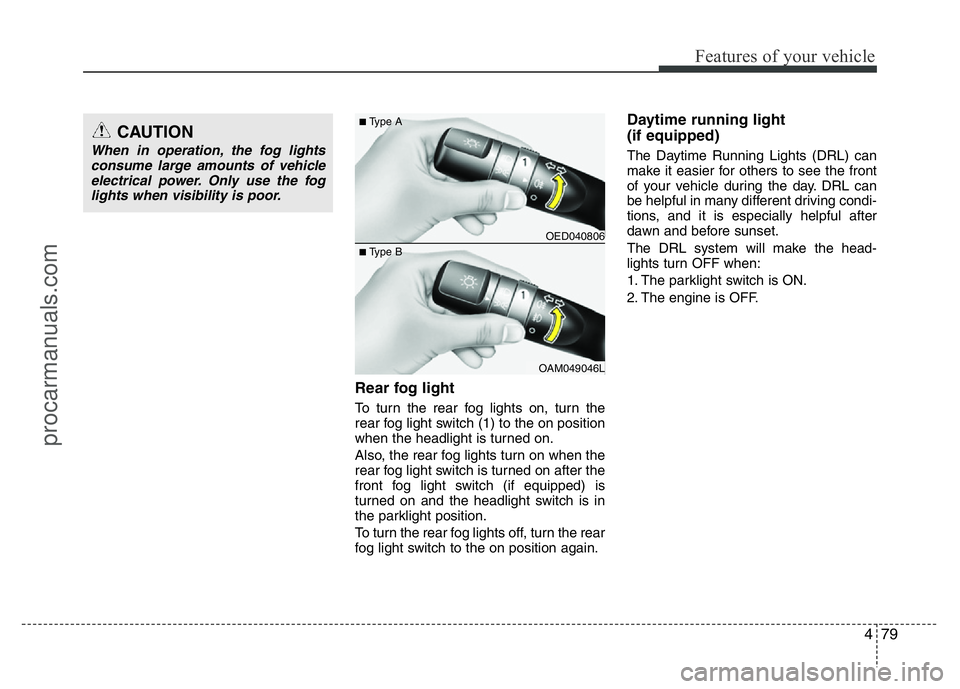
Rear fog light
To turn the rear fog lights on, turn the
rear fog light switch (1) to the on position
when the headlight is turned on.
Also, the rear fog lights turn on when the
rear fog light switch is turned on after the
front fog light switch (if equipped) is
turned on and the headlight switch is in
the parklight position.
To turn the rear fog lights off, turn the rear
fog light switch to the on position again.
Daytime running light
(if equipped)
The Daytime Running Lights (DRL) can
make it easier for others to see the front
of your vehicle during the day. DRL can
be helpful in many different driving condi-
tions, and it is especially helpful after
dawn and before sunset.
The DRL system will make the head-
lights turn OFF when:
1. The parklight switch is ON.
2. The engine is OFF.
OED040806
OAM049046L
■Type A
■Type B
CAUTION
When in operation, the fog lights
consume large amounts of vehicle
electrical power. Only use the fog
lights when visibility is poor.
procarmanuals.com
Page 168 of 386
Features of your vehicle
94 4
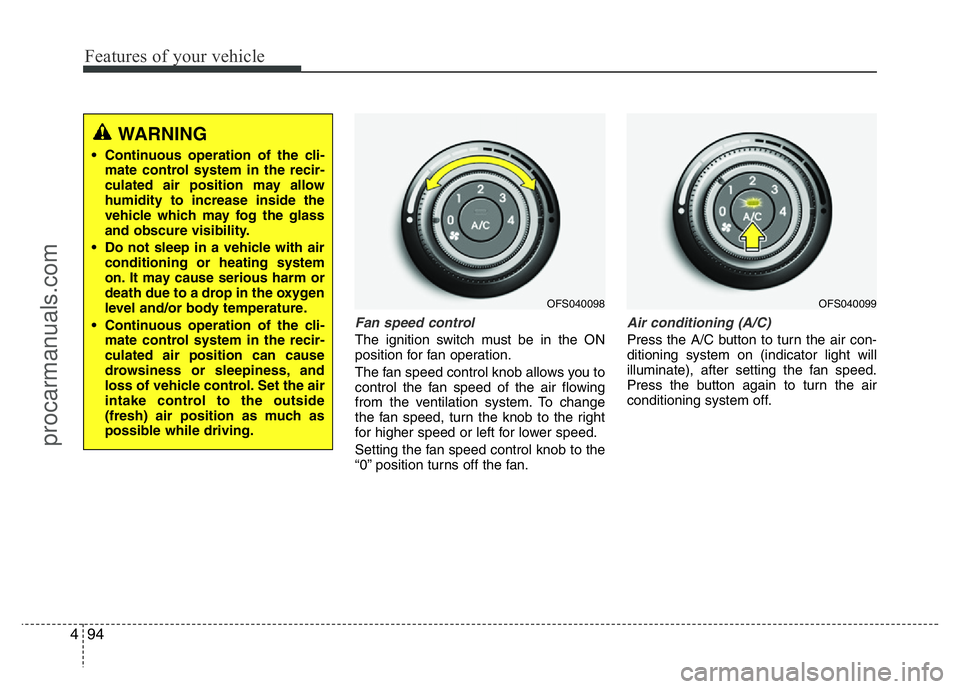
Fan speed control
The ignition switch must be in the ON
position for fan operation.
The fan speed control knob allows you to
control the fan speed of the air flowing
from the ventilation system. To change
the fan speed, turn the knob to the right
for higher speed or left for lower speed.
Setting the fan speed control knob to the
“0” position turns off the fan.
Air conditioning (A/C)
Press the A/C button to turn the air con-
ditioning system on (indicator light will
illuminate), after setting the fan speed.
Press the button again to turn the air
conditioning system off.
OFS040098OFS040099
WARNING
• Continuous operation of the cli-
mate control system in the recir-
culated air position may allow
humidity to increase inside the
vehicle which may fog the glass
and obscure visibility.
• Do not sleep in a vehicle with air
conditioning or heating system
on. It may cause serious harm or
death due to a drop in the oxygen
level and/or body temperature.
• Continuous operation of the cli-
mate control system in the recir-
culated air position can cause
drowsiness or sleepiness, and
loss of vehicle control. Set the air
intake control to the outside
(fresh) air position as much as
possible while driving.
procarmanuals.com
Page 358 of 386

Maintenance
66 7
LIGHT BULBS
Use only the bulbs of the specified
wattage.
✽NOTICE
After heavy, driving rain or washing,
headlight and taillight lenses could
appear frosty. This condition is caused by
the temperature difference between the
lamp inside and outside. This is similar
to the condensation on your windows
inside your vehicle during the rain and
doesn’t indicate a problem with your
vehicle. If the water leaks into the lamp
bulb circuitry, have the vehicle checked
by an authorized HYUNDAI dealer.
Headlight, position light, turn sig-
nal light, front fog light bulb
replacement
(1) Headlight (Low)
(2) Headlight (High)
(3) Front turn signal light
(4) Position/DRL light
(5) Front fog light*
* if equipped
WARNING - Working on
the lights
Prior to working on the light, firmly
apply the parking brake, ensure
that the ignition switch is turned to
the LOCK position and turn off the
lights to avoid sudden movement
of the vehicle and burning your fin-
gers or receiving an electric shock.
CAUTION
Be sure to replace the burned-out
bulb with one of the same wattage
rating. Otherwise, it may cause
damage to the fuse or electric
wiring system.
CAUTION
If you don’t have necessary tools,
the correct bulbs and the expertise,
consult an authorized HYUNDAI
dealer. In many cases, it is difficult
to replace vehicle light bulbs
because other parts of the vehicle
must be removed before you can
get to the bulb. This is especially
true if you have to remove the head-
light assembly to
get to the bulb(s).
Removing/installingthe headlight
assembly can result in damage to
the vehicle.
OFS070025
OFS072025L ■Type A
■Type B
procarmanuals.com
Page 360 of 386
Maintenance
68 7
Position light (if equipped)
If the light does not operate, have the
vehicle checked by an authorized
HYUNDAI dealer.
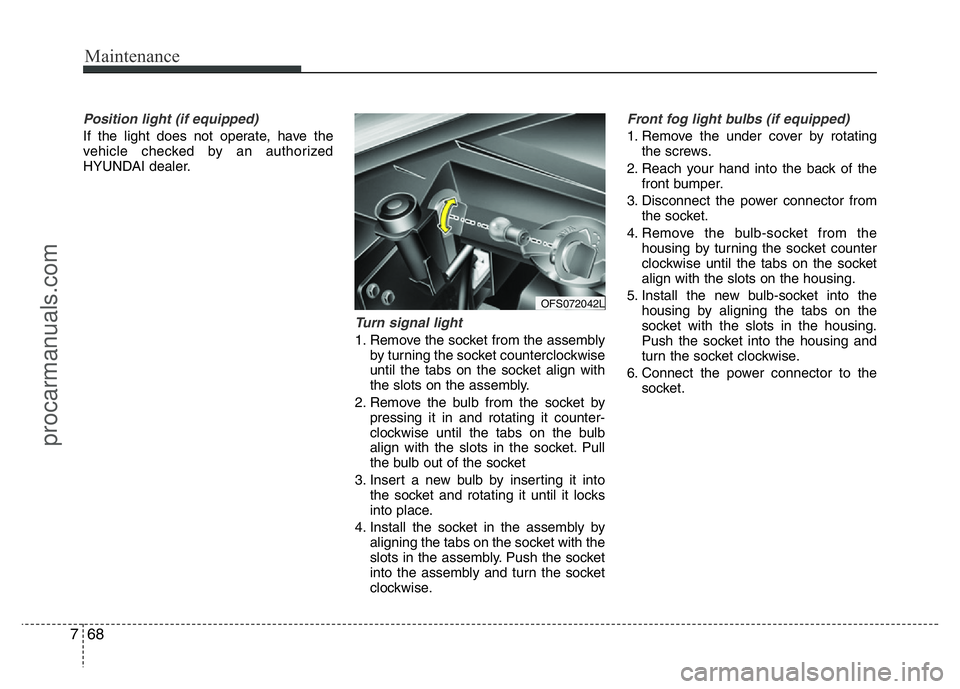
Turn signal light
1. Remove the socket from the assembly
by turning the socket counterclockwise
until the tabs on the socket align with
the slots on the assembly.
2. Remove the bulb from the socket by
pressing it in and rotating it counter-
clockwise until the tabs on the bulb
align with the slots in the socket. Pull
the bulb out of the socket
3. Insert a new bulb by inserting it into
the socket and rotating it until it locks
into place.
4. Install the socket in the assembly by
aligning the tabs on the socket with the
slots in the assembly. Push the socket
into the assembly and turn the socket
clockwise.
Front fog light bulbs (if equipped)
1. Remove the under cover by rotating
the screws.
2. Reach your hand into the back of the
front bumper.
3. Disconnect the power connector from
the socket.
4. Remove the bulb-socket from the
housing by turning the socket counter
clockwise until the tabs on the socket
align with the slots on the housing.
5. Install the new bulb-socket into the
housing by aligning the tabs on the
socket with the slots in the housing.
Push the socket into the housing and
turn the socket clockwise.
6. Connect the power connector to the
socket.
OFS072042L
procarmanuals.com