Page 12 of 386

Introduction
6 1
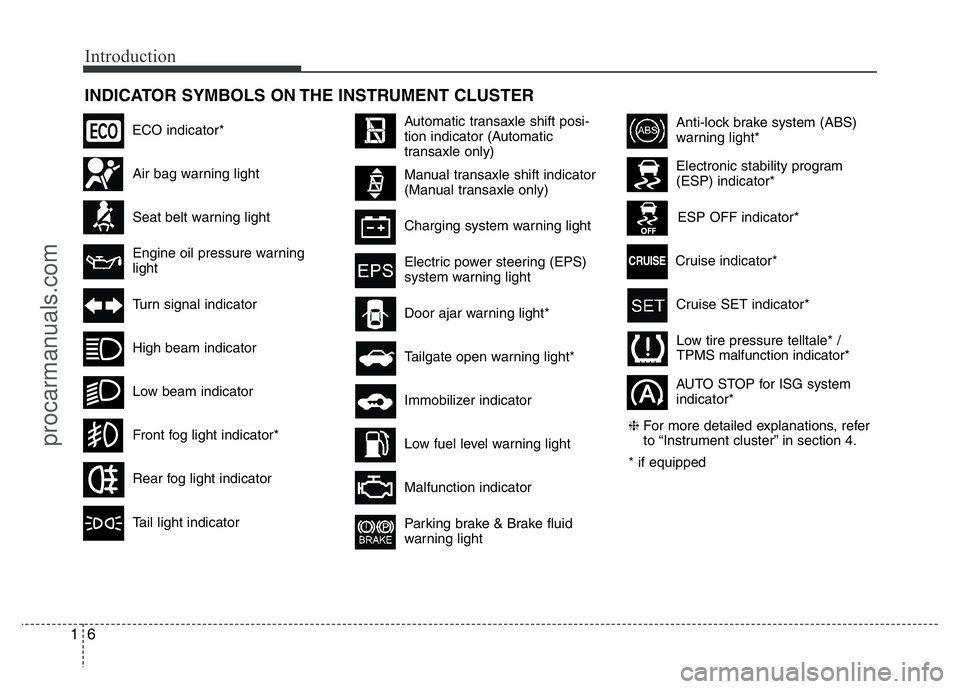
INDICATOR SYMBOLS ON THE INSTRUMENT CLUSTER
Seat belt warning light
High beam indicator
Turn signal indicator
Anti-lock brake system (ABS)
warning light*
Parking brake & Brake fluid
warning light
Malfunction indicator
Immobilizer indicator Tailgate open warning light*
Charging system warning light
Door ajar warning light*
Electronic stability program
(ESP) indicator*
ESP OFF indicator*
Front fog light indicator*
Engine oil pressure warning
lightElectric power steering (EPS)
system warning light
Air bag warning light
Low tire pressure telltale* /
TPMS malfunction indicator*
Rear fog light indicator
Cruise SET indicator*
AUTO STOP for ISG system
indicator* Cruise indicator*
Tail light indicator
Automatic transaxle shift posi-
tion indicator (Automatic
transaxle only)
Manual transaxle shift indicator
(Manual transaxle only)
Low fuel level warning light
Low beam indicator
❈For more detailed explanations, refer
to “Instrument cluster” in section 4.
* if equipped
ECO indicator*
CRUISE
procarmanuals.com
Page 129 of 386

455
Features of your vehicle
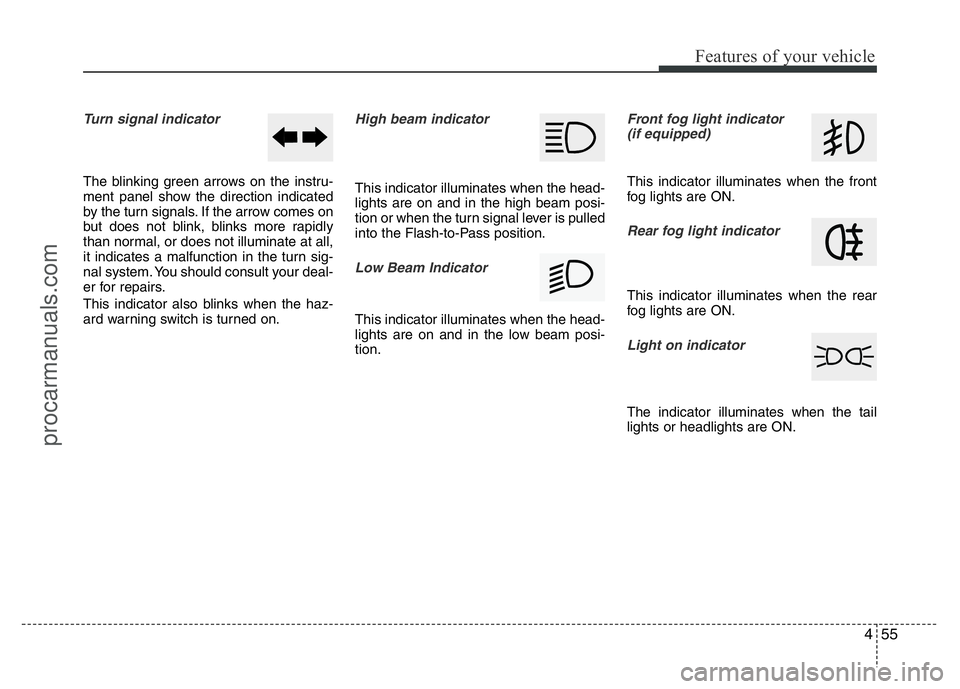
Turn signal indicator
The blinking green arrows on the instru-
ment panel show the direction indicated
by the turn signals. If the arrow comes on
but does not blink, blinks more rapidly
than normal, or does not illuminate at all,
it indicates a malfunction in the turn sig-
nal system. You should consult your deal-
er for repairs.
This indicator also blinks when the haz-
ard warning switch is turned on.
High beam indicator
This indicator illuminates when the head-
lights are on and in the high beam posi-
tion or when the turn signal lever is pulled
into the Flash-to-Pass position.
Low Beam Indicator
This indicator illuminates when the head-
lights are on and in the low beam posi-
tion.
Front fog light indicator
(if equipped)
This indicator illuminates when the front
fog lights are ON.
Rear fog light indicator
This indicator illuminates when the rear
fog lights are ON.
Light on indicator
The indicator illuminates when the tail
lights or headlights are ON.
procarmanuals.com
Page 150 of 386

Features of your vehicle
76 4
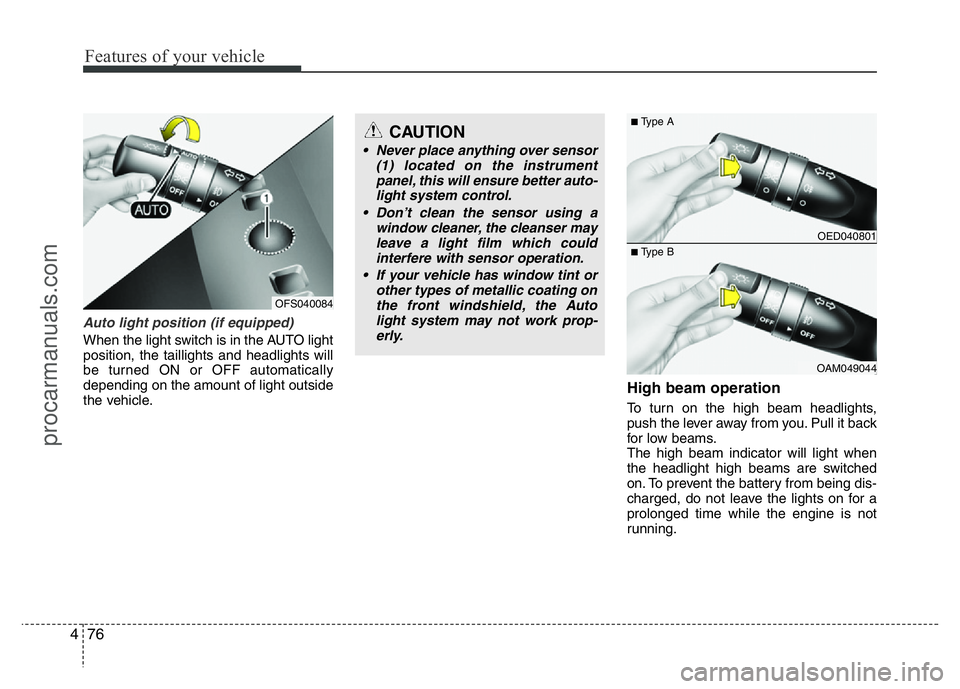
Auto light position (if equipped)
When the light switch is in the AUTO light
position, the taillights and headlights will
be turned ON or OFF automatically
depending on the amount of light outside
the vehicle.
High beam operation
To turn on the high beam headlights,
push the lever away from you. Pull it back
for low beams.
The high beam indicator will light when
the headlight high beams are switched
on. To prevent the battery from being dis-
charged, do not leave the lights on for a
prolonged time while the engine is not
running.
CAUTION
• Never place anything over sensor
(1) located on the instrument
panel, this will ensure better auto-
light system control.
• Don’t clean the sensor using a
window cleaner, the cleanser may
leave a light film which could
interfere with sensor operation.
• If your vehicle has window tint or
other types of metallic coating on
the front windshield, the Auto
light system may not work prop-
erly.
OED040801
OAM049044
■Type A
■Type B
OFS040084
procarmanuals.com
Page 151 of 386
477
Features of your vehicle
To flash the headlights, pull the lever
towards you. It will return to the normal
(low beam) position when released. The
headlight switch does not need to be on
to use this flashing feature.
Turn signals and lane change sig-
nals
The ignition switch must be on for the
turn signals to function. To turn on the
turn signals, move the lever up or down
(A). The green arrow indicators on the
instrument panel indicate which turn sig-
nal is operating. They will self-cancel
after a turn is completed.
OED040802
OAM049043
■Type A
■Type B
OED040804
OAM049045
■Type A
■Type B
WARNING
Do not use high beam when there
are other vehicles. Using high
beam could obstruct the other dri-
ver's vision.
procarmanuals.com
Page 154 of 386
Features of your vehicle
80 4
Headlight leveling device
(if equipped)
To adjust the headlight beam level
according to the number of the passen-
gers and loading weight in the luggage
area, turn the beam leveling switch.
The higher the number of the switch
position, the lower the headlight beam
level. Always keep the headlight beam at
the proper leveling position, or headlights
may dazzle other road users.
Listed below are the examples of proper
switch settings. For loading conditions
other than those listed below, adjust the
switch position so that the beam level
may be the nearest as the condition
obtained according to the list.
OFS042139L
Loading condition Switch position
Driver only 0
Driver + Front passenger 0
Full passengers
(including driver)1
Full passengers (including
driver) + Maximum permis-
sible loading2
Driver + Maximum permis-
sible loading 3
procarmanuals.com
Page 362 of 386
Maintenance
70 7
Aiming point
Vehicle condition H1 H2 H3 W1 W2 W3
Without driver733 (28.9) 729 (28.7) 366 (14.4)
1,476 (58.1) 1,196 (47.1) 1,386 (54.6)
With driver726 (28.6) 722 (28.4) 359 (14.1)
Unit: mm (in)
H1 : Height between the head lamp bulb center and ground (Low beam)
H2 : Height between the head lamp bulb center and ground (High beam)
H3 : Height between the fog lamp bulb center and ground
W1 : Distance between the two head lamp bulbs centers (Low beam)
W2 : Distance between the two head lamp bulbs centers (High beam)
W3 : Distance between the two fog lamp bulbs centers
procarmanuals.com