Page 174 of 722

�µ�µ
CONT INUED
You can customize the power sliding
doors button on the remote
transmitter to not open the sliding
doors without unlocking the sliding
doors lock f irst.
When you customize the setting,
make sure your vehicle is parked
saf ely, the parking brake is applied,
all doors are f ully closed and locked,
the key is removed f rom the ignition switch, and the power sliding door
MAIN switch is set to the OFF
position.
There are two settings you can
choose f rom:
ANYTIME The sliding door
unlocks and opens when you press
andholdtheslidingdoorbuttonon
theremotetransmitterfor1second.
Thefrontdooronthesamesidealso
unlocks at the same time.
WHEN UNLOCKED In this mode,
you must unlock the sliding door
bef ore opening it.
You can switch between these two
modes as f ollowing:
Press and hold the driver’s side
sliding door dashboard CLOSE
switch. Keep pressing the dashboard
switch, press and hold the driver’s
side power sliding door button on
the remote transmitter until the
LED on the remote f lashes (f or 1
second).
Release the dashboard switch.
Follow steps 1 through 3 within 20
seconds and repeat it f our times.
To go back to the other setting,
repeat the above procedure.
When the ‘‘WHEN UNLOCKED’’
mode is set, you will hear 3 short
beeps.
When the ‘‘ANYTIME’’ mode is
set, you will hear a long beep.
1. 2.
3.
4.
Sliding Doors
T o Customize the Power Sliding
Doors Set t ing
Instruments and Controls
171
MAIN SWITCH DRIVER’S SIDE DASHBOARD SWITCH
DRIVER’S SIDE
POWER SLIDING
DOOR BUTTON LED
10/07/17 09:57:05 31TK8600_176
2011 Odyssey
Page 175 of 722

You can manually open or close the
sliding doors. The MAIN switch
must be in the OFF position. To
open a door, pull the inside or
outside door handle, and slide the
door back. It will latch in the f ully
open position. To close, pull either
handle and slide the door f orward.
When the door is almost closed, the
auto-closer will pull the door shut.When replacing a flat tire, make sure
to turn of f the power sliding door
MAIN switch on the dashboard.
Do not allow anyone to step on the
lower arm of the sliding door while
the door is open. This could damage
the sliding door mechanism.
Whenyoudrivewithchildreninyour
vehicle, use the childproof door
locks (see page ). This will
prevent children f rom opening the
doors accidentally. Do not put any item in the door
pocket that sticks out f rom the
pocket. It can prevent the doors f rom
opening or closing properly, and
damage the vehicle body.
Bef ore operating the sliding doors,
check that passengers, especially
children, do not have their hands on
the edge of the sliding door or on the
door pillar. The auto-reverse motor
stops working when the door is
about to latch so the auto-closer can
pull the door shut. If there is an obstacle in the door sill,
the power sliding door may not open
or close properly. When removing
the obstacle f rom the door sill, make
suretoturnoff theMAINswitchon
the dashboard.
162
On all models
On all models except LX
Manually Opening/Closing t he
Power Sliding Door
Important Sliding Door
PrecautionsSliding Doors172
Closing a sliding door while any
part of a passenger is in the
door’s path can cause serious
injury.
Make sure all passengers are
clear of the doorway before
closing a sliding door.
10/07/17 09:57:14 31TK8600_177
2011 Odyssey
Page 176 of 722

When you release the f uel f ill door,
the driver’s side sliding door
automatically locks so it cannot open
and interfere with the fuel door. If a
passenger attempts to unlock the
door by cycling the lock knob several
times, the door can be opened.
If a passenger needs to get out while
you are ref ueling, instruct that
person to exit on the passenger’s
side.When parking f acing downhill, make
sure the doors are latched in the
f ully open position, and then hold the
door open f or your passengers. Do
not pull the inside or outside door
handle, or the door will slam shut.
If you leave the vehicle on a steep
downhill with a power sliding door
half open and the engine of f , the
magnetic lock will turn off after 30
minutes and the sliding door will
automatically open or close. In this
case you will hear a continuous tone.
If you open the f uel f ill door while
the driver’s side sliding door is
opening, the sliding door stops. If
this happens, the door must be
operated manually. When parking f acing downhill on a
steep grade, the power sliding doors
may not open or close as they do
normally. Make sure the MAIN switch on the
dashboard is in the ON position.
If your vehicle is facing a downhill,
do not turn the MAIN switch to OFF
while the door is operating because
thedoormayslamshut.
When you close the f uel f ill door, the
driver’s side sliding door unlocks if it
was locked when you opened the
fuel fill door.On all models except LX On all models except LXRef ueling
Parking on a Hill
Sliding Doors
Instruments and Controls
173
10/07/17 09:57:24 31TK8600_178
2011 Odyssey
Page 179 of 722
�µ
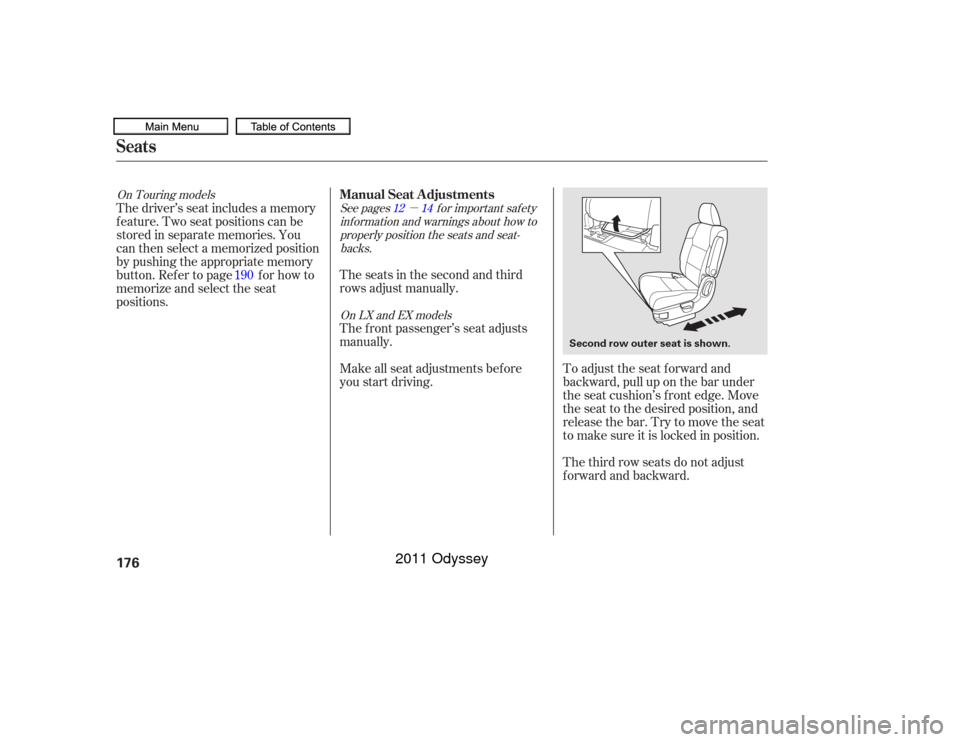
To adjust the seat forward and
backward, pull up on the bar under
the seat cushion’s f ront edge. Move
the seat to the desired position, and
releasethebar.Trytomovetheseat
to make sure it is locked in position.
The third row seats do not adjust
f orward and backward.
The seats in the second and third
rows adjust manually.
The f ront passenger’s seat adjusts
manually.
Make all seat adjustments bef ore
you start driving.
The driver’s seat includes a memory
f eature. Two seat positions can be
stored in separate memories. You
canthenselectamemorizedposition
by pushing the appropriate memory
button. Ref er to page f or how to
memorize and select the seat
positions.
190
See pages f or important saf ety
inf ormation and warnings about how toproperly position the seats and seat-backs.
On LX and EX models
On Touring models
12 14
Seats
Manual Seat Adjustments
176
Second row outer seat is shown.
10/07/17 09:57:55 31TK8600_181
2011 Odyssey
Page 180 of 722
The lef t and right halves of the third
seat-back can be adjusted separately.
To adjust the angle, pull the
adjustment strap on the outside of
each seat-back, move the seat-back
to the desired position, and release
the adjustment strap. Let the seat-
back latch in the new position.
Once a seat is adjusted correctly,
rock it back and f orth to make sure it
is locked in position.
To change the angle of the seat-back,
pull the strap on the right side of the
seat bottom. Move the seat-back to
the desired position and release the
strap. Let the seat-back latch into the
new position.
To change the seat-back angle, pull
up on the lever on the outside of the
seat bottom.On the third row seats
On the second row center seat
On the f ront passenger’s manual
adjustable seat and the second row outerseats
Seats
Instruments and Controls
177
ADJUSTMENT STRAPS
ADJUSTMENT STRAP
Second row outer seat is shown.
10/07/17 09:58:01 31TK8600_182
2011 Odyssey
Page 184 of 722

This reduces the distance between
the restraint and the occupant’s head.
It also helps protect the occupants
against the likelihood of whiplash
and injuries to the neck and upper
spine.
Af ter a collision, the activated
restraint should return to its normal
position.
If the restraints do not return to their
normal position, or in the event of a
severe collision, have the vehicle
inspected by a Honda dealer.
The driver’s and f ront passenger’s
seats have active head restraints. If
the vehicle is struck severely f rom
the rear, the occupant properly
secured with the seat belt will be
pushed against the seat-back and the
head restraint will automatically
move forward.
Make sure the head restraint locks
in position when you reinstall it.
CONT INUED
Seats
A ct ive Head Rest raint s
Instruments and Controls
181
Failure to reinstall the head
restraints can result in severe
injury during a crash.
Always replace the head
restraints before driving.
10/07/17 09:58:29 31TK8600_186
2011 Odyssey
Page 186 of 722
Both seats can be removed to give
more cargo capacity.
Do not remove the seats while
driving.
To remove a seat:Lower the head restraint to its
lowest position.
Pull up the seat-back angle
adjustment lever, and fold the
seat-back forward. Unlock the seat f rom the f loor by
pulling the lock release lever on
the outside of the seat bottom, and
lifttherearoftheseatbyholding
the handle under the back of the
seat cushion.Unhook the f ront of the seat f rom
the f loor by pulling it back slightly,
then pivoting it upward.
To reinstall the seat, hook the front
of the seat to the f loor, then push the
rear of the seat-back until it locks in
place. Make sure the seat is securely
latched bef ore driving.
Move the second row seat to the
rear-most position.
1.
5.
4.
2.
3.
Seats
Removing the Second Row Outer
Seats
Instruments and Controls
183
LOCK RELEASE LEVER HANDLE SEAT-BACK ANGLE
ADJUSTMENT LEVER
10/07/17 09:58:47 31TK8600_188
2011 Odyssey
Page 187 of 722

On all models except LX
The second row outer seats can be
moved to the center to provide an
easier access to the third row seat.
Or you can move them to the outer
position if you intend to install two or
three child seats in the second row
seats.
To move a seat:Followsteps1and2onthe
previous section. With the f ront of the seat hooked
onto the f loor, slide the seat
laterally to the center or outer
position. Make sure to move it
until it stops.
Lower the seat and push the rear
of the seat-back until it locks in
place. Make sure the seat is
securely latched bef ore driving.Your vehicle has a multi-f unctional
center seat f or the second row
center position.
You can remove the multi-functional
center seat when it is not used. Do
not remove the seat while driving.
To remove a seat:
Use the latch plate to release the
center seat belt f rom the
detachable anchor (see page ).
Allow the seat belt to retract into
the holder on the ceiling and store
the buckles in it.
Pull up the adjustment strap, and
fold the seat-back forward.
1.
2.
2.
3. 1.
187SeatsMoving the Second Row Outer
Seats Removing the Second Row Multi-
Functional Center Seat184
HANDLE
10/07/17 09:58:57 31TK8600_189
2011 Odyssey