2011 HONDA FIT light
[x] Cancel search: lightPage 55 of 152
54Navigation System
Driving to Your Destination
Map Scale
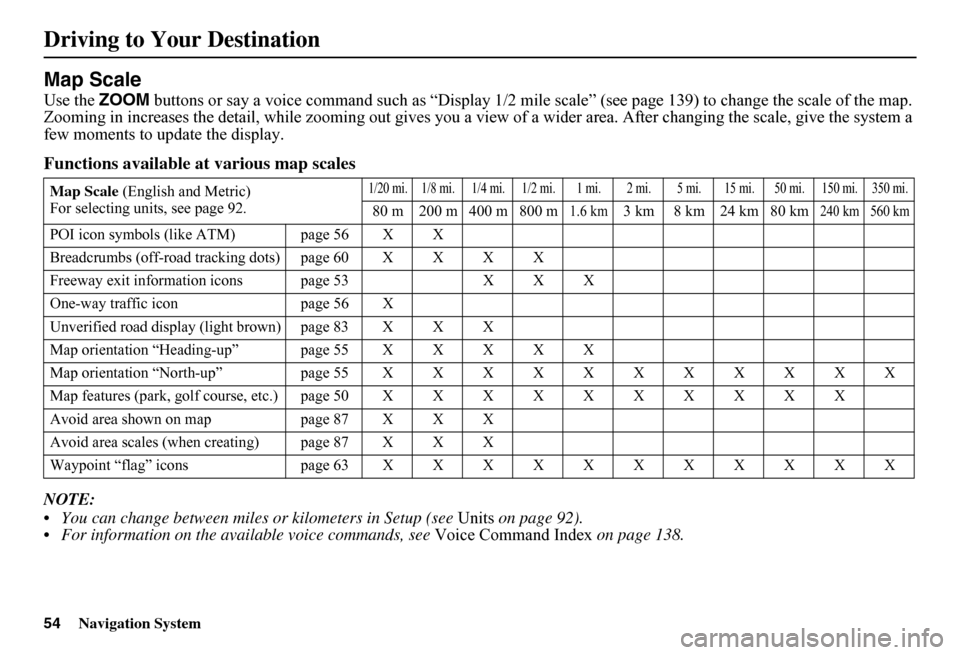
Use the ZOOM buttons or say a voice command such as “Display 1/2 mile scale” (see page 139) to change the scale of the map. Zooming in increases the detail, while zooming out gives you a vi ew of a wider area. After changing the scale, give the system a few moments to update the display.
Functions available at various map scales
NOTE:
You can change between miles or kilometers in Setup (see Units on page 92). For information on the av ailable voice commands, see Voice Command Index on page 138.
Map Scale (English and Metric) For selecting uni ts, see page 92.
1/20 mi. 1/8 mi. 1/4 mi. 1/2 mi. 1 mi. 2 mi. 5 mi. 15 mi. 50 mi. 150 mi. 350 mi.
80 m 200 m 400 m 800 m1.6 km3 km 8 km 24 km 80 km240 km 560 km
POI icon symbols (like ATM) page 56 X X
Breadcrumbs (off-road tracking dots)page60XXXX
Freeway exit information icons page 53 X X X
One-way traffic icon page 56 X
Unverified road display (light brown) page 83 X X X
Map orientation “Heading-up” page55XXXXX
Map orientation “North-up” page55XXXXXXXXXXX
Map features (park, golf course, etc.)page50XXXXXXXXXX
Avoid area shown on map page 87 X X X
Avoid area scales (w hen creating) page 87 X X X
Waypoint “flag” icons page 63 XXXXXXXXXXX
Page 62 of 152
Navigation System61
Viewing/Saving the Current
Location
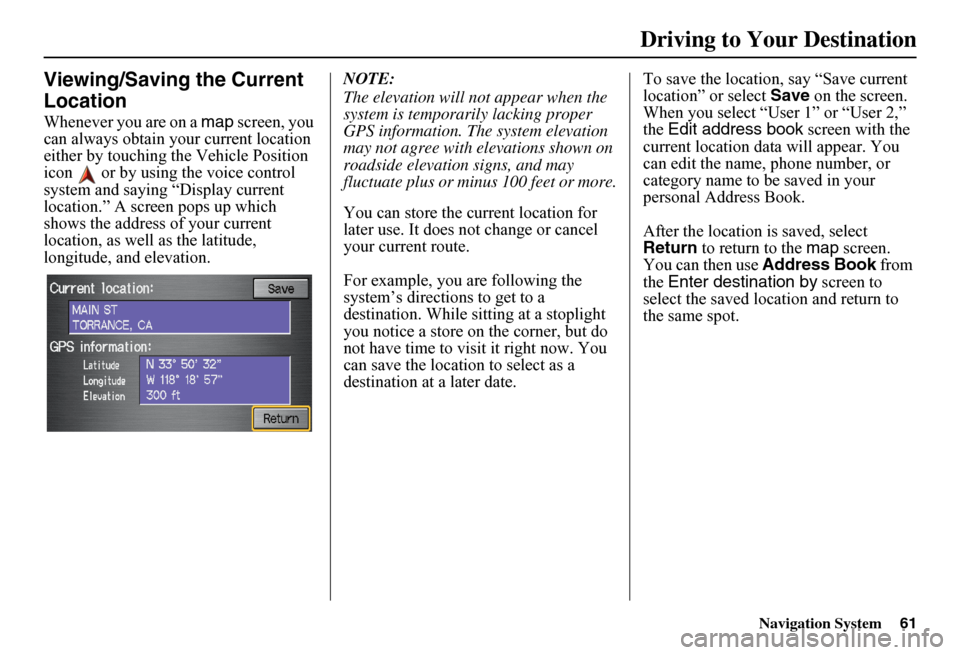
Whenever you are on a map screen, you can always obtain your current location either by touching the Vehicle Position icon or by using the voice control system and saying “Display current location.” A screen pops up which shows the address of your current location, as well as the latitude, longitude, and elevation.
NOTE:
The elevation will not appear when the system is temporarily lacking proper GPS information. The system elevation may not agree with elevations shown on roadside elevation signs, and may fluctuate plus or minus 100 feet or more.
You can store the current location for later use. It does not change or cancel your current route.
For example, you are following the system’s directions to get to a destination. While sitting at a stoplight you notice a store on the corner, but do not have time to visit it right now. You can save the location to select as a destination at a later date.
To save the location, say “Save current location” or select Save on the screen. When you select “User 1” or “User 2,” the Edit address book screen with the current location data will appear. You can edit the name, phone number, or category name to be saved in your personal Address Book.
After the location is saved, select Return to return to the map screen. You can then use Address Book from the Enter destination by screen to select the saved location and return to the same spot.
Driving to Your Destination
Page 71 of 152

70Navigation System
Information Features
When you make a command help selection under any of the help screens, you will see the help commands that can be used with the voice control. You can say or select Read List, and the system will read the list to you.
For a listing of all voice commands, see Voice Command Index on page 138.
Map Legend
You can use the Map legend screens to learn the meaning of map features, icons, colors, etc. us ed in this system. When you say or select Map Legend, the display changes to:
Say or select the desired item or item number to view each section of the map legend.
Calendar
The Calendar option allows you to enter events and be reminded of them in the future. When you say or select Calendar , the system shows the calendar with the current calendar day highlighted.
Dates with an icon indicate there is a scheduled entry for that date.
Page 75 of 152
74Navigation System
System Setup
Display
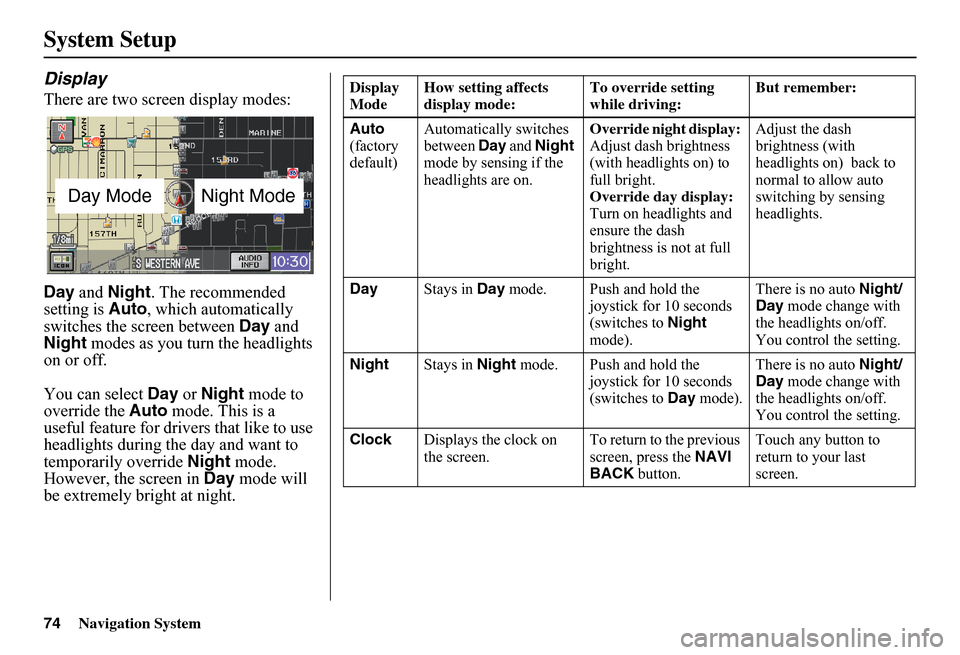
There are two screen display modes:
Day and Night. The recommended setting is Auto, which automatically switches the screen between Day and Night modes as you turn the headlights on or off.
You can select Day or Night mode to override the Auto mode. This is a useful feature for drivers that like to use headlights during the day and want to temporarily override Night mode. However, the screen in Day mode will be extremely bright at night.
Day ModeNight Mode
Display Mode How setting affects display mode: To override setting while driving: But remember:
Auto (factory default)
Automatically switches between Day and Night mode by sensing if the headlights are on.
Override night display: Adjust dash brightness (with headlights on) to full bright.Override day display:Turn on headlights and ensure the dash brightness is not at full bright.
Adjust the dash brightness (with headlights on) back to normal to allow auto switching by sensing headlights.
Day Stays in Day mode. Push and hold the joystick for 10 seconds (switches to Night mode).
There is no auto Night/ Day mode change with the headlights on/off. You control the setting.
Night Stays in Night mode. Push and hold the joystick for 10 seconds (switches to Day mode).
There is no auto Night/ Day mode change with the headlights on/off. You control the setting.
Clock Displays the clock on the screen. To return to the previous screen, press the NAVI BACK button.
Touch any button to return to your last screen.
Page 84 of 152
Navigation System83
System Setup
Unverified Area Routing
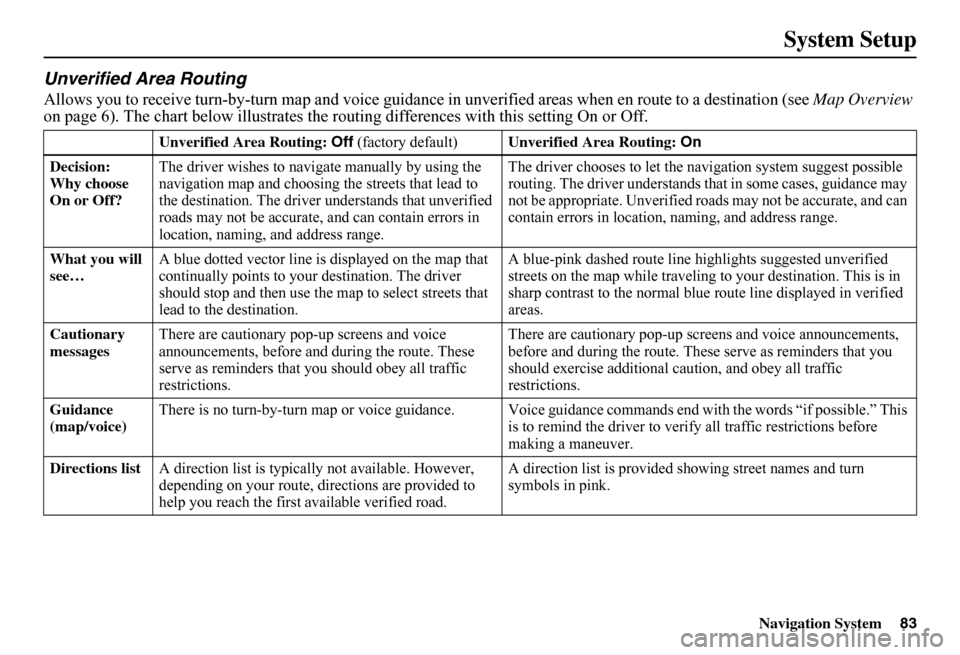
Allows you to receive turn-by-turn map and voice guidance in unverified areas when en route to a destination (see Map Overview on page 6). The chart below illustrates the rou ting differences with this setting On or Off.
Unverified Area Routing: Off (factory default)Unverified Area Routing: On
Decision: Why choose On or Off?
The driver wishes to navi gate manually by using the navigation map and choosing the streets that lead to the destination. The driver understands that unverified roads may not be a ccurate, and can contain errors in location, naming, and address range.
The driver chooses to let the na vigation system suggest possible routing. The driver understands that in some cases, guidance may not be appropriate. Unverified ro ads may not be accurate, and can contain errors in location, naming, and address range.
What you will see… A blue dotted vector line is displayed on the map that continually points to your destination. The driver should stop and then use the ma p to select streets that lead to the destination.
A blue-pink dashed route line highlights suggested unverified streets on the map while traveling to your destination. This is in sharp contrast to the normal blue route line displayed in verified areas.
Cautionary messages There are cautionary pop-up screens and voice announcements, before and during the route. These serve as reminders that you should obey all traffic restrictions.
There are cautionary pop-up sc reens and voice announcements, before and during the route. These serve as reminders that you should exercise additional ca ution, and obey all traffic restrictions.
Guidance (map/voice) There is no turn-by-turn map or voice guidance. Voice gui dance commands end with the words “if possible.” This is to remind the driver to verify all traffic restrictions before making a maneuver.
Directions list A direction list is typically not available. However, depending on your route, dire ctions are provided to help you reach the first available verified road.
A direction list is provided s howing street names and turn symbols in pink.
Page 85 of 152

84Navigation System
System Setup
Unverified Area Routing
When driving to your destination, you have the choice of using or not using “unverified” roads. You make this choice in Setup screen (second). The next few pages contain an example of a route to a destinatio n in an unverified area explaining the routing differences found in unverified areas.
With Unverified Area Routing Off, the system tries to use verified roads whenever possible. In this example, since only verified streets are used, it created a longer rout e than necessary.
With Unverified Area Routing On, the route is shorter, but consists of unverified (light co lored) streets that may not be accurate. Because the streets are unverified, there may be errors in street location, name, or address range. Additional caution is recommended in these areas. Always obey posted traffic restrictions.
Because both routes bypass or use unverified streets, an initial Disclaimer screen is provided. It is recommended that you stop and review the map.
Unverified Area Routing “Off”
Unverified Area Routing “On”
NOTE:
Unverified roads are shown only when viewing the map in the 1/20, 1/8, and 1/4 mile map scales, or the 80, 200, and 400 meter map scales.
Page 88 of 152

Navigation System87
System Setup
Edit Avoid Area
This function allows you to select areas you wish to avoid when calculating a route to your destination. You can select up to five areas to avoid. You may wish to set up an “avoid area” to route around long-term road construction, closures, or any area you wish to avoid. If you enter a route that takes you through or into an “avoid area,” a pop-up box will warn you that your route takes you into one of these areas. However, you can still choose destinations in an avoided area.
When you select Edit for the Setup item “Edit Avoid Area,” the following list screen is displayed:
You can select New Area or select (by touch) one of your existing areas to modify. If you choose New Area, the following screen is displayed:
Say or select Edit Name and use the keyboard to enter the name on the Enter avoid area name screen (19 characters max). Say or select Done to return to the previous screen. Say or select Edit Area to create the area to be avoided. The following screen appears:
Either select Address or Map Input on the Enter avoid area by screen. Each choice provides a slightly different way to locate the approximate map display for drawing the area you wish to avoid. After selecting the choice, a map screen will be displayed.
Use the ZOOM buttons to select the map scale (available scales are 1/20, 1/8, and 1/4 mile scales). Use the joystick to move the crosshairs (red circle) to the desired start point and push in the joystick to “set” the start point. Then move the joystick in a straight or diagonal direction to encompass the area to be avoided.
Page 90 of 152
Navigation System89
System Setup
Edit Waypoint Search Area
When driving en route to your destination, you can select a temporary destination waypoint (marked with a small flag on the map) along your route for gas, a restaurant, or other POI. When you resume your trip from the waypoint, the system continues the trip to your original destination. To use this feature, see Waypoints on page 63.
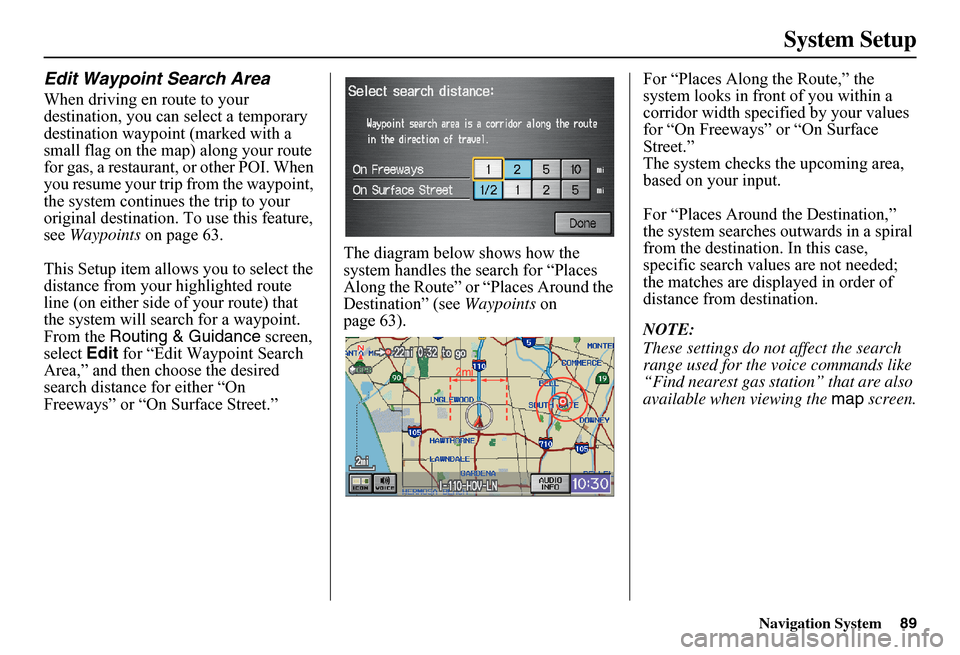
This Setup item allows you to select the distance from your highlighted route line (on either side of your route) that the system will search for a waypoint. From the Routing & Guidance screen, select Edit for “Edit Waypoint Search Area,” and then choose the desired search distance for either “On Freeways” or “On Surface Street.”
The diagram below shows how the system handles the search for “Places Along the Rout e” or “Places Around the Destination” (see Waypoints on page 63).
For “Places Along the Route,” the system looks in front of you within a corridor width specified by your values for “On Freeways” or “On Surface Street.”The system checks the upcoming area, based on your input.
For “Places Around the Destination,” the system searches outwards in a spiral from the destination. In this case, specific search values are not needed; the matches are displayed in order of distance from destination.
NOTE:
These settings do not affect the search range used for the voice commands like “Find nearest gas station” that are also available when viewing the map screen.