Page 8 of 369
�Î�Î
�Î
�Î
�Î
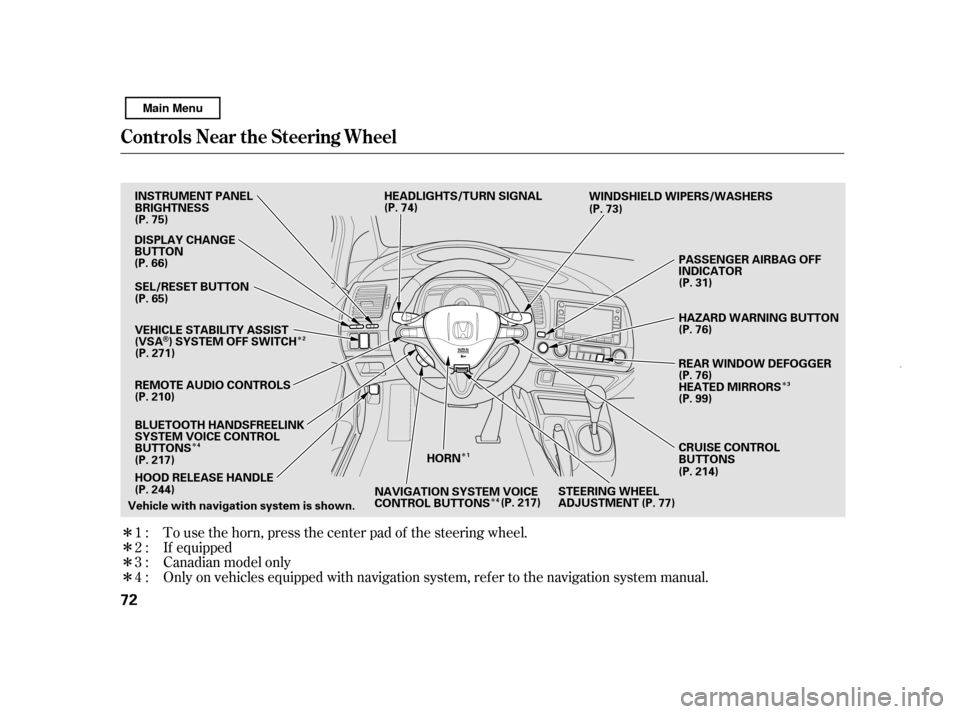
�Π���ΠOnly on vehicles equipped with navigation system. Ref er to the navigati on system manual.
To use the horn, press the center pad of the steering wheel.
Canadian model only
1: 2:3:4: If equipped
Your Vehicle at a Glance
4 PASSENGER AIRBAG OFF
INDICATOR
HAZARD WARNING BUTTON
REAR WINDOW DEFOGGER
HORN
HEADLIGHTS/TURN SIGNAL WINDSHIELD WIPERS/WASHERS
(P. 74)
(P. 73)
(P. 76)
(P. 76)
HEATED MIRRORS(P. 214)
(P. 99)
CRUISE CONTROL
BUTTONS
NAVIGATION SYSTEM VOICE
CONTROL BUTTONS (P. 217)
INSTRUMENT PANEL
BRIGHTNESS BUTTONS
(P. 75)
DISPLAY CHANGE
BUTTON
(P. 66)
SEL/RESET BUTTON
(P. 65)
VEHICLE STABILITY ASSIST
(VSA
) SYSTEM OFF SWITCH
(P. 271)
REMOTE AUDIO CONTROLS
(P. 210)
(P. 217)
HOOD RELEASE HANDLE
(P. 244)
BLUETOOTH HANDSFREELINK
SYSTEM VOICE CONTROL
BUTTONS
STEERING WHEEL
ADJUSTMENT (P. 77)
Vehicle with navigation system is shown. (P. 31)
1
3
4
2
4
Main Menu
Page 69 of 369
To switch the information display
between the odometer, trip meter,
outside temperature, and engine oil
lif e and maintenance item code(s),
press the SEL/RESET button
repeatedly.
The odometer shows the total
distance your vehicle has been
driven. It measures miles in U.S.
models and kilometers in Canadian
models. It is illegal under U.S.
federal law and Canadian provincial/
territorial regulations to disconnect,
reset, or alter the odometer with the
intent to change the number of miles
or kilometers indicated.
Odometer
Gauges
Inst rument s and Cont rols
65
TRIP METER
SEL/RESET BUTTON DISPLAY CHANGE BUTTON TACHOMETER
INSTRUMENT PANEL BRIGHTNESS CONTROL BUTTONS INFORMATION
DISPLAY
FUEL GAUGE
SPEEDOMETER
INSTANT FUEL ECONOMY/
TEMPERATURE GAUGE
ODOMETER/OUTSIDE
TEMPERATURE INDICATOR
Main Menu
Page 76 of 369
�Î�Î
�Î
�Î �Î
�Π���ΠOnly on vehicles equipped with navigation system, ref er to the navigati on system manual.
To use the horn, press the center pad of the steering wheel.
1:2:3:4: If equipped
Canadian model only
Controls Near the Steering Wheel
72 HORN
Vehicle with navigation system is shown. CRUISE CONTROL
BUTTONS
WINDSHIELD WIPERS/WASHERS
(P. 75) (P. 74)
(P. 73)
(P. 76)
HEATED MIRRORS
(P. 214)
NAVIGATION SYSTEM VOICE
CONTROL BUTTONS (P. 217) (P. 76)
DISPLAY CHANGE
BUTTON
(P. 66)
(P. 99)
HEADLIGHTS/TURN SIGNAL
STEERING WHEEL
ADJUSTMENT
(P. 217)
HOOD RELEASE HANDLE
(P. 244)
INSTRUMENT PANEL
BRIGHTNESS
SEL/RESET BUTTON
PASSENGER AIRBAG OFF
INDICATOR
HAZARD WARNING BUTTON
REAR WINDOW DEFOGGER
BLUETOOTH HANDSFREELINK
SYSTEM VOICE CONTROL
BUTTONS
VEHICLE STABILITY ASSIST
(VSA
) SYSTEM OFF SWITCH
(P. 65)
(P. 271)
(P. 77)
REMOTE AUDIO CONTROLS
(P. 210)
(P. 31)
1 3
4
4 2
Main Menu
Page 79 of 369

�´�µ
The buttons under the lef t side vent
control the brightness of the
instrument panel. Push the or
button to adjust the brightness.
With the headlight switch of f or in
the position, the high beam
headlights come on with reduced
brightness when you turn the
ignition switch to the ON (II)
position and release the parking
brake. They remain on until you turn
the ignition switch of f , even if you
set the parking brake.
The headlights revert to normal
operation when you turn them on
with the switch.
There are six brightness levels.
When you push either button, the
inf ormation display indicates the
current level. You will hear a tone
when you reach the maximum or
minimum brightness. The display
returns to the odometer 5 seconds af ter you stop adjusting the
brightness.
To reduce glare at night, the
instrument panel illumination dims
when you turn the light switch to the
or position.
The center of each meter (upper and
lower) illuminates with reduced
brightness when you unlock and
open the driver’s door, and then goes
back to the selected brightness when
you turn the ignition switch to the
ON (II) position.
If you insert the key but do not turn
the ignition switch to the ON (II)
position, the illumination turns of f in
about 10 seconds.
Daytime Running L ights Instrument Panel Brightness
Headlights, Instrument Panel Brightness
Inst rument s and Cont rols
75
INSTRUMENT PANEL BRIGHTNESS
CONTROL BUTTONS
Main Menu
Page 110 of 369

Airf low is divided between
the f loor vents and def roster vents at
the base of the windshield.
Air f lows f rom the def roster
vents at the base of the windshield.
When you select , the system
automatically switches to fresh air
mode and turns on the A/C.
In AUTO mode, the system controls
the airf low direction automatically
between the dashboard vents and
the f loor vents.
This button turns the air
conditioning on and of f . The
indicatorinthebuttonisonwhen
the A/C is on.
When the recirculation indicator is
on, air f rom the vehicle’s interior is
sent throughout the system again.
Select recirculation mode when
driving through dusty or smoky
conditions, then return to fresh air
mode.
The outside air intakes f or the
heating and cooling system are at
the base of the windshield. Keep this
area clear of leaves and other debris.
When the f resh air indicator is on,
air is brought in f rom the outside of
the vehicle. Thesystemshouldbeleftinfresh
air mode under almost all conditions.
Keeping the system in recirculation
mode, particularly with the A/C of f ,
can cause the windows to fog up.
Use the mode control buttons to
select the vents air flows from. Some
air will f low f rom the dashboard
corner vents in all modes.
Air flows from the center
and corner vents in the dashboard.
Airf low is divided between
the vents in the dashboard and the
f loor vents.
Air f lows f rom the f loor
vents. When you select , the
system automatically switches to
f resh air mode.
Air Conditioning (A/C) Button
Recirculation Button
Fresh Air Button
Mode Control Button
Climat e Cont rol
106
Main Menu
Page 116 of 369
Audio System (Models without navigation system)
112TUNE/SOUND KNOB
PRESET BUTTONS SEEK BUTTON
PWR/VOL KNOB AM/FM BUTTON
SCAN BUTTON AUTO SELECT BUTTON
Main Menu
Page 117 of 369

�µ�µ
�µ
�µ
�µ
CONT INUED
If you do nothing, the system will
then scan f or the next strong station
andplayitfor10seconds.Whenit
plays a station you want to listen to,
press the SCAN button again.
Use the TUNE knob to
tune the radio to a desired f requency.
Turn the knob right to tune to a
higher f requency, or lef t to tune to a
lower f requency.
Each side of the buttons
(1 through 6) can store one
f requency on AM, and two
f requencies on FM.
Repeat steps 1 through 3 to store a
total of six stations on AM and
twelve stations on FM.
Pick a preset number (1 6), and
hold it until you hear a beep.
Usethetune,seek,orscan
function to tune the radio to a
desired station.
Select the desired band, AM or
FM. FM1 and FM2 let you store
six stations each.
You can use any of f ive methods to
find radio stations on the selected
band: the
preset buttons, and .
The ignition switch must be in the
ACCESSORY (I) or the ON (II)
position. Turn the system on by
pushingthePWR/VOLknoborthe
AM/FM button. Adjust the volume
by turning the same knob.
The band and f requency that the
radio was last tuned to is displayed.
To change bands, press the AM/FM
button. On the FM band, ST will be
displayed if the station is
broadcasting in stereo. Stereo
reproduction in AM is not available.
The scan f unction samples
all stations with strong signals on the
selected band. To activate it, press
the SCAN button, then release it.
You will see SCAN in the display.
When it f inds a strong signal, it will
stop and play that station for about
10 seconds. The seek f unction
searches up and down f rom the
current f requency to f ind a station
with a strong signal. To activate it,
press the or side of the
SEEK button, then release it. 1.
2. 3. 4.
To Select a Station TUNE
Preset
To Play the AM/FM Radio
TUNE,SEEK,SCAN, AUTO SELECT SCAN
SEEK
Playing t he A M/FM Radio (Models wit hout navigat ion syst em)
Features
113
Main Menu
Page 118 of 369
�µ
To turn of f auto select,pressthe
A. SEL (auto select) button. This
restores the presets you originally
set.
Press the A. SEL button. ‘‘A.SEL’’
f lashes in the display, and the system
goes into scan mode f or several
seconds. It stores the f requencies of
six AM, and twelve FM stations in
the preset buttons. You will see a ‘‘0’’ displayed af ter
pressing a preset button if auto
select cannot f ind a strong station f or
that preset button.
If you do not like the stations auto
select has stored, you can store
other f requencies on the preset
buttons as previously described.
For inf ormation on AM/FM radio
f requencies and reception, see page
.
If you are
traveling and can no longer receive
your preset stations, you can use the
auto select feature to find stations in
the local area.
204
Playing t he A M/FM Radio (Models wit hout navigat ion syst em)
AUTO SELECT 114
Main Menu

,
press the SEL/RESET button
repeatedly.
The odometer shows")

112TUNE/SOUND KNOB
PRESET BUTTONS SEEK BUTTON
PWR/VOL KNOB AM/FM BUTTON
SCAN BUTTON AUTO SELECT BUTTON
Main Menu")