Page 262 of 369
Make sure all windows, mirrors,
and outside lights are clean and
unobstructed. Remove f rost, snow,
or ice.Check that any items you may be
carrying are stored properly or
f astened down securely.
Check the seat adjustment (see
page ).
Check the adjustment of the
inside and outside mirrors (see
page ).
Check the steering wheel
adjustment (see page ).
Make sure the doors are securely
closed and locked.Fasten your seat belt. Check that
your passengers have f astened
their seat belts (see page ).
Youshoulddothefollowingchecks
and adjustments bef ore you drive
your vehicle.
When you start the engine, check
the gauges and indicators in the
instrument panel (see page ).
Check that the hood and trunk are
f ully closed.
Visually check the tires. If a tire
looks low, use a gauge to check its
pressure (see page ).
1. 2. 3.
8.
7.
6. 9.
4. 5.
57
10.
91
98 77
303 15
Preparing to Drive
258
Main Menu
Page 265 of 369

�µ
To shif t f rom Park to any position,
press the brake pedal, the release
button on the f ront of the shif t lever,
then pull the lever. You cannot shif t
out of Park when the ignition switch
is in the LOCK (0) or the
ACCESSORY (I) position. This position mechani-
cally locks the transmission. Use
Park whenever you are turning of f or
starting the engine. To shif t out of
Park, you must press on the brake
pedal and have your f oot of f the
accelerator pedal. Press the release
buttononthefrontof theshiftlever
to move it. If you have done all of the above and
still cannot move the lever out of
Park, see on
page .
You must also press the release
button to shift into Park. To avoid
transmission damage, come to a
complete stop bef ore shif ting into
Park. The shif t lever must be in Park
bef ore you can remove the key f rom
the ignition switch.
263
To shift from:
PtoR
RtoP
NtoR StoL
LtoS
StoD
DtoN DtoS
NtoD RtoN Do this:
Press the brake pedal and
press the release button.
Press the release button.
Move the lever.
CONT INUED
Park (P) Shif t L ock Release
Shif ting
Automatic Transmission (CVT)
Driving
261
SHIFT LEVER
RELEASE BUTTON
Main Menu
Page 267 of 369

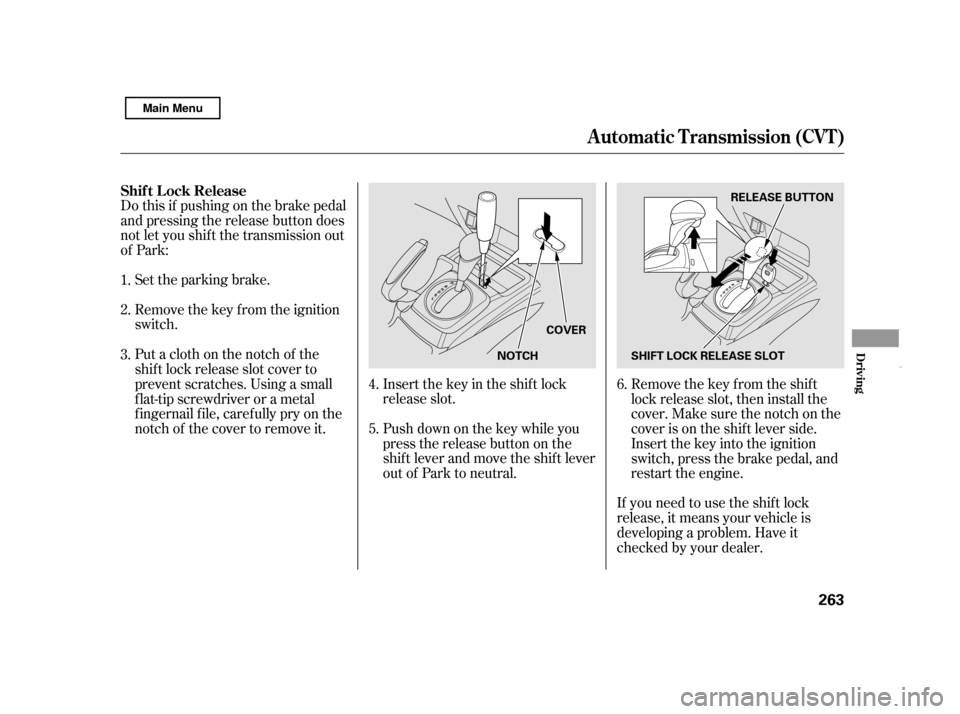
Remove the key from the ignition
switch.
Set the parking brake.
If you need to use the shif t lock
release, it means your vehicle is
developing a problem. Have it
checked by your dealer.
Do this if pushing on the brake pedal
and pressing the release button does
not let you shif t the transmission out
of Park:
Push down on the key while you
pressthereleasebuttononthe
shif t lever and move the shif t lever
out of Park to neutral.
Insert the key in the shift lock
release slot.
Putaclothonthenotchof the
shif t lock release slot cover to
prevent scratches. Using a small
f lat-tip screwdriver or a metal
f ingernail f ile, caref ully pry on the
notch of the cover to remove it. Remove the key from the shift
lock release slot, then install the
cover. Make sure the notch on the
cover is on the shif t lever side.
Insert the key into the ignition
switch, press the brake pedal, and
restart the engine.
1. 2. 3.
4.5.6.
Shif t L ock Release
Automatic Transmission (CVT)
Driving
263
NOTCH
COVER RELEASE BUTTON
SHIFT LOCK RELEASE SLOT
Main Menu
Page 269 of 369
If you open the driver’s door when
Auto Stop is active, the indicator will
blink and you will hear a continuous
beep. The beep will stop when you
close the door.
With the driver’s door open, you will
hear a continuous beep even if the
Auto Idle Stop f unction is
deactivated and the engine restarts.
Always turn the ignition switch to
the LOCK (0) position and remove
the key if you are getting out of the
vehicle.
The indicator blinks as a reminder
that the engine has stopped because
of the Auto Idle Stop f unction. You
cannot restart the engine with the
ignition switch when this indicator is
blinking.
A uto Idle Stop Indicator
Automatic Transmission (CVT)
Driving
265
AUTO IDLE STOP INDICATOR
Main Menu
Page 270 of 369

Make sure the windows are closed.
Turn of f the lights.
Place any packages, valuables, etc.,
in the trunk or take them with you.If the vehicle is f acing downhill,
turn the front wheels toward the
curb.
Make sure the parking brake is
f ully released bef ore driving away.
Driving with the parking brake
partially set can overheat or
damage the rear brakes.
Lock the doors.
Check the indicator on the
instrument panel to verif y that the
security system is set.
Never park over dry leaves, tall
grass, or other f lammable
materials. The hot three way
catalytic converter could cause
these materials to catch on fire.
If the vehicle is f acing uphill, turn
the front wheels away from the
curb.
Set the parking brake bef ore you put
the transmission in Park. This keeps
the vehicle from moving and putting
pressure on the parking mechanism
in the transmission.
Always use the parking brake when
you park your vehicle. Make sure
the parking brake is set f irmly, or
your vehicle may roll if it is parked
on an incline.
Parking T ips
Parking
266 Never install a sunshade between the
upper and lower meters on the
instrument panel. If you do, you could
cause heat damage to the upper meter
on a very hot day.
Main Menu
Page 272 of 369

The electronic brake distribution
(EBD) system, which is part of the
ABS, also balances the f ront-to-rear
braking distribution according to
vehicle loading.
The hydraulic system that operates
the brakes has two separate circuits.
Each circuit works diagonally across
the vehicle (the lef t-f ront brake is
connected with the right-rear brake,
etc.). If one circuit should develop a
problem, you will still have braking
at two wheels.
If the brake pads need replacing, you
will hear a distinctive, metallic
screeching sound when you apply
the brake pedal. If you do not have
the brake pads replaced, they will
screech all the time. It is normal f or
the brakes to occasionally squeal or
squeak when you apply them. The anti-lock brake system (ABS)
helpspreventthewheelsfrom
locking up, and helps you retain
steering control by pumping the
brakes rapidly, much f aster than a
person can do it.
Let the ABS work f or you by always
keeping f irm, steady pressure on the
brake pedal. This is sometimes
ref erred to as ‘‘stomp and steer.’’
You will f eel a pulsation in the brake
pedal when the ABS activates, and
you may hear some noise. This is
normal: it is the ABS rapidly
pumpingthebrakes.Ondry
pavement, you will need to press on
thebrakepedalveryhardbeforetheABS activates. However, you may
feel the ABS activate immediately if
you are trying to stop on snow or ice.
If this indicator comes on, the anti-
lock f unction of the braking system
has shut down. The brakes still work
like a conventional system, but
without anti-lock. You should have
your dealer inspect your vehicle as
soon as possible.
If the ABS indicator comes on while
driving, test the brakes as shown on
page .
326
You should never pump the brake pedal.
Anti-lock Brakes (ABS)
Braking System Design
Brake Pad Wear Indicators ABS Indicator
268
Main Menu
Page 273 of 369

If the ABS indicator and the brake
system indicator come on together,
and the parking brake is f ully
released, the EBD system may also
be shut down.It only helps with steering
control during braking.
such as trying to take a
corner too f ast or making a sudden
lane change. Always drive at a safe
speed f or the road and weather
conditions.
Always steer moderately
when you are braking hard. Severe
or sharp steering wheel movement
can still cause your vehicle to veer
into oncoming traffic or off the road.
Test your brakes as instructed on
page . If the brakes f eel normal,
drive slowly and have your vehicle
repaired by your dealer as soon as
possible. Avoid sudden hard braking
which could cause the rear wheels to
lock up and possibly lead to a loss of
control.
on loose or
uneven surfaces, such as gravel or
snow, than a vehicle without anti-
lock.
326 Important Saf ety Reminders
A BS does not reduce the time or
distance it takes to stop the
vehicle.
A BS will not prevent a skid that
results f rom changing direction
abruptly,
A BS cannot prevent a loss of
stability. A vehicle with A BS may require a
longer distance to stop
Anti-lock Brakes (ABS)
Driving
269
Main Menu
Page 292 of 369

Turn of f the engine, let it sit f or
several minutes, then check the oil
level on the dipstick. If necessary,
add more oil.
Put the under-cover back in place
and reinstall the nine holding clips.
Locktheclipssecurelybypushing
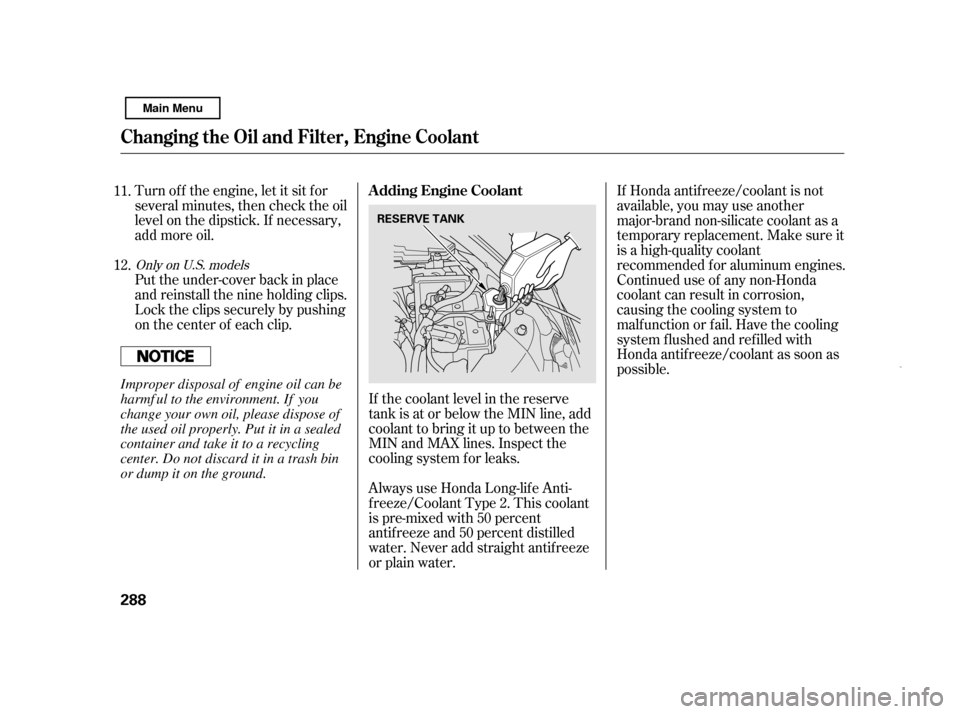
on the center of each clip.If the coolant level in the reserve
tank is at or below the MIN line, add
coolant to bring it up to between the
MIN and MAX lines. Inspect the
cooling system f or leaks. If Honda antif reeze/coolant is not
available, you may use another
major-brand non-silicate coolant as a
temporaryreplacement.Makesureit
is a high-quality coolant
recommended f or aluminum engines.
Continued use of any non-Honda
coolant can result in corrosion,
causingthecoolingsystemto
malf unction or f ail. Have the cooling
system f lushed and ref illed with
Honda antif reeze/coolant as soon as
possible.
Always use Honda Long-lif e Anti-
f reeze/Coolant Type 2. This coolant
is pre-mixed with 50 percent
antif reeze and 50 percent distilled
water. Never add straight antif reeze
or plain water.
11. 12.
Only on U.S. models
A dding Engine Coolant
Changing the Oil and Filter, Engine Coolant
288 RESERVE TANK
Improper disposal of engine oil can be
harmf ul to the environment. If you
change your own oil, please dispose of
the used oil properly. Put it in a sealed
container and take it to a recycling
center. Do not discard it in a trash bin
or dump it on the ground.
Main Menu