Page 293 of 369

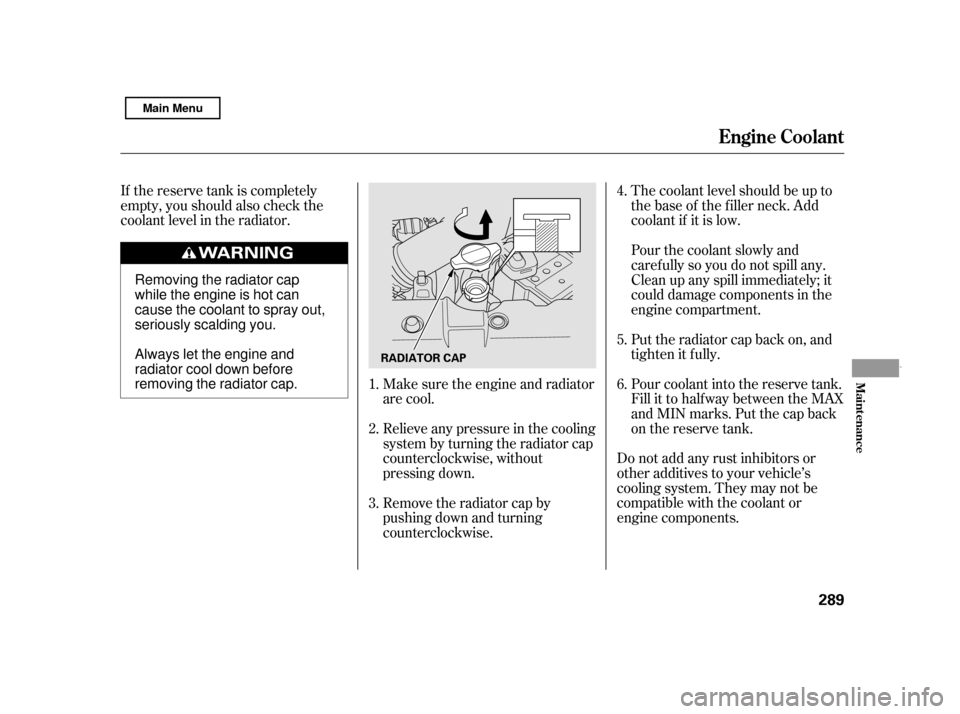
If the reserve tank is completely
empty, you should also check the
coolant level in the radiator.The coolant level should be up to
the base of the f iller neck. Add
coolant if it is low.
Do not add any rust inhibitors or
other additives to your vehicle’s
cooling system. They may not be
compatible with the coolant or
engine components. Pour coolant into the reserve tank.
Fill it to half way between the MAX
and MIN marks. Put the cap back
on the reserve tank.
Pourthecoolantslowlyand
caref ully so you do not spill any.
Clean up any spill immediately; it
could damage components in the
engine compartment.
Make sure the engine and radiator
are cool.
Relieve any pressure in the cooling
system by turning the radiator cap
counterclockwise, without
pressing down.
Remove the radiator cap by
pushing down and turning
counterclockwise. Put the radiator cap back on, and
tighten it fully.
1. 2. 3. 4. 5. 6.
Engine Coolant
Maint enance
289
RADIATOR CAP
Removing the radiator cap
while the engine is hot can
cause the coolant to spray out,
seriously scalding you.
Always let the engine and
radiator cool down before
removing the radiator cap.
Main Menu
Page 298 of 369
If youreplacedaheadlightbulbon
the driver’s side, reinstall the
engine coolant reserve tank.To change the bulb on the driver’s
side, start the engine, turn the
steering wheel all the way to the
right, then turn of f the engine. To
change the bulb on the passenger’s
side, turn the steering wheel to the
lef t.
Use a f lat-tip screwdriver to
remove the two holding clips f rom
the inner f ender, and pull the inner
f ender cover back.
Push the electrical connector back
onto the bulb. Make sure it is on
all the way.
Install the new bulb, and turn it
one-quarter turn clockwise to lock
it in place.
Turn on the headlights to test the
new bulb.
Remove the electrical connector
f rom the bulb by pushing on the
tab and pulling the connector
down.
Remove the bulb f rom the
headlight assembly by turning it
one-quarter turn counterclockwise.
2. 3.
2.
4.5.6. 7.
1.
L ow Beam Headlight
Lights
294TAB
CONNECTORBULB HOLDING CLIP
Main Menu
Page 299 of 369
To change the bulb on the driver’s
side, start the engine, turn the
steering wheel all the way to the
right, then turn of f the engine. To
change the bulb on the passenger’s
side, turn the steering wheel to the
lef t.
Remove the bulb f rom the
headlight assembly by turning it
one-quarter turn counterclockwise. Install the new bulb, and turn it
one-quarter turn clockwise to lock
it in place.
Push the electrical connector back
onto the bulb. Make sure it is on
all the way.
Turn on the headlights to test the
new bulb.
Reinstall the inner f ender cover.
Then reinstall the holding clips,
andlocktheminplacebypushing
on their centers.
Remove the electrical connector
f rom the bulb by pushing on the
tab and pulling the connector
down. 5. 6.
1.
7. 8.
3. 4.
CONT INUED
Lights
Replacing the Front Side Marker/
Turn Signal Light Bulb
Maint enance
295
TAB
BULB
HOLDING CLIP
Main Menu
Page 300 of 369

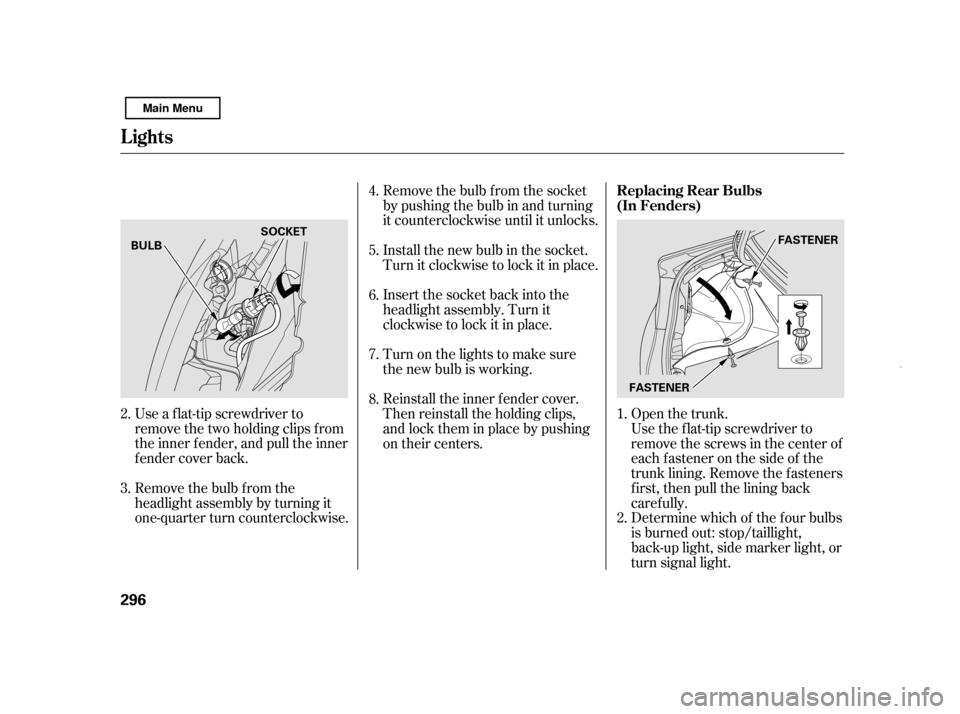
Open the trunk.
Use a f lat-tip screwdriver to
remove the two holding clips f rom
the inner f ender, and pull the inner
f ender cover back. Remove the bulb f rom the socket
by pushing the bulb in and turning
it counterclockwise until it unlocks.
Install the new bulb in the socket.
Turn it clockwise to lock it in place.
Insert the socket back into the
headlight assembly. Turn it
clockwise to lock it in place.
Reinstall the inner f ender cover.
Then reinstall the holding clips,
andlocktheminplacebypushing
on their centers.
Turn on the lights to make sure
the new bulb is working.
Remove the bulb f rom the
headlight assembly by turning it
one-quarter turn counterclockwise. Use the f lat-tip screwdriver to
remove the screws in the center of
each f astener on the side of the
trunk lining. Remove the f asteners
first, then pull the lining back
caref ully.
Determine which of the f our bulbs
is burned out: stop/taillight,
back-up light, side marker light, or
turn signal light.
1.
4. 5. 6. 7. 8.
3.
2.
2.
Replacing Rear Bulbs
(In Fenders)
Lights
296
FASTENER
BULB
SOCKET
FASTENER
Main Menu
Page 301 of 369
Remove the socket by turning it
one-quarter turn counterclockwise.
Pull the bulb straight out of its
socket. Push the new bulb straight
into the socket until it bottoms.
Reinstall the socket into the light
assembly by turning it clockwise
until it locks.Put the f asteners into the holes on
the side of the trunk lining.
Reinstall the screws.
Reinstall the trunk lining. Make
sure it is installed under the edge
of the trunk seal.
Turn on the lights to make sure
the new bulb is working.
Open the trunk.
Use the Phillips-head screwdriver to
remove the screws in the center of
each f astener on the back of the boot
lid. Remove the f asteners f irst, then
pull the lining back caref ully.
1.
4. 5. 6. 7. 8.
3.
CONT INUED
Replacing Rear Bulbs
(in T runk L id)
Lights
Maint enance
297
BULBS
SOCKETS SOCKETS
BULB
BULB FASTENER
Main Menu
Page 302 of 369
Pull the bulb straight out of its
socket. Push the new bulb straight
into the socket until it bottoms.
Insert the socket back into the
light assembly. Turn it clockwise
to lock it in place.
Push the trunk lid trim back into
position.
Put the f asteners into the holes on
the trunk lid trim. Reinstall the
screws.Beforeusinganautomaticcarwash,
remove the audio antenna so it does
not get damaged. Remove the
antenna by unscrewing it. When you
reinstall the antenna, tighten it
securely.
Bef ore entering or parking in areas
with low ceiling height, remove the
antenna.
Turn on the lights to make sure
the new bulb is working.
Remove the socket by turning it
one-quarter turn counterclockwise.
2. 3. 4.5. 6.7.
Lights, Roof Antenna
A udio A ntenna
298 BULB
SOCKET
Main Menu
Page 305 of 369
CONT INUED
Disconnect the blade assembly
from the wiper arm:Put a cloth on the edge of the
lock tab to prevent scratches,
then push up on the lock tab
carefully with a flat-tip
screwdriver. When replacing a wiper blade,
make sure not to drop the wiper
blade or wiper arm down on the
windshield. Remove the blade f rom its holder
by grabbing the tabbed end of the
blade. Pull f irmly until the tabs
come out of the holder.
Pivot the blade assembly toward
the wiper arm until it releases
from the wiper arm.
2.
3.
Wiper Blades
Maint enance
301
WIPER ARM
LOCK TAB BLADE
Main Menu
Page 306 of 369
Examine the new wiper blades. If
they have no plastic or metal
reinf orcement along the back
edge, remove the metal
reinf orcement strips f rom the old
wiper blade, and install them in
the slots along the edge of the new
blade.
Make sure the three rubber tabs
inside the blade f it to each notch of
the reinf orcement, as shown. Place the top of the wiper blade on
the end of the blade assembly, and
slide the blade onto the assembly
in the direction pointed to by the
arrow.
Make sure the tab on the blade
assembly fits in the indent of the
wiper blade and the blade is
completely installed.Slide the wiper blade assembly
onto the wiper arm. Make sure it
locks in place.
Make sure the blade is completely
installed and that its edge is not
bunched up.
Lower the wiper arm down against
the windshield, the passenger’s
side first, then the driver’s side.
4.
5.6. 7.8.
Wiper Blades
302TOP
REINFORCEMENT
BLADETAB
INDENT
Main Menu