Page 59 of 369

This section gives inf ormation about
the controls and displays that
contribute to the daily operation of
your vehicle. All the essential
controls are within easy reach............................
Control Locations . 56
............................
Instrument Panel . 57
..........
Instrument Panel Indicators . 58
.............................................
Gauges . 65
.....................................
Odometer . 65
..............
Display Change Button . 66
................
Instant Fuel Economy . 66
...................
Temperature Gauge . 66
...................................
Trip Meter . 67
..............
Average Fuel Economy . 67
..................................
Fuel Gauge . 67
Outside Temperature
...................................
Indicator . 68
..........
Check Fuel Cap Message . 69
...............
Maintenance Minder . 69
.........
IMA Battery Level Gauge . 70
................
Charge/Assist Gauge . 71
Controls Near the Steering ...........................................
Wheel . 72
.
Windshield Wipers and Washers . 73
.........
Turn Signals and Headlights . 74
............
Daytime Running Lights . 75
........
Instrument Panel Brightness . 75
.................
Hazard Warning Button . 76
.................
Rear Window Def ogger . 76
..........
Steering Wheel Adjustment . 77 ...............................
Keys and Locks . 78
........................
Immobilizer System . 79
................................
Ignition Switch . 80
......................................
Door Locks . 81
......................
Power Door Locks . 81
..............
Childproof Door Locks . 82
.
Auto Door Locking/Unlocking . 82
.....................
Auto Door Locking . 82
.................
Auto Door Unlocking . 85
................................................
Trunk . 88
........
Emergency Trunk Opener . 88
.......................
Remote Transmitter . 89
.................................................
Seats . 91
....................................
Seat Heaters . 96
..............................
Power Windows . 97
.............................................
Mirrors . 98
.................................
Parking Brake . 99
.........
Interior Convenience Items . 100
.....................
Beverage Holders . 101
.........
Accessory Power Socket . 101
..................................
Glove Box . 101
.............
Console Compartment . 101
...............................
Interior Lights . 102
Instruments and Controls
Inst rument s and Cont rols
55
TM
Main Menu
Page 95 of 369

�µ
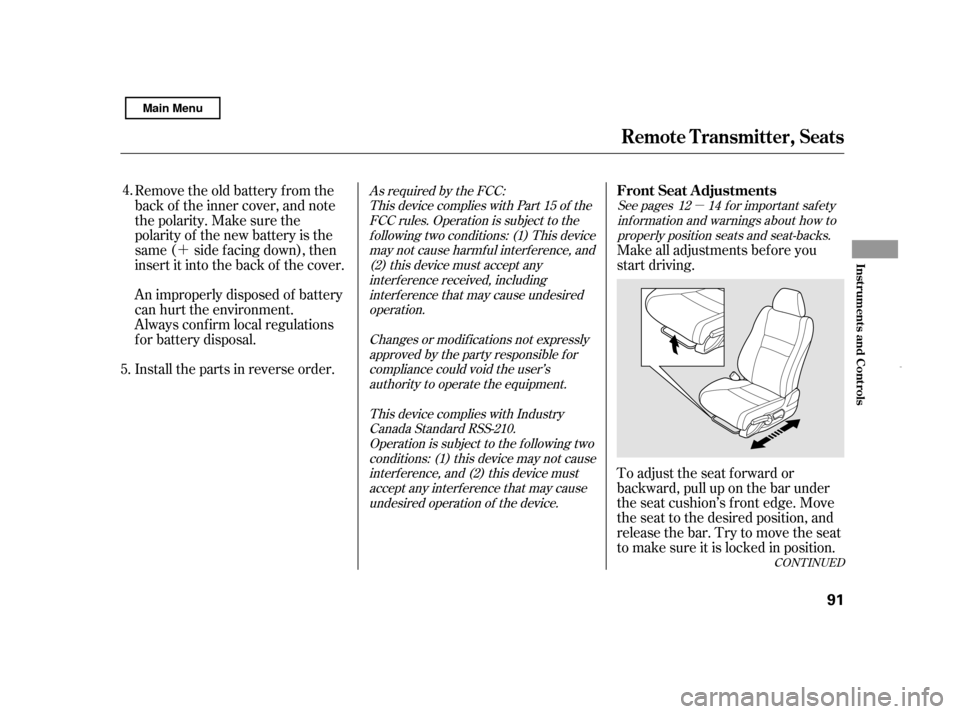
�´To adjust the seat f orward or
backward, pull up on the bar under
the seat cushion’s f ront edge. Move
the seat to the desired position, and
releasethebar.Trytomovetheseat
to make sure it is locked in position.
Remove the old battery from the
back of the inner cover, and note
the polarity. Make sure the
polarity of the new battery is the
same ( side f acing down), then
insert it into the back of the cover.
An improperly disposed of battery
can hurt the environment.
Always conf irm local regulations
for battery disposal.
Install the parts in reverse order.
Make all adjustments bef ore you
start driving.
4.
5.
See pages f or important saf ety inf ormation and warnings about how to properly position seats and seat-backs.
As required by the FCC:
This device complies with Part 15 of theFCC rules. Operation is subject to the f ollowing two conditions: (1) This devicemay not cause harmf ul interf erence, and (2) this device must accept anyinterf erence received, including interf erence that may cause undesiredoperation.
Changes or modif ications not expresslyapproved by the party responsible f or
compliance could void the user’s authority to operate the equipment.
This device complies with IndustryCanada Standard RSS-210. Operation is subject to the f ollowing twoconditions: (1) this device may not cause interf erence, and (2) this device mustaccept any interf erence that may cause undesired operation of the device. 12 14
CONT INUED
FrontSeatAdjustments
Remote Transmitter, Seats
Inst rument s and Cont rols
91
Main Menu
Page 96 of 369
To change the seat-back angle of the
f ront seat, pull up the lever on the
outside of the seat bottom.
Once a seat is adjusted correctly,
rock it back and f orth to make sure it
is locked in position.The height of your driver’s seat is
adjustable. To raise the seat,
repeatedly pull up the lever on the
outside of the seat cushion. To lower
the seat, push the lever down
repeatedly.Your vehicle is equipped with head
restraints in all seating positions to
help protect you and your
passengers f rom the likelihood of
whiplash and other injuries.
See page f or important saf ety
inf ormation and a warning about improperly positioning head restraints. 14
Driver’s Seat Height Adjustment Head Restraints
Seats
92
Main Menu
Page 262 of 369
Make sure all windows, mirrors,
and outside lights are clean and
unobstructed. Remove f rost, snow,
or ice.Check that any items you may be
carrying are stored properly or
f astened down securely.
Check the seat adjustment (see
page ).
Check the adjustment of the
inside and outside mirrors (see
page ).
Check the steering wheel
adjustment (see page ).
Make sure the doors are securely
closed and locked.Fasten your seat belt. Check that
your passengers have f astened
their seat belts (see page ).
Youshoulddothefollowingchecks
and adjustments bef ore you drive
your vehicle.
When you start the engine, check
the gauges and indicators in the
instrument panel (see page ).
Check that the hood and trunk are
f ully closed.
Visually check the tires. If a tire
looks low, use a gauge to check its
pressure (see page ).
1. 2. 3.
8.
7.
6. 9.
4. 5.
57
10.
91
98 77
303 15
Preparing to Drive
258
Main Menu