2011 FORD KUGA Head gasket
[x] Cancel search: Head gasketPage 55 of 2057

Pressurized Equipment
See HighPressure Air, Lubrication and Oil Test
Equipment.
Solder
Solders are mixtures of metals such that the
melting point of the mixture is below that of the
constituent metals (normally lead and tin). Solder
application does not normally give rise to toxic lead
fumes, provided a gas/air flame is used.
Oxy-acetylene flames should not be used, as they
are much hotter and will cause lead fumes to be
produced.
Some fumes may be produced by the application
of any flame to surfaces coated with grease, and
inhalation of these should be avoided.
Removal of excess solder should be undertaken
with care, to make sure that fine lead dust is not
produced, which can give toxic effects if inhaled.
Respiratory protection may be necessary.
Solder spillage and filings should be collected and
removed promptly to prevent general air
contamination by lead.
High standards of personal hygiene are necessary
in order to avoid ingestion of lead or inhalation of
solder dust from clothing.
Solvents
See also Chemical Materials, Fuels (Kerosene),
Fire.
For example acetone, white spirit, toluene, xylene,
trichloroethane.
Used in cleaning and dewaxing materials, paints,
plastics, resins and thinners.
Some may be highly flammable or flammable.
Skin contact will degrease the skin and may result
in irritation and dermatitis following repeated or
prolonged contact. Some can be absorbed through
the skin in toxic or harmful quantities.
Splashes in the eye may cause severe irritation
and could lead to loss of vision.
Brief exposure of high concentrations of vapors or
mists will cause eye and throat irritation,
drowsiness, dizziness, headaches and, in the worst
circumstances, unconsciousness.
Repeated or prolonged exposure to excessive but
lower concentrations of vapors or mists, for which there might not be adequate warning indications,
can cause more serious toxic or harmful effects.
Aspiration into the lungs, for example through
vomiting, is the most serious consequence of
swallowing.
Avoid splashes to the skin, eyes and clothing. Wear
protective gloves, goggles and clothing if
necessary.
Make sure there is good ventilation when in use,
avoid breathing fumes, vapors and spray mists and
keep containers tightly sealed. Do not use in
confined spaces.
When spraying materials containing solvents, for
example paints, adhesive, coatings, use extraction
ventilation or personal respiratory protection in the
absence of adequate general ventilation.
Do not apply heat or flame except under specific
and detailed manufacturers instructions.
Sound Insulation
See
Fibre Insulation, Foams.
Suspended Loads
CAUTION: Never improvise lifting tackle.
There is always a danger when loads are lifted or
suspended. Never work under an unsupported,
suspended or raised load, for example a
suspended engine.
Always make sure that lifting equipment such as
jacks, hoists, axle stands and slings are adequate
and suitable for the job, in good condition and
regularly maintained.
Transmission Brake Bands
See Asbestos.
Underseal
SeeCorrosion Protection.
Viton
In common with many other manufacturers
vehicles, some components have O-rings, seals
or gaskets, which contain a material known as
`Viton'.
G566527en2008.50 Kuga8/2011
100-00- 50
General Information
100-00- 50
DESCRIPTION AND OPERATION
TO MODEL INDEX
BACK TO CHAPTER INDEX
FORD KUGA 2011.0MY WORKSHOP REPAIR MANUAL
Page 1519 of 2057
Action
Possible Sources
Symptom
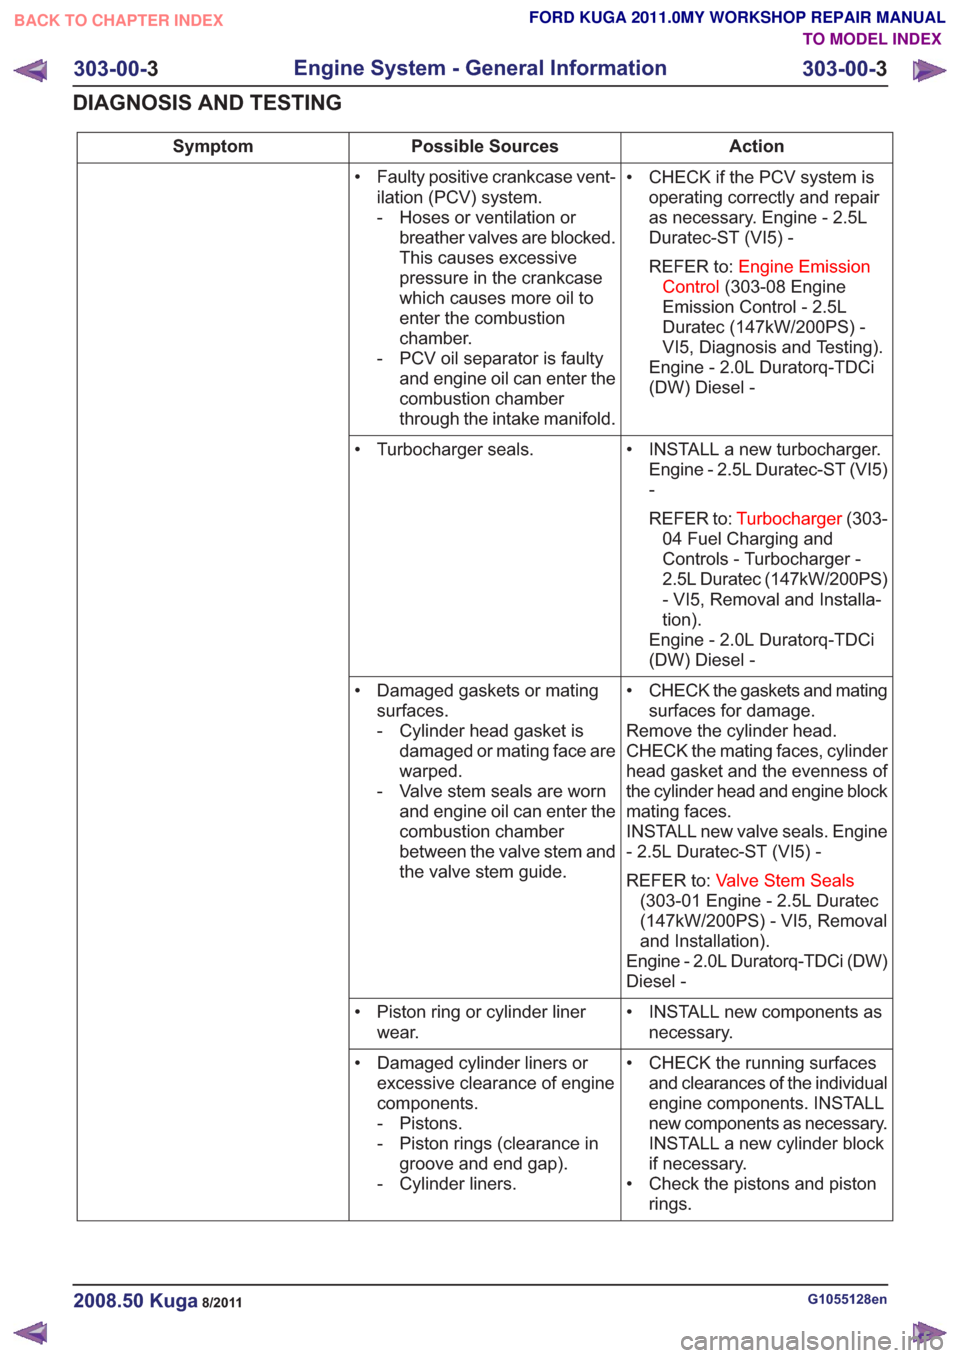
• CHECK if the PCV system isoperating correctly and repair
as necessary. Engine - 2.5L
Duratec-ST (VI5) -
REFER to: Engine Emission
Control (303-08 Engine
Emission Control - 2.5L
Duratec (147kW/200PS) -
VI5, Diagnosis and Testing).
Engine - 2.0L Duratorq-TDCi
(DW) Diesel -
• Faulty positive crankcase vent-
ilation (PCV) system.
- Hoses or ventilation orbreather valves are blocked.
This causes excessive
pressure in the crankcase
which causes more oil to
enter the combustion
chamber.
- PCV oil separator is faulty and engine oil can enter the
combustion chamber
through the intake manifold.
• INSTALL a new turbocharger.Engine - 2.5L Duratec-ST (VI5)
-
REFER to: Turbocharger (303-
04 Fuel Charging and
Controls - Turbocharger -
2.5L Duratec (147kW/200PS)
- VI5, Removal and Installa-
tion).
Engine - 2.0L Duratorq-TDCi
(DW) Diesel -
• Turbocharger seals.
• CHECK the gaskets and matingsurfaces for damage.
Remove the cylinder head.
CHECK the mating faces, cylinder
head gasket and the evenness of
the cylinder head and engine block
mating faces.
INSTALL new valve seals. Engine
- 2.5L Duratec-ST (VI5) -
REFER to: Valve Stem Seals
(303-01 Engine - 2.5L Duratec
(147kW/200PS) - VI5, Removal
and Installation).
Engine - 2.0L Duratorq-TDCi (DW)
Diesel -
• Damaged gaskets or mating
surfaces.
- Cylinder head gasket isdamaged or mating face are
warped.
- Valve stem seals are worn and engine oil can enter the
combustion chamber
between the valve stem and
the valve stem guide.
• INSTALL new components asnecessary.
• Piston ring or cylinder liner
wear.
• CHECK the running surfacesand clearances of the individual
engine components. INSTALL
new components as necessary.
INSTALL a new cylinder block
if necessary.
• Check the pistons and piston rings.
• Damaged cylinder liners or
excessive clearance of engine
components.
- Pistons.
- Piston rings (clearance ingroove and end gap).
- Cylinder liners.
G1055128en2008.50 Kuga8/2011
303-00- 3
Engine System - General Information
303-00- 3
DIAGNOSIS AND TESTING
TO MODEL INDEX
BACK TO CHAPTER INDEX
FORD KUGA 2011.0MY WORKSHOP REPAIR MANUAL
Page 1520 of 2057
Action
Possible Sources
Symptom
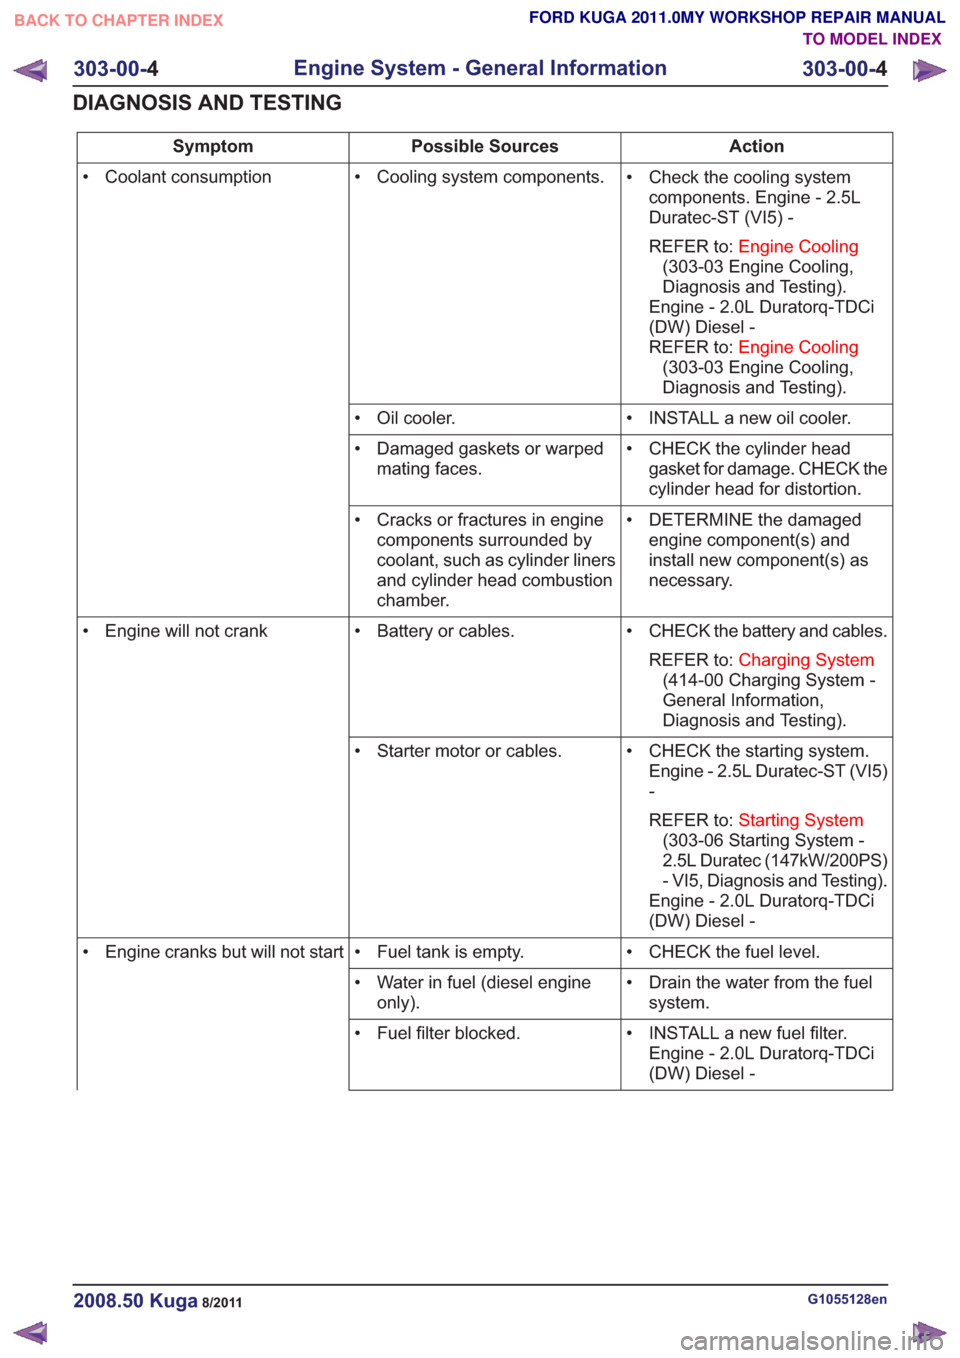
• Check the cooling systemcomponents. Engine - 2.5L
Duratec-ST (VI5) -
REFER to: Engine Cooling
(303-03 Engine Cooling,
Diagnosis and Testing).
Engine - 2.0L Duratorq-TDCi
(DW) Diesel -
REFER to: Engine Cooling
(303-03 Engine Cooling,
Diagnosis and Testing).
• Cooling system components.
• Coolant consumption
• INSTALL a new oil cooler.
• Oil cooler.
• CHECK the cylinder headgasket for damage. CHECK the
cylinder head for distortion.
• Damaged gaskets or warped
mating faces.
• DETERMINE the damagedengine component(s) and
install new component(s) as
necessary.
• Cracks or fractures in engine
components surrounded by
coolant, such as cylinder liners
and cylinder head combustion
chamber.
• CHECK the battery and cables.REFER to: Charging System
(414-00 Charging System -
General Information,
Diagnosis and Testing).
• Battery or cables.
• Engine will not crank
• CHECK the starting system.Engine - 2.5L Duratec-ST (VI5)
-
REFER to: Starting System
(303-06 Starting System -
2.5L Duratec (147kW/200PS)
- VI5, Diagnosis and Testing).
Engine - 2.0L Duratorq-TDCi
(DW) Diesel -
• Starter motor or cables.
• CHECK the fuel level.
• Fuel tank is empty.
• Engine cranks but will not start
• Drain the water from the fuelsystem.
• Water in fuel (diesel engine
only).
• INSTALL a new fuel filter.Engine - 2.0L Duratorq-TDCi
(DW) Diesel -
• Fuel filter blocked.
G1055128en2008.50 Kuga8/2011
303-00-
4
Engine System - General Information
303-00- 4
DIAGNOSIS AND TESTING
TO MODEL INDEX
BACK TO CHAPTER INDEX
FORD KUGA 2011.0MY WORKSHOP REPAIR MANUAL
Page 1544 of 2057
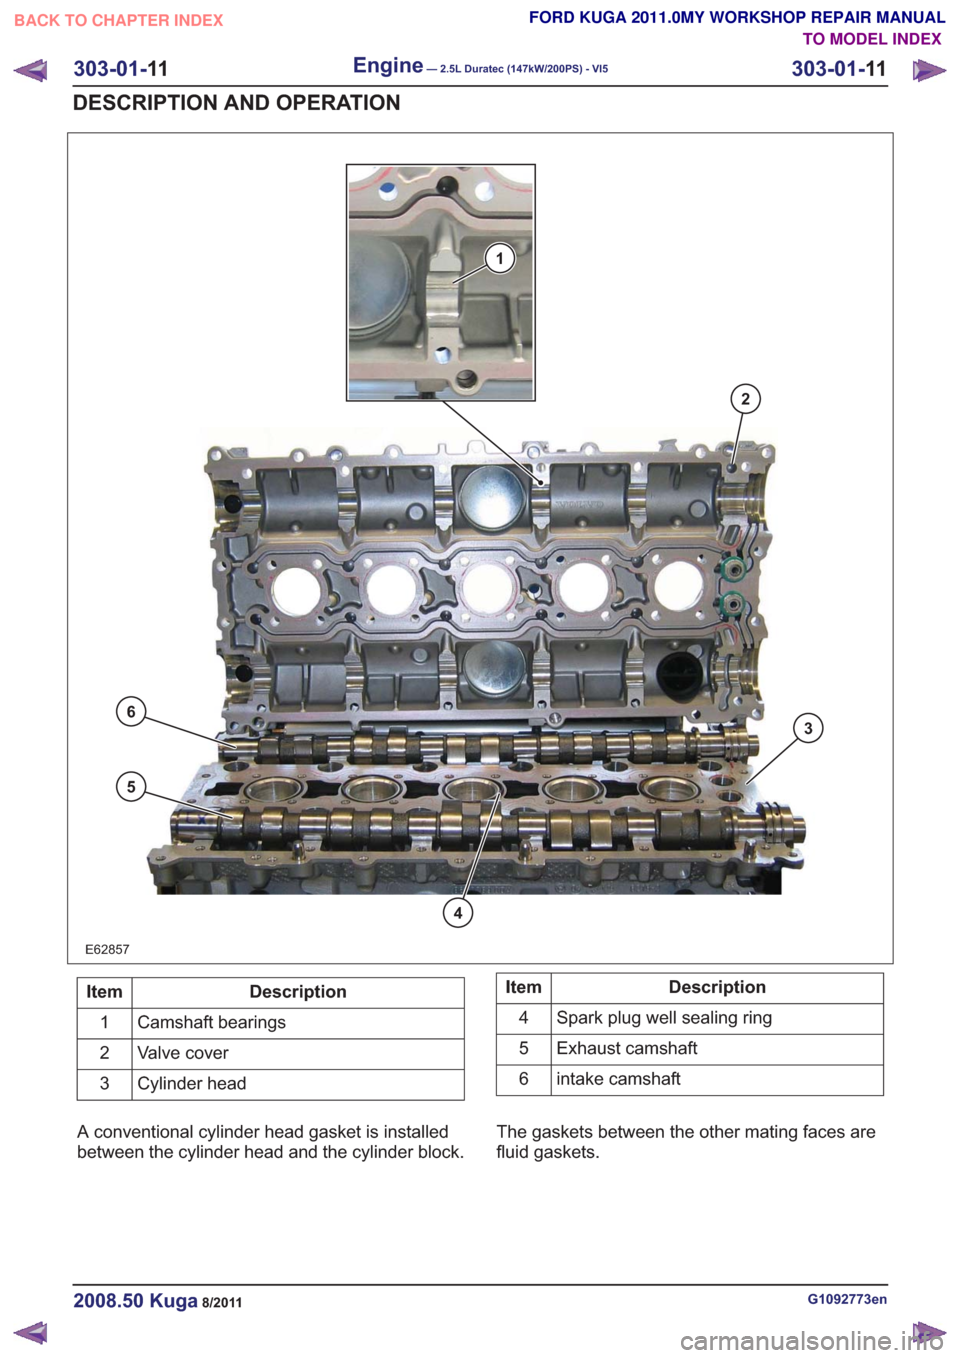
E62857
1
2
3
6
5
4
Description
Item
Camshaft bearings
1
Valve cover
2
Cylinder head
3Description
Item
Spark plug well sealing ring
4
Exhaust camshaft
5
intake camshaft
6
A conventional cylinder head gasket is installed
between the cylinder head and the cylinder block. The gaskets between the other mating faces are
fluid gaskets.
G1092773en2008.50 Kuga8/2011
303-01-
11
Engine— 2.5L Duratec (147kW/200PS) - VI5303-01-
11
DESCRIPTION AND OPERATION
TO MODEL INDEX
BACK TO CHAPTER INDEX
FORD KUGA 2011.0MY WORKSHOP REPAIR MANUAL
Page 1705 of 2057
Action
Possible Sources
Symptom
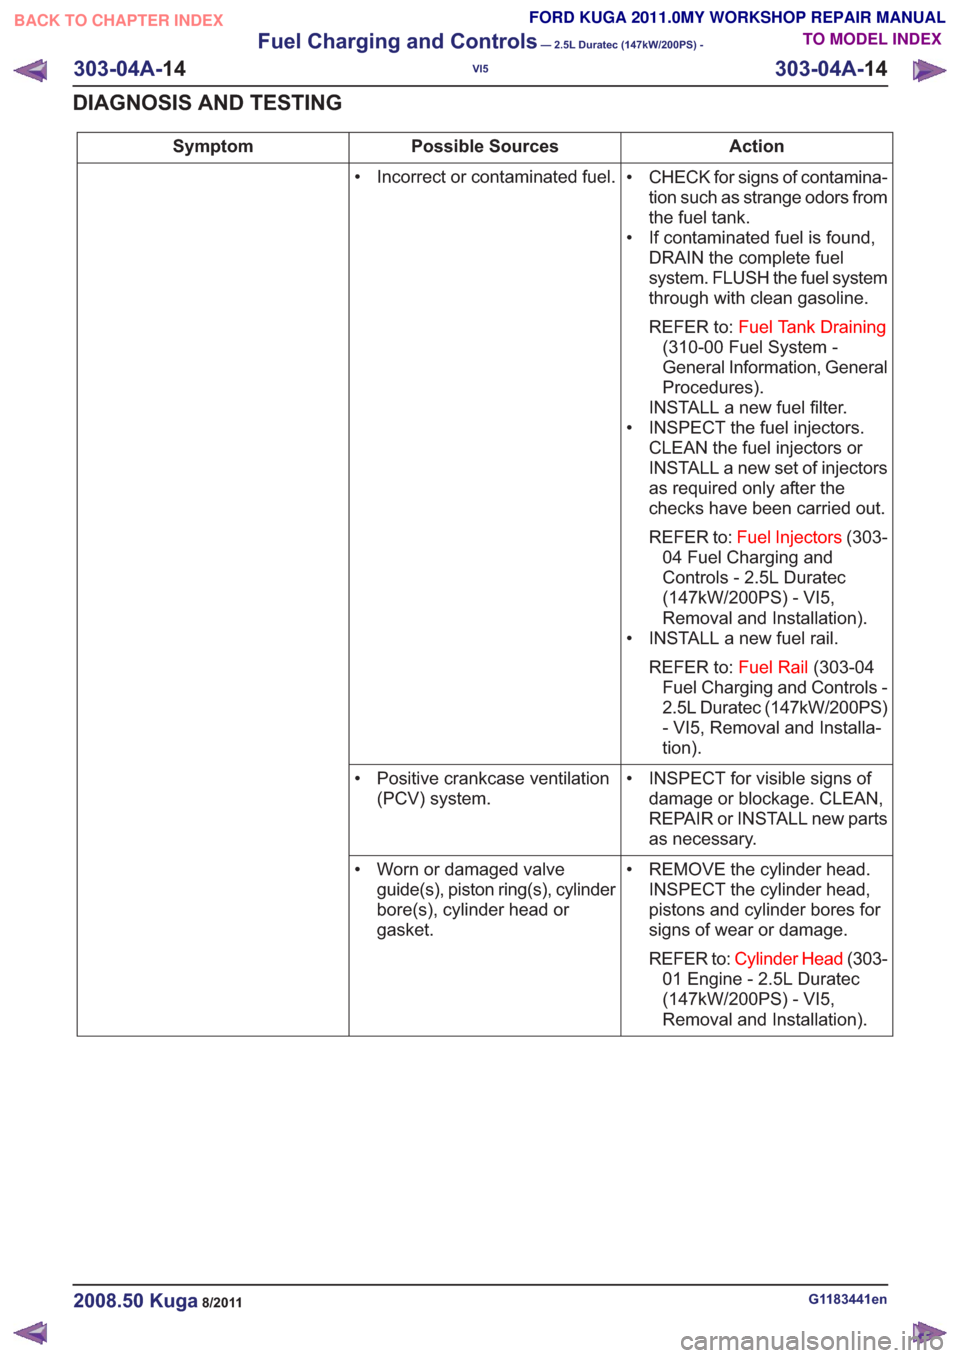
• CHECK for signs of contamina-tion such as strange odors from
the fuel tank.
• If contaminated fuel is found, DRAIN the complete fuel
system. FLUSH the fuel system
through with clean gasoline.
REFER to: Fuel Tank Draining
(310-00 Fuel System -
General Information, General
Procedures).
INSTALL a new fuel filter.
• INSPECT the fuel injectors. CLEAN the fuel injectors or
INSTALL a new set of injectors
as required only after the
checks have been carried out.
REFER to: Fuel Injectors (303-
04 Fuel Charging and
Controls - 2.5L Duratec
(147kW/200PS) - VI5,
Removal and Installation).
• INSTALL a new fuel rail.
REFER to: Fuel Rail(303-04
Fuel Charging and Controls -
2.5L Duratec (147kW/200PS)
- VI5, Removal and Installa-
tion).
• Incorrect or contaminated fuel.
• INSPECT for visible signs ofdamage or blockage. CLEAN,
REPAIR or INSTALL new parts
as necessary.
• Positive crankcase ventilation
(PCV) system.
• REMOVE the cylinder head.INSPECT the cylinder head,
pistons and cylinder bores for
signs of wear or damage.
REFER to: Cylinder Head (303-
01 Engine - 2.5L Duratec
(147kW/200PS) - VI5,
Removal and Installation).
• Worn or damaged valve
guide(s), piston ring(s), cylinder
bore(s), cylinder head or
gasket.
G1183441en2008.50 Kuga8/2011
303-04A- 14
Fuel Charging and Controls
— 2.5L Duratec (147kW/200PS) -
VI5
303-04A- 14
DIAGNOSIS AND TESTING
TO MODEL INDEX
BACK TO CHAPTER INDEX
FORD KUGA 2011.0MY WORKSHOP REPAIR MANUAL
Page 1706 of 2057
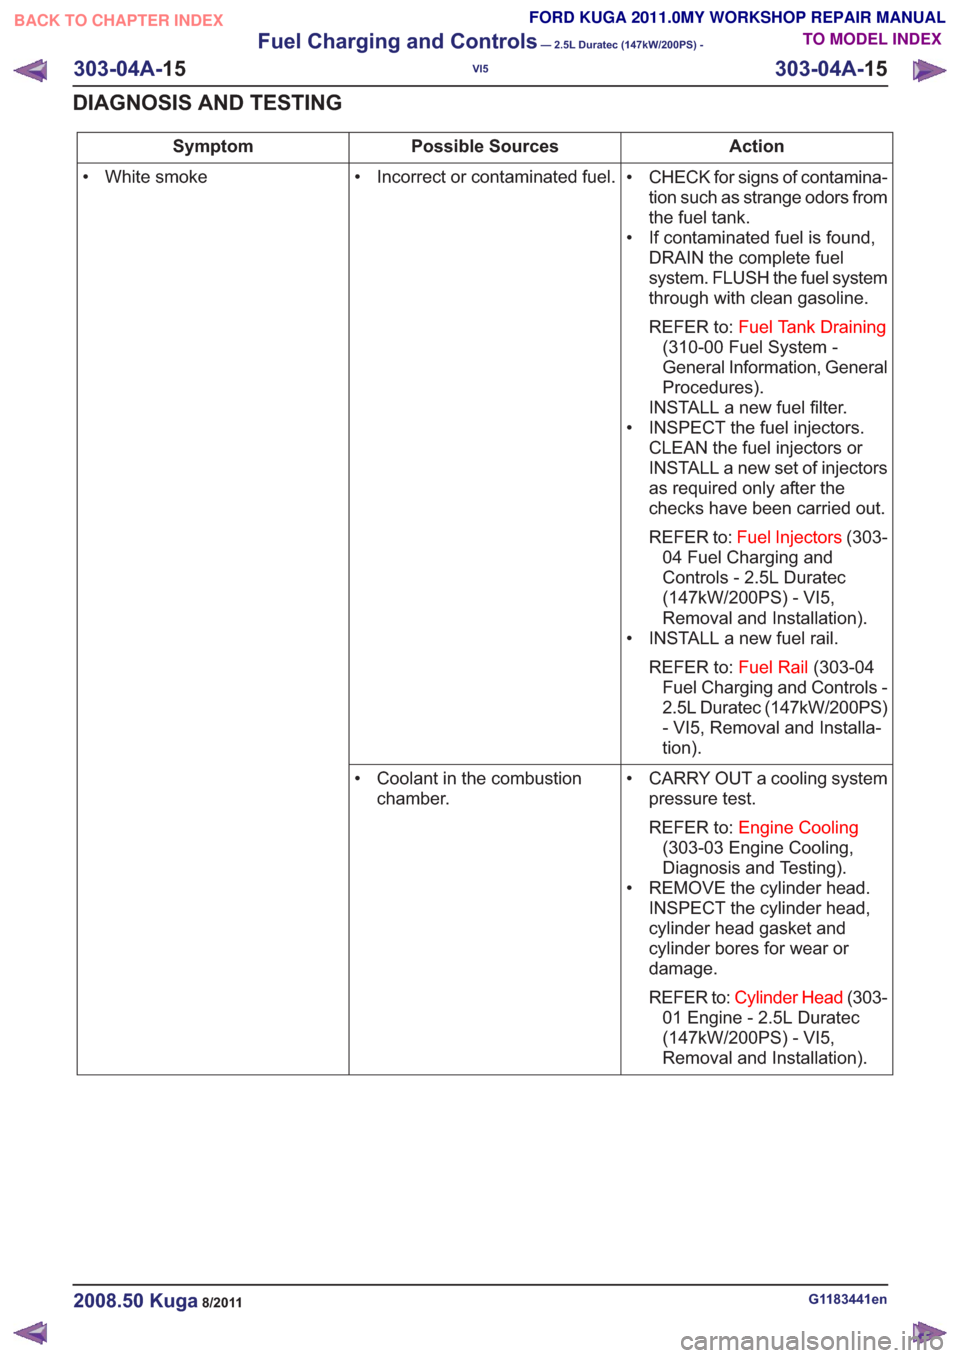
Action
Possible Sources
Symptom
• CHECK for signs of contamina-tion such as strange odors from
the fuel tank.
• If contaminated fuel is found, DRAIN the complete fuel
system. FLUSH the fuel system
through with clean gasoline.
REFER to: Fuel Tank Draining
(310-00 Fuel System -
General Information, General
Procedures).
INSTALL a new fuel filter.
• INSPECT the fuel injectors. CLEAN the fuel injectors or
INSTALL a new set of injectors
as required only after the
checks have been carried out.
REFER to: Fuel Injectors (303-
04 Fuel Charging and
Controls - 2.5L Duratec
(147kW/200PS) - VI5,
Removal and Installation).
• INSTALL a new fuel rail.
REFER to: Fuel Rail(303-04
Fuel Charging and Controls -
2.5L Duratec (147kW/200PS)
- VI5, Removal and Installa-
tion).
• Incorrect or contaminated fuel.
• White smoke
• CARRY OUT a cooling systempressure test.
REFER to: Engine Cooling
(303-03 Engine Cooling,
Diagnosis and Testing).
• REMOVE the cylinder head. INSPECT the cylinder head,
cylinder head gasket and
cylinder bores for wear or
damage.
REFER to: Cylinder Head (303-
01 Engine - 2.5L Duratec
(147kW/200PS) - VI5,
Removal and Installation).
• Coolant in the combustion
chamber.
G1183441en2008.50 Kuga8/2011
303-04A- 15
Fuel Charging and Controls
— 2.5L Duratec (147kW/200PS) -
VI5
303-04A- 15
DIAGNOSIS AND TESTING
TO MODEL INDEX
BACK TO CHAPTER INDEX
FORD KUGA 2011.0MY WORKSHOP REPAIR MANUAL
Page 1708 of 2057
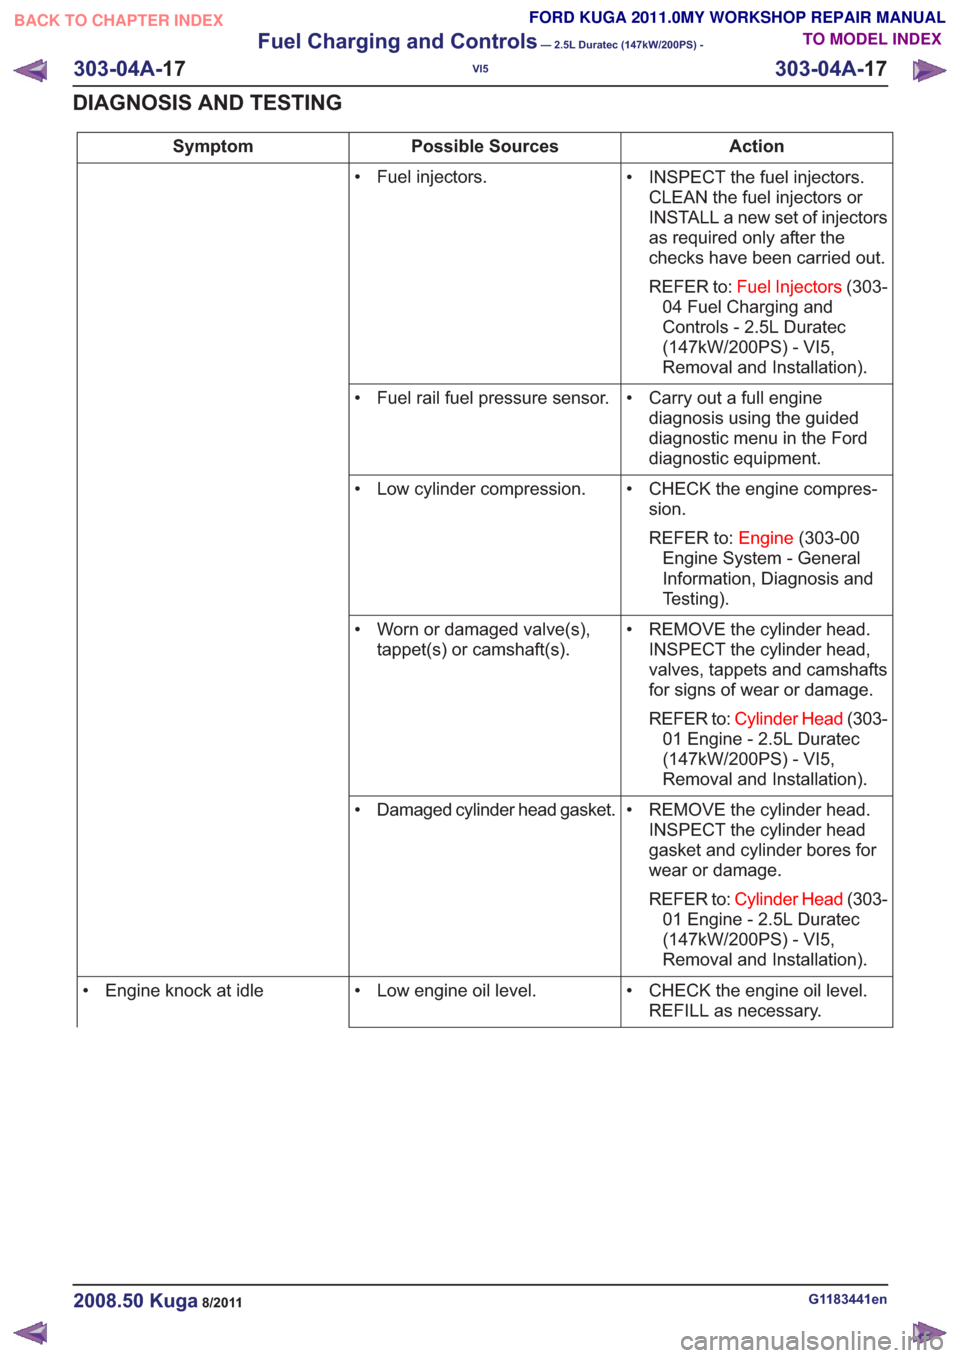
Action
Possible Sources
Symptom
• INSPECT the fuel injectors.CLEAN the fuel injectors or
INSTALL a new set of injectors
as required only after the
checks have been carried out.
REFER to: Fuel Injectors (303-
04 Fuel Charging and
Controls - 2.5L Duratec
(147kW/200PS) - VI5,
Removal and Installation).
• Fuel injectors.
• Carry out a full enginediagnosis using the guided
diagnostic menu in the Ford
diagnostic equipment.
• Fuel rail fuel pressure sensor.
• CHECK the engine compres-sion.
REFER to: Engine(303-00
Engine System - General
Information, Diagnosis and
Testing).
• Low cylinder compression.
• REMOVE the cylinder head.INSPECT the cylinder head,
valves, tappets and camshafts
for signs of wear or damage.
REFER to: Cylinder Head (303-
01 Engine - 2.5L Duratec
(147kW/200PS) - VI5,
Removal and Installation).
• Worn or damaged valve(s),
tappet(s) or camshaft(s).
• REMOVE the cylinder head.INSPECT the cylinder head
gasket and cylinder bores for
wear or damage.
REFER to: Cylinder Head (303-
01 Engine - 2.5L Duratec
(147kW/200PS) - VI5,
Removal and Installation).
• Damaged cylinder head gasket.
• CHECK the engine oil level.REFILL as necessary.
• Low engine oil level.
• Engine knock at idle
G1183441en2008.50 Kuga8/2011
303-04A- 17
Fuel Charging and Controls
— 2.5L Duratec (147kW/200PS) -
VI5
303-04A- 17
DIAGNOSIS AND TESTING
TO MODEL INDEX
BACK TO CHAPTER INDEX
FORD KUGA 2011.0MY WORKSHOP REPAIR MANUAL
Page 1714 of 2057
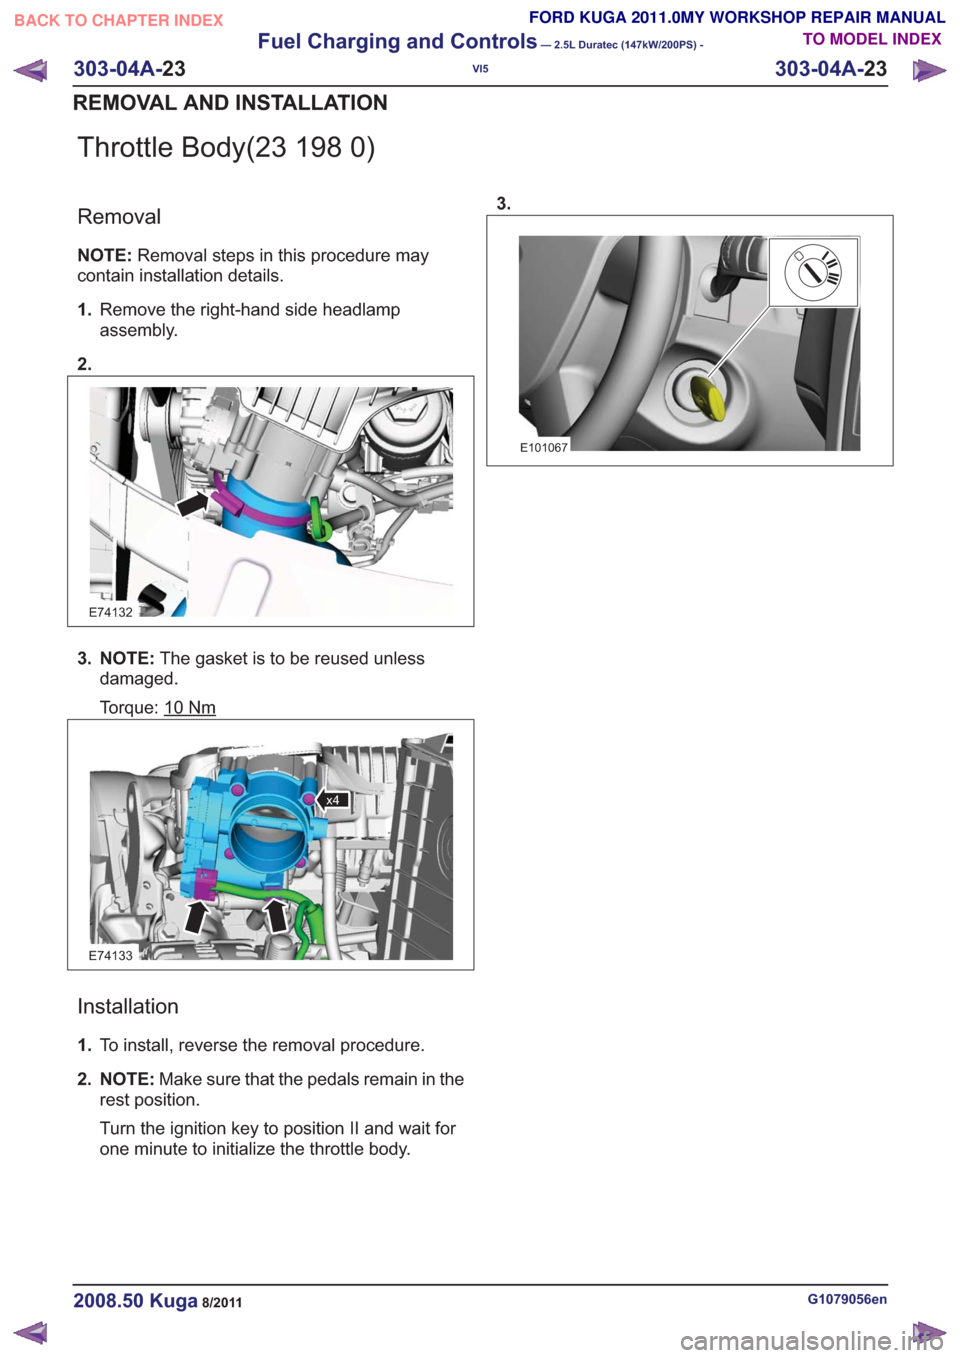
Throttle Body(23 198 0)
Removal
NOTE:Removal steps in this procedure may
contain installation details.
1. Remove the right-hand side headlamp
assembly.
2.
E74132
3. NOTE: The gasket is to be reused unless
damaged.
Torque: 10
Nm
E74133
x4
Installation
1. To install, reverse the removal procedure.
2. NOTE: Make sure that the pedals remain in the
rest position.
Turn the ignition key to position II and wait for
one minute to initialize the throttle body. 3.
E101067
G1079056en2008.50 Kuga8/2011
303-04A-
23
Fuel Charging and Controls
— 2.5L Duratec (147kW/200PS) -
VI5
303-04A- 23
REMOVAL AND INSTALLATION
TO MODEL INDEX
BACK TO CHAPTER INDEX
FORD KUGA 2011.0MY WORKSHOP REPAIR MANUAL