Page 1389 of 2057

DETAILS/RESULTS/ACTIONS
TEST CONDITIONS
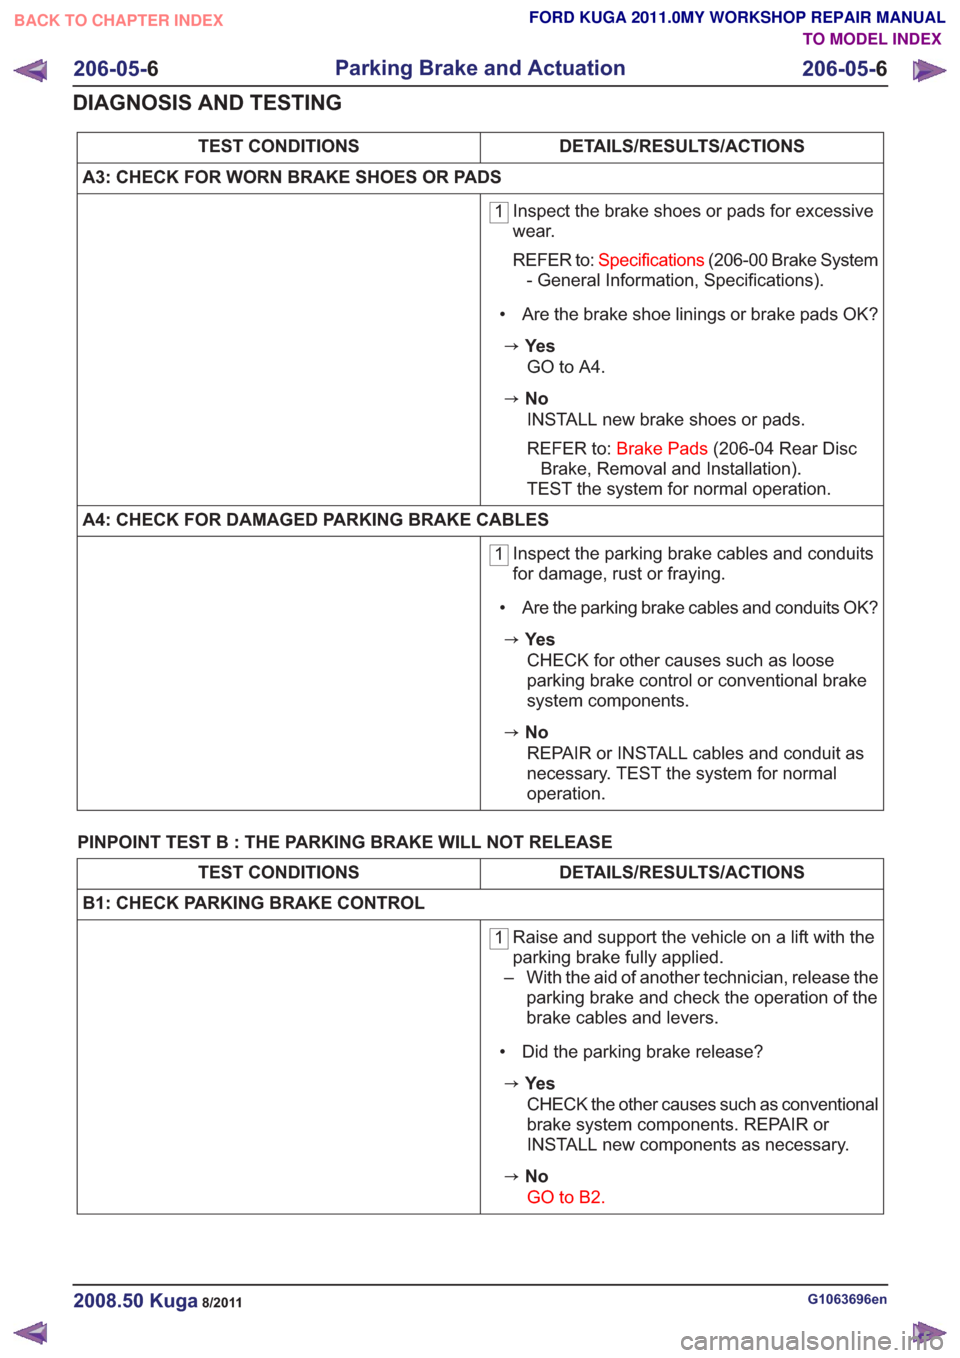
A3: CHECK FOR WORN BRAKE SHOES OR PADS
1 Inspect the brake shoes or pads for excessive
wear.
REFER to:
Specifications (206-00 Brake System
- General Information, Specifications).
• Are the brake shoe linings or brake pads OK?
zYe s GO to A4.
zNoINSTALL new brake shoes or pads.
REFER to: Brake Pads (206-04 Rear Disc
Brake, Removal and Installation).
TEST the system for normal operation.
A4: CHECK FOR DAMAGED PARKING BRAKE CABLES
1 Inspect the parking brake cables and conduits
for damage, rust or fraying.
• Are the parking brake cables and conduits OK?
zYe s CHECK for other causes such as loose
parking brake control or conventional brake
system components.
zNoREPAIR or INSTALL cables and conduit as
necessary. TEST the system for normal
operation.
PINPOINT TEST B : THE PARKING BRAKE WILL NOT RELEASE
DETAILS/RESULTS/ACTIONS
TEST CONDITIONS
B1: CHECK PARKING BRAKE CONTROL
1 Raise and support the vehicle on a lift with the
parking brake fully applied.
– With the aid of another technician, release the parking brake and check the operation of the
brake cables and levers.
• Did the parking brake release?
zYe s CHECK the other causes such as conventional
brake system components. REPAIR or
INSTALL new components as necessary.
zNoGO to B2.
G1063696en2008.50 Kuga8/2011
206-05- 6
Parking Brake and Actuation
206-05- 6
DIAGNOSIS AND TESTING
TO MODEL INDEX
BACK TO CHAPTER INDEX
FORD KUGA 2011.0MY WORKSHOP REPAIR MANUAL
Page 1390 of 2057
DETAILS/RESULTS/ACTIONS
TEST CONDITIONS
B2: CHECK PARKING BRAKE CABLES
1 Loosen the parking brake cable tension.
– Rotate the rear wheels by hand.
• Did the rear wheels turn freely?
zYe s INSTALL a new parking brake control.
REFER to: Parking Brake Control (206-05
Parking Brake and Actuation, Removal and
Installation).
TEST the system for normal operation.
zNo
GO to B3.
B3: CHECK FRONT PARKING BRAKE CABLE
1 Disconnect the parking brake front cable and
conduit from the rear brake cable and conduit
at the equalizer.
– Rotate the rear wheels by hand.
• Did the rear wheels turn freely?
zYe s INSTALL a new front parking brake cable and
conduit.
REFER to: Parking Brake Rear Cables (206-
05 Parking Brake and Actuation, Removal
and Installation).
TEST the system for normal operation.
zNo
GO to B4.
G1063696en2008.50 Kuga8/2011
206-05- 7
Parking Brake and Actuation
206-05- 7
DIAGNOSIS AND TESTING
TO MODEL INDEX
BACK TO CHAPTER INDEX
FORD KUGA 2011.0MY WORKSHOP REPAIR MANUAL
Page 1391 of 2057
DETAILS/RESULTS/ACTIONS
TEST CONDITIONS
B4: CHECK REAR PARKING BRAKE CABLES
1 Disconnect the parking brake at the rear brakes,
one at a time.
– Rotate the wheel affected by the disconnected parking brake.
• Did the wheel turn freely?
zYe s INSTALL a new parking brake control lever
on the rear drum brakes or caliper assembly
on rear disc brakes.
REFER to: Parking Brake Control (206-05
Parking Brake and Actuation, Removal and
Installation)
/ Brake Caliper (206-04 Rear Disc Brake,
Removal and Installation).
TEST the system for normal operation.
zNo
REFER to: Brake System (206-00 Brake
System - General Information, Diagnosis
and Testing).
G1063696en2008.50 Kuga8/2011
206-05- 8
Parking Brake and Actuation
206-05- 8
DIAGNOSIS AND TESTING
TO MODEL INDEX
BACK TO CHAPTER INDEX
FORD KUGA 2011.0MY WORKSHOP REPAIR MANUAL
Page 1398 of 2057
SECTION 206-06 Hydraulic Brake Actuation
VEHICLE APPLICATION:2008.50 Kuga
PA G E
CONTENTS
REMOVAL AND INSTALLATION
206-06-2
Brake Pedal and Bracket — RHD 4WD/RHD FWD ...........................................................
206-06-5
(12 343 0)
Brake Master Cylinder — 2.5L Duratec (147kW/200PS) - VI5 .......................
206-06-1
Hydraulic Brake Actuation
206-06- 1
.
BACK TO CHAPTER INDEXFORD KUGA 2011.0MY WORKSHOP REPAIR MANUAL
TO MODEL INDEX
Page 1401 of 2057
5. CAUTION: Make sure that the brakepedal remains in the rest position.
Torque: 24Nm
E101510
x4
Installation
1. CAUTIONS:
Make sure that the brake booster push
rod is correctly located.
Make sure that the brake pedal remains
in the rest position.
To install, reverse the removal procedure.
G1065459en2008.50 Kuga8/2011
206-06- 4
Hydraulic Brake Actuation
206-06- 4
REMOVAL AND INSTALLATION
TO MODEL INDEX
BACK TO CHAPTER INDEX
FORD KUGA 2011.0MY WORKSHOP REPAIR MANUAL
Page 1402 of 2057
Brake Master Cylinder — 2.5L Duratec (147kW/200PS) -VI5(12 343 0)
Removal
NOTE: Removal steps in this procedure may
contain installation details.
1. Refer to: Brake System Health and Safety
Precautions (100-00 General Information,
Description and Operation).
2. Connect one end of a suitable piece of clear
plastic pipe to the brake caliper bleed nipple
1.
and place the other end into a suitable
container.
2. Loosen the bleed nipple.
3. Depress the brake pedal until no more brake fluid comes through the bleed nipple.
4. Tighten the bleed nipple.
5. Repeat the draining procedure on the opposite side brake caliper.
E86914
Left-hand drive vehicles
3. CAUTION: Make sure that all openings are sealed.
1. Torque: 18Nm
2.NOTE: Make sure that new components are
installed.
Torque: 25
Nm
G1174985en2008.50 Kuga8/2011
206-06- 5
Hydraulic Brake Actuation
206-06- 5
REMOVAL AND INSTALLATION
TO MODEL INDEX
BACK TO CHAPTER INDEX
FORD KUGA 2011.0MY WORKSHOP REPAIR MANUAL
Page 1405 of 2057
SECTION 206-07 Power Brake Actuation
VEHICLE APPLICATION:2008.50 Kuga
PA G E
CONTENTS
REMOVAL AND INSTALLATION
206-07-2
(12 451 0)
Brake Booster — 2.5L Duratec (147kW/200PS) - VI5, RHD 4WD/RHD FWD .
206-07-7
Brake Vacuum Hose — 2.5L Duratec (147kW/200PS) - VI5 ..............................................
206-07-9
(12 414 0)
Brake Vacuum Pump — 2.5L Duratec (147kW/200PS) - VI5 ........................
206-07-1
Power Brake Actuation
206-07- 1
.
TO MODEL INDEX
BACK TO CHAPTER INDEX
FORD KUGA 2011.0MY WORKSHOP REPAIR MANUAL
Page 1410 of 2057
13.Torque: 8Nm
E99864
1
14.
E99863
Installation
CAUTION: Make sure that the brake
booster pushrod is correctly located.
1. To install, reverse the removal procedure.
G1185955en2008.50 Kuga8/2011
206-07- 6
Power Brake Actuation
206-07- 6
REMOVAL AND INSTALLATION
TO MODEL INDEX
BACK TO CHAPTER INDEX
FORD KUGA 2011.0MY WORKSHOP REPAIR MANUAL