Page 1505 of 2057
Steering Wheel(13 524 0)
General EquipmentAdhesive Tape
Removal
1. Refer to: Driver Air Bag Module (501-20
Supplemental Restraint System, Removal and
Installation).
2. CAUTION: Make sure that the steering wheel lock is engaged.
NOTE: Make sure that the road wheels are in
the straight ahead position.
E99259
3. Torque: 48Nm
E99634
4. CAUTION: Make sure that the
clockspring rotor does not rotate.
General Equipment: Adhesive Tape
E102968
Installation
1.To install, reverse the removal procedure.
G1058717en2008.50 Kuga8/2011
211-04- 4
Steering Column
211-04- 4
REMOVAL AND INSTALLATION
TO MODEL INDEX
BACK TO CHAPTER INDEX
FORD KUGA 2011.0MY WORKSHOP REPAIR MANUAL
Page 1508 of 2057

Steering Column Shaft
Removal
WARNINGS:
The supplemental restraint system (SRS)
is active for a certain length of time after
the power supply has been disconnected.
Wait for a minimum of 3 minutes before
disconnecting or removing any SRS
components.
Make sure that the vehicle electrical
system is fully depowered and no other
power source is connected.
NOTE: Removal steps in this procedure may
contain installation details.
1. Refer to: Clockspring (501-20 Supplemental
Restraint System, Removal and Installation).
Refer to: Steering Column Multifunction Switch
LH (211-05 Steering Column Switches,
Removal and Installation).
Refer to: Steering Column Multifunction Switch
RH (211-05 Steering Column Switches,
Removal and Installation).
Refer to: Steering Column Lock Module (211-05
Steering Column Switches, Removal and
Installation).
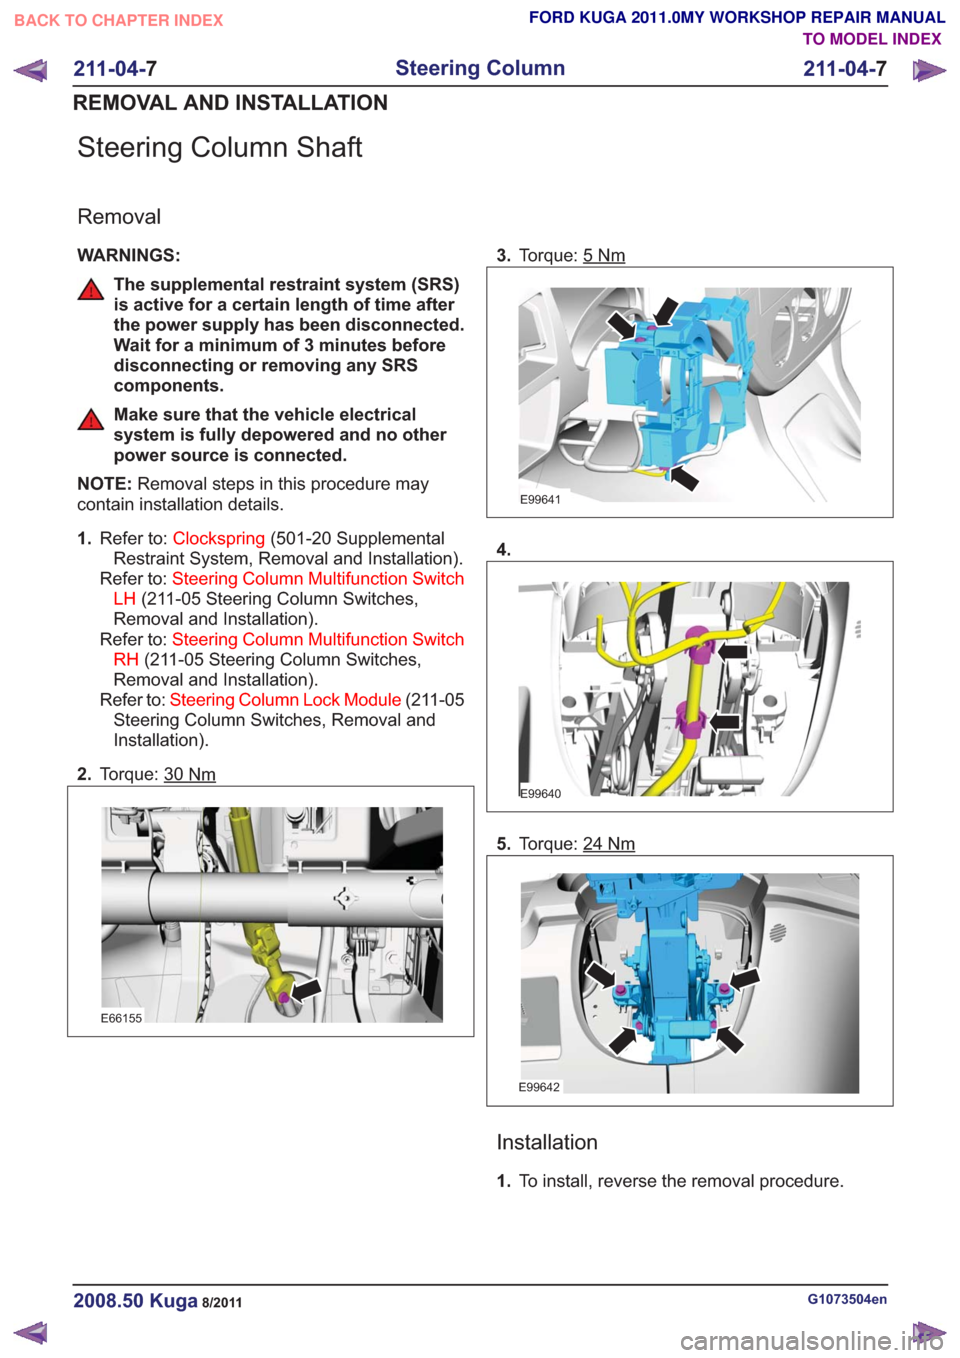
2. Torque: 30
Nm
E66155
3.Torque: 5Nm
E99641
4.
E99640
5.Torque: 24Nm
E99642
Installation
1.To install, reverse the removal procedure.
G1073504en2008.50 Kuga8/2011
211-04- 7
Steering Column
211-04- 7
REMOVAL AND INSTALLATION
TO MODEL INDEX
BACK TO CHAPTER INDEX
FORD KUGA 2011.0MY WORKSHOP REPAIR MANUAL
Page 1509 of 2057

SECTION 211-05 Steering Column Switches
VEHICLE APPLICATION:2008.50 Kuga
PA G E
CONTENTS
DESCRIPTION AND OPERATION
211-05-2
Steering Column Switches (Component Location) .............................................................
211-05-3
Steering Column Switches (Overview) ........................................................................\
.......
211-05-3
Switch unit, steering column ........................................................................\
.......................
211-05-3
Clockspring ........................................................................\
.................................................
REMOVAL AND INSTALLATION 211-05-4
Steering Column Lock Module ........................................................................\
...................
211-05-6
Steering Column Multifunction Switch LH ........................................................................\
..
211-05-7
Steering Column Multifunction Switch RH ........................................................................\
..
211-05-1
Steering Column Switches
211-05- 1
.
TO MODEL INDEX
BACK TO CHAPTER INDEX
FORD KUGA 2011.0MY WORKSHOP REPAIR MANUAL
Page 1511 of 2057

Steering Column Switches – Overview
Switch unit, steering column
E98629
1
2
3
4
5
Description
Item
Left-hand switch, steering column
1
Switch unit carrier, steering column
2
Right-hand switch, steering column
3Description
Item
Steering wheel rotation sensor
Refer to: Anti-Lock Control - Stability
Assist (206-09 Anti-Lock Control -
Stability Assist, Description and
Operation).
4
Clockspring
5
Clockspring
The clockspring is designed to carry signals
between the RCM and the driver air bag module.
The clockspring is installed on the steering column,
and consists of fixed and moving parts connected
by a coiled Mylar tape with internal conducting
tracks. The Mylar tape is able to 'wind up' and
'unwind' as the steering wheel is rotated,
maintaining electrical contact at all times between
the RCM and the driver air bag module. During removal and installation or renewal of the
clockspring, pay attention to the following:
• Before installation of the clockspring, it must be
aligned according to the installation instructions.
• Make sure that the vehicle electrical system is fully depowered and no other power source is
connected.
• Secure the clockspring rotor with adhesive tape to the clockspring outer.
• The clockspring rotor must not be turned during removal or installation of the steering wheel or
the steering column switch unit.
G1030755en2008.50 Kuga8/2011
211-05- 3
Steering Column Switches
211-05- 3
DESCRIPTION AND OPERATION
TO MODEL INDEX
BACK TO CHAPTER INDEX
FORD KUGA 2011.0MY WORKSHOP REPAIR MANUAL
Page 1608 of 2057
E112535
1
2
62.General Equipment: Cable Ties
E112536
63. WARNING: Make sure that the engine
and transmission assembly is on
wooden blocks and secured with
suitable retaining straps.
General Equipment: Retaining Strap
General Equipment: Mounting Table Set
General Equipment: Wooden Block
G1191240en2008.50 Kuga8/2011
303-01- 75
Engine— 2.5L Duratec (147kW/200PS) - VI5303-01-
75
REMOVAL
TO MODEL INDEX
BACK TO CHAPTER INDEX
FORD KUGA 2011.0MY WORKSHOP REPAIR MANUAL
Page 1653 of 2057
4.Torque: 48Nm
E65770
5. NOTE: Install all the bolts finger tight before
final tightening.
Torque: 60
Nm
6
5
3
4
2
1
x6
6
5
3
4
2
1
x6
E124910
6. WARNING: Make sure that the engine and transmission assembly is on
wooden blocks and secured with
suitable retaining straps.
General Equipment: Retaining Strap
General Equipment: Mounting Table Set
General Equipment: Wooden Block
G1191241en2008.50 Kuga8/2011
303-01- 120
Engine— 2.5L Duratec (147kW/200PS) - VI5303-01-
120
INSTALLATION
TO MODEL INDEX
BACK TO CHAPTER INDEX
FORD KUGA 2011.0MY WORKSHOP REPAIR MANUAL
Page 1832 of 2057

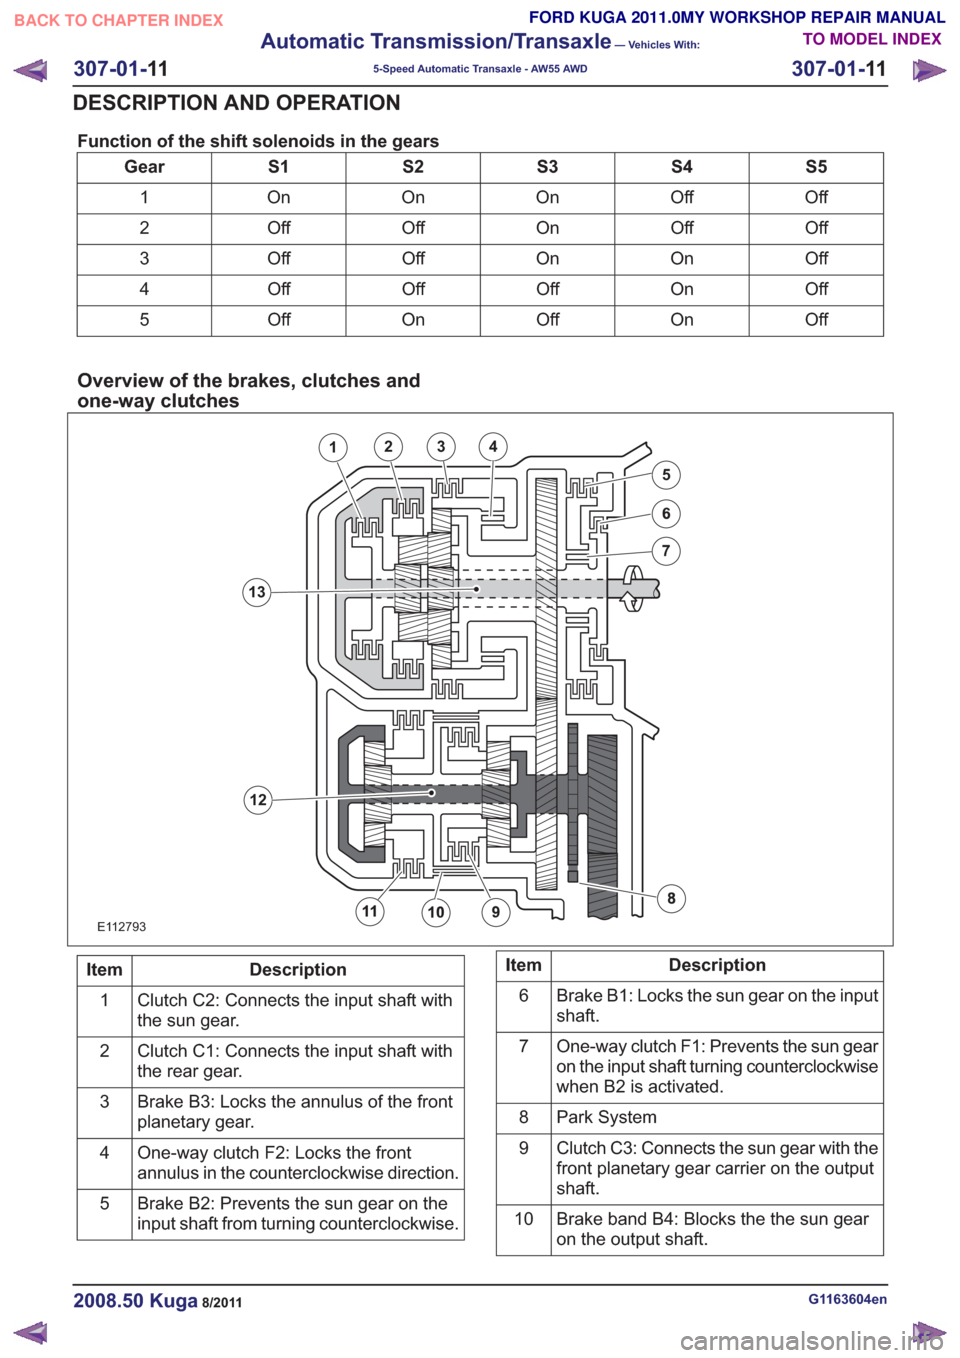
Function of the shift solenoids in the gears
S5
S4
S3
S2
S1
Gear
Off
Off
On
On
On
1
Off
Off
On
Off
Off
2
Off
On
On
Off
Off
3
Off
On
Off
Off
Off
4
Off
On
Off
On
Off
5
Overview of the brakes, clutches and
one-way clutches
E112793
1234
5
12
13
Description
Item
Clutch C2: Connects the input shaft with
the sun gear.
1
Clutch C1: Connects the input shaft with
the rear gear.
2
Brake B3: Locks the annulus of the front
planetary gear.
3
One-way clutch F2: Locks the front
annulus in the counterclockwise direction.
4
Brake B2: Prevents the sun gear on the
input shaft from turning counterclockwise.
5Description
Item
Brake B1: Locks the sun gear on the input
shaft.
6
One-way clutch F1: Prevents the sun gear
on the input shaft turning counterclockwise
when B2 is activated.
7
Park System
8
Clutch C3: Connects the sun gear with the
front planetary gear carrier on the output
shaft.
9
Brake band B4: Blocks the the sun gear
on the output shaft.
10
G1163604en2008.50 Kuga8/2011
307-01-
11
Automatic Transmission/Transaxle
— Vehicles With:
5-Speed Automatic Transaxle - AW55 AWD
307-01- 11
DESCRIPTION AND OPERATION
TO MODEL INDEX
BACK TO CHAPTER INDEX
FORD KUGA 2011.0MY WORKSHOP REPAIR MANUAL
Page 1833 of 2057

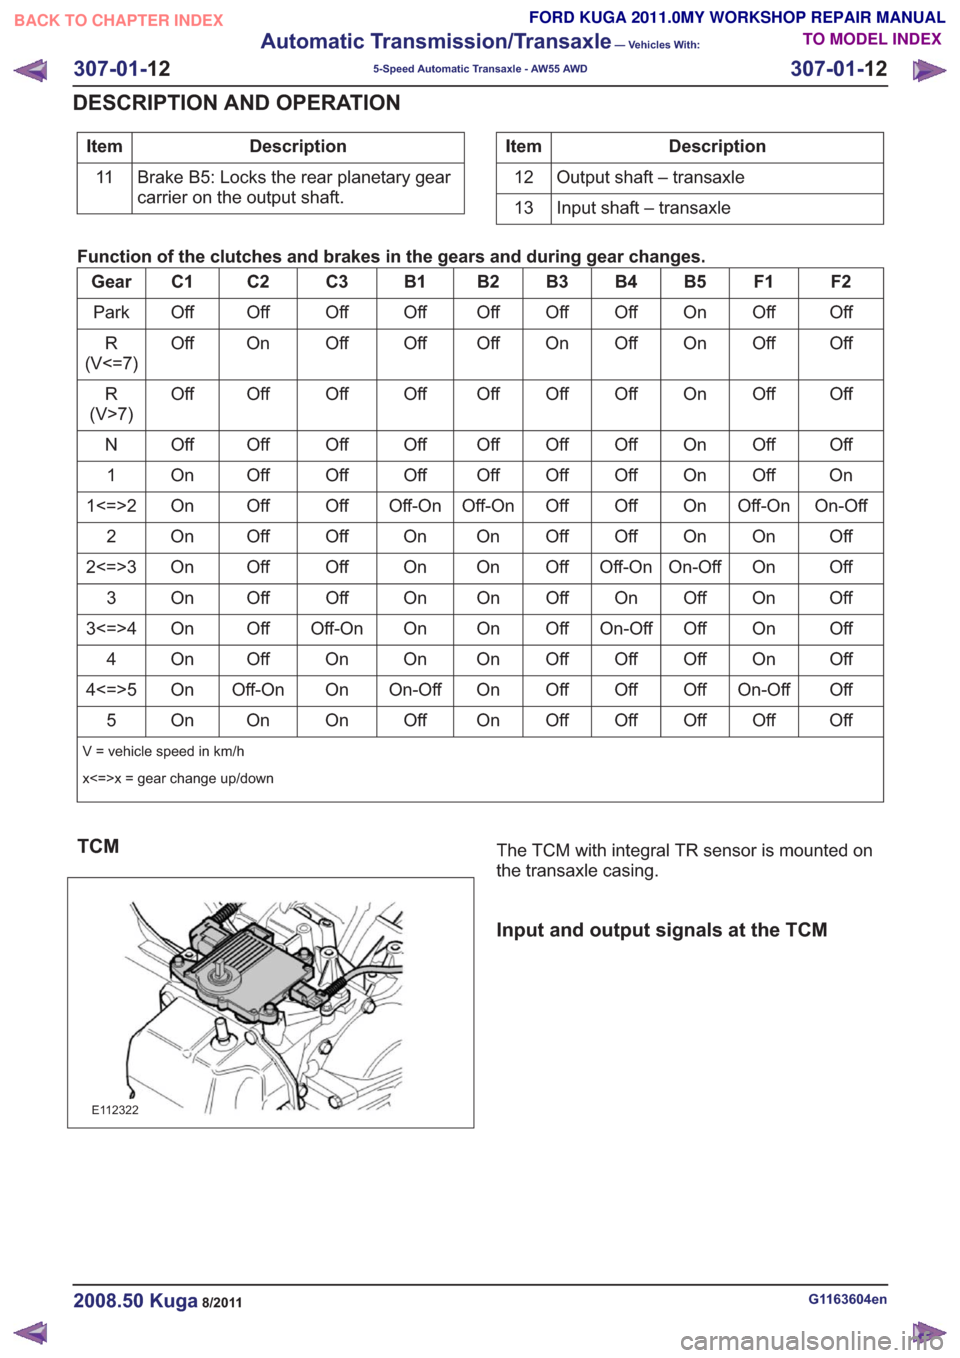
Description
Item
Brake B5: Locks the rear planetary gear
carrier on the output shaft.
11Description
Item
Output shaft – transaxle
12
Input shaft – transaxle
13
Function of the clutches and brakes in the gears and during gear changes.
F2
F1
B5
B4
B3
B2
B1
C3
C2
C1
Gear
Off
Off
On
Off
Off
Off
Off
Off
Off
Off
Park
Off
Off
On
Off
On
Off
Off
Off
On
Off
R
(V<=7)
Off
Off
On
Off
Off
Off
Off
Off
Off
Off
R
(V>7)
Off
Off
On
Off
Off
Off
Off
Off
Off
Off
N
On
Off
On
Off
Off
Off
Off
Off
Off
On
1
On-Off
Off-On
On
Off
Off
Off-On
Off-On
Off
Off
On
1<=>2
Off
On
On
Off
Off
On
On
Off
Off
On
2
Off
On
On-Off
Off-On
Off
On
On
Off
Off
On
2<=>3
Off
On
Of
f
On
Off
On
On
Off
Off
On
3
Off
On
Off
On-Off
Off
On
On
Off-On
Off
On
3<=>4
Off
On
Off
Off
Off
On
On
On
Off
On
4
Off
On-Off
Off
Off
Off
On
On-Off
On
Off-On
On
4<=>5
Off
Off
Off
Off
Off
On
Off
On
On
On
5
V = vehicle speed in km/h
x<=>x = gear change up/down
TCM
E112322
The TCM with integral TR sensor is mounted on
the transaxle casing.
Input and output signals at the TCM
G1163604en2008.50 Kuga8/2011
307-01- 12
Automatic Transmission/Transaxle
— Vehicles With:
5-Speed Automatic Transaxle - AW55 AWD
307-01- 12
DESCRIPTION AND OPERATION
TO MODEL INDEX
BACK TO CHAPTER INDEX
FORD KUGA 2011.0MY WORKSHOP REPAIR MANUAL